Linux系统启动过程
一、预备
学习Linux,是一个渐进的过程,不可能一下就去钻研Linux内核等,感觉首要的是建立对Linux的宏观认识。其中,Linux系统的启动过程是非常有必要学习的。为了理解Linux的启动过程,还需要知道系统通电到操作系统接管硬件这个过程(可能做嵌入式开发的,Bootloader更熟一些,但功能作用基本是一样的):

BIOS(Basic Input Output System),基本输入输出系统。BIOS是计算机启动时加载的第一个软件。其实,它是一组固化到计算机内主板上一个ROM芯片上的程序,它保存着计算机最重要的基本输入输出的程序、系统设置信息、开机后自检程序和系统自启动程序。 其主要功能是为计算机提供最底层的、最直接的硬件设置和控制。
主引导记录(MBR,Main Boot Record)是位于磁盘最前边的一段引导(Loader)代码。它负责磁盘操作系统(DOS)对磁盘进行读写时分区合法性的判别、分区引导信息的定位,它由磁盘操作系统(DOS)在对硬盘进行初始化时产生的。硬盘的主引导记录(MBR)是不属于任何一个操作系统的,它先于所有的操作系统而被调入内存,并发挥作用,然后才将控制权交给主分区(活动分区)内的操作系统。
二、Linux启动过程
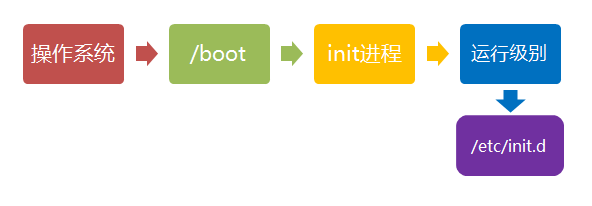
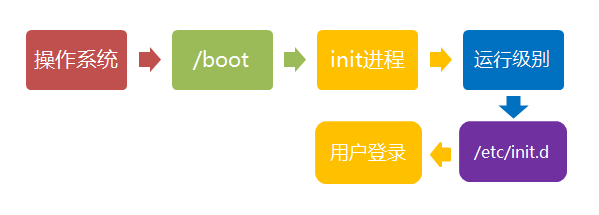
Linux启动过程大致如下:
- 加载内核
- 启动初始化进程init
- 确定运行级别
- 加载开机启动程序
- 用户登录
- 进入 login shell(Linux启动结束)
- 打开 non-login shell(不算在Linux启动过程中,只是列在这里)
(注意:不同的Linux发行版本,同一发行版本的不同内核版本,可能配置文件的存放位置等细节可能会有所不同,以下参照Ubuntu16.04LTS)
1、加载内核
当计算机打开电源后,首先是BIOS开机自检,按照BIOS中设置的启动设备(通常是硬盘)来启动。操作系统接管硬件以后,首先读入 /boot 目录下的内核文件。
![]()
进入到boot目录可以看到以下文件:
sl@Li:/boot$ ls
abi-4.15.0-32-generic     config-4.15.0-34-generic  grub                          initrd.img-4.15.0-45-generic  retpoline-4.15.0-34-generic   System.map-4.15.0-39-generic  vmlinuz-4.15.0-34-generic
abi-4.15.0-33-generic     config-4.15.0-36-generic  initrd.img-4.15.0-32-generic  initrd.img-4.15.0-46-generic  retpoline-4.15.0-36-generic   System.map-4.15.0-42-generic  vmlinuz-4.15.0-36-generic
abi-4.15.0-34-generic     config-4.15.0-39-generic  initrd.img-4.15.0-33-generic  initrd.img-4.15.0-47-generic  retpoline-4.15.0-39-generic   System.map-4.15.0-43-generic  vmlinuz-4.15.0-39-generic
abi-4.15.0-36-generic     config-4.15.0-42-generic  initrd.img-4.15.0-34-generic  memtest86+.bin                retpoline-4.15.0-42-generic   System.map-4.15.0-45-generic  vmlinuz-4.15.0-42-generic
abi-4.15.0-39-generic     config-4.15.0-43-generic  initrd.img-4.15.0-36-generic  memtest86+.elf                System.map-4.15.0-32-generic  System.map-4.15.0-46-generic  vmlinuz-4.15.0-43-generic
abi-4.15.0-42-generic     config-4.15.0-45-generic  initrd.img-4.15.0-39-generic  memtest86+_multiboot.bin      System.map-4.15.0-33-generic  System.map-4.15.0-47-generic  vmlinuz-4.15.0-45-generic
config-4.15.0-32-generic  config-4.15.0-46-generic  initrd.img-4.15.0-42-generic  retpoline-4.15.0-32-generic   System.map-4.15.0-34-generic  vmlinuz-4.15.0-32-generic     vmlinuz-4.15.0-46-generic
config-4.15.0-33-generic  config-4.15.0-47-generic  initrd.img-4.15.0-43-generic  retpoline-4.15.0-33-generic   System.map-4.15.0-36-generic  vmlinuz-4.15.0-33-generic     vmlinuz-4.15.0-47-generic
2、启动初始化进程
内核文件加载以后,就开始运行第一个程序 /sbin/init,它的作用是初始化系统环境。
![]()
由于init是第一个运行的程序,它的进程编号(pid)就是1。其他所有进程都从它衍生,都是它的子进程。查看进程可以看到pid=1的init进程。
sl@Li:~$ ps -ef
UID        PID  PPID  C STIME TTY          TIME CMD
root         1     0  0 18:48 ?        00:00:01 /sbin/init splash
root         2     0  0 18:48 ?        00:00:00 [kthreadd]
root         4     2  0 18:48 ?        00:00:00 [kworker/0:0H]
root         6     2  0 18:48 ?        00:00:00 [mm_percpu_wq]
root         7     2  0 18:48 ?        00:00:00 [ksoftirqd/0]
root         8     2  0 18:48 ?        00:00:00 [rcu_sched]
root         9     2  0 18:48 ?        00:00:00 [rcu_bh]
root        10     2  0 18:48 ?        00:00:00 [migration/0
3、运行级别
许多程序需要开机启动。它们在Windows叫做"服务"(service),在Linux就叫做"守护进程"(daemon)。init进程的一大任务,就是去运行这些开机启动的程序。
但是,不同的场合需要启动不同的程序,比如用作服务器时,需要启动Apache,用作桌面就不需要。Linux允许为不同的场合,分配不同的开机启动程序,这就叫做"运行级别"(runlevel)。也就是说,启动时根据"运行级别",确定要运行哪些程序。
![]()
Linux预置七种运行级别(0-6)。一般来说,0是关机,1是单用户模式(也就是维护模式),6是重启。运行级别2-5,各个发行版不太一样,对于Debian来说,都是同样的多用户模式(也就是正常模式)。查看/etc/init/rc-sysinit.conf,可以看到一般默认运行级别为2,正常模式。
# Default runlevel, this may be overriden on the kernel command-line
# or by faking an old /etc/inittab entry
env DEFAULT_RUNLEVEL=2

emits runlevel
那么,运行级别2有些什么程序呢,系统怎么知道每个级别应该加载哪些程序呢?…回答是每个运行级别在/etc目录下面,都有一个对应的子目录,指定要加载的程序。
rc0.d
rc1.d
rc2.d
rc3.d
rc4.d
rc5.d
rc6.d
上面目录名中的"rc",表示run command(运行程序),最后的d表示directory(目录)。下面让我们看看 /etc/rc2.d 目录中到底指定了哪些程序。
sl@Li:/etc/rc2.d$ ll
total 20
drwxr-xr-x   2 root root  4096 5月   7 09:34 ./
drwxr-xr-x 148 root root 12288 5月  16 18:49 ../
-rw-r--r--   1 root root   677 2月   5  2016 README
lrwxrwxrwx   1 root root    16 4月  23  2018 S01apport -> ../init.d/apport*
lrwxrwxrwx   1 root root    24 11月  8  2018 S01binfmt-support -> ../init.d/binfmt-support*
lrwxrwxrwx   1 root root    17 5月   7 09:34 S01glances -> ../init.d/glances*
lrwxrwxrwx   1 root root    25 9月   6  2018 S01rabbitmq-server -> ../init.d/rabbitmq-server*
lrwxrwxrwx   1 root root    17 4月  23  2018 S01rsyslog -> ../init.d/rsyslog*
lrwxrwxrwx   1 root root    20 11月 30 13:13 S01supervisor -> ../init.d/supervisor*
lrwxrwxrwx   1 root root    29 4月  23  2018 S01unattended-upgrades -> ../init.d/unattended-upgrades*
lrwxrwxrwx   1 root root    15 4月  23  2018 S01uuidd -> ../init.d/uuidd*
lrwxrwxrwx   1 root root    15 4月  23  2018 S02acpid -> ../init.d/acpid*
lrwxrwxrwx   1 root root    17 4月  23  2018 S02anacron -> ../init.d/anacron*
lrwxrwxrwx   1 root root    24 5月  22  2018 S02cgroupfs-mount -> ../init.d/cgroupfs-mount*
lrwxrwxrwx   1 root root    14 4月  23  2018 S02cron -> ../init.d/cron*
lrwxrwxrwx   1 root root    14 4月  23  2018 S02dbus -> ../init.d/dbus*
lrwxrwxrwx   1 root root    17 5月   7 09:34 S02hddtemp -> ../init.d/hddtemp*
lrwxrwxrwx   1 root root    20 4月  23  2018 S02irqbalance -> ../init.d/irqbalance*
lrwxrwxrwx   1 root root    20 4月  23  2018 S02kerneloops -> ../init.d/kerneloops*
lrwxrwxrwx   1 root root    13 7月   4  2018 S02ntp -> ../init.d/ntp*
lrwxrwxrwx   1 root root    15 4月  23  2018 S02rsync -> ../init.d/rsync*
lrwxrwxrwx   1 root root    27 4月  23  2018 S02speech-dispatcher -> ../init.d/speech-dispatcher*
lrwxrwxrwx   1 root root    13 9月  12  2018 S02ssh -> ../init.d/ssh*
lrwxrwxrwx   1 root root    17 9月  14  2018 S02sysstat -> ../init.d/sysstat*
lrwxrwxrwx   1 root root    18 4月  23  2018 S02thermald -> ../init.d/thermald*
lrwxrwxrwx   1 root root    18 4月  23  2018 S02whoopsie -> ../init.d/whoopsie*
lrwxrwxrwx   1 root root    22 4月  23  2018 S03avahi-daemon -> ../init.d/avahi-daemon*
lrwxrwxrwx   1 root root    19 4月  23  2018 S03bluetooth -> ../init.d/bluetooth*
lrwxrwxrwx   1 root root    16 5月  22  2018 S03docker -> ../init.d/docker*
lrwxrwxrwx   1 root root    19 11月 16 12:59 S03firewalld -> ../init.d/firewalld*
lrwxrwxrwx   1 root root    17 4月  23  2018 S03lightdm -> ../init.d/lightdm*
lrwxrwxrwx   1 root root    14 4月  23  2018 S04cups -> ../init.d/cups*
lrwxrwxrwx   1 root root    22 4月  23  2018 S04cups-browsed -> ../init.d/cups-browsed*
lrwxrwxrwx   1 root root    15 4月  23  2018 S04saned -> ../init.d/saned*
lrwxrwxrwx   1 root root    21 4月  23  2018 S05grub-common -> ../init.d/grub-common*
lrwxrwxrwx   1 root root    15 4月  16 18:27 S05monit -> ../init.d/monit*
lrwxrwxrwx   1 root root    18 4月  23  2018 S05ondemand -> ../init.d/ondemand*
lrwxrwxrwx   1 root root    18 4月  23  2018 S05plymouth -> ../init.d/plymouth*
lrwxrwxrwx   1 root root    18 4月  23  2018 S05rc.local -> ../init.d/rc.local*
可以看到,除了第一个文件README以外,其他文件名都是"字母S+两位数字+程序名"的形式。字母S表示Start,也就是启动的意思(启动脚本的运行参数为start),如果这个位置是字母K,就代表Kill(关闭),即如果从其他运行级别切换过来,需要关闭的程序(启动脚本的运行参数为stop)。后面的两位数字表示处理顺序,数字越小越早处理,数字相同时,则按照程序名的字母顺序启动。
这个目录里的所有文件(除了README),就是启动时要加载的程序。如果想增加或删除某些程序,不建议手动修改 /etc/rc*.d 目录,最好是用一些专门命令进行管理(参考这里和这里)。
4、加载开机启动程序
前面提到,七种预设的"运行级别"各自有一个目录,存放需要开机启动的程序。不难想到,如果多个"运行级别"需要启动同一个程序,那么这个程序的启动脚本,就会在每一个目录里都有一个拷贝。这样会造成管理上的困扰:如果要修改启动脚本,岂不是每个目录都要改一遍?
Linux的解决办法,就是七个 /etc/rc*.d 目录里列出的程序,都设为链接文件,指向另外一个目录 /etc/init.d (从上面那张图片可以看出都是链接文件),真正的启动脚本都统一放在这个目录中。init进程逐一加载开机启动程序,其实就是运行这个目录里的启动脚本。

这样做的另一个好处,就是如果你要手动关闭或重启某个进程,直接到目录 /etc/init.d 中寻找启动脚本即可。比如,我要重启rabbitmq,就运行下面的命令:
sudo /etc/init.d/rabbitmq-server restart
/etc/init.d 这个目录名最后一个字母d,是directory的意思,表示这是一个目录,用来与程序 /etc/init 区分。
5、用户登录
开机启动程序加载完毕以后,就要让用户登录了。

一般来说,用户的登录方式有三种:
- 命令行登录
- ssh登录
- 图形界面登录
这三种情况,都有自己的方式对用户进行认证。
- 命令行登录:init进程调用getty程序(意为get teletype),让用户输入用户名和密码。输入完成后,再调用login程序,核对密码(Debian还会再多运行一个身份核对程序/etc/pam.d/login)。如果密码正确,就从文件 /etc/passwd 读取该用户指定的shell,然后启动这个shell。
sl@Li:/etc$ cat passwd
root:x:0:0:root:/root:/bin/bash
daemon:x:1:1:daemon:/usr/sbin:/usr/sbin/nologin
bin:x:2:2:bin:/bin:/usr/sbin/nologin
sys:x:3:3:sys:/dev:/usr/sbin/nologin
sync:x:4:65534:sync:/bin:/bin/sync
games:x:5:60:games:/usr/games:/usr/sbin/nologin
man:x:6:12:man:/var/cache/man:/usr/sbin/nologin
lp:x:7:7:lp:/var/spool/lpd:/usr/sbin/nologin
mail:x:8:8:mail:/var/mail:/usr/sbin/nologin
news:x:9:9:news:/var/spool/news:/usr/sbin/nologin
uucp:x:10:10:uucp:/var/spool/uucp:/usr/sbin/nologin
proxy:x:13:13:proxy:/bin:/usr/sbin/nologin
-
ssh登录:这时系统调用sshd程序(Debian还会再运行/etc/pam.d/ssh ),取代getty和login,然后启动shell。
-
图形界面登录:init进程调用显示管理器,Gnome图形界面对应的显示管理器为gdm(GNOME Display Manager),然后用户输入用户名和密码。如果密码正确,就读取/etc/gdm3/Xsession,启动用户的会话。
6、进入 login shell
所谓shell,简单说就是命令行界面,让用户可以直接与操作系统对话。用户登录时打开的shell,就叫做login shell。到这里就比较熟了。

Debian默认的shell是Bash,它会读入一系列的配置文件。上一步的三种情况,在这一步的处理,也存在差异。
-
命令行登录:首先读入 /etc/profile,这是对所有用户都有效的配置;然后依次寻找下面三个文件,这是针对当前用户的配置。
~/.bash_profile ~/.bash_login ~/.profile
需要注意的是,这三个文件只要有一个存在,就不再读入后面的文件了。比如,要是 ~/.bash_profile 存在,就不会再读入后面两个文件了。目前我的机子上是只有.profile文件。 -
ssh登录:与第一种情况完全相同。
-
图形界面登录:只加载 /etc/profile 和~/.profile。 也就是说~/.bash_profile 不管有没有,都不会运行。
7、打开 non-login shell
上一步完成以后,Linux的启动过程就算结束了,用户已经可以看到命令行提示符或者图形界面了。但是,为了内容的完整,必须再介绍一下这一步。
用户进入操作系统以后,常常会再手动开启一个shell。这个shell就叫做 non-login shell,意思是它不同于登录时出现的那个shell,不读取/etc/profile和.profile等配置文件。

non-login shell的重要性,不仅在于它是用户最常接触的那个shell,还在于它会读入用户自己的bash配置文件 ~/.bashrc。大多数时候,我们对于bash的定制,都是写在这个文件里面的。
sl@Li:~$ cat .bashrc
# ~/.bashrc: executed by bash(1) for non-login shells.
# see /usr/share/doc/bash/examples/startup-files (in the package bash-doc)
# for examples

# If not running interactively, don't do anything
case $- in
    *i*) ;;
      *) return;;
esac

# don't put duplicate lines or lines starting with space in the history.
# See bash(1) for more options
HISTCONTROL=ignoreboth

# append to the history file, don't overwrite it
shopt -s histappend

# for setting history length see HISTSIZE and HISTFILESIZE in bash(1)
HISTSIZE=1000
HISTFILESIZE=2000

# check the window size after each command and, if necessary,
# update the values of LINES and COLUMNS.
shopt -s checkwinsize

# If set, the pattern "**" used in a pathname expansion context will
# match all files and zero or more directories and subdirectories.
#shopt -s globstar

# make less more friendly for non-text input files, see lesspipe(1)
[ -x /usr/bin/lesspipe ] && eval "$(SHELL=/bin/sh lesspipe)"

# set variable identifying the chroot you work in (used in the prompt below)
if [ -z "${debian_chroot:-}" ] && [ -r /etc/debian_chroot ]; then
    debian_chroot=$(cat /etc/debian_chroot)
fi

# set a fancy prompt (non-color, unless we know we "want" color)
case "$TERM" in
    xterm-color|*-256color) color_prompt=yes;;
esac

# 省略...
你也许会问,要是不进入 non-login shell,岂不是.bashrc就不会运行了,因此bash 也就不能完成定制了?事实上,Debian已经考虑到这个问题了,请打开文件 ~/.profile,可以看到下面的代码:
sl@Li:~$ cat .profile
# ~/.profile: executed by the command interpreter for login shells.
# This file is not read by bash(1), if ~/.bash_profile or ~/.bash_login
# exists.
# see /usr/share/doc/bash/examples/startup-files for examples.
# the files are located in the bash-doc package.

# the default umask is set in /etc/profile; for setting the umask
# for ssh logins, install and configure the libpam-umask package.
#umask 022

# if running bash
if [ -n "$BASH_VERSION" ]; then
    # include .bashrc if it exists
    if [ -f "$HOME/.bashrc" ]; then
	. "$HOME/.bashrc"
    fi
fi

# set PATH so it includes user's private bin directories
PATH="$HOME/bin:$HOME/.local/bin:$PATH"

export PATH="$HOME/.cargo/bin:$PATH"
上面代码先判断变量$BASH_VERSION是否有值,然后判断主目录下是否存在 .bashrc 文件,如果存在就运行该文件。第三行开头的那个点,是source命令的简写形式,表示运行某个文件,写成"source ~/.bashrc"也是可以的。
因此,只要运行~/.profile文件,~/.bashrc文件就会连带运行。但是上一节的第一种情况提到过,如果存在~/.bash_profile文件,那么有可能不会运行~/.profile文件。解决这个问题很简单,把下面代码写入.bash_profile就行了。
  if [ -f ~/.profile ]; then
    . ~/.profile
  fi
这样一来,不管是哪种情况,.bashrc都会执行,用户的设置可以放心地都写入这个文件了。
Bash的设置之所以如此繁琐,是由于历史原因造成的。早期的时候,计算机运行速度很慢,载入配置文件需要很长时间,Bash的作者只好把配置文件分成了几个部分,阶段性载入。系统的通用设置放在 /etc/profile,用户个人的、需要被所有子进程继承的设置放在.profile,不需要被继承的设置放在.bashrc。
顺便提一下,除了Linux以外, Mac OS X 使用的shell也是Bash。但是,它只加载.bash_profile,然后在.bash_profile里面调用.bashrc。而且,不管是ssh登录,还是在图形界面里启动shell窗口,都是如此。
参考资料:
BIOS是什么
Linux 系统启动过程
Linux 的启动流程
Environment Variables