Git教程
1.Git简介
1)安装Git
yum install -y git2)创建版本库
版本库又名仓库,英文名repository,你可以简单理解成一个目录,这个目录里面的所有文件都可以被Git管理起来,每个文件的修改、删除,Git都能跟踪,以便任何时刻都可以追踪历史,或者在将来某个时刻可以“还原”。
step1:创建一个空目录
[root@foundation8 ~]# mkdir KatyGit
[root@foundation8 ~]# cd KatyGit/
[root@foundation8 KatyGit]# pwd
/root/KatyGit
step2:把这个目录变成Git可以管理的仓库
[root@foundation8 KatyGit]# git init
Initialized empty Git repository in /root/KatyGit/.git/
#瞬间Git就把仓库建好了,而且告诉你是一个空的仓库(empty Git repository),细心的读者可以发现当前目录下多了一个.git的目录,这个目录是Git来跟踪管理版本库的,没事千万不要手动修改这个目录里面的文件,不然改乱了,就把Git仓库给破坏了。

[root@foundation8 KatyGit]# ls -a
.  ..  .git
step3:编写一个纯文本文件
#在Git仓库(/root/KatyGit/当前目录或其子目录)中编写一个readme.txt文件,内容如下:

[root@foundation8 KatyGit]# cat readme.txt
这是Git仓库中的一个纯文本文件
step4:把一个文件放到Git仓库中
第一步,用命令git add告诉Git,把文件添加到仓库:
[root@foundation8 KatyGit]# git add readme.txt

第二步,用命令git commit告诉Git,把文件提交到仓库:
[root@foundation8 KatyGit]# git commit -m "wrote a readme file"
[master (root-commit) 40d7cf2] wrote a readme file
 Committer: root
Your name and email address were configured automatically based
on your username and hostname. Please check that they are accurate.
You can suppress this message by setting them explicitly:

    git config --global user.name "Your Name"
    git config --global user.email [email protected]

After doing this, you may fix the identity used for this commit with:

    git commit --amend --reset-author

 1 file changed, 1 insertion(+)
 create mode 100644 readme.txt
#简单解释一下git commit命令,-m后面输入的是本次提交的说明,可以输入任意内容,当然最好是有意义的,这样你就能从历史记录里方便地找到改动记录。
2.时光机穿梭
1)版本回退
首先我们先把之前的readme.txt进行修改:
[root@foundation8 KatyGit]# cat readme.txt
这是Git仓库中的一个纯文本文件
这是Git仓库中的一个纯文本文件 第二版
然后尝试提交:
[root@foundation8 KatyGit]# git add readme.txt
[root@foundation8 KatyGit]# git commit -m "readme.txt 第二版"
[master 9f1c3eb] readme.txt 第二版
 Committer: root
Your name and email address were configured automatically based
on your username and hostname. Please check that they are accurate.
You can suppress this message by setting them explicitly:

    git config --global user.name "Your Name"
    git config --global user.email [email protected]

After doing this, you may fix the identity used for this commit with:

    git commit --amend --reset-author

 1 file changed, 1 insertion(+)
在Git中,我们用git log命令查看历史记录:
[root@foundation8 KatyGit]# git log
commit 9f1c3ebd24f5b3144c49f7e06a48b47763c9e706
Author: root .ilt.example.com>
Date:   Sun Feb 4 23:51:07 2018 +0800

    readme.txt 第二版

commit 40d7cf210cf3081b9042988a0d261a0c00a0abbf
Author: root .ilt.example.com>
Date:   Sun Feb 4 23:46:13 2018 +0800

    wrote a readme file

#如果嫌输出信息太多,看得眼花缭乱的,可以试试加上--pretty=oneline参数:
[root@foundation8 KatyGit]# git log --pretty=oneline
9f1c3ebd24f5b3144c49f7e06a48b47763c9e706 readme.txt 第二版
40d7cf210cf3081b9042988a0d261a0c00a0abbf wrote a readme file
把readme.txt回退到上一个版本:
首先,Git必须知道当前版本是哪个版本,在Git中,用HEAD表示当前版本,上一个版本就是HEAD^,上上一个版本就是HEAD^^,当然往上100个版本写100个^比较容易数不过来,所以写成HEAD~100
[root@foundation8 KatyGit]# git reset --hard HEAD^
HEAD is now at 40d7cf2 wrote a readme file
如果想要在回去readme.txt第二版的该怎么做呢?
首先当前窗口不要关闭,找对应版本的ID,不需要全部写出来,前几个就可以了
[root@foundation8 KatyGit]# git reset --hard 9f1c
HEAD is now at 9f1c3eb readme.txt 第二版
[root@foundation8 KatyGit]# cat readme.txt
这是Git仓库中的一个纯文本文件
这是Git仓库中的一个纯文本文件 第二版
同时,Git提供了一个命令git reflog用来记录你的每一次命令:
[root@foundation8 KatyGit]# git reflog
9f1c3eb HEAD@{0}: reset: moving to 9f1c
40d7cf2 HEAD@{1}: reset: moving to HEAD^
9f1c3eb HEAD@{2}: commit: readme.txt 第二版
40d7cf2 HEAD@{3}: commit (initial): wrote a readme file
2)工作区和暂存区
- 名词解释
工作区:终端操作的地方:比如我们这里的KatyGit
暂存区:git add命令执行之后,会被放到版本库中的stage中进行暂存,即就是它了
Git的版本库:.git
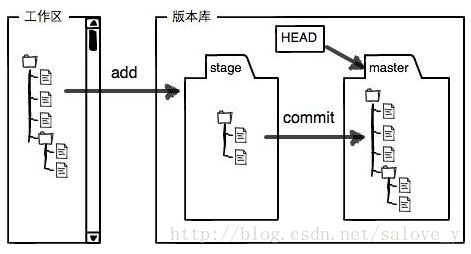
我们创建Git版本库时,Git自动为我们创建了唯一一个master分支,所以,现在,git commit就是往master分支上提交更改。
3)管理修改
- 首先明确一个概念:Git管理的是修改,而不是文件
- 何谓修改:比如你新增了一行,这就是一个修改,删除了一行,也是一个修改,更改了某些字符,也是一个修改,删了一些又加了一些,也是一个修改,甚至创建一个新文件,也算一个修改。
4)撤销修改
git checkout -- file可以丢弃工作区的修改
[root@foundation8 KatyGit]# cat readme.txt
这是Git仓库中的一个纯文本文件
这是Git仓库中的一个纯文本文件 第二版
[root@foundation8 KatyGit]# git checkout -- readme.txt
[root@foundation8 KatyGit]# cat readme.txt
这是Git仓库中的一个纯文本文件
这是Git仓库中的一个纯文本文件 第二版
这是Git仓库中的一个纯文本文件 第二版
这是Git仓库中的一个纯文本文件 第二版
这是Git仓库中的一个纯文本文件 第二版
这是Git仓库中的一个纯文本文件 第二版
git reset HEAD file可以把暂存区的修改撤销掉
[root@foundation8 KatyGit]# cat readme.txt
这是Git仓库中的一个纯文本文件
这是Git仓库中的一个纯文本文件 第二版
这是Git仓库中的一个纯文本文件 第三版
[root@foundation8 KatyGit]# git add readme.txt
[root@foundation8 KatyGit]# git status
# On branch master
# Changes to be committed:
#   (use "git reset HEAD ..." to unstage)
#
#   modified:   readme.txt
#
[root@foundation8 KatyGit]# git reset HEAD readme.txt
Unstaged changes after reset:
M   readme.txt
5)删除文件
首先,先添加一个新文件test.txt到Git并且提交
[root@foundation8 KatyGit]# git add test.txt
[root@foundation8 KatyGit]# git commit -m "add test.txt"
[master 7f5e03e] add test.txt
 Committer: root
Your name and email address were configured automatically based
on your username and hostname. Please check that they are accurate.
You can suppress this message by setting them explicitly:

    git config --global user.name "Your Name"
    git config --global user.email [email protected]

After doing this, you may fix the identity used for this commit with:

    git commit --amend --reset-author

 1 file changed, 0 insertions(+), 0 deletions(-)
 create mode 100644 test.txt
一般情况下,你通常直接在文件管理器中把没用的文件删了,或者用rm命令删了:
rm -rf test.txt这个时候,Git知道你删除了文件,因此,工作区和版本库就不一致了,git status命令会立刻告诉你哪些文件被删除了:
[root@foundation8 KatyGit]# git status
# On branch master
# Changes not staged for commit:
#   (use "git add/rm ..." to update what will be committed)
#   (use "git checkout -- ..." to discard changes in working directory)
#
#   modified:   readme.txt
#   deleted:    test.txt
#
no changes added to commit (use "git add" and/or "git commit -a")
现在你有两个选择,一是确实要从版本库中删除该文件,那就用命令git rm删掉,并且git commit:
[root@foundation8 KatyGit]# git rm test.txt
rm 'test.txt'
[root@foundation8 KatyGit]# git commit -m "remove test.txt"
[master 15d7313] remove test.txt
 Committer: root
Your name and email address were configured automatically based
on your username and hostname. Please check that they are accurate.
You can suppress this message by setting them explicitly:

    git config --global user.name "Your Name"
    git config --global user.email [email protected]

After doing this, you may fix the identity used for this commit with:

    git commit --amend --reset-author

 1 file changed, 0 insertions(+), 0 deletions(-)
 delete mode 100644 test.txt
现在,文件就从版本库中被删除了。
另一种情况是删错了,因为版本库里还有呢,所以可以很轻松地把误删的文件恢复到最新版本:
[root@foundation8 KatyGit]# git checkout -- test.txt
[root@foundation8 KatyGit]# ls
readme.txt  test.txt
3.远程仓库
1)添加远程库
第一步:获得Git远程仓库(注册一个Github帐号)
第二步:使用SSH进行通讯
- 创建SSH Key
//在用户主目录下,看看有没有.ssh目录,如果有,再看看这个目录下有没有id_rsa和id_rsa.pub这两个文件,如果已经有了,可直接跳到下一步。如果没有,打开Shell,创建SSH Key:
 ssh-keygen -t rsa -C "[email protected]"
- 登陆GitHub
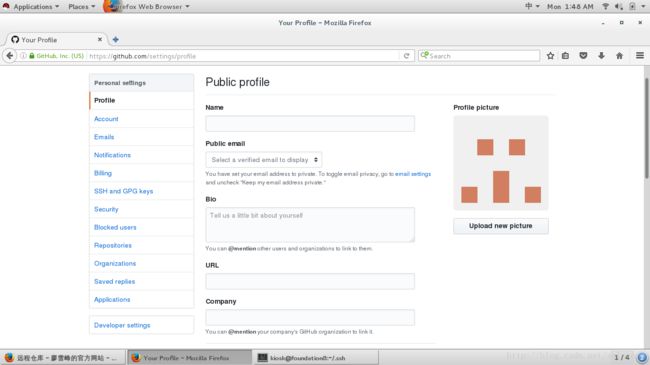
然后,点“Add SSH Key”,填上任意Title,在Key文本框里粘贴id_rsa.pub文件的内容,点“Add Key”,你就应该看到已经添加的Key:

第三步:向远程仓库进行推送
创建一个远程仓库和本地的Git仓库名字一样
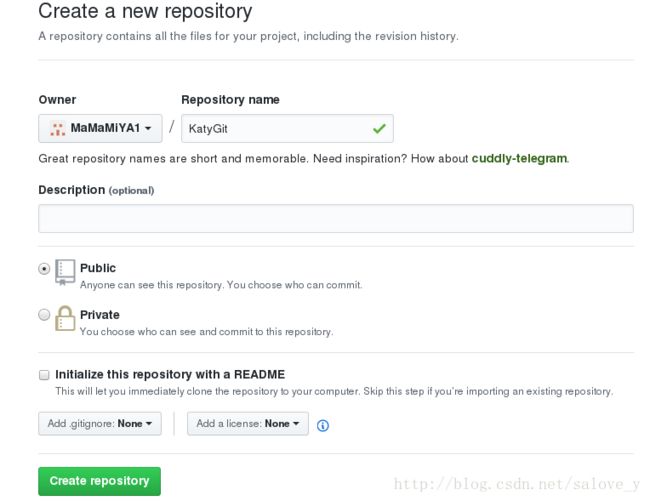
在本地的KatyGit仓库下运行命令:
git remote add origin git@github.com:MaMaMiYA1/KatyGit加后,远程库的名字就是origin,这是Git默认的叫法,也可以改成别的,但是origin这个名字一看就知道是远程库。
下一步,就可以把本地库的所有内容推送到远程库上:
[root@foundation8 KatyGit]# git push -u origin master
The authenticity of host 'github.com (192.30.255.113)' can't be established.
RSA key fingerprint is 16:27:ac:a5:76:28:2d:36:63:1b:56:4d:eb:df:a6:48.
Are you sure you want to continue connecting (yes/no)? yes
Warning: Permanently added 'github.com,192.30.255.113' (RSA) to the list of known hosts.
Counting objects: 14, done.
Delta compression using up to 4 threads.
Compressing objects: 100% (9/9), done.
Writing objects: 100% (14/14), 1.19 KiB | 0 bytes/s, done.
Total 14 (delta 3), reused 0 (delta 0)
remote: Resolving deltas: 100% (3/3), done.
To [email protected]:MaMaMiYA1/KatyGit
 * [new branch]      master -> master
Branch master set up to track remote branch master from origin1.
把本地库的内容推送到远程,用git push命令,实际上是把当前分支master推送到远程。
由于远程库是空的,我们第一次推送master分支时,加上了-u参数,Git不但会把本地的master分支内容推送的远程新的master分支,还会把本地的master分支和远程的master分支关联起来,在以后的推送或者拉取时就可以简化命令。
推送成功后,可以立刻在GitHub页面中看到远程库的内容已经和本地一模一样:

从现在起,只要本地作了提交,就可以通过命令:
git push origin master把本地master分支的最新修改推送至GitHub,现在,你就拥有了真正的分布式版本库!
2)从远程库中克隆
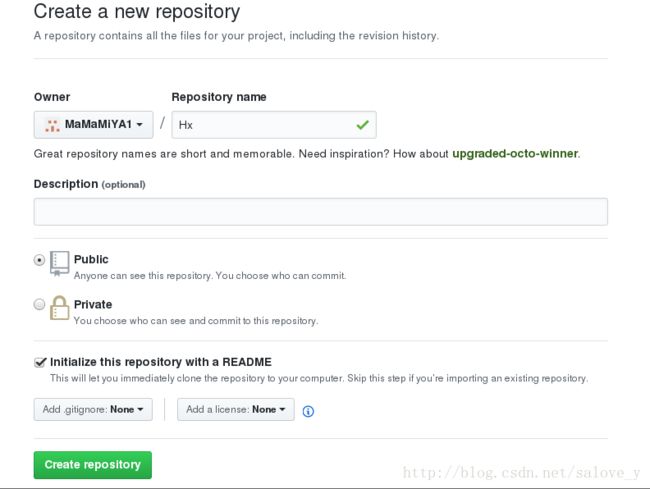
我们勾选Initialize this repository with a README,这样GitHub会自动为我们创建一个README.md文件。创建完毕后,可以看到README.md文件:
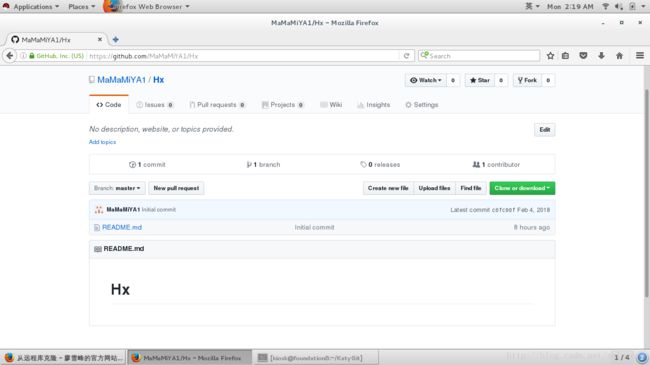
现在,远程库已经准备好了,下一步是用命令git clone克隆一个本地库:
[root@foundation8 KatyGit]# git clone https://github.com/MaMaMiYA1/Hx
Cloning into 'Hx'...
remote: Counting objects: 3, done.
remote: Total 3 (delta 0), reused 0 (delta 0), pack-reused 0
Unpacking objects: 100% (3/3), done.
4.分支管理
1)创建与合并分支
在版本回退里,你已经知道,每次提交,Git都把它们串成一条时间线,这条时间线就是一个分支。截止到目前,只有一条时间线,在Git里,这个分支叫主分支,即master分支。

每次提交,master分支都会向前移动一步,这样,随着你不断提交,master分支的线也越来越长
当我们创建新的分支,例如dev时,Git新建了一个指针叫dev,指向master相同的提交,再把HEAD指向dev,就表示当前分支在dev上:

- 实战
首先,我们创建dev分支,然后切换到dev分支:
[root@foundation8 KatyGit]# git checkout -b dev
M   readme.txt
Switched to a new branch 'dev'
git checkout命令加上-b参数表示创建并切换,相当于以下两条命令:
 git branch dev
 git checkout dev
然后,用git branch命令查看当前分支:
[root@foundation8 KatyGit]# git branch
* dev
  master
然后,我们就可以在dev分支上正常提交,比如对readme.txt做个修改,加上一行,
然后提交:
[root@foundation8 KatyGit]# vim readme.txt
[root@foundation8 KatyGit]# git add readme.txt
[root@foundation8 KatyGit]# git commit -m "branch test"
[dev 4e32bfd] branch test
 Committer: root
Your name and email address were configured automatically based
on your username and hostname. Please check that they are accurate.
You can suppress this message by setting them explicitly:

    git config --global user.name "Your Name"
    git config --global user.email [email protected]

After doing this, you may fix the identity used for this commit with:

    git commit --amend --reset-author

 1 file changed, 2 insertions(+), 4 deletions(-)
现在,dev分支的工作完成,我们就可以切换回master分支:
[root@foundation8 KatyGit]# git checkout master
Switched to branch 'master'
[root@foundation8 KatyGit]# git branch
  dev
* master
切换回master分支后,再查看一个readme.txt文件,刚才添加的内容不见了!因为那个提交是在dev分支上,而master分支此刻的提交点并没有变:
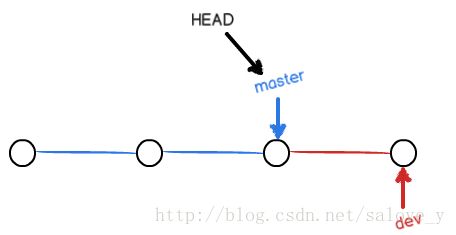
现在,我们把dev分支的工作成果合并到master分支上:
[root@foundation8 KatyGit]# cat readme.txt
这是Git仓库中的一个纯文本文件
这是Git仓库中的一个纯文本文件 第二版
这是Git仓库中的一个纯文本文件 第三版
[root@foundation8 KatyGit]# git merge dev
Updating be7d1f9..4e32bfd
Fast-forward
 readme.txt | 6 ++----
 1 file changed, 2 insertions(+), 4 deletions(-)
[root@foundation8 KatyGit]# cat readme.txt
这是Git仓库中的一个纯文本文件
这是Git仓库中的一个纯文本文件 第二版
这是Git仓库中的一个纯文本文件 第三版
creating a new branch dev
合并完成后,就可以放心地删除dev分支了:
[root@foundation8 KatyGit]# git branch -d dev
Deleted branch dev (was 4e32bfd).
[root@foundation8 KatyGit]# git branch
* master
2)解决冲突
人生不如意之事十之八九,合并分支往往也不是一帆风顺的。
准备新的feature1分支,继续我们的新分支开发:
[root@foundation8 KatyGit]# git checkout -b feature1
Switched to a new branch 'feature1'
修改readme.txt最后一行,改为:
creating a new branch feature1在feature1分支上提交:
[root@foundation8 KatyGit]# git add readme.txt
[root@foundation8 KatyGit]# git commit -m "a new branch feature1"
切换到master分支:
[root@foundation8 KatyGit]# git checkout master
Switched to branch 'master'
Your branch is ahead of 'origin1/master' by 1 commit.
  (use "git push" to publish your local commits)
Git还会自动提示我们当前master分支比远程的master分支要超前1个提交。
在master分支上把readme.txt文件的最后一行改为:
creating a new branch FEATURE1提交:
[root@foundation8 KatyGit]# git add readme.txt
[root@foundation8 KatyGit]# git commit -m " FEATURE1"
现在,master分支和feature1分支各自都分别有新的提交,变成了这样:
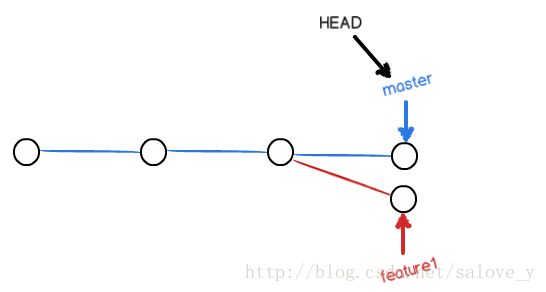
这种情况下,Git无法执行“快速合并”,只能试图把各自的修改合并起来,但这种合并就可能会有冲突,我们试试看:
[root@foundation8 KatyGit]# git merge feature1
Auto-merging readme.txt
CONFLICT (content): Merge conflict in readme.txt
Automatic merge failed; fix conflicts and then commit the result.
果然冲突了!Git告诉我们,readme.txt文件存在冲突,必须手动解决冲突后再提交。git status也可以告诉我们冲突的文件:
[root@foundation8 KatyGit]# git status
# On branch master
# Your branch is ahead of 'origin1/master' by 2 commits.
#   (use "git push" to publish your local commits)
#
# You have unmerged paths.
#   (fix conflicts and run "git commit")
#
# Unmerged paths:
#   (use "git add ..." to mark resolution)
#
#   both modified:      readme.txt
#
# Untracked files:
#   (use "git add ..." to include in what will be committed)
#
#   Hx/
no changes added to commit (use "git add" and/or "git commit -a")
我们可以直接查看readme.txt的内容:
[root@foundation8 KatyGit]# cat readme.txt
这是Git仓库中的一个纯文本文件
这是Git仓库中的一个纯文本文件 第二版
这是Git仓库中的一个纯文本文件 第三版
<<<<<<< HEAD
creating a new branch FEATURE1
=======
creating a new branch feature1
>>>>>>> feature1
Git用<<<<<<<,=======,>>>>>>>标记出不同分支的内容,我们修改如下后保存:
creating a new branch feature1
再提交:
[root@foundation8 KatyGit]# git add readme.txt
[root@foundation8 KatyGit]# git commit -m "conflict fixed"
现在,master分支和feature1分支变成了下图所示:
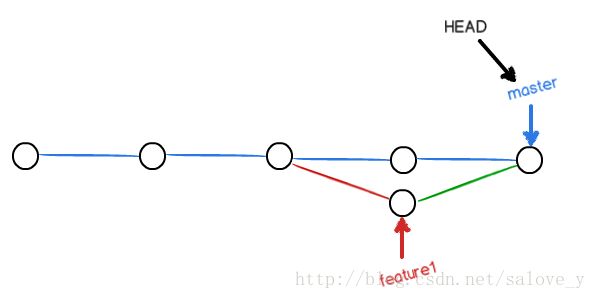
用带参数的git log也可以看到分支的合并情况:
[root@foundation8 KatyGit]# git log --graph --pretty=oneline --abbrev-commit
*   5b74425 conflict fixed
|\
| * 1d64287 a new branch feature1
* | b9e378e  FEATURE1
|/
* 4e32bfd branch test
* be7d1f9 add test.txt
* 15d7313 remove test.txt
* 7f5e03e add test.txt
* 29c8692 readme.txt
* 9f1c3eb readme.txt 第二版
* 40d7cf2 wrote a readme file
最后,删除feature1分支:
[root@foundation8 KatyGit]# git branch -d feature1
Deleted branch feature1 (was 1d64287).
工作完成。
3)分支管理策略
通常,合并分支时,如果可能,Git会用Fast forward模式,但这种模式下,删除分支后,会丢掉分支信息。
如果要强制禁用Fast forward模式,Git就会在merge时生成一个新的commit,这样,从分支历史上就可以看出分支信息。
下面我们实战一下--no-ff方式的git merge:
首先,仍然创建并切换dev分支:
[root@foundation8 KatyGit]# git checkout -b dev
Switched to a new branch 'dev'
修改readme.txt文件,并提交一个新的commit:
[root@foundation8 KatyGit]# vim readme.txt
[root@foundation8 KatyGit]# git add readme.txt
[root@foundation8 KatyGit]# git commit -m " add merge"
[dev f725295]  add merge
 Committer: root
Your name and email address were configured automatically based
on your username and hostname. Please check that they are accurate.
You can suppress this message by setting them explicitly:

    git config --global user.name "Your Name"
    git config --global user.email [email protected]

After doing this, you may fix the identity used for this commit with:

    git commit --amend --reset-author

 1 file changed, 3 insertions(+)
现在,我们切换回master:
[root@foundation8 KatyGit]# git checkout master
Switched to branch 'master'
Your branch is ahead of 'origin1/master' by 4 commits.
  (use "git push" to publish your local commits)
准备合并dev分支,请注意–no-ff参数,表示禁用Fast forward:
[root@foundation8 KatyGit]# git merge --no-ff -m "merge with no-ff" dev
Merge made by the 'recursive' strategy.
 readme.txt | 3 +++
 1 file changed, 3 insertions(+)
因为本次合并要创建一个新的commit,所以加上-m参数,把commit描述写进去。
合并后,我们用git log看看分支历史:
[root@foundation8 KatyGit]# git log --graph --pretty=oneline --abbrev-commit
*   0835900 merge with no-ff
|\
| * f725295  add merge
|/
*   5b74425 conflict fixed
|\
| * 1d64287 a new branch feature1
* | b9e378e  FEATURE1
|/
* 4e32bfd branch test
* be7d1f9 add test.txt
* 15d7313 remove test.txt
* 7f5e03e add test.txt
* 29c8692 readme.txt
* 9f1c3eb readme.txt 第二版
* 40d7cf2 wrote a readme file
可以看到,不使用Fast forward模式,merge后就像这样:

分支管理策略
Reads: 473799
通常,合并分支时,如果可能,Git会用Fast forward模式,但这种模式下,删除分支后,会丢掉分支信息。
如果要强制禁用Fast forward模式,Git就会在merge时生成一个新的commit,这样,从分支历史上就可以看出分支信息。
下面我们实战一下–no-ff方式的git merge:
首先,仍然创建并切换dev分支:
$ git checkout -b dev
Switched to a new branch ‘dev’
修改readme.txt文件,并提交一个新的commit:
gitaddreadme.txt g i t a d d r e a d m e . t x t git commit -m “add merge”
[dev 6224937] add merge
1 file changed, 1 insertion(+)
现在,我们切换回master:
$ git checkout master
Switched to branch ‘master’
准备合并dev分支,请注意–no-ff参数,表示禁用Fast forward:
$ git merge –no-ff -m “merge with no-ff” dev
Merge made by the ‘recursive’ strategy.
readme.txt | 1 +
1 file changed, 1 insertion(+)
因为本次合并要创建一个新的commit,所以加上-m参数,把commit描述写进去。
合并后,我们用git log看看分支历史:
$ git log –graph –pretty=oneline –abbrev-commit
* 7825a50 merge with no-ff
|\
| * 6224937 add merge
|/
* 59bc1cb conflict fixed
…
可以看到,不使用Fast forward模式,merge后就像这样:
git-no-ff-mode
分支策略
在实际开发中,我们应该按照几个基本原则进行分支管理:
首先,master分支应该是非常稳定的,也就是仅用来发布新版本,平时不能在上面干活;
那在哪干活呢?干活都在dev分支上,也就是说,dev分支是不稳定的,到某个时候,比如1.0版本发布时,再把dev分支合并到master上,在master分支发布1.0版本;
你和你的小伙伴们每个人都在dev分支上干活,每个人都有自己的分支,时不时地往dev分支上合并就可以了。
4)Bug分支
软件开发中,bug就像家常便饭一样。有了bug就需要修复,在Git中,由于分支是如此的强大,所以,每个bug都可以通过一个新的临时分支来修复,修复后,合并分支,然后将临时分支删除。
当你接到一个修复一个代号101的bug的任务时,很自然地,你想创建一个分支issue-101来修复它,但是,等等,当前正在dev上进行的工作还没有提交:
[root@foundation8 KatyGit]# git status
# On branch dev
# Untracked files:
#   (use "git add ..." to include in what will be committed)
#
#   Hx/
#   hello.txt
nothing added to commit but untracked files present (use "git add" to track)
并不是你不想提交,而是工作只进行到一半,还没法提交,预计完成还需1天时间。但是,必须在两个小时内修复该bug,怎么办?
幸好,Git还提供了一个stash功能,可以把当前工作现场“储藏”起来,等以后恢复现场后继续工作:
[root@foundation8 KatyGit]# git stash
Saved working directory and index state WIP on dev: f725295  add merge
HEAD is now at f725295  add merge
现在,用git status查看工作区,就是干净的(除非有没有被Git管理的文件),因此可以放心地创建分支来修复bug。
首先确定要在哪个分支上修复bug,假定需要在master分支上修复,就从master创建临时分支:
[root@foundation8 KatyGit]# git checkout master
Switched to branch 'master'
Your branch is ahead of 'origin1/master' by 6 commits.
  (use "git push" to publish your local commits)
[root@foundation8 KatyGit]# git checkout -b issue-101
Switched to a new branch 'issue-101'
现在修复bug,假如需要在readme.txt中追加Successfully然后提交:
[root@foundation8 KatyGit]# git add readme.txt
[root@foundation8 KatyGit]# git commit -m "fix bug 101"
[issue-101 abc5cbe] fix bug 101
 Committer: root
Your name and email address were configured automatically based
on your username and hostname. Please check that they are accurate.
You can suppress this message by setting them explicitly:

    git config --global user.name "Your Name"
    git config --global user.email [email protected]

After doing this, you may fix the identity used for this commit with:

    git commit --amend --reset-author

 1 file changed, 1 insertion(+)
太棒了,原计划两个小时的bug修复只花了5分钟!现在,是时候接着回到dev分支干活了!
[root@foundation8 KatyGit]# git checkout dev
Switched to branch 'dev'
[root@foundation8 KatyGit]# git checkout dev
Switched to branch 'dev'
[root@foundation8 KatyGit]# git status
# On branch dev
# Untracked files:
#   (use "git add ..." to include in what will be committed)
#
#   Hx/
nothing added to commit but untracked files present (use "git add" to track)
工作区是干净的,刚才的工作现场存到哪去了?用git stash list命令看看:
[root@foundation8 KatyGit]# git stash list
stash@{0}: WIP on dev: f725295 add merge
工作现场还在,Git把stash内容存在某个地方了,但是需要恢复一下,有两个办法:
一是用git stash apply恢复,但是恢复后,stash内容并不删除,你需要用git stash drop来删除;
另一种方式是用git stash pop,恢复的同时把stash内容也删了:
[root@foundation8 KatyGit]# git stash pop
# On branch dev
# Changes to be committed:
#   (use "git reset HEAD ..." to unstage)
#
#   new file:   hello.txt
#
# Untracked files:
#   (use "git add ..." to include in what will be committed)
#
#   Hx/
Dropped refs/stash@{0} (4a92e21d2cdc7f57c116399b4452e57ac19a3b28)
再用git stash list查看,就看不到任何stash内容了:
[root@foundation8 KatyGit]# git stash list
[root@foundation8 KatyGit]#
你可以多次stash,恢复的时候,先用git stash list查看,然后恢复指定的stash,用命令:
git stash apply stash@{0}5)Feature分支
软件开发中,总有无穷无尽的新的功能要不断添加进来。
添加一个新功能时,你肯定不希望因为一些实验性质的代码,把主分支搞乱了,所以,每添加一个新功能,最好新建一个feature分支,在上面开发,完成后,合并,最后,删除该feature分支。
现在,你终于接到了一个新任务:开发代号为HX的新功能,该功能计划用于下一代软件。
于是准备开发:
[root@foundation8 KatyGit]# git checkout -b feature-HX
A   hello.txt
Switched to a new branch 'feature-HX'
5分钟后,开发完毕:
[root@foundation8 KatyGit]# git add HX.py
[root@foundation8 KatyGit]# git status
# On branch feature-HX
# Changes to be committed:
#   (use "git reset HEAD ..." to unstage)
#
#   new file:   HX.py
#   new file:   hello.txt
#
# Untracked files:
#   (use "git add ..." to include in what will be committed)
#
#   Hx/
[root@foundation8 KatyGit]# git commit -m "add feature-HX"
[feature-HX 94d7b67] add feature-HX
 Committer: root @foundation8.ilt.example.com>
Your name and email address were configured automatically based
on your username and hostname. Please check that they are accurate.
You can suppress this message by setting them explicitly:

    git config --global user.name "Your Name"
    git config --global user.email you@example.com

After doing this, you may fix the identity used for this commit with:

    git commit --amend --reset-author

 2 files changed, 0 insertions(+), 0 deletions(-)
 create mode 100644 HX.py
 create mode 100644 hello.txt
切回dev,准备合并:
[root@foundation8 KatyGit]# git checkout dev
Switched to branch 'dev'
一切顺利的话,feature分支和bug分支是类似的,合并,然后删除。
但是,
就在此时,接到上级命令,因经费不足,新功能必须取消!
虽然白干了,但是这个分支还是必须就地销毁:
[root@foundation8 KatyGit]# git branch -d feature-HX
error: The branch 'feature-HX' is not fully merged.
If you are sure you want to delete it, run 'git branch -D feature-HX'.
销毁失败。Git友情提醒,feature-HX分支还没有被合并,如果删除,将丢失掉修改,如果要强行删除,需要使用命令git branch -D feature-HX。
现在我们强行删除:
[root@foundation8 KatyGit]# git branch -D feature-HX
Deleted branch feature-HX (was 94d7b67).
终于删除成功!
6)多人协作
当你从远程仓库克隆时,实际上Git自动把本地的master分支和远程的master分支对应起来了,并且,远程仓库的默认名称是origin。
要查看远程库的信息,用git remote:
[root@foundation8 KatyGit]# git remote
origin
或者,用git remote -v显示更详细的信息:
[root@foundation8 KatyGit]# git remote -v
origin  git@github.com:MaMaMiYA1/KatyGit (fetch)
origin  git@github.com:MaMaMiYA1/KatyGit (push)
上面显示了可以抓取和推送的origin的地址。如果没有推送权限,就看不到push的地址。
推送分支
推送分支,就是把该分支上的所有本地提交推送到远程库。推送时,要指定本地分支,这样,Git就会把该分支推送到远程库对应的远程分支上:
[root@foundation8 KatyGit]# git push origin master
Warning: Permanently added the RSA host key for IP address '192.30.255.112' to the list of known hosts.
Counting objects: 16, done.
Delta compression using up to 4 threads.
Compressing objects: 100% (14/14), done.
Writing objects: 100% (14/14), 1.27 KiB | 0 bytes/s, done.
Total 14 (delta 6), reused 0 (delta 0)
remote: Resolving deltas: 100% (6/6), done.
To [email protected]:MaMaMiYA1/KatyGit
   be7d1f9..0835900  master -> master
如果要推送其他分支,比如dev,就改成:
[root@foundation8 KatyGit]# git push origin1 dev
Total 0 (delta 0), reused 0 (delta 0)
To git@github.com:MaMaMiYA1/KatyGit
 * [new branch]      dev -> dev
多人协作
Reads: 499215
当你从远程仓库克隆时,实际上Git自动把本地的master分支和远程的master分支对应起来了,并且,远程仓库的默认名称是origin。
要查看远程库的信息,用git remote:
$ git remote
origin
或者,用git remote -v显示更详细的信息:
$ git remote -v
origin [email protected]:michaelliao/learngit.git (fetch)
origin [email protected]:michaelliao/learngit.git (push)
上面显示了可以抓取和推送的origin的地址。如果没有推送权限,就看不到push的地址。
推送分支
推送分支,就是把该分支上的所有本地提交推送到远程库。推送时,要指定本地分支,这样,Git就会把该分支推送到远程库对应的远程分支上:
$ git push origin master
如果要推送其他分支,比如dev,就改成:
$ git push origin dev
但是,并不是一定要把本地分支往远程推送,那么,哪些分支需要推送,哪些不需要呢?
master分支是主分支,因此要时刻与远程同步;

dev分支是开发分支,团队所有成员都需要在上面工作,所以也需要与远程同步;

bug分支只用于在本地修复bug,就没必要推到远程了,除非老板要看看你每周到底修复了几个bug;

feature分支是否推到远程,取决于你是否和你的小伙伴合作在上面开发。
总之,就是在Git中,分支完全可以在本地自己藏着玩,是否推送,视你的心情而定!
抓取分支
多人协作时,大家都会往master和dev分支上推送各自的修改。
现在,模拟一个你的小伙伴,可以在另一台电脑(注意要把SSH Key添加到GitHub)或者同一台电脑的另一个目录下克隆:
[root@foundation8 friend]# git clone [email protected]:MaMaMiYA1/KatyGit
Cloning into 'KatyGit'...
remote: Counting objects: 28, done.
remote: Compressing objects: 100% (14/14), done.
Receiving objects: 100% (28/28), done.
Resolving deltas: 100% (9/9), done.
remote: Total 28 (delta 9), reused 28 (delta 9), pack-reused 0当你的小伙伴从远程库clone时,默认情况下,你的小伙伴只能看到本地的master分支。不信可以用git status命令看看:
[root@foundation8 friend]# git status
# On branch master
#
# Initial commit
#
# Untracked files:
#   (use "git add ..." to include in what will be committed)
#
#   KatyGit/
nothing added to commit but untracked files present (use "git add" to track)
现在,你的小伙伴要在dev分支上开发,就必须创建远程origin的dev分支到本地,于是他用这个命令创建本地dev分支:
git checkout -b dev origin/dev现在,他就可以在dev上继续修改,然后,时不时地把dev分支push到远程:
git push origin dev你的小伙伴已经向origin/dev分支推送了他的提交,而碰巧你也对同样的文件作了修改,并试图推送
推送失败,因为你的小伙伴的最新提交和你试图推送的提交有冲突,解决办法也很简单,Git已经提示我们,先用git pull把最新的提交从origin/dev抓下来,然后,在本地合并,解决冲突,再推送
git pull也失败了,原因是没有指定本地dev分支与远程origin/dev分支的链接,根据提示,设置dev和origin/dev的链接:
git branch --set-upstream dev origin/dev再pull:
git pull这回git pull成功,但是合并有冲突,需要手动解决,解决的方法和分支管理中的解决冲突完全一样。解决后,提交,再push
5.标签管理
发布一个版本时,我们通常先在版本库中打一个标签(tag),这样,就唯一确定了打标签时刻的版本。将来无论什么时候,取某个标签的版本,就是把那个打标签的时刻的历史版本取出来。所以,标签也是版本库的一个快照。

Git的标签虽然是版本库的快照,但其实它就是指向某个commit的指针(跟分支很像对不对?但是分支可以移动,标签不能移动),所以,创建和删除标签都是瞬间完成的。

Git有commit,为什么还要引入tag?

“请把上周一的那个版本打包发布,commit号是6a5819e...”

“一串乱七八糟的数字不好找!”

如果换一个办法:

“请把上周一的那个版本打包发布,版本号是v1.2”

“好的,按照tag v1.2查找commit就行!”

所以,tag就是一个让人容易记住的有意义的名字,它跟某个commit绑在一起。
1)创建标签
在Git中打标签非常简单,首先,切换到需要打标签的分支上:
[root@foundation8 KatyGit]# git checkout master
Switched to branch 'master'
[root@foundation8 KatyGit]# git branch
  dev
  issue-101
* master
然后,敲命令git tag 就可以打一个新标签:
[root@foundation8 KatyGit]# git tag v1.0可以用命令git tag查看所有标签:
[root@foundation8 KatyGit]# git tag
v1.0
默认标签是打在最新提交的commit上的。有时候,如果忘了打标签,比如,现在已经是周五了,但应该在周一打的标签没有打,怎么办?
方法是找到历史提交的commit id,然后打上就可以了:
[root@foundation8 KatyGit]#  git log --pretty=oneline --abbrev-commit
0835900 merge with no-ff
f725295  add merge
5b74425 conflict fixed
b9e378e  FEATURE1
1d64287 a new branch feature1
4e32bfd branch test
be7d1f9 add test.txt
15d7313 remove test.txt
7f5e03e add test.txt
29c8692 readme.txt
9f1c3eb readme.txt 第二版
40d7cf2 wrote a readme file
比方说要对add merge这次提交打标签,它对应的commit id是f725295,敲入命令:
[root@foundation8 KatyGit]# git tag v0.9 f725295再用命令git tag查看标签:
[root@foundation8 KatyGit]# git tag
v0.9
v1.0
注意,标签不是按时间顺序列出,而是按字母排序的。可以用git show 查看标签信息:
[root@foundation8 KatyGit]# git show v0.9
commit f7252953abe27e3fd092a1eb9c4c50c657543fdf
Author: root
Date:   Mon Feb 5 23:45:59 2018 +0800

     add merge     #可以看到,v0.9确实打在add merge这次提交上。

diff --git a/readme.txt b/readme.txt
index 3803372..696849b 100644
--- a/readme.txt
+++ b/readme.txt
@@ -2,3 +2,6 @@
 这是Git仓库中的一个纯文本文件 第二版
 这是Git仓库中的一个纯文本文件 第三版
 creating a new branch feature1
+creating a new branch feature1
+creating a new branch feature1
+creating a new branch feature1
还可以创建带有说明的标签,用-a指定标签名,-m指定说明文字:
[root@foundation8 KatyGit]# git tag -a v0.1 -m "version 0.1 released" 40d7cf2 用命令git show tagname可以看到说明文字:
[root@foundation8 KatyGit]# git show v0.1
tag v0.1
Tagger: root .ilt.example.com>
Date:   Tue Feb 6 00:33:07 2018 +0800

version 0.1 released

commit 40d7cf210cf3081b9042988a0d261a0c00a0abbf
Author: root .ilt.example.com>
Date:   Sun Feb 4 23:46:13 2018 +0800

    wrote a readme file

diff --git a/readme.txt b/readme.txt
new file mode 100644
index 0000000..6af26ed
--- /dev/null
+++ b/readme.txt
@@ -0,0 +1 @@
+这是Git仓库中的一个纯文本文件
还可以通过-s用私钥签名一个标签:
[root@foundation8 KatyGit]# git tag -s v0.2 -m "signed version 0.2 released" 9f1c3eb
gpg: directory `/root/.gnupg' created
gpg: new configuration file `/root/.gnupg/gpg.conf' created
gpg: WARNING: options in `/root/.gnupg/gpg.conf' are not yet active during this run
gpg: keyring `/root/.gnupg/secring.gpg' created
gpg: keyring `/root/.gnupg/pubring.gpg' created
gpg: skipped "root ": No secret key
gpg: signing failed: No secret key
error: gpg failed to sign the data  #签名采用PGP签名,因此,必须首先安装gpg(GnuPG),如果没有找到gpg,或者没有gpg密钥对,就会报错
error: unable to sign the tag
如果报错,请参考GnuPG帮助文档(http://blog.csdn.net/killmice/article/details/30748077)配置Key:
[root@foundation8 KatyGit]# gpg --gen-key
gpg (GnuPG) 2.0.22; Copyright (C) 2013 Free Software Foundation, Inc.
This is free software: you are free to change and redistribute it.
There is NO WARRANTY, to the extent permitted by law.

Please select what kind of key you want:
   (1) RSA and RSA (default)
   (2) DSA and Elgamal
   (3) DSA (sign only)
   (4) RSA (sign only)
Your selection?
RSA keys may be between 1024 and 4096 bits long.
What keysize do you want? (2048)
Requested keysize is 2048 bits
Please specify how long the key should be valid.
         0 = key does not expire
        = key expires in n days
      w = key expires in n weeks
      m = key expires in n months
      y = key expires in n years
Key is valid for? (0)
Key does not expire at all
Is this correct? (y/N)
Key is valid for? (0) y
invalid value
Key is valid for? (0)
Key does not expire at all
Is this correct? (y/N) y

GnuPG needs to construct a user ID to identify your key.

Real name: Katy
Name must be at least 5 characters long
Real name: huanghuang
Email address: [email protected]
Comment: huanghuang
You selected this USER-ID:
    "huanghuang (huanghuang) "

Change (N)ame, (C)omment, (E)mail or (O)kay/(Q)uit? o
You need a Passphrase to protect your secret key.

We need to generate a lot of random bytes. It is a good idea to perform
some other action (type on the keyboard, move the mouse, utilize the
disks) during the prime generation; this gives the random number
generator a better chance to gain enough entropy.
We need to generate a lot of random bytes. It is a good idea to perform
some other action (type on the keyboard, move the mouse, utilize the
disks) during the prime generation; this gives the random number
generator a better chance to gain enough entropy.
gpg: key 5D01FEA6 marked as ultimately trusted
public and secret key created and signed.

gpg: checking the trustdb
gpg: 3 marginal(s) needed, 1 complete(s) needed, PGP trust model
gpg: depth: 0  valid:   2  signed:   0  trust: 0-, 0q, 0n, 0m, 0f, 2u
pub   2048R/5D01FEA6 2018-02-05
      Key fingerprint = 15DE 1957 E2B0 FF13 CF03  BD10 4D06 45FD 5D01 FEA6
uid                  huanghuang (huanghuang)
sub   2048R/AA289227 2018-02-05
再次尝试创建标签
[root@foundation8 KatyGit]# git tag -u "huanghuang" -s v0.2 -m "signed version 0.2 released" 9f1c3eb
You need a passphrase to unlock the secret key for
user: "huanghuang (huanghuang) "
2048-bit RSA key, ID 5D01FEA6, created 2018-02-05
再次查看tag
[root@foundation8 KatyGit]# git show v0.2
tag v0.2
Tagger: root .ilt.example.com>
Date:   Tue Feb 6 01:08:47 2018 +0800

signed version 0.2 released
-----BEGIN PGP SIGNATURE-----
Version: GnuPG v2.0.22 (GNU/Linux)

iQEcBAABAgAGBQJaeI+iAAoJEE0GRf1dAf6myXQH/iL59S2flekfxJUWwNFbjIsp
qmYy2bNXUDmlFfJNnG78KEImhmsFFIH53NSlBFyhGd3vyqpUL3A7WFgAPqUFIdZc
8XvXoIahb7xo4WuBxumoUlrG+GZ1VYiPzcE9y45rYfrBxhCN0ZEIlB3VTYylZhK7
VAW+LihPj0dznxUBIbkcoiiOZT4YBXVZdpYJE4i4g2Jb4Vs7r/PPplRVYuaoLNop
TZbZKcQVZceTs+UGesBjdmYMDsCTB+7Ly3pWPnidGCuYsNliuaVYLYyT+cC/FoF1
ffpud1xo95d3S91LVtrBo+MuV9R9x2Ry6euTI33PAsamZLpvIs0mUI1LfIEpZ8Q=
=Z8Kp
-----END PGP SIGNATURE-----

commit 9f1c3ebd24f5b3144c49f7e06a48b47763c9e706
Author: root .ilt.example.com>
Date:   Sun Feb 4 23:51:07 2018 +0800

    readme.txt 第二版
2)操作标签
如果标签打错了,也可以删除:
[root@foundation8 KatyGit]# git tag
v0.1
v0.2
v0.9
v1.0
[root@foundation8 KatyGit]# git tag -d v0.1
Deleted tag 'v0.1' (was ae6b8e8)
[root@foundation8 KatyGit]# git tag
v0.2
v0.9
v1.0
因为创建的标签都只存储在本地,不会自动推送到远程。所以,打错的标签可以在本地安全删除。
如果要推送某个标签到远程,使用命令git push origin tagname:
[root@foundation8 KatyGit]# git push origin v1.0
Total 0 (delta 0), reused 0 (delta 0)
To git@github.com:MaMaMiYA1/KatyGit
 * [new tag]         v1.0 -> v1.0
或者,一次性推送全部尚未推送到远程的本地标签:
[root@foundation8 KatyGit]# git push origin --tags
Counting objects: 1, done.
Writing objects: 100% (1/1), 556 bytes | 0 bytes/s, done.
Total 1 (delta 0), reused 0 (delta 0)
To git@github.com:MaMaMiYA1/KatyGit
 * [new tag]         v0.2 -> v0.2
 * [new tag]         v0.9 -> v0.9
如果标签已经推送到远程,要删除远程标签就麻烦一点,先从本地删除:
[root@foundation8 KatyGit]# git tag
v0.2
v0.9
v1.0
[root@foundation8 KatyGit]# git tag -d v0.2
Deleted tag 'v0.2' (was f1a09e7)
然后,从远程删除。删除命令也是push,但是格式如下:
[root@foundation8 KatyGit]# git push origin :refs/tags/v0.2
To git@github.com:MaMaMiYA1/KatyGit
 - [deleted]         v0.2
3)使用Github
一定要从自己的账号下clone仓库,这样你才能推送修改。
如果你希望别人能接受你的修改,你就可以在GitHub上发起一个pull request。当然,对方是否接受你的pull request就不一定了。
4)使用码云
和GitHub相比,码云也提供免费的Git仓库。此外,还集成了代码质量检测、项目演示等功能。对于团队协作开发,码云还提供了项目管理、代码托管、文档管理的服务,5人以下小团队免费
6.自定义Git
在安装Git一节中,我们已经配置了user.name和user.email,实际上,Git还有很多可配置项。
比如,让Git显示颜色,会让命令输出看起来更醒目:
git config --global color.ui true
1)忽略特殊文件
有些时候,你必须把某些文件放到Git工作目录中,但又不能提交它们,比如保存了数据库密码的配置文件啦,等等,每次git status都会显示Untracked files …,有强迫症的童鞋心里肯定不爽。
好在Git考虑到了大家的感受,这个问题解决起来也很简单,在Git工作区的根目录下创建一个特殊的`.gitignore文件,然后把要忽略的文件名填进去,Git就会自动忽略这些文件。
[root@foundation8 KatyGit]# ls -a
.  ..  Desktop.ini  .git  .gitignore  Hx  readme.txt  test.txt
[root@foundation8 KatyGit]# cat .gitignore
[root@foundation8 KatyGit]#
[root@foundation8 KatyGit]# git status
# On branch master
# Untracked files:
#   (use "git add ..." to include in what will be committed)
#
#   .gitignore
#   Desktop.ini
#   Hx/
nothing added to commit but untracked files present (use "git add" to track)
我们现在要做的就是隐藏.ini文件
#编辑.gitignore
[root@foundation8 KatyGit]# cat .gitignore
*.ini
#再次查询,Desktop.ini成功隐藏,类似的我们可以隐藏其他文件
[root@foundation8 KatyGit]# git status
# On branch master
# Untracked files:
#   (use "git add ..." to include in what will be committed)
#
#   .gitignore
#   Hx/
nothing added to commit but untracked files present (use "git add" to track)
2)配置别名
有没有经常敲错命令?比如git status?status这个单词真心不好记。
如果敲git st就表示git status那就简单多了,当然这种偷懒的办法我们是极力赞成的。
我们只需要敲一行命令,告诉Git,以后st就表示status:
[root@foundation8 KatyGit]# git config --global alias.st status
[root@foundation8 KatyGit]# git st
# On branch master
# Untracked files:
#   (use "git add ..." to include in what will be committed)
#
#   .gitignore
#   Hx/
nothing added to commit but untracked files present (use "git add" to track)
//–global参数是全局参数,也就是这些命令在这台电脑的所有Git仓库下都有用。
配置文件
配置Git的时候,加上–global是针对当前用户起作用的,如果不加,那只针对当前的仓库起作用。
配置文件放哪了?每个仓库的Git配置文件都放在.git/config文件中:
[root@foundation8 KatyGit]# cat .git/config
[core]
    repositoryformatversion = 0
    filemode = true
    bare = false
    logallrefupdates = true
[remote "origin"]
    url = git@github.com:MaMaMiYA1/KatyGit
    fetch = +refs/heads/*:refs/remotes/origin1/*
[branch "master"]
    remote = origin1
    merge = refs/heads/master
[commit]
    gpgsign = true
3)搭建Git服务器
第一步,安装git
$ sudo apt-get install git

第二步,创建一个git用户,用来运行git服务:
$ sudo adduser git

第三步,创建证书登录:
收集所有需要登录的用户的公钥,就是他们自己的id_rsa.pub文件,把所有公钥导入到/home/git/.ssh/authorized_keys文件里,一行一个。

四步,初始化Git仓库:
先选定一个目录作为Git仓库,假定是/srv/sample.git,在/srv目录下输入命令:
$ sudo git init --bare sample.git

Git就会创建一个裸仓库,裸仓库没有工作区,因为服务器上的Git仓库纯粹是为了共享,所以不让用户直接登录到服务器上去改工作区,并且服务器上的Git仓库通常都以.git结尾。然后,把owner改为git:
$ sudo chown -R git:git sample.git

第五步,禁用shell登录:
出于安全考虑,第二步创建的git用户不允许登录shell,这可以通过编辑/etc/passwd文件完成。找到类似下面的一行:
git:x:1001:1001:,,,:/home/git:/bin/bash
改为:
git:x:1001:1001:,,,:/home/git:/usr/bin/git-shell
这样,git用户可以正常通过ssh使用git,但无法登录shell,因为我们为git用户指定的git-shell每次一登录就自动退出。

第六步,克隆远程仓库:
现在,可以通过git clone命令克隆远程仓库了,在各自的电脑上运行:
$ git clone git@server:/srv/sample.git
Cloning into 'sample'...
warning: You appear to have cloned an empty repository.

剩下的推送就简单了。
管理公钥

如果团队很小,把每个人的公钥收集起来放到服务器的/home/git/.ssh/authorized_keys文件里就是可行的。如果团队有几百号人,就没法这么玩了,这时,可以用Gitosis来管理公钥。

这里我们不介绍怎么玩Gitosis了,几百号人的团队基本都在500强了,相信找个高水平的Linux管理员问题不大。
管理权限

有很多不但视源代码如生命,而且视员工为窃贼的公司,会在版本控制系统里设置一套完善的权限控制,每个人是否有读写权限会精确到每个分支甚至每个目录下。因为Git是为Linux源代码托管而开发的,所以Git也继承了开源社区的精神,不支持权限控制。不过,因为Git支持钩子(hook),所以,可以在服务器端编写一系列脚本来控制提交等操作,达到权限控制的目的。Gitolite就是这个工具。

这里我们也不介绍Gitolite了,不要把有限的生命浪费到权限斗争中。