树莓派3之Qt5.11.3交叉编译 PC机-Ubuntu16.04-64bit 官方镜像-buster版本
- 参考资料
官方教程:https://wiki.qt.io/RaspberryPi2EGLFS#Step_by_step
感谢红模仿的小作坊博主-原博主博客地址:http://blog.csdn.net/qq21497936
文章博客地址:https://blog.csdn.net/qq21497936/article/details/79710509
关于中间编译出现问题时查到的资料:https://forum.qt.io/topic/94936/cross-compile-qt-5-11-for-raspberry-pi-3/7
树莓派环境配置
- 树莓派系统安装好以后需要升级树莓派!注意:是升级树莓派
sudo rpi-update
reboot- 更新树莓派的源,保证后续文件安装的流畅性,不然官方源就等着蜗牛爬吧
# 编辑 `/etc/apt/sources.list` 文件,删除原文件所有内容,用以下内容取代:
deb http://mirrors.tuna.tsinghua.edu.cn/raspbian/raspbian/ buster main non-free contrib
deb-src http://mirrors.tuna.tsinghua.edu.cn/raspbian/raspbian/ buster main non-free contrib

# 编辑 `/etc/apt/sources.list.d/raspi.list` 文件,删除原文件所有内容,用以下内容取代:
deb http://mirrors.tuna.tsinghua.edu.cn/raspberrypi/ buster main ui- 更新软件源
sudo apt-get update- 更新安装系统所需的库
sudo apt-get update
sudo apt-get build-dep qt4-x11
sudo apt-get build-dep libqt5gui5
sudo apt-get install libudev-dev libinput-dev libts-dev libxcb-xinerama0-dev libxcb-xinerama0- 准备好qt文件安装的文件夹
sudo mkdir /usr/local/qt5pi
sudo chown pi:pi /usr/local/qt5pi
PC机上环境配置
- 创建工作文件夹并获取交叉编译工具
mkdir ~/raspi
cd ~/raspi
git clone https://github.com/raspberrypi/tools- 创建sysroot目录,利用 rsync 指令把树莓派的系统环境及库同步到此目录中. 其中需要将 raspberrypi.local 替换为树莓派的IP地址,通过局域网进行更新,前提是树莓派的SSH已经配置好
mkdir sysroot sysroot/usr sysroot/opt
rsync -avz [email protected]:/lib sysroot
rsync -avz [email protected]:/usr/include sysroot/usr
rsync -avz [email protected]:/usr/lib sysroot/usr
rsync -avz [email protected]:/opt/vc sysroot/opt- 修复软连接,此前的fixQualifiedLibraryPaths 已经不能正常使用了
wget https://raw.githubusercontent.com/Kukkimonsuta/rpi-buildqt/master/scripts/utils/sysroot-relativelinks.py
chmod +x sysroot-relativelinks.py
./sysroot-relativelinks.py sysroot- Qt5.11.3安装及源码下载
Qt源码下载地址:qt官方下载地址或中科大镜像站
源码解压移动至~/work目录,没有就创建
cd ~/work
tar xvJf qt-everywhere-opensource-src-5.11.3.tar.xz
mv qt-everywhere-opensource-src-5.11.3 qt5.11.3
因为PC机系统是64位系统,所以在选择交叉编译工具时,需要选择x64
-device-option CROSS_COMPILE=~/raspi/tools/arm-bcm2708/gcc-linaro-arm-linux-gnueabihf-raspbian-x64/bin/arm-linux-gnueabihf-如果是32位则
-device-option CROSS_COMPILE=~/raspi/tools/arm-bcm2708/gcc-linaro-arm-linux-gnueabihf-raspbian/bin/arm-linux-gnueabihf-如果Qt的版本超过5.9.1,configure时需要加上选项
-no-use-gold-linker- Configure过程 make 以及make install
首先进入源码的安装目录
cd ~/raspi/qt5.11.3/qtbase/
configure,配置选项如下
./configure -release -opengl es2 -device linux-rasp-pi3-g++ -device-option CROSS_COMPILE=~/raspi/tools/arm-bcm2708/gcc-linaro-arm-linux-gnueabihf-raspbian-x64/bin/arm-linux-gnueabihf- -sysroot ~/raspi/sysroot -opensource -confirm-license -make libs -prefix /usr/local/qt5pi -extprefix ~/raspi/qt5pi -hostprefix ~/raspi/qt5 -no-use-gold-linker -v -no-gbm
- -openg es2表示编译带opengl es2的qt
- -extprefix 为输出qt库目录,这个目录迟点要复制到树莓派上
- -hostprefix 为本地主机qt creator配置kit套件所需的目录,不用复制到树莓派上
- -device 这里为选择的目标设备,目标设备的配置文件可在/qtbase/mkspec/device找到
- -device-option CROSS_COMPILE= 这里给定我们刚刚下载的交叉编译器的路径,注意最后那里的arm-linux-gnueabihf- ,确实有一杠,不要以为打错了
- -sysroot为我们刚刚构建开发板文件系统的路径
之后操作
make
make install
在开始的make过程中 出现错误
vc/include -I=/opt/vc/include/interface/vcos/pthreads -I=/opt/vc/include/interface/vmcs_host/linux -isystem /usr/include/libdrm -I/media/pi/BC1/qt-everywhere-src-5.11.0/qtbase/mkspecs/devices/linux-rasp-pi3-g++ -o .obj/qeglfskmsgbmwindow.o /media/pi/BC1/qt-everywhere-src-5.11.0/qtbase/src/plugins/platforms/eglfs/deviceintegration/eglfs_kms/qeglfskmsgbmwindow.cpp
/media/pi/BC1/qt-everywhere-src-5.11.0/qtbase/src/plugins/platforms/eglfs/deviceintegration/eglfs_kms/qeglfskmsgbmwindow.cpp: In member function ‘virtual void QEglFSKmsGbmWindow::resetSurface()’:
/media/pi/BC1/qt-everywhere-src-5.11.0/qtbase/src/plugins/platforms/eglfs/deviceintegration/eglfs_kms/qeglfskmsgbmwindow.cpp:58:5: error: ‘PFNEGLCREATEPLATFORMWINDOWSURFACEEXTPROC’ was not declared in this scope
     PFNEGLCREATEPLATFORMWINDOWSURFACEEXTPROC createPlatformWindowSurface = nullptr;
     ^
/media/pi/BC1/qt-everywhere-src-5.11.0/qtbase/src/plugins/platforms/eglfs/deviceintegration/eglfs_kms/qeglfskmsgbmwindow.cpp:61:9: error: ‘createPlatformWindowSurface’ was not declared in this scope
         createPlatformWindowSurface = reinterpret_cast(
         ^
/media/pi/BC1/qt-everywhere-src-5.11.0/qtbase/src/plugins/platforms/eglfs/deviceintegration/eglfs_kms/qeglfskmsgbmwindow.cpp:61:56: error: ‘PFNEGLCREATEPLATFORMWINDOWSURFACEEXTPROC’ does not name a type
         createPlatformWindowSurface = reinterpret_cast(
                                                        ^
/media/pi/BC1/qt-everywhere-src-5.11.0/qtbase/src/plugins/platforms/eglfs/deviceintegration/eglfs_kms/qeglfskmsgbmwindow.cpp:65:9: error: ‘createPlatformWindowSurface’ was not declared in this scope
     if (createPlatformWindowSurface) {
         ^
Makefile:2794: recipe for target '.obj/qeglfskmsgbmwindow.o' failed
make[7]: *** [.obj/qeglfskmsgbmwindow.o] Error 1
make[7]: Leaving directory '/media/pi/BC1/qt-everywhere-src-5.11.0/build/qtbase/src/plugins/platforms/eglfs/deviceintegration/eglfs_kms'
Makefile:72: recipe for target 'sub-eglfs_kms-make_first' failed
make[6]: *** [sub-eglfs_kms-make_first] Error 2
make[6]: Leaving directory '/media/pi/BC1/qt-everywhere-src-5.11.0/build/qtbase/src/plugins/platforms/eglfs/deviceintegration'
Makefile:104: recipe for target 'sub-deviceintegration-make_first-ordered' failed
make[5]: *** [sub-deviceintegration-make_first-ordered] Error 2
make[5]: Leaving directory '/media/pi/BC1/qt-everywhere-src-5.11.0/build/qtbase/src/plugins/platforms/eglfs'
Makefile:125: recipe for target 'sub-eglfs-make_first' failed
make[4]: *** [sub-eglfs-make_first] Error 2
make[4]: Leaving directory '/media/pi/BC1/qt-everywhere-src-5.11.0/build/qtbase/src/plugins/platforms'
Makefile:102: recipe for target 'sub-platforms-make_first' failed
make[3]: *** [sub-platforms-make_first] Error 2
make[3]: Leaving directory '/media/pi/BC1/qt-everywhere-src-5.11.0/build/qtbase/src/plugins'
Makefile:776: recipe for target 'sub-plugins-make_first' failed
make[2]: *** [sub-plugins-make_first] Error 2
make[2]: Leaving directory '/media/pi/BC1/qt-everywhere-src-5.11.0/build/qtbase/src'
Makefile:48: recipe for target 'sub-src-make_first' failed
make[1]: *** [sub-src-make_first] Error 2
make[1]: Leaving directory '/media/pi/BC1/qt-everywhere-src-5.11.0/build/qtbase'
Makefile:81: recipe for target 'module-qtbase-make_first' failed
make: *** [module-qtbase-make_first] Error 2
最终在 加入configure过程中加入 -no-gbm 重新configure之后 再make就解决该问题
=================================我是分割线-2019-08-20=========================
- [PC机] make install之后,我们所编译出来的库都安装在~/raspi/qt5pi目录中,现在就需要将编译输出的库同步至树莓派3中
cd ~/raspi
rsync -avz qt5pi [email protected]:/usr/local- [树莓派] 修改树莓派的环境变量,保证qt程序执行时能够找到相应的库
echo /usr/local/qt5pi/lib | sudo tee /etc/ld.so.conf.d/qt5pi.conf
sudo ldconfig- [树莓派] 修复EGL/GLES库!注:如果开发用到opengl库的话,建议做一下这一步。
官方解释:The device may have the Mesa version of libEGL and libGLESv2 in /usr/lib/arm-linux-gnueabihf, resulting Qt apps picking these instead of the real thing from /opt/vc/lib.
意思是设备在/usr/lib/arm-linux-gnueabihf可能有mesa版本的libEGL 和 libGLESv2库,但实际树莓派有原生的安装在/opt/vc/lib位置的动态库,我们需要将这个文件夹中的库链接过去。执行指令之前确保在/home/pi路径
注意,执行之前先确定下/usr/lib/arm-linux-gnueabihf/对应库的版本是不是libEGL.so.1.0.0 的版本
sudo mv /usr/lib/arm-linux-gnueabihf/libEGL.so.1.1.0 /usr/lib/arm-linux-gnueabihf/libEGL.so.1.1.0_backup
sudo mv /usr/lib/arm-linux-gnueabihf/libGLESv2.so.2.1.0 /usr/lib/arm-linux-gnueabihf/libGLESv2.so.2.1.0_backup
sudo ln -s /opt/vc/lib/libEGL.so /usr/lib/arm-linux-gnueabihf/libEGL.so.1.1.0
sudo ln -s /opt/vc/lib/libGLESv2.so /usr/lib/arm-linux-gnueabihf/libGLESv2.so.2.1.0
sudo ln -s /opt/vc/lib/libbrcmEGL.so /opt/vc/lib/libEGL.so
sudo ln -s /opt/vc/lib/libbrcmGLESv2.so /opt/vc/lib/libGLESv2.so
同时记得添加缺失的软连接
sudo ln -s /opt/vc/lib/libEGL.so /opt/vc/lib/libEGL.so.1
sudo ln -s /opt/vc/lib/libGLESv2.so /opt/vc/lib/libGLESv2.so.2- [PC机]设置qtcreate的构建套件KITS
1.选项-kits-编译器,添加GCC编译器对应的是 我们编译器放的位置~/raspi/tools/arm-bcm2708/gcc-linaro-arm-linux-gnueabihf-raspbian-x64/bin/arm-linux-gnueabihf-
2.选项-kits-Qt versions 添加安装在~/raspi/qt5/bin/qmake 版本
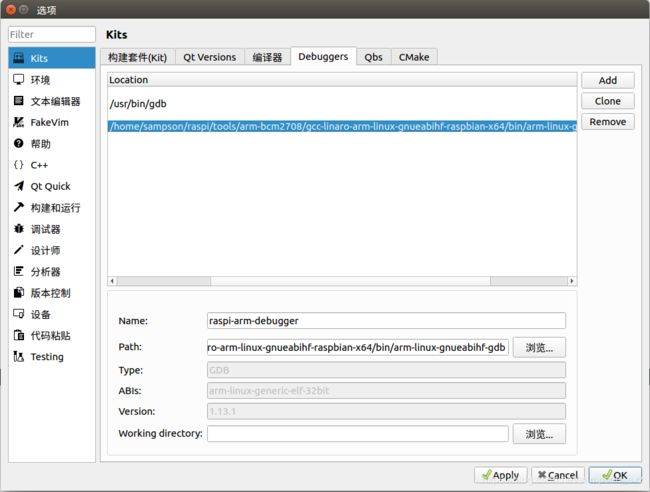
3. 选项-kits-Debuggers 添加调试器-仍在我们下载的编译器目录中
4.选项-设备-添加
5.选项-Kits-添加
至此,构建套件设置完毕,可以愉快的构建并远程调试了
- Unknown module(s) in QT: quick qml 问题 !!!
在打开qt自带的qmldemo时,出现了未识别的模块,经过一番折腾,终于找到原因,是因为我没有编译对应的libQt5Qml.so 以及 libQt5Quick.so库。这时候需要的操作如下
cd ~/raspi/qt5.11.3/qtdeclarative/
~/raspi/qt5/bin/qmake
make
make install
同步至树莓派
cd ~/raspi
rsync -avz qt5pi [email protected]:/usr/local
至此,PC编译,树莓派完美运行demo程序
后续问题后面继续记录!!!!


