Android Studio第一个JNI开发入门(整理一)
Android Studio第一个JNI开发入门
- 概述
- NDK环境的安装
- AS配置关联NDK
- NDK开发JNI流程
- 在JAVA里面写native代码
- 写C/C++代码实现本地接口
- 配置动态链接库名称
- 测试使用JNI方法
- 编译测试
概述
该篇主要描述如何通过AS进行开发自己的JNI so库文件,通过一个简单的测试用例引导初学者了解其中的过程。
NDK环境的安装
开发so库就必须用到NDK(本地开发环境包),在这里只需知道它是专门用来编译C/C++的工程文件的。其他更细节的内容可以自行查阅了解。
那么如何进行安装呢? 大致可以分为两种:一种手动下载安装,另一种通过IDE自行下载安装;
- 手动下载安装
这种方法首先,从官网下载最新的NDK下载链接
其次,解压到一个指定的安装目录,这个目录不能有中文或空格,否则会有问题
最后,配置path环境变量 - 这一步可以省略,后续用到的时候可以在增加
这样就完成了,其实就是下载,解压就完了 非常简单明了。
完成之后我们需要复制一下安装的目录全路径如:C:\Users\User\AppData\Local\Android\Sdk\ndk\21.0.6113669
这是我解压后的路径,这个后面会用到。 - IDE下载安装
IDE的安装我们这里只介绍AS的方法。
首先打开AS->Tools->SDK Manager->Android SDK->SDK Tools选中NDK/LLDB -> apply 就自行开始下载
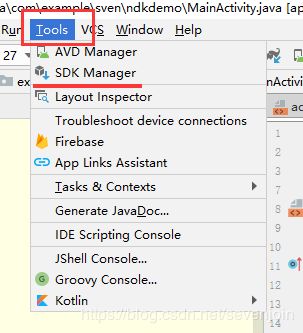
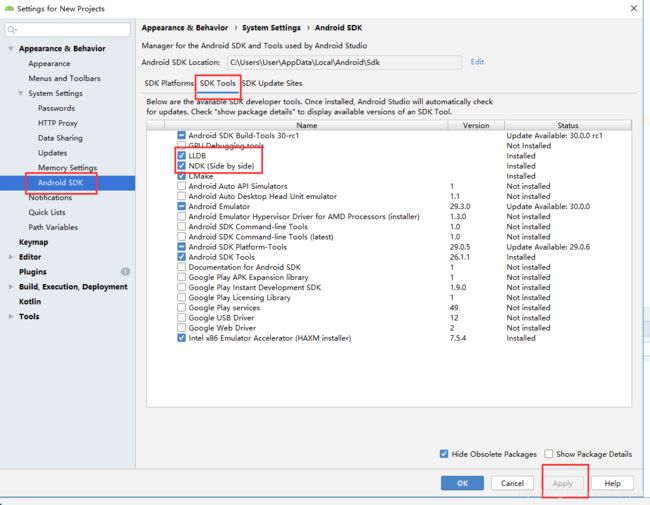
如此AS就自行下载并安装。 注意在这里大家最好把Cmake也选择上,后面也会用到。因为在后面配置build.grandle的时候AS3.0以下的版本已经不能再使用android.useDeprecatedNdk不再支持了这样的属性进行配置so库了,必须采用Cmake。
AS配置关联NDK
NDK安装完成之后,就需要让AS知道怎么使用NDK。其实很简单只需要让AS关联一下NDK的路径就好。
还记得前面保存下来的路径吗,将它们复制粘贴到下面的输入框即可。
首先, 我们需要先创建一个测试工程ndkdemo。
然后,打开File->Project Structure
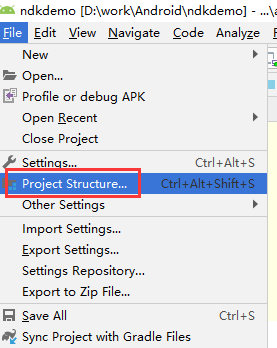
找到SDK Location:这样将前面复制的ndk路径粘贴到NDK Location即可。如果是通过IDE自行安装的,不知道安装到哪个目录时,我们可以通过上面SDK location的路径来找到它,通常都是在sdk的目录下。

还有一种方法是直接找到local.properties这个文件,增加ndk.dir宏即可。
# local.properties
sdk.dir=C\:\\Users\\User\\AppData\\Local\\Android\\Sdk
ndk.dir=C\:\\Users\\User\\AppData\\Local\\Android\\Sdk\\ndk\\21.0.6113669
这两种方式作用都是一样的, 第一种方式修改完后最终也是作用到这个文件。
NDK开发JNI流程
在JAVA里面写native代码
// JNI.java
package com.example.sven.ndkdemo;

/**
 *  Creator: @By Sven 2020-02-26
 *  作用: java调用对应的C代码
 **/
public class JNI {
    {
    	// 在这里我们需要加载这个jni so库, 这个Hello名字就是最终编译产出的so的名字,也可以起其他的名字,但必须要和最终的so库名相同。
        System.loadLibrary("Hello");
    }
    /* *
    *  定义native方法
    *  调用C代码对应的方法
    *  @return
    */
    public native String sayHello();  // 在这里我们声明了一个sayHello的本地接口。
}
写C/C++代码实现本地接口
在前面声明了一个sayHello本地接口,那么在这里就需要进行实现它。
- 首先获取函数名。
JNI本地接口函数名的命名规则为Java_全类名_函数名。即本例sayHello来说:
Java_com_example_sven_ndkdemo_sayHello();
不过我们有个简单方便的操作可以将鼠标放到sayHello接口上,然后右键->copy reference这样就获取到了:
com.example.sven.ndkdemo.JNI#sayHello这样的一个名称,在这里我们只需要稍微改变将所有的 '.‘换成’’, #也换成 ''即可。 这样对特别长或者难记的名称就方便多了呢?

- 创建C文件
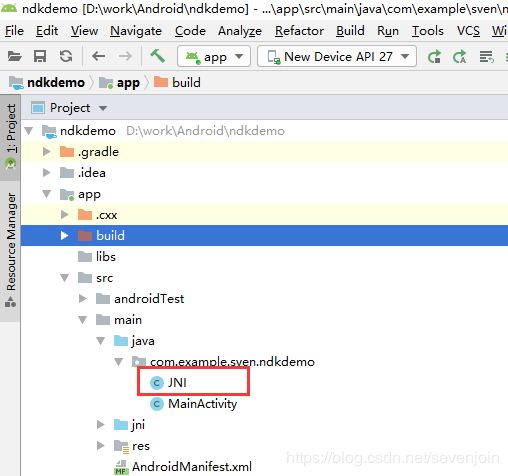
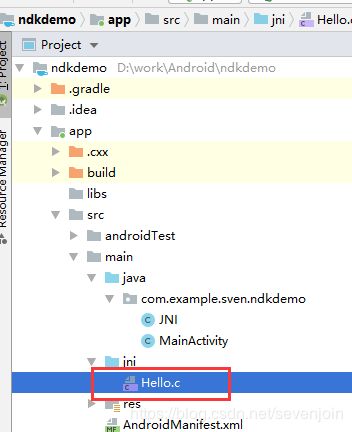
在main目录下创建jni目录,然后创建Hello.c文件, 目录结构如下:
- 编辑C文件实现本地代码
前面已经简单获取了函数名com.example.sven.ndkdemo.JNI#sayHello,在这里我们只需要将所有的 '.‘换成’’, #也换成 ''即可。
//
// Created by User on 2020/2/26.
//
#include 配置动态链接库名称
在这里我们需要指定编译产出的so库名,如前面指定的Hello。
配置通常有两种方式,一种通过ndk属性进行配置, 另一种通过cmake配置
- ndk配置
这种方式好像AS3.0以上就不支持了,即使网上有很多说需要增加android.useDeprecatedNdk=true属性进行兼容, 但是在AS3.5我使用的这个版本是不支持的,报以下错误。
Flag android.useDeprecatedNdk is no longer supported and will be removed in the next……
即使这样在这里也列出使用方式:
我们需要编辑build.grandle文件进行配置ndk。
# build.grandle
    defaultConfig {
        applicationId "com.example.sven.ndkdemo"
        minSdkVersion 23
        targetSdkVersion 29
        versionCode 1
        versionName "1.0"
        testInstrumentationRunner "androidx.test.runner.AndroidJUnitRunner"
        ndk {
            # 指定库名称
            moduleName "Hello"
            # 指定需要产出哪些架构平台
            abiFilters "armeabi", "armeabi-v7a", "x86", "x86_64"
        }
      }
然后编辑:grandle.properties文件增加android.useDeprecatedNdk=true属性
- cmake配置
在这里我们实际操作采用的是cmake方式进行编译链接。
和ndk方式一样也需要编辑build.grandle文件进行配置增加cmake属性。
android {
    compileSdkVersion 29
    buildToolsVersion "29.0.2"
    defaultConfig {
        applicationId "com.example.sven.ndkdemo"
        minSdkVersion 23
        targetSdkVersion 29
        versionCode 1
        versionName "1.0"
        testInstrumentationRunner "androidx.test.runner.AndroidJUnitRunner"
//        ndk {
//            moduleName "Hello"
//            abiFilters "armeabi", "armeabi-v7a", "x86"
//        }
        // 增加cmake控制属性
        externalNativeBuild{
            cmake{
            	// 指定编译架构
                abiFilters 'arm64-v8a','armeabi-v7a','x86','x86_64'
            }
        }
    }
    // 在android节点下
    // 指定CMakeLists.txt路径
    externalNativeBuild{
        cmake{
        	// 在该文件种设置所要编写的c源码位置,以及编译后so文件的名字
            path 'CMakeLists.txt'
        }
    }
- 添加编写CMakeLists.txt文件
首先,添加CMakeLists.txt文件到build.gradle文件同级目录下即app目录中添加
其次, 编写控制内容,具体语法和正常在Linux环境创建cmake工程一样,如果开发过linux应用经过使用cmake维护编译工程的话,那对于这个就很容易理解了。具体内容如下:
# CMakeLists.txt
# For more information about using CMake with Android Studio, read the
# documentation: https://d.android.com/studio/projects/add-native-code.html

# Sets the minimum version of CMake required to build the native library.
#CMakeLists.txt
cmake_minimum_required(VERSION 3.4.1)

# Creates and names a library, sets it as either STATIC
# or SHARED, and provides the relative paths to its source code.
add_library(
      # 设置so文件名称.
       Hello
       # 设置这个so文件为共享.
       SHARED
       # Provides a relative path to your source file(s).
       src/main/jni/Hello.c)

# Searches for a specified prebuilt library and stores the path as a
# variable. Because CMake includes system libraries in the search path by
# default, you only need to specify the name of the public NDK library
# you want to add. CMake verifies that the library exists before
# completing its build.
find_library( # Sets the name of the path variable.
       log-lib
       # Specifies the name of the NDK library that
       # you want CMake to locate.
       log )

# Specifies libraries CMake should link to your target library. You
# can link multiple libraries, such as libraries you define in this
# build script, prebuilt third-party libraries, or system libraries.
target_link_libraries( # Specifies the target library.
            # 制定目标库.
            Hello
            # Links the target library to the log library
            # included in the NDK.
            ${log-lib} )
测试使用JNI方法
接下来我就可以编写应用测试jni方法是否可以使用了。
在MainActivity.java中增加实例:
package com.example.sven.ndkdemo;

import androidx.appcompat.app.AppCompatActivity;

import android.os.Bundle;
import android.util.Log;

public class MainActivity extends AppCompatActivity {
    String TAG="NDKDemo";
    @Override
    protected void onCreate(Bundle savedInstanceState) {
        super.onCreate(savedInstanceState);
        setContentView(R.layout.activity_main);
        // 创建JNI实例,并调用本地声明的方法
        String result = new JNI().sayHello();
        System.out.println(result);
        // 打印JNI本地方法返回的字符串。
        Log.d(TAG, "the string from JNC C '"+result + "'");
    }
}
编译测试
编译完成后会看到产出的so库文件了,和我们测试用的apk;
库文件所在目录如下:
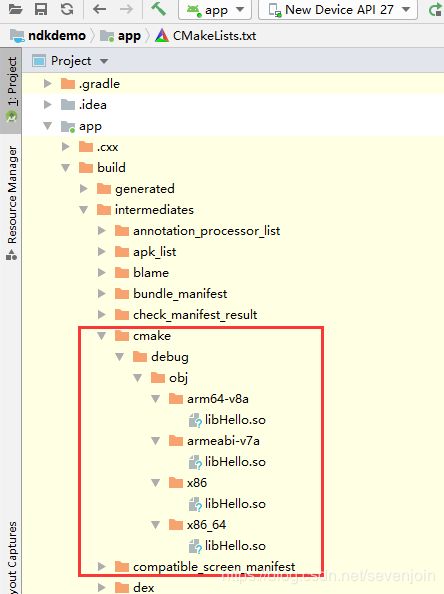
是不是前面所指定的几个架构平台都有了呢???
最后在模拟器上运行测试ndkdemo.apk将会看到输出信息了:
2020-02-27 10:21:04.080 28711-28711/com.example.sven.ndkdemo D/NDKDemo: the string from JNC C 'I am from c'
总结:
ndkdemo工程实例可以在这里下载
下载工程使用的小伙伴记得要修改成自己的ndk和sdk路径哦!!!
