RabbitMQ 实例(一对一、一对多、多对多、多对一)
原理就不说了,自己先百度。 我们不做理论高手, 我们要实战。
现在网上的博客太混乱了,有些贴出来完全是错误的,很容易误导我们理解。
我这里主要是分享代码,让你们在电脑上跑起来。
在看下面之前,先看我上一篇博客 https://blog.csdn.net/shushugood/article/details/81076917, 在本地把自己的rabbitmq服务先跑起来把。
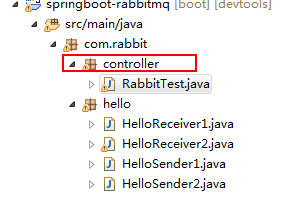
目录结构如下:
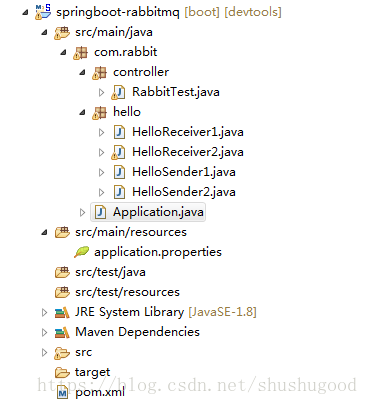
1.我们先看pom.xml
  4.0.0
  com.broadtech
  springboot-rabbitmq
  0.0.1-SNAPSHOT


        org.springframework.boot
        spring-boot-starter-parent
        1.4.0.RELEASE


        1.8
        UTF-8


            org.springframework.boot
            spring-boot-starter


            org.springframework.boot
            spring-boot-devtools
            true
            true


            org.springframework.boot
            spring-boot-starter-test
            test


            org.springframework.boot
            spring-boot-starter-actuator


            org.springframework.boot
            spring-boot-starter-web


            org.springframework.boot
            spring-boot-starter-amqp


            org.springframework.boot
            spring-boot-starter-tomcat
            provided


            org.apache.tomcat.embed
            tomcat-embed-jasper
            provided


		    com.rabbitmq
		    amqp-client
		    3.6.5
2.看 application.properties
spring.application.name=springboot-rabbitmq
spring.rabbitmq.host=127.0.0.1
spring.rabbitmq.port=5672
spring.rabbitmq.username=mengl
spring.rabbitmq.password=123456
#spring.rabbitmq.publisher-confirms=true
#spring.rabbitmq.virtual-host=/
3.Application.java
package com.rabbit;

import org.springframework.amqp.core.Queue;
import org.springframework.boot.SpringApplication;
import org.springframework.boot.autoconfigure.SpringBootApplication;
import org.springframework.boot.autoconfigure.jdbc.DataSourceAutoConfiguration;
import org.springframework.context.annotation.Bean;


@SpringBootApplication(exclude = DataSourceAutoConfiguration.class)
public class Application {
    public final static String HELLO = "helloQueue1";

    public static void main(String[] args) throws Exception {
        SpringApplication.run(Application.class, args);
    }

    @Bean
    public Queue helloQueue() {
        return new Queue(Application.HELLO); // 1
    }

    @Bean
    public Queue userQueue() {
        return new Queue("user");
    }

}
4. 下面是生产 sender 和消费 receiver

4.1 HelloReceiver1.java
package com.rabbit.hello;

import org.springframework.amqp.rabbit.annotation.RabbitHandler;
import org.springframework.amqp.rabbit.annotation.RabbitListener;
import org.springframework.stereotype.Component;

import com.rabbit.Application;

@Component
@RabbitListener(queues = Application.HELLO) //3
public class HelloReceiver1 {

    @RabbitHandler
    public void process(String hello) {
        System.out.println("Receiver1  : " + hello);
    }

}
4.2 HelloReceiver2.java
package com.rabbit.hello;

import org.springframework.amqp.rabbit.annotation.RabbitHandler;
import org.springframework.amqp.rabbit.annotation.RabbitListener;
import org.springframework.stereotype.Component;

import com.rabbit.Application;

@Component
//@RabbitListener(queues = Application.HELLO)
public class HelloReceiver2 {

    @RabbitHandler
    public void process(String hello) {
        System.out.println("Receiver2  : " + hello);
    }

}
4.3 HelloSender1.java
package com.rabbit.hello;

import java.util.Date;

import org.springframework.amqp.core.AmqpTemplate;
import org.springframework.beans.factory.annotation.Autowired;
import org.springframework.stereotype.Component;

import com.rabbit.Application;

@Component
public class HelloSender1 {

    @Autowired
    private AmqpTemplate rabbitTemplate;

    public void send(String msg) {
        String sendMsg = "hello孟梁,你在测试MQ " + new Date();
        System.out.println("Sender1 : " + sendMsg);
        rabbitTemplate.convertAndSend(Application.HELLO, sendMsg); // 4
    }

}
4.4 HelloSender2.java
package com.rabbit.hello;


import java.util.Date;

import org.springframework.amqp.core.AmqpTemplate;
import org.springframework.beans.factory.annotation.Autowired;
import org.springframework.stereotype.Component;

import com.rabbit.Application;

@Component
public class HelloSender2 {

    @Autowired
    private AmqpTemplate rabbitTemplate;

    public void send(String msg) {
        String sendMsg = msg + new Date();
        System.out.println("Sender2 : " + sendMsg);
        this.rabbitTemplate.convertAndSend(Application.HELLO, sendMsg);
    }

}
5. 下面是controller
5.1 RabbitTest.java
package com.rabbit.controller;
import org.springframework.amqp.core.Queue;
import org.springframework.beans.factory.annotation.Autowired;
import org.springframework.web.bind.annotation.GetMapping;
import org.springframework.web.bind.annotation.PostMapping;
import org.springframework.web.bind.annotation.RequestMapping;
import org.springframework.web.bind.annotation.RestController;

import com.rabbit.hello.HelloSender1;
import com.rabbit.hello.HelloSender2;

@RestController
@RequestMapping("/rabbit")
public class RabbitTest {

    @Autowired
    private HelloSender1 helloSender1;
    @Autowired
    private HelloSender2 helloSender2;


    @GetMapping("/hello")
    public String hello() {
        helloSender1.send("a");
        return "/rabbit/hello的调用";
    }


    /**
     * 单生产者-多消费者
     */
    @GetMapping("/oneToMany")
    public void oneToMany() {
        for(int i=0;i<10;i++){
        	System.out.println("执行"+i);
            helloSender1.send("hellomsg:"+i);
        }

    }


    /**
     * 多生产者-多消费者
     */
    @GetMapping("/manyToMany")
    public void manyToMany() {
        for(int i=0;i<10;i++){
            helloSender1.send("hellomsg:"+i);
            helloSender2.send("hellomsg:"+i);
        }

    }

}
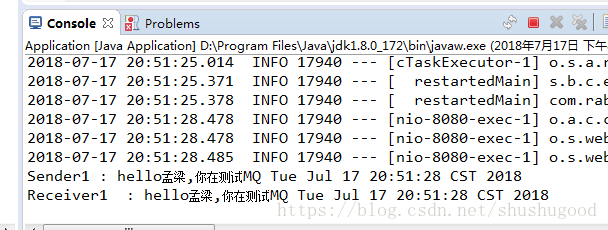
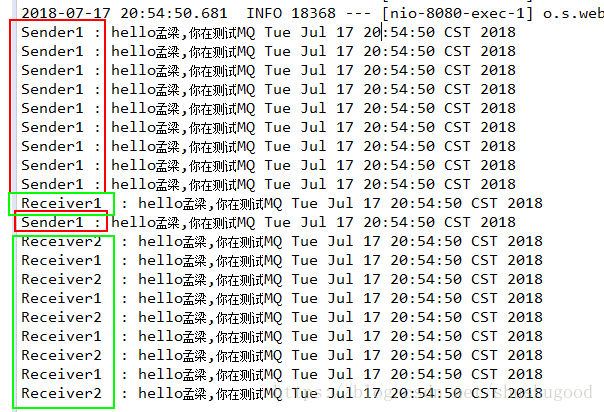
6.测试页面 + 控制台显示。
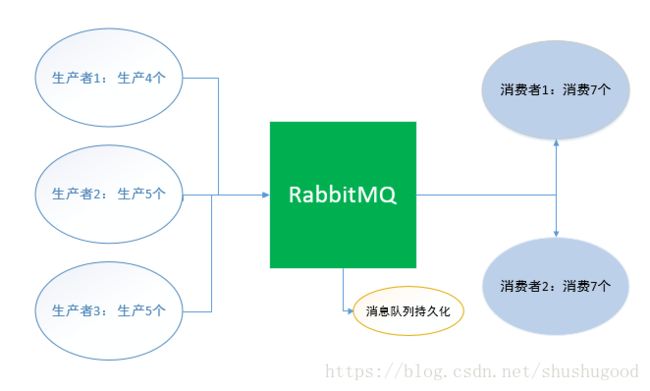
一对一:

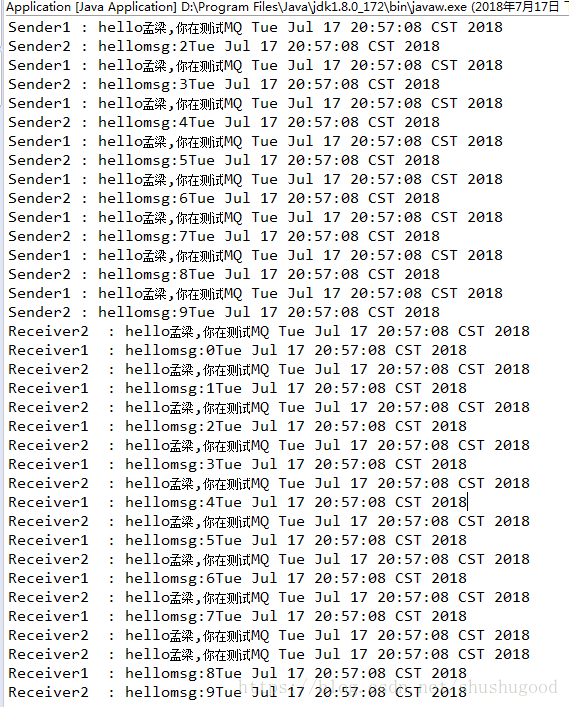
一对多: ( 即1个生产者提供10个棒棒糖,2个消费者平均每人分5个棒棒糖)
http://localhost:8080/rabbit/oneToMany
多对多: (生产者2个,消费者2个, 都是平均分配)
多对一:(省略。同上)
总结: