Spring Cloud 快速上手之 Eureka 服务注册
Spring Cloud 快速上手之 Eureka 服务注册
目录
- Spring Cloud 快速上手之 Eureka 服务注册
- 准备工作
- 简单的RestTemplate调用
- Spring Boot Actuator
- 小结
- 服务注册与发现
- Eureka Server
- Eureka Client
- Eureka Server 的高可用
- 用户认证
- Eureka 元数据
- 端点信息
- 自我保护模式
- 健康检查
- REFERENCES
- 获取更多
- 知识星球
简介
本文主要介绍 Spring Cloud 中的 Eureka 服务注册中心。
手机用户请
横屏获取最佳阅读体验,REFERENCES中是本文参考的链接,如需要链接和更多资源,可以扫码加入『知识星球』(文末)获取长期知识分享服务。
准备工作
版本
-
Greenwich.SR5
-
Spring Boot 2.1.5
-
MySQL
简单的RestTemplate调用
消费端服务调用
@RestController
public class UserController {

    @Autowired
    private IUserService userService;

    @GetMapping("/user/{id}")
    public User findById(@PathVariable Long id) {
        return userService.findById(id);
    }
}

//---

@Service
public class UserServiceImpl implements IUserService {

    @Autowired
    private RestTemplate restTemplate;

    @Override
    public User findById(Long id) {
        return this.restTemplate.getForObject("http://localhost:8000/"+id,User.class);
    }

}

@Configuration
public class RpcConfig {

    @Bean
    public RestTemplate restTemplate() {
        return new RestTemplate();
    }
}
返回结果
{
  "id": 1,
  "account": "account0",
  "userName": "x_user_0",
  "age": 18
}
Spring Boot Actuator
 <dependency>
  <groupId>org.springframework.bootgroupId>
  <artifactId>spring-boot-starter-actuatorartifactId>
 dependency>
从日志打印的端点信息进入,查看状态监控返回信息
//获取健康指标
HTTP/1.1 200
Content-Type: application/json;charset=UTF-8
Transfer-Encoding: chunked
Date: Sun, 03 May 2020 13:53:14 GMT

{
  "status": "UP"
}

//获取应用信息
GET http://localhost:8000/actuator/info

HTTP/1.1 200
Content-Type: application/json;charset=UTF-8
Transfer-Encoding: chunked
Date: Sun, 03 May 2020 13:54:41 GMT

{}

//查询端点信息
GET http://localhost:8000/actuator

HTTP/1.1 200
Content-Type: application/json;charset=UTF-8
Transfer-Encoding: chunked
Date: Sun, 03 May 2020 13:55:56 GMT

{
  "_links": {
    "self": {
      "href": "http://localhost:8000/actuator",
      "templated": false
    },
    "health": {
      "href": "http://localhost:8000/actuator/health",
      "templated": false
    },
    "info": {
      "href": "http://localhost:8000/actuator/info",
      "templated": false
    }
  }
}

Response code: 200; Time: 51ms; Content length: 227 bytes
可以通过在 yml 中补充 info 节点信息:
info:
  app:
    name: @project.artifactId@
    encoding: @project.build.sourceEncoding@
    java:
      source: @java.version@
      target: @java.version@
效果如下:
GET http://localhost:8000/actuator/info

HTTP/1.1 200
Content-Type: application/json;charset=UTF-8
Transfer-Encoding: chunked
Date: Sun, 03 May 2020 14:01:48 GMT

{
  "app": {
    "name": "ms-provider-user-v1",
    "encoding": "UTF-8",
    "java": {
      "source": "1.8.0_181",
      "target": "1.8.0_181"
    }
  }
}

Response code: 200; Time: 182ms; Content length: 108 bytes
小结
我们通过RestTemplate直接完成服务端的接口调用,但是对于远端应用地址的硬编码,往往会带来很多问题:
- 无法解决 IP 地址或端口变更的场景。
- 无法进行动态伸缩,不支持多实例。
服务注册与发现
Eureka Server
编写单点服务注册中心
<dependency>
  <groupId>org.springframework.cloudgroupId>
  <artifactId>spring-cloud-starter-netflix-eureka-serverartifactId>
dependency>
/**
 * 核心启动类
 */
@EnableEurekaServer
@SpringBootApplication
public class MsDiscoveryEurekaApplication {

    public static void main(String[] args) {
        SpringApplication.run(MsDiscoveryEurekaApplication.class, args);
    }

}
server:
  port: 8010

eureka:
  client:
    # 表示是否将自己注册到 Eureka Server,默认为 true
    register-with-eureka: false
    # 表示是否从 Eureka Server 获取注册信息,默认为 true
    fetch-registry: false
    service-url:
      defaultZone: http://localhost:8010/eureka/

spring:
  application:
    name: ms-discovery-eureka
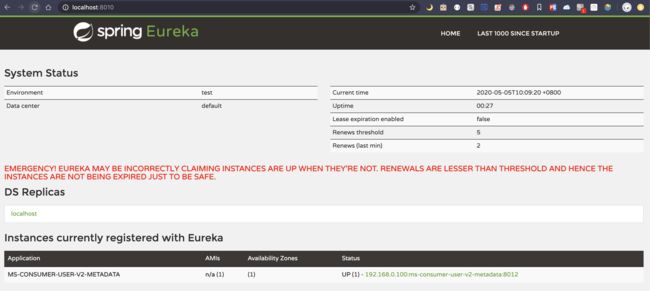
访问
http://localhost:8010/
此处配置的是一个单点的 Eureka Server,不需要同步其他的 Eureka Server 节点的数据,因而 fetch-registry: false
Eureka Client
注册微服务
- 启动类
@SpringBootApplication
public class MsProviderUserV2Application {

    public static void main(String[] args) {
        SpringApplication.run(MsProviderUserV2Application.class, args);
    }

}
- 配置
server:
  port: 8011

spring:
  datasource:
    url: jdbc:mysql://127.0.0.1:3306/db_yier?characterEncoding=UTF-8&rewriteBatchedStatements=true
    username: root
    password: Abc123++
    driver-class-name: com.mysql.jdbc.Driver
  jpa:
    hibernate:
      ddl-auto: update
    show-sql: true
    database-platform: org.hibernate.dialect.MySQL5Dialect

  application:
    name: ms-provider-user-v2

eureka:
  client:
    service-url:
      # 如果此处是注册到 Eureka Server 集群的话,建议多配几个节点,以便适应某些极端场景
      defaultZone: http://localhost:8010/eureka/
  instance:
		# 表示将自己的 IP 注册到 Eureka Server,若不配置,默认为 false,表示注册微服务所在操作系统的 hostname 到 Eureka Server
    prefer-ip-address: true

info:
  app:
    name: @project.artifactId@
    encoding: @project.build.sourceEncoding@
    java:
      source: @java.version@
      target: @java.version@
将项目ms-provider-user-v2注册到 Eureka Server 服务中心。
同理,将消费者注册到服务中心
与Eureka Server不同,Eureka Client无需在在启动类上加注解@EnableEurekaClient注解1
Eureka Server 的高可用
构建双节点集群
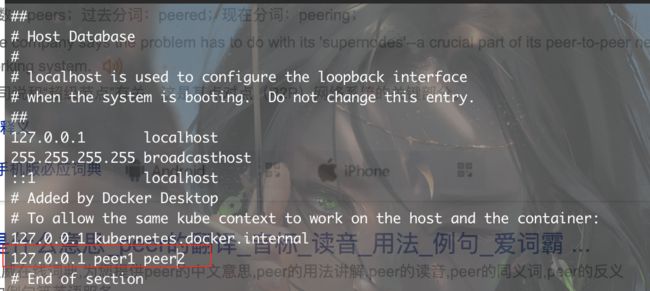
- 修改 Hosts:Mac
vim /etc/hosts
- 修改配置
spring:
  application:
    name: ms-discovery-eureka-ha
---
spring:
  profiles: peer1
server:
  port: 8010
eureka:
  instance:
    hostname: peer1
  client:
    service-url:
      defaultZone: http://peer2:8020/eureka/

---
spring:
  profiles: peer2
server:
  port: 8020
eureka:
  instance:
    hostname: peer2
  client:
    service-url:
      defaultZone: http://peer1:8010/eureka/
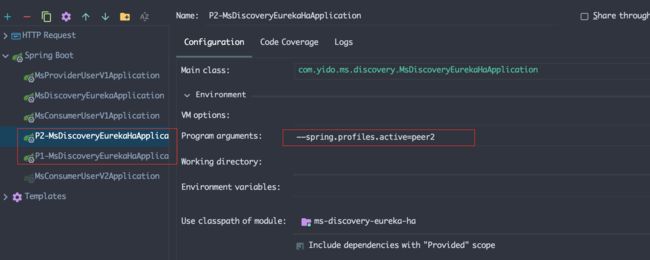
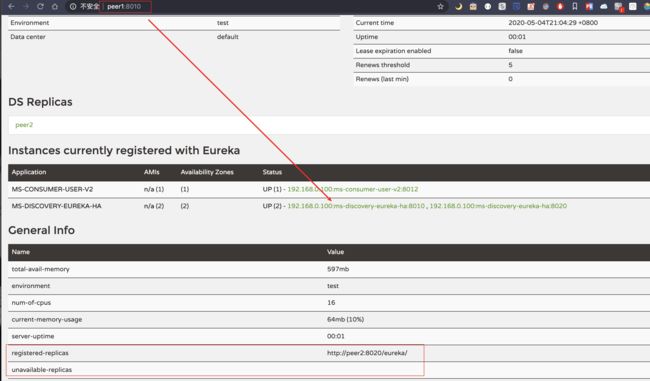
- 启动
profiles:peer1和profiles:peer2
Eureka Server 集群精简配置
spring:
  application:
    name: ms-discovery-eureka-ha

eureka:
  client:
    service-url:
      defaultZone: http://peer2:8020/eureka/,http://peer1:8010/eureka/

---
spring:
  profiles: peer1
server:
  port: 8010
eureka:
  instance:
    hostname: peer1

---
spring:
  profiles: peer2
server:
  port: 8020
eureka:
  instance:
    hostname: peer2
用户认证
为注册中心的访问增加权限认证控制
- 引入
Spring Security
<dependency>
  <groupId>org.springframework.bootgroupId>
  <artifactId>spring-boot-starter-securityartifactId>
dependency>
- 配置认证信息
server:
  port: 8010

eureka:
  client:
    register-with-eureka: false
    fetch-registry: false
    service-url:
      defaultZone: http://admin:Abc123++@localhost:8010/eureka/

spring:
  application:
    name: ms-discovery-eureka-authentication
  security:
    user:
      name: admin
      password: Abc123++
- 访问
localhost:8010,会跳转到登录界面
服务注册到带有安全认证的注册中心
- Spring Boot 2.0 配置不兼容修改
/*
 * @ProjectName: 编程学习
 * @Copyright:   2019 HangZhou Helios Dev, Ltd. All Right Reserved.
 * @address:     微信搜索公众号「架构探险之道」获取更多资源。
 * @date:        2020/5/4 9:50 下午
 * @description: 本内容仅限于编程技术学习使用,转发请注明出处.
 */
package com.yido.ms.discovery.config;

import org.springframework.context.annotation.Configuration;
import org.springframework.security.config.annotation.web.builders.HttpSecurity;
import org.springframework.security.config.annotation.web.configuration.WebSecurityConfigurerAdapter;
import org.springframework.security.config.http.SessionCreationPolicy;

/**
 *
 *
 *
 *
 * @author Helios
 * @date 2020/5/4 9:50 下午
 */
@Configuration
public class SecurityConfig extends WebSecurityConfigurerAdapter {

    /**
     * 高版本的丢弃了
     *
     * security:
     *   basic:
     *    enabled: true
     * 配置,应该使用以下方式开启
     * @param http
     * @throws Exception
     */
    @Override
    protected void configure(HttpSecurity http) throws Exception {
        //方式1
        // Configure HttpSecurity as needed (e.g. enable http basic).
        //http.sessionManagement().sessionCreationPolicy(SessionCreationPolicy.NEVER);
        //http.csrf().disable();
        //注意:为了可以使用 http://user:{user}:user:{password}@host:{host}:host:{port}/eureka/ 这种方式登录,所以必须是httpBasic,
        //如果是form方式,不能使用url格式登录
        //http.authorizeRequests().anyRequest().authenticated().and().httpBasic();

        //方式2
        //默认情况下,将其添加到classpath后,会对每个请求进行CSRF检查。Eureka并不会生成CSRF token,
        // 所以需要关掉对/eureka/*路径下的检查:
        // 关闭csrf
        http.csrf().ignoringAntMatchers("/eureka/**");
        super.configure(http);
    }
}
- YAML 配置
server:
  port: 8010

eureka:
  client:
    register-with-eureka: false
    fetch-registry: false
    service-url:
      defaultZone: http://admin:Abc123++@localhost:8010/eureka/

spring:
  application:
    name: ms-discovery-eureka-authentication
  security:
    user:
      name: admin
      password: Abc123++
- 注册成功
Eureka 元数据
元数据配置
server:
  port: 8012

spring:
  application:
    name: ms-consumer-user-v2-metadata

eureka:
  client:
    service-url:
      defaultZone: http://localhost:8010/eureka/
  instance:
    prefer-ip-address: true
    # 定义实例元数据信息
    metadata-map:
      my-metadata: 自定义信息
查询接口
/**
 * 查询当前实例信息
 * @param instanceId
 * @return
 */
@GetMapping("/instances/{instanceId}")
public List<ServiceInstance> instances(@PathVariable String instanceId) {
    //为空,返回自身实例信息
    if (StringUtils.isEmpty(instanceId)) {
        return this.discoveryClient.getInstances("ms-consumer-user-v2-metadata");
    }
    return this.discoveryClient.getInstances(instanceId);
}
演示
端点信息
示例
http://localhost:8010/eureka/apps
其余参见Eureka REST operations
用途
- 获取微服务注册信息
- 通过 xml 和 json 注册(或注销)非 jvm 微服务
自我保护模式
保护模式主要用于一组客户端和Eureka Server之间存在网络分区场景下的保护。一旦进入保护模式,Eureka Server将会尝试保护其服务注册表中的信息,不再删除服务注册表中的数据(也就是不会注销任何微服务)。
默认情况下,如果Eureka Server在一定时间内没有接收到某个微服务实例的心跳,Eureka Server将会注销该实例(默认90秒)。但是当网络分区故障发生时,微服务与Eureka Server之间无法正常通信,以上行为可能变得非常危险了(因为微服务本身其实是健康的,此时本不应该注销这个微服务)。
Eureka通过“自我保护模式”来解决这个问题:当Eureka Server节点在短时间内丢失过多客户端时(可能发生了网络分区故障),那么这个节点就会进入自我保护模式。一旦进入该模式,Eureka Server就会保护服务注册表中的信息,不再删除服务注册表中的数据(也就是不会注销任何微服务)。当网络故障恢复后,该Eureka Server节点会自动退出自我保护模式。
综上,自我保护模式是一种应对网络异常的安全保护措施。它的架构哲学是宁可同时保留所有微服务(健康的微服务和不健康的微服务都会保留),也不盲目注销任何健康的微服务。使用自我保护模式,可以让Eureka集群更加的健壮、稳定。
自我保护的条件:
一般情况下,微服务在Eureka上注册后,会30秒定期发送心跳,Eureka 通过心跳来判断微服务是否健康,同时会定期删除超过90秒没有发送心跳的服务。
有2种情况会导致Eureka Server收不到微服务的心跳,
-
是微服务自身原因所致,比如故障或关闭;
-
是微服务与eureka之间的网络出现故障。
通常(微服务自身的故障关闭)只会导致个别服务出现故障,一般不会出现大面积的故障,而(网络故障)通常会导致Eureka Server在短时间内无法收到大批心跳。
考虑到这个区别,Eureka设定了一个阀值,当判断挂掉的服务的数量超过阀值时,Eureka Server认为很大程度上出现了网络故障,将不再删除心跳过期的服务。
那这个阀值是多少呢?
Eureka Server在运行期间,会统计心跳失败的比例在15分钟之内是否低于85%。换句话就是:默认情况下启用自我保留,启用自我保留的默认阈值大于当前注册表大小的15%。
关闭自我保护模式(生产上不建议)
server:
  port: 8010

eureka:
  client:
    register-with-eureka: false
    fetch-registry: false
    service-url:
      defaultZone: http://localhost:8010/eureka/
  # 关闭自我保护模式
  server:
    enable-self-preservation: false
spring:
  application:
    name: ms-discovery-eureka
健康检查
引入 spring-boot-starter-actuator
<dependency>
  <groupId>org.springframework.bootgroupId>
  <artifactId>spring-boot-starter-actuatorartifactId>
dependency>
开启健康检查
server:
  port: 8012

spring:
  application:
    name: ms-consumer-user-v2

eureka:
  client:
    # 健康检查
    healthcheck:
      enabled: true
    service-url:
      defaultZone: http://localhost:8010/eureka/
  instance:
    prefer-ip-address: true
查询状态
在开启健康检查后,应用程序可以将自己的健康状态传播到 Eureka Server。
REFERENCES
-
安全认证注册失败
-
Spring Boot 2.0 Security配置教程
获取更多
扫码关注
架构探险之道,回复"源码",获取本文相关源码
扫码加入知识星球,获取更多珍贵笔记、视频、电子书的等资源。
在 Spring Cloud Edgware 以及高版本中,只需要添加相关依赖即可。 ↩︎
