轻松搭建 LNMP环境+DVWA 双节点web集群 负载均衡
题目:
用nginx负载均衡功能建立双节点WEB集群,验证负载结果。
1概要
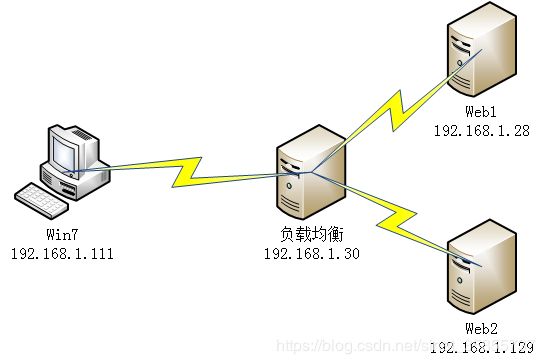
如上图所示,本实验用到四台机器,一台win7物理机,三台CentOS 7虚拟机
,一台CentOS 7作为负载均衡机,另外两台CentOS 7分别为web1和web2,四台机器在同一个网段,实验结果为,win7在浏览器中访问192.168.1.130/dvwa,能自动跳转到web1或者web2,当两者之中有一台不能访问时,自动访问另一台。
2首先配置web1
查看selinux状态
getenforce
若结果为:
Enforcing
关闭selinux
vi /etc/selinux/config
修改为SELINUX=disable
SELINUX=disable
修改防火墙为开机不启动
systemctl disable firewalld
重启虚拟机
reboot
2.1配置LNMP
安装数据库
yum -y install mariadb mariadb-server
安装PHP
yum -y install php php-fpm
yum -y install php-gd php-mysql php-mbstring php-xml php-mcrypt  php-imap php-odbc php-pear php-xmlrpc
安装所需库文件
yum -y install gcc-c++ openssl openssl-devel pcre pcre-devel zlib zlib-devel
2.2安装NGINX;
上传压缩包nginx-1.17.9.tar.gz到web1虚拟机
上传nginx软件包到/usr/local/目录下,
在/usr/local/目录下解压nginx压缩包,
tar -zxvf nginx-1.17.9.tar.gz
解压后的文件夹名为:
nginx-1.17.9
进入解压后的文件夹,安装nginx。
cd nginx-1.17.9
./configure
make
make install
修改nginx配置文件
vi /usr/local/nginx/conf/nginx.conf
修改后的文件内容如下:
user  nginx;	#修改第一行为user nginx
worker_processes  1;

#error_log  logs/error.log;
#error_log  logs/error.log  notice;
#error_log  logs/error.log  info;

#pid        logs/nginx.pid;


events {
    worker_connections  1024;
}


http {
    include       mime.types;
    default_type  application/octet-stream;

    #log_format  main  '$remote_addr - $remote_user [$time_local] "$request" '
    #                  '$status $body_bytes_sent "$http_referer" '
    #                  '"$http_user_agent" "$http_x_forwarded_for"';

    #access_log  logs/access.log  main;

    sendfile        on;
    #tcp_nopush     on;

    #keepalive_timeout  0;
    keepalive_timeout  65;

    #gzip  on;

    server {
        listen       80;
        server_name  localhost;

        #charset koi8-r;

        #access_log  logs/host.access.log  main;

        location / {
            root   html;
            index  index.html index.htm index.php;	#加上index.php
        }

        #error_page  404              /404.html;

        # redirect server error pages to the static page /50x.html
        #
        error_page   500 502 503 504  /50x.html;
        location = /50x.html {
            root   html;
        }

        # proxy the PHP scripts to Apache listening on 127.0.0.1:80
        #
        #location ~ \.php$ {
        #    proxy_pass   http://127.0.0.1;
        #}

        # pass the PHP scripts to FastCGI server listening on 127.0.0.1:9000
        #
		#把下面的location的注释打开
        location ~ \.php$ {
            root           html;
            fastcgi_pass   127.0.0.1:9000;
            fastcgi_index  index.php;
            fastcgi_param  SCRIPT_FILENAME  $document_root$fastcgi_script_name;	# 修改此处
            include        fastcgi_params;
        }

        # deny access to .htaccess files, if Apache's document root
        # concurs with nginx's one
        #
        #location ~ /\.ht {
        #    deny  all;
        #}
    }


    # another virtual host using mix of IP-, name-, and port-based configuration
    #
    #server {
    #    listen       8000;
    #    listen       somename:8080;
    #    server_name  somename  alias  another.alias;

    #    location / {
    #        root   html;
    #        index  index.html index.htm;
    #    }
    #}


    # HTTPS server
    #
    #server {
    #    listen       443 ssl;
    #    server_name  localhost;

    #    ssl_certificate      cert.pem;
    #    ssl_certificate_key  cert.key;

    #    ssl_session_cache    shared:SSL:1m;
    #    ssl_session_timeout  5m;

    #    ssl_ciphers  HIGH:!aNULL:!MD5;
    #    ssl_prefer_server_ciphers  on;

    #    location / {
    #        root   html;
    #        index  index.html index.htm;
    #    }
    #}

}
在/usr/local/nginx/html目录下添加index.php
vi /usr/local/nginx/html/index.php
写进如下内容:
添加用户nginx
useradd nginx
遍历修改/usr/local/nginx的属主为nginx
chown -R nginx /usr/local/nginx

chown -R nginx /var/lib/php/session
启动nginx:
/usr/local/nginx/sbin/nginx -s stop #关闭nginx
/usr/local/nginx/sbin/nginx #启动nginx
在win7浏览器中访问web1的IP地址,nginx配置成功:
修改php配置文件
vi /etc/php-fpm.d/www.conf
找到下面所示位置,修改user和group:
	 35 ; Unix user/group of processes
     36 ; Note: The user is mandatory. If the group is not set, the default user's group
     37 ;       will be used.
     38 ; RPM: apache Choosed to be able to access some dir as httpd
     39 user = nginx		#修改此处
     40 ; RPM: Keep a group allowed to write in log dir.
     41 group = nginx		#修改此处
重启php-fpm
systemctl restart php-fpm
查看端口:
netstat -lntp
[root@localhost ~]# netstat -lntp
Active Internet connections (only servers)
Proto Recv-Q Send-Q Local Address           Foreign Address         State       PID/Program name
tcp        0      0 127.0.0.1:9000          0.0.0.0:*               LISTEN      1734/php-fpm: maste
tcp        0      0 0.0.0.0:3306            0.0.0.0:*               LISTEN      1460/mysqld
tcp        0      0 0.0.0.0:80              0.0.0.0:*               LISTEN      1504/nginx: master
tcp        0      0 0.0.0.0:22              0.0.0.0:*               LISTEN      911/sshd
tcp        0      0 127.0.0.1:25            0.0.0.0:*               LISTEN      1039/master
tcp6       0      0 :::22                   :::*                    LISTEN      911/sshd
tcp6       0      0 ::1:25                  :::*                    LISTEN      1039/master
如上所示,9000和80端口号正在被监听,说明php和nginx已经启动。
在win7浏览器中访问 192.168.1.128/p.php

3配置DVWA
启动mariadb数据库
[root@localhost ~]# systemctl start mariadb.service
设置数据库管理员账号密码
[root@localhost ~]# mysqladmin -u root password 123321
登录数据库
[root@localhost ~]# mysql -uroot -p123321
给mysql数据库设置远程连接权限
grant all privileges on *.* to dvadmin@'%' identified by '123321';
给数据库设置本地操作的权限
grant all privileges on *.* to dvadmin@'localhost' identified by '123321';
用dvadmin用户登录数据库
[root@localhost ~]# mysql -udvadmin -p123321
把DVWA-master压缩包传到此虚拟机中,
解压到/usr/local/nginx/html/dvwa/目录下:
在/usr/local/nginx/html/dvwa/config目录下复制config.inc.php.dist文件并把新文件命名为 config.inc.php:
[root@localhost config]#cp config.inc.php.dist config.inc.php
在dvwa配置文件中修改账号密码:
[root@localhost config]#vi config.inc.php
修改用户名和密码:
递归修改目录及文件的属主为nginx
[root@localhost html]# chown -R nginx ./usr/local/nginx/html/dvwa
修改文件支持写入
[root@localhost html]# vi /etc/php.ini
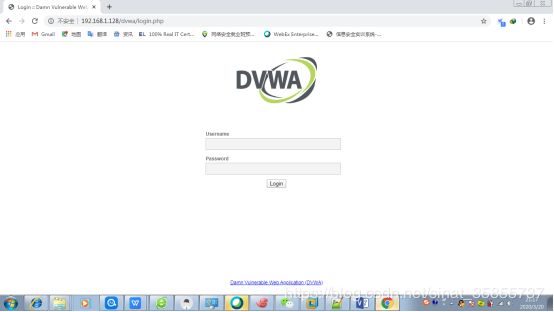
在win7浏览器访问192.168.1.128/dvwa
4克隆此虚拟机
把上面配置过得虚拟机克隆出web2虚拟机和负载均衡虚拟机,修改web2的IP地址为192.168.1.129,修改负载均衡的IP地址为192.168.1.130。
配置web2
查看ip信息:
[root@localhost ~]# ifconfig
ens33: flags=4163  mtu 1500
        inet 192.168.1.128  netmask 255.255.255.0  broadcast 192.168.1.255
        inet6 fe80::c6d7:8abb:be44:25dd  prefixlen 64  scopeid 0x20
        inet6 fe80::1839:d744:bd21:d039  prefixlen 64  scopeid 0x20
        inet6 fe80::6775:82fa:361f:ac80  prefixlen 64  scopeid 0x20
        ether 00:0c:29:ca:c8:40  txqueuelen 1000  (Ethernet)
        RX packets 54760  bytes 3825461 (3.6 MiB)
        RX errors 0  dropped 0  overruns 0  frame 0
        TX packets 4588  bytes 707646 (691.0 KiB)
        TX errors 0  dropped 0 overruns 0  carrier 0  collisions 0
        device interrupt 19  base 0x2000

lo: flags=73  mtu 65536
        inet 127.0.0.1  netmask 255.0.0.0
        inet6 ::1  prefixlen 128  scopeid 0x10
        loop  txqueuelen 1000  (Local Loopback)
        RX packets 5277  bytes 794619 (775.9 KiB)
        RX errors 0  dropped 0  overruns 0  frame 0
        TX packets 5277  bytes 794619 (775.9 KiB)
        TX errors 0  dropped 0 overruns 0  carrier 0  collisions 0
修改网卡ens33的IP为192.168.1.129:
nmcli connection modify ens33 ipv4.addresses 192.168.1.129
修改web1的/usr/local/nginx/html/dvwa/login.php
vi /usr/local/nginx/html/dvwa/login.php
修改下面的代码:
92 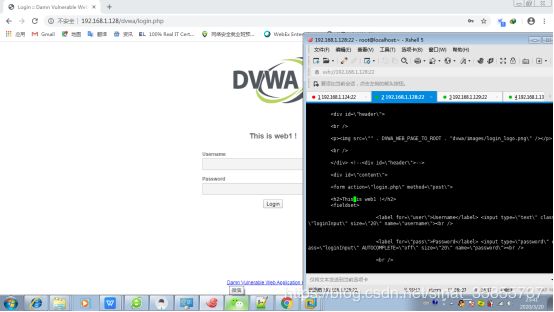
修改web2的/usr/local/nginx/html/dvwa/login.php
vi /usr/local/nginx/html/dvwa/login.php
修改下面的代码:
92 
配置负载均衡机
查看ip信息:
[root@localhost ~]# ifconfig
ens33: flags=4163  mtu 1500
        inet 192.168.1.128  netmask 255.255.255.0  broadcast 192.168.1.255
        inet6 fe80::c6d7:8abb:be44:25dd  prefixlen 64  scopeid 0x20
        inet6 fe80::1839:d744:bd21:d039  prefixlen 64  scopeid 0x20
        inet6 fe80::6775:82fa:361f:ac80  prefixlen 64  scopeid 0x20
        ether 00:0c:29:ca:c8:40  txqueuelen 1000  (Ethernet)
        RX packets 54760  bytes 3825461 (3.6 MiB)
        RX errors 0  dropped 0  overruns 0  frame 0
        TX packets 4588  bytes 707646 (691.0 KiB)
        TX errors 0  dropped 0 overruns 0  carrier 0  collisions 0
        device interrupt 19  base 0x2000

lo: flags=73  mtu 65536
        inet 127.0.0.1  netmask 255.0.0.0
        inet6 ::1  prefixlen 128  scopeid 0x10
        loop  txqueuelen 1000  (Local Loopback)
        RX packets 5277  bytes 794619 (775.9 KiB)
        RX errors 0  dropped 0  overruns 0  frame 0
        TX packets 5277  bytes 794619 (775.9 KiB)
        TX errors 0  dropped 0 overruns 0  carrier 0  collisions 0
修改网卡ens33的IP为192.168.1.129:
nmcli connection modify ens33 ipv4.addresses 192.168.1.129
修改负载均衡的nginx配置文件:
vi /usr/local/nginx/conf/nginx.conf
修改为如下:
user  nginx;
worker_processes  1;

#error_log  logs/error.log;
#error_log  logs/error.log  notice;
#error_log  logs/error.log  info;

#pid        logs/nginx.pid;


events {
    worker_connections  1024;
}


http {
    include       mime.types;
    default_type  application/octet-stream;

    #log_format  main  '$remote_addr - $remote_user [$time_local] "$request" '
    #                  '$status $body_bytes_sent "$http_referer" '
    #                  '"$http_user_agent" "$http_x_forwarded_for"';

    #access_log  logs/access.log  main;

    sendfile        on;
    #tcp_nopush     on;

    #keepalive_timeout  0;
    keepalive_timeout  65;

    #gzip  on;

	#负载均衡资源池
    upstream dvwaPool {
    server 192.168.1.128 weight=4 max_fails=3 fail_timeout=30s;
    server 192.168.1.129 weight=4 max_fails=3 fail_timeout=30s;
}

    server {
        listen       80;
        server_name  localhost;
        #charset koi8-r;

        #access_log  logs/host.access.log  main;

		#配置规则
        location / {
            root   html;
            index  index.html index.htm index.php;

			proxy_pass   http://dvwaPool;
        	proxy_redirect     off;
        	proxy_set_header   Host             $host;
        	proxy_set_header   X-Real-IP        $remote_addr;
        	proxy_set_header   X-Forwarded-For  $proxy_add_x_forwarded_for;
        	proxy_next_upstream error timeout invalid_header http_500 http_502 http_503 http_504;
        	proxy_max_temp_file_size 0;
        	proxy_connect_timeout      90;
        	proxy_send_timeout         90;
        	proxy_read_timeout         90;
        	proxy_buffer_size          4k;
        	proxy_buffers              4 32k;
        	proxy_busy_buffers_size    64k;
        	proxy_temp_file_write_size 64k;
        }

        #error_page  404              /404.html;

        # redirect server error pages to the static page /50x.html
        #
        error_page   500 502 503 504  /50x.html;
        location = /50x.html {
            root   html;
        }

        # proxy the PHP scripts to Apache listening on 127.0.0.1:80
        #
        #location ~ \.php$ {
        #    proxy_pass   http://127.0.0.1;
        #}

        # pass the PHP scripts to FastCGI server listening on 127.0.0.1:9000
        #
        location ~ \.php$ {
            root           html;
            fastcgi_pass   127.0.0.1:9000;
            fastcgi_index  index.php;
            fastcgi_param  SCRIPT_FILENAME  $document_root$fastcgi_script_name;
            include        fastcgi_params;
        }

        # deny access to .htaccess files, if Apache's document root
        # concurs with nginx's one
        #
        #location ~ /\.ht {
        #    deny  all;
        #}
    }


    # another virtual host using mix of IP-, name-, and port-based configuration
    #
    #server {
    #    listen       8000;
    #    listen       somename:8080;
    #    server_name  somename  alias  another.alias;

    #    location / {
    #        root   html;
    #        index  index.html index.htm;
    #    }
    #}

}
启动三台虚拟机mariadb,nginx,php-fpm服务
systemctl restart mariadb
/usr/local/nginx/sbin/nginx -s stop #关闭nginx
/usr/local/nginx/sbin/nginx #启动nginx
systemctl restart php-fpm
在win7浏览器访问192.168.1.130/dvwa,刷新页面就自动能跳转到web1和web2:


遗留问题:访问负载均衡机的ip能能自动跳转到web1或者web2,点一下刷新按钮就能切换web1或者web2。单独访问web1或者web2的ip能登陆成功,但是访问负载均衡机的ip就登录不上。
<<<<<<<<<<<<<<<<<<<<<分割线>>>>>>>>>>>>>>>>>>>>>
2020.5.30
解决遗留问题
	#负载均衡资源池
    upstream dvwaPool {
    #加上ip_hash就能解决访问负载均衡无法登陆dvwa的问题
    ip_hash;
    server 192.168.1.128 weight=4 max_fails=3 fail_timeout=30s;
    server 192.168.1.129 weight=4 max_fails=3 fail_timeout=30s;
}