Kiali代码结构剖析以及拓扑图生成流程代码解析
文章目录
- Kiali 架构
- 启动
- 启动命令
- 启动程序
- 代码结构
- 路由构建
- 拓扑图数据获取
- 拓扑图构建
Kiali 架构
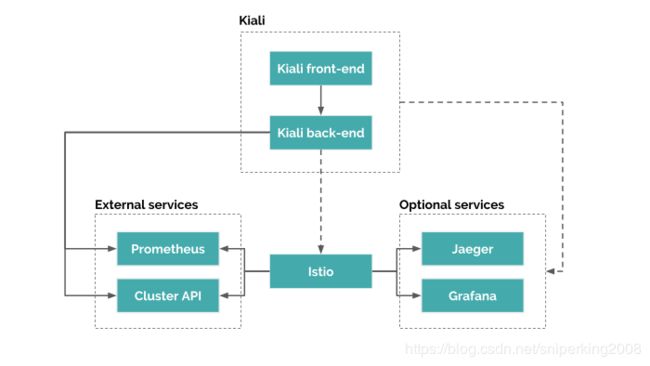
在分析 Kiali 结构之前,我们先看下官方给出的架构图

在上面的结构中,可以清晰的看出 Kiali 是一个前后端分离的系统,但是在构建镜像的时候,前端和后端是放到同一个镜像中的。
Kiali 依赖两个外部的服务,一个是 Prometheus,这是一个监控和报警系统。这里的 Prometheus 是 Istio 中的 Prometheus,它会收集 envoy 上报给 mixer 的数据,然后 Kiali 会从 Prometheus 查询数据,生产拓扑图或者一些其他的统计图。另外一个服务是 Cluster API,在这里就是 Kubernetes 的 apiserver,Kiali 会调 apiserve r获取 service、deployment 等数据,也会获取 virtualservice、destinationrule 的yaml配置,作为配置检测使用。
另外Kiali还可以配置两个可选的服务,Jaeger 和 Grafana。Jaeger 是 Uber 开发的分布式追踪系统,Grafana 是一个数据可视化系统,在 Kiali 中可以配置这两个系统的 Url,然后在一些页面中可以跳转到这些系统中,查看更加详细的信息。注意这里的 Url 一定要是这两个系统可以在外部浏览器访问到的 Url。
Kiali 的这些功能都是基于 Istio 的,也就是需要在集群中安装 Istio,才能使用 Kiali 的这些功能。在 Istio 的 chart 包中,已经包含了 Kiali,所以如果使用默认的方式安装 Istio 的话,Kiali 服务也会被安装到 Istio 的命名空间下。
启动
启动命令
Kilia pod 中运行的命令是 /opt/kiali/kiali -config /kiali-configuration/config.yaml -v 4
/kiali-configuration/config.yaml 是使用 ConfigMap 挂载进去的。
istio_namespace: istio-system  #istio所在的命名空间
auth:
  strategy: "login"  #登陆方式
server:  #Kiali的web路径
  port: 20001
  web_root: /kiali
external_services: #外部服务的url配置
  tracing:
    url:
  grafana:
    url:
  prometheus:
    url: http://prometheus:9090
启动程序
启动程序是 kiali.go,在项目的根路径下。Kiali 在启动的时候会读取启动参数,获取配置文件,然后初始化并启动系统。
func main() {
	defer glog.Flush()
	util.Clock = util.RealClock{}

	// 处理命令行
	flag.Parse()
	// 验证配置文件
	validateFlags()

	// log startup information
	log.Infof("Kiali: Version: %v, Commit: %v\n", version, commitHash)
	log.Debugf("Kiali: Command line: [%v]", strings.Join(os.Args, " "))

	// 如果指定了配置文件,读取文件。如果没有配置,那么就从环境变量中获取配置信息
	if *argConfigFile != "" {
		c, err := config.LoadFromFile(*argConfigFile)
		if err != nil {
			glog.Fatal(err)
		}
		config.Set(c)
	} else {
		log.Infof("No configuration file specified. Will rely on environment for configuration.")
		config.Set(config.NewConfig())
	}
	log.Tracef("Kiali Configuration:\n%s", config.Get())

	// 验证一些必要的配置
	if err := validateConfig(); err != nil {
		glog.Fatal(err)
	}
	// 获取 UI 的版本
	consoleVersion := determineConsoleVersion()
	log.Infof("Kiali: Console version: %v", consoleVersion)

	status.Put(status.ConsoleVersion, consoleVersion)
	status.Put(status.CoreVersion, version)
	status.Put(status.CoreCommitHash, commitHash)

	if webRoot := config.Get().Server.WebRoot; webRoot != "/" {
		updateBaseURL(webRoot)
		configToJS()
	}

	// 注册到 Prometheus,提供指标采集
	internalmetrics.RegisterInternalMetrics()

	// we need first discover Jaeger
	// 检查 Jaeger 服务是否存在
	if config.Get().ExternalServices.Tracing.Enabled {
		status.DiscoverJaeger()
	}

	// 启动服务,开始监听请求
	server := server.NewServer()
	server.Start()

	// 如果开启了登陆功能,那么要从 secret 中获取用户名密码
	// 这里是用异步获取 secret 的方式,使用一个协程循环监听 secret,这样可以及时获取到用户名、密码的变化
	if config.Get().Auth.Strategy == config.AuthStrategyLogin {
		waitForSecret()
	}

	// 等待退出信号
	waitForTermination()

	log.Info("Shutting down internal components")
	// 结束服务
	server.Stop()
}
代码结构
路由构建
在上面的启动代码中,启动的时候会调用一个 NewServer 方法,在这个方法中会创建服务的路由。
func NewServer() *Server {
	conf := config.Get()
	// 创建请求的路由
	router := routing.NewRouter()

	if conf.Server.CORSAllowAll {
		router.Use(corsAllowed)
	}

	// 创建一个 http 多路复用器,用于请求的分发
	mux := http.NewServeMux()
	http.DefaultServeMux = mux
	// 处理 router 中的路径
	http.Handle("/", router)

	// 定义服务的地址和端口号
	httpServer := &http.Server{
		Addr: fmt.Sprintf("%v:%v", conf.Server.Address, conf.Server.Port),
	}

	// 返回构建的服务
	return &Server{
		httpServer: httpServer,
	}
}
从上面的代码可以看出,NewRouter 方法是创建了请求的路由,再来看下这个方法。
func NewRouter() *mux.Router {

	conf := config.Get()
	webRoot := conf.Server.WebRoot
	webRootWithSlash := webRoot + "/"

	rootRouter := mux.NewRouter().StrictSlash(false)
	appRouter := rootRouter

	// 进行 url 重定向
	// 例如 /foo -> /foo/
	// 详见 https://github.com/gorilla/mux/issues/31
	if webRoot != "/" {
		rootRouter.HandleFunc(webRoot, func(w http.ResponseWriter, r *http.Request) {
			http.Redirect(w, r, webRootWithSlash, http.StatusFound)
		})

		// help the user out - if a request comes in for "/", redirect to our true webroot
		rootRouter.HandleFunc("/", func(w http.ResponseWriter, r *http.Request) {
			http.Redirect(w, r, webRootWithSlash, http.StatusFound)
		})

		appRouter = rootRouter.PathPrefix(conf.Server.WebRoot).Subrouter()
	}

	appRouter = appRouter.StrictSlash(true)

	// 构建路由
	apiRoutes := NewRoutes()
	authenticationHandler, _ := handlers.NewAuthenticationHandler()
	// 循环遍历定义好的 routes
	for _, route := range apiRoutes.Routes {
		var handlerFunction http.Handler = authenticationHandler.HandleUnauthenticated(route.HandlerFunc)
		// 设置 Prometheus 数据收集,这里是收集请求相应时间
		handlerFunction = metricHandler(handlerFunction, route)
		if route.Authenticated {
			// 设置认证的 handler
			handlerFunction = authenticationHandler.Handle(route.HandlerFunc)
		}
		// 设置 router
		appRouter.
			Methods(route.Method).
			Path(route.Pattern).
			Name(route.Name).
			Handler(handlerFunction)
	}

	// 将 /console 的请求转发到 index.html 上
	appRouter.PathPrefix("/console").HandlerFunc(func(w http.ResponseWriter, r *http.Request) {
		http.ServeFile(w, r, conf.Server.StaticContentRootDirectory+"/index.html")
	})

	// 构建静态文件存储,例如 css、js 之类的资源
	staticFileServer := http.FileServer(http.Dir(conf.Server.StaticContentRootDirectory))
	if webRoot != "/" {
		staticFileServer = http.StripPrefix(webRootWithSlash, staticFileServer)
	}
	appRouter.PathPrefix("/").Handler(staticFileServer)

	return rootRouter
}
从上面的代码可以看出,路由的定义在 Routes.go 里面,如果我们想新加接口,那么在这里新加 Api 就可以了。
拓扑图数据获取
拓扑图中所有的信息都是从 Prometheus 中查询到的,Kiali 进行数据的组装。代码的入口是在 kiali/handlers/graph.go 中。
Kiali 查询拓扑图的数据是以 namespace 为维度进行查询。如果查询结果涉及到多个维度,那么需要将单个维度的命名空间的数据进行组合处理。
Kiali 获取数据是通过组装 Promql 语句,然后调用 Prometheus 的 API 进行查询,从而获取指标数据。例如其中一个查询是这个样的:
groupBy := "source_workload_namespace,source_workload,source_app,source_version,destination_service_namespace,destination_service_name,destination_workload_namespace,destination_workload,destination_app,destination_version,request_protocol,response_code,response_flags"
	switch n.NodeType {
	case graph.NodeTypeWorkload:
		query = fmt.Sprintf(`sum(rate(%s{reporter="destination",destination_workload_namespace="%s",destination_workload="%s"} [%vs])) by (%s)`,
			httpMetric,
			namespace,
			n.Workload,
			int(interval.Seconds()), // range duration for the query
			groupBy)
在上面的代码中,组装了 Promql 查询语句。上面的查询语句是用来查询进入到这个命名空间中的流量信息。
其中的参数都是通过页面选择传入的(构建的 PQL 中的选项在 kiali/graph/options/options.go 中定义)
- reporter=“destination”:metric 报告来源,终点服务(destination)是 envoy 代理的上游客户端。在服务网格里,一个源服务通常是一个工作负载,但是入口流量的源服务有可能包含其他客户端,例如浏览器,或者一个移动应用。
- source_workload_namespace=“default”:选择命名空间。
- response_code:返回码区间。
- [600s]:查询的数据中的时间间隔。
拓扑图构建
这里看一下生成拓扑图的逻辑,代码在 kiali/graph/config/cytoscape/ctyoscape.go 中。
func buildNamespacesTrafficMap(o options.Options, client *prometheus.Client, globalInfo *appender.GlobalInfo) graph.TrafficMap {
   switch o.Vendor {
   case "cytoscape":
   default:
      graph.Error(fmt.Sprintf("Vendor [%s] not supported", o.Vendor))
   }

   // 新建trafficMap
   trafficMap := graph.NewTrafficMap()

   // 遍历namespaces
   for _, namespace := range o.Namespaces {
      // 调用prometheus获取数据并组成trafficMap
      namespaceTrafficMap := buildNamespaceTrafficMap(namespace.Name, o, client)
      namespaceInfo := appender.NewNamespaceInfo(namespace.Name)
      for _, a := range o.Appenders {
         appenderTimer := internalmetrics.GetGraphAppenderTimePrometheusTimer(a.Name())
         // 获取附加信息
         a.AppendGraph(namespaceTrafficMap, globalInfo, namespaceInfo)
         appenderTimer.ObserveDuration()
      }
      合并不同namespace下的trafficMap
      mergeTrafficMaps(trafficMap, namespace.Name, namespaceTrafficMap)
   }

   // 对特殊点进行标记
   markOutsideOrInaccessible(trafficMap, o)
   markTrafficGenerators(trafficMap)


   return trafficMap
}
Appender 位于 kiali/graph/appender 目录下,作用是获取拓扑图中一些附加的信息,目前一共有如下实现:
- DeadNodeAppender:用于将不想要 node 从 service graph 中删除。
- IstioAppender:获取指定 namespace 下 Istio 的详细信息,当前版本获取指定 namespace 下的 VirtualService 和 DestinationRule 信息。
- ResponseTimeAppender:获取响应时间。
- SecurityPolicyAppender:在 service graph 中添加安全性策略信息。
- SidecarsCheckAppender:检查 Sidecar 的配置信息,例如 Pod 中是否有 App label。
- UnusedNodeAppender:未加入 Service Mesh 的 node。
最后看下返回的 TrafficMap 的结构
type TrafficMap map[string]*Node

type Node struct {
   ID        string                 // unique identifier for the node
   NodeType  string                 // Node type
   Namespace string                 // Namespace
   Workload  string                 // Workload (deployment) name
   App       string                 // Workload app label value
   Version   string                 // Workload version label value
   Service   string                 // Service name
   Edges     []*Edge                // child nodes
   Metadata  map[string]interface{} // app-specific data
}

type Edge struct {
    Source   *Node
    Dest     *Node
    Metadata map[string]interface{} // app-specific data
}
这个数据结构中包含了点和边的信息,通过这些信息已经可以组装成拓扑图。到这里整个基本流程就结束了。