ARouter系列2:源码分析
0、相关文章
探索Android路由框架-ARouter之深挖源码(二)(3.3k阅读量,65赞)
ARouter原理剖析及手动实现(1.4w阅读量,70赞,讲的详细)
阿里ARouter使用及源码解析(一)(三篇文章,讲的详细)
1、测试项目介绍
为了介绍方便地介绍源码,所有的activity写在了一个module中。
1.1、MainActivity
public class MainActivity extends AppCompatActivity {

    public static final String AROUTER_PATH_TEST1 = "/app/Test1Activity";
    public static final String AROUTER_PATH_TEST2 = "/app/Test2Activity";
    public static final String AROUTER_PATH_TEST3 = "/app/Test3Activity";

    private static Activity activity;

    public static Activity getActivity() {
        return activity;
    }

    @Override
    protected void onCreate(Bundle savedInstanceState) {
        super.onCreate(savedInstanceState);
        setContentView(R.layout.activity_main);

        activity = this;

        //不携带参数跳转
        findViewById(R.id.btn1).setOnClickListener(v -> {
            // 1. 应用内简单的跳转
            ARouter.getInstance()
                    .build(AROUTER_PATH_TEST1)
                    .navigation();
        });

        // 携带参数跳转
        findViewById(R.id.btn2).setOnClickListener(v -> {
            ARouter.getInstance()
                    .build(AROUTER_PATH_TEST2)
                    .withString("name", "android")
                    .withInt("age", 33)
                    .withParcelable("test", new Person("张三", 66))
                    .navigation();
        });

        // 拦截器测试
        findViewById(R.id.btn3).setOnClickListener(v -> {
            ARouter.getInstance()
                    .build(AROUTER_PATH_TEST3)
                    .navigation(this, new NavCallback() {
                        @Override
                        public void onArrival(Postcard postcard) {

                        }

                        @Override
                        public void onInterrupt(Postcard postcard) {
                            LogUtils.e("被拦截了");
                        }
                    });
        });
    }
}
1.2、Test1Activity
@Route(path = MainActivity.AROUTER_PATH_TEST1)
public class Test1Activity extends AppCompatActivity {

    @Override
    protected void onCreate(Bundle savedInstanceState) {
        super.onCreate(savedInstanceState);
        setContentView(R.layout.activity_test1);
    }
}
1.3、Test2Activity
@Route(path = MainActivity.AROUTER_PATH_TEST2)
public class Test2Activity extends AppCompatActivity {

    @Autowired(name = "name")
    String name;

    @Autowired(name = "age")
    int age;

    @Autowired(name = "test")
    Person person;

    @Override
    protected void onCreate(Bundle savedInstanceState) {
        ARouter.getInstance().inject(this);

        super.onCreate(savedInstanceState);
        setContentView(R.layout.activity_test2);

        TextView tvShow = findViewById(R.id.tvShow);
        if (person != null){
            tvShow.setText(name + ", " + age + "," + person.toString());
        }

    }
}
1.4、TestInterceptorActivity
@Route(path = MainActivity.AROUTER_PATH_TEST3)
public class TestInterceptorActivity extends AppCompatActivity {

    @Override
    protected void onCreate(Bundle savedInstanceState) {
        super.onCreate(savedInstanceState);
        setContentView(R.layout.activity_test_interceptor);
    }
}
1.5、Test1Interceptor
@Interceptor(priority = 7)
public class Test1Interceptor implements IInterceptor {

    Context mContext;

    @Override
    public void process(Postcard postcard, InterceptorCallback callback) {
        if (MainActivity.AROUTER_PATH_TEST3.equals(postcard.getPath())){
            // 这里的弹窗仅做举例,代码写法不具有可参考价值
            final AlertDialog.Builder ab = new AlertDialog.Builder(MainActivity.getActivity());
            ab.setCancelable(false);
            ab.setTitle("温馨提醒");
            ab.setMessage("想要跳转到TestInterceptorActivity么?(触发了\"/inter/test1\"拦截器,拦截了本次跳转)");
            ab.setNegativeButton("继续", new DialogInterface.OnClickListener() {
                @Override
                public void onClick(DialogInterface dialog, int which) {
                    callback.onContinue(postcard);
                }
            });
            ab.setNeutralButton("算了", new DialogInterface.OnClickListener() {
                @Override
                public void onClick(DialogInterface dialog, int which) {
                    callback.onInterrupt(null);
                }
            });
            ab.setPositiveButton("加点料", new DialogInterface.OnClickListener() {
                @Override
                public void onClick(DialogInterface dialog, int which) {
                    postcard.withString("extra", "我是在拦截器中附加的参数");
                    callback.onContinue(postcard);
                }
            });

            MainLooper.runOnUiThread(new Runnable() {
                @Override
                public void run() {
                    ab.create().show();
                }
            });
        }else {
            callback.onContinue(postcard);
        }
    }

    @Override
    public void init(Context context) {
        mContext = context;
        LogUtils.e(Test1Interceptor.class.getName()+" has init.");
    }
}
1.6、其他
public class Person implements Parcelable {
    private String name;
    private int age;

    public Person(String name, int age) {
        this.name = name;
        this.age = age;
    }

    protected Person(Parcel in) {
        name = in.readString();
        age = in.readInt();
    }

    @Override
    public String toString() {
        return "Person{" +
                "name='" + name + '\'' +
                ", age=" + age +
                '}';
    }

    public static final Creator CREATOR = new Creator() {
        @Override
        public Person createFromParcel(Parcel in) {
            return new Person(in);
        }

        @Override
        public Person[] newArray(int size) {
            return new Person[size];
        }
    };

    public String getName() {
        return name;
    }

    public void setName(String name) {
        this.name = name;
    }

    public int getAge() {
        return age;
    }

    public void setAge(int age) {
        this.age = age;
    }

    @Override
    public int describeContents() {
        return 0;
    }

    @Override
    public void writeToParcel(Parcel dest, int flags) {
        dest.writeString(name);
        dest.writeInt(age);
    }
}
public class MainLooper extends Handler {
private static MainLooper instance = new MainLooper(Looper.getMainLooper());
protected MainLooper(Looper looper) {
super(looper);
}
public static MainLooper getInstance() {
return instance;
}
public static void runOnUiThread(Runnable runnable) {
if(Looper.getMainLooper().equals(Looper.myLooper())) {
runnable.run();
} else {
instance.post(runnable);
}
}
}2、源码分析
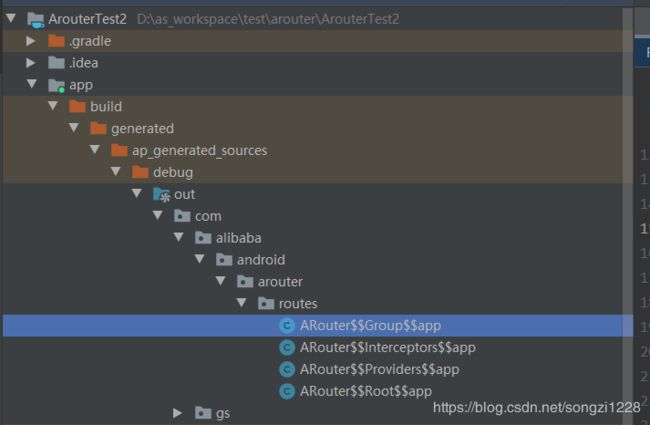
ARouter是通过APT生成代码在框架内部进行操作,那么,项目编译生成的文件位置在那里?
既然生成了这些源码,我们就先随便点点看看这些都是啥?
/**
 * DO NOT EDIT THIS FILE!!! IT WAS GENERATED BY AROUTER. */
public class ARouter$$Group$$app implements IRouteGroup {
  @Override
  public void loadInto(Map atlas) {
    atlas.put("/app/Test1Activity", RouteMeta.build(RouteType.ACTIVITY, Test1Activity.class, "/app/test1activity", "app", null, -1, -2147483648));
    atlas.put("/app/Test2Activity", RouteMeta.build(RouteType.ACTIVITY, Test2Activity.class, "/app/test2activity", "app", new java.util.HashMap(){{put("test", 10); put("name", 8); put("age", 3); }}, -1, -2147483648));
    atlas.put("/app/Test3Activity", RouteMeta.build(RouteType.ACTIVITY, TestInterceptorActivity.class, "/app/test3activity", "app", null, -1, -2147483648));
  }
}
/**
 * DO NOT EDIT THIS FILE!!! IT WAS GENERATED BY AROUTER. */
public class ARouter$$Root$$app implements IRouteRoot {
  @Override
  public void loadInto(Map> routes) {
    routes.put("app", ARouter$$Group$$app.class);
  }
}
具体源码大家可以自行查看,不过多粘贴了。
这里简简单单随便截图了APT生成的部分源码,是不是感觉跟上一篇文章使用到的代码很多相似性呐~比如拦截器的优先级是1、跳转匹配的路径也是一样的、跳转传递的参数、定义的组名等等。既然这么多一样的那肯定是在内部某部分进行封装使用,带着这个问题我们开始逐步分析。
首先,我们从该框架使用到的注解开始分析(因为注解是使用这个框架的起点)
2.1、注解分析
首先,我们知道要使用ARouter的首先需要在类的注释上面写上 @Route 这个注解,点进源码看看
@Target({ElementType.TYPE})
@Retention(RetentionPolicy.CLASS)
public @interface Route {

    String path();
    String group() default "";
    String name() default "";
    int extras() default Integer.MIN_VALUE;
    int priority() default -1;

}
使用该注解标注的类将被自动添加至路由表中。而且,ARouter 并非仅提供页面(Activity)的路由功能,还可以用来路由模块想要暴露给其他模块调用的接口。也就是说 @Route 不仅可用于 Activity 类,还可用于模块对外接口的实现类。那么具体它可以实现那些类型?
从上面的源码可以看到,除了拦截器,里面通过实现接口重写方法,方法里面都有一个RouteMeta,那么我们点进去RouteMeta这个类看看:
/**
 * It contains basic route information.
 *
 */
public class RouteMeta {
    private RouteType type;         // Type of route
    private Element rawType;        // Raw type of route
    private Class destination;   // Destination
    private String path;            // Path of route
    private String group;           // Group of route
    private int priority = -1;      // The smaller the number, the higher the priority
    private int extra;              // Extra data
    private Map paramsType;  // Param type
    private String name;

    private Map injectConfig;  // Cache inject config.

    public RouteMeta() {
    }
}
注释的意思是:它包含基本路由信息。
RouteType,就是路由的类型。那么,这款路由框架的具体路由类型又有那些?带着这个疑问,点进RouteType 源码看看。
public enum RouteType {
    ACTIVITY(0, "android.app.Activity"),
    SERVICE(1, "android.app.Service"),
    PROVIDER(2, "com.alibaba.android.arouter.facade.template.IProvider"),
    CONTENT_PROVIDER(-1, "android.app.ContentProvider"),
    BOARDCAST(-1, ""),
    METHOD(-1, ""),
    FRAGMENT(-1, "android.app.Fragment"),
    UNKNOWN(-1, "Unknown route type");
}
首先这是一个枚举,这些就是框架可以具体使用到的路由类型
说完Route 这个注解,我们在来看看@Interceptor 拦截器注解,
@Target({ElementType.TYPE})
@Retention(RetentionPolicy.CLASS)
public @interface Interceptor {
    /**
     * The priority of interceptor, ARouter will be excute them follow the priority.
     */
    int priority();

    /**
     * The name of interceptor, may be used to generate javadoc.
     */
    String name() default "Default";
}
哦,我们发现拦截器的注解就2个方法,第一个是定义优先级的,第二个就是拦截器的名字。
接着,@Autowired 注解:
@Target({ElementType.FIELD})
@Retention(RetentionPolicy.CLASS)
public @interface Autowired {

    // Mark param's name or service name.
    String name() default "";

    // If required, app will be crash when value is null.
    // Primitive type wont be check!
    boolean required() default false;

    // Description of the field
    String desc() default "";
}
我们知道这个注解是界面跳转时参数传递用的。Activity 中使用该注解标志的变量,会在页面被路由打开的时候自动赋予传递的参数值。
2.2、初始化分析
我们知道,ARouter框架使用的第一个步骤,是要先初始化,也就是调用:ARouter.init( Application.this );这个API,那么,它的初始化究竟是做了那些东西?我们先点进源码看看:
/**
     * Init, it must be call before used router.
     */
    public static void init(Application application) {
        if (!hasInit) {
            logger = _ARouter.logger;
            _ARouter.logger.info(Consts.TAG, "ARouter init start.");
            hasInit = _ARouter.init(application);

            if (hasInit) {
                _ARouter.afterInit();
            }

            _ARouter.logger.info(Consts.TAG, "ARouter init over.");
        }
    }
那么,实际上它调用的是绿色矩形内的代码,绿色矩形内有两个初始化,一个是 _ARouter.init(application),还有一个是 _ARouter.afterInit( )。
我们首先点进 _ARouter . init()看看,
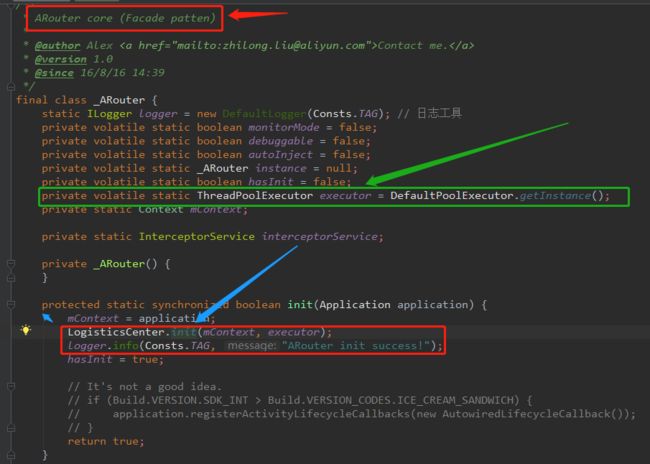
A:红色箭头的是类注释,翻译过来就是:ARouter核心( 外观模式 )
B:绿色箭头代表的是一个线程池,对线程池概念不是很清楚的朋友可以点进 必须要理清的Java线程池 先了解一下
C:蓝色箭头代表的是 这个_ARouter init()实际是调用的LogisticsCenter里面的init方法。
首先,什么是外观模式?
简单点理解就是,通过创建一个统一的类,用来包装子系统中一个或多个复杂的类,客户端可以通过调用外观类的方法来调用内部子系统中所有方法。大概意思就是这样,想深入理解的话可以自行查阅资料。
其次,这个线程池做了什么功能?
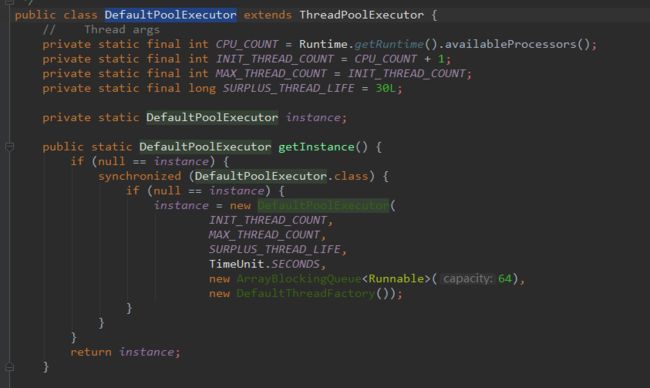
点进去DefaultPoolExecutor这个类看看:
由源码得知就是创建了一个数组阻塞队列的线程池
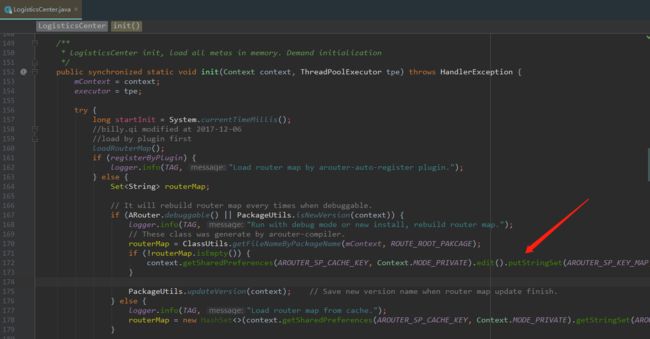
最后,我们点进LogisticsCenter,看看里面的init方法执行了什么操作(因为源码太长,我就分别截图)
图一:
图二:
通过LogisticsCenter - init(1)这幅源码图可以得知:如果是Debug模式,则执行从if代码块; 如果是Release模式:通过PackageUtils.isNewVersion(context)判断当前应用是否是第一次启动。接着,获取arouter-compiler生成的文件,然后将该文件,存储在sp中,下次启动应用的时候,直接从sp缓存中读取。
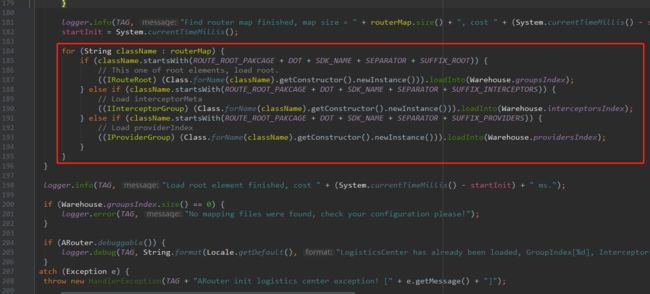
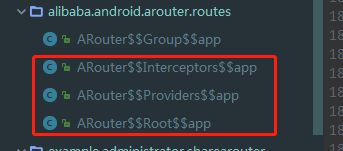
然后,在LogisticsCenter - init(2)红色矩形的代码块可以得知:首先遍历arouter-compiler生成的文件,将他们按照类型分别存储到Warehouse的对应字段中。也就是,如果类名前缀符合文件拼接规则,比如为com.alibaba.android.arouter.routes.ARouter$$Root的文件,就将其添加到具体的Warehouse里面的集合中。也就是对应的这里
那么,这个文件拼接规则(也就是字符串拼接)是?
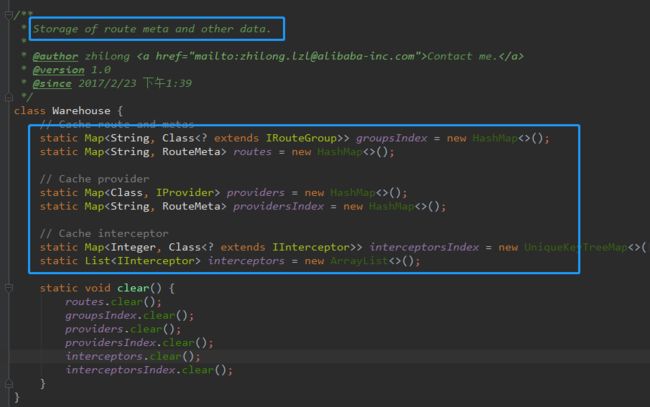
Warehouse又是什么?点进源码看看
其中,Warehouse的类注释写的非常好,翻译过来就是:路由元数据和其他数据的存储。这个类本质就是路由文件映射表。里面提供了各种HashMap集合(Map不允许重复的key),去存储SP存储的值。
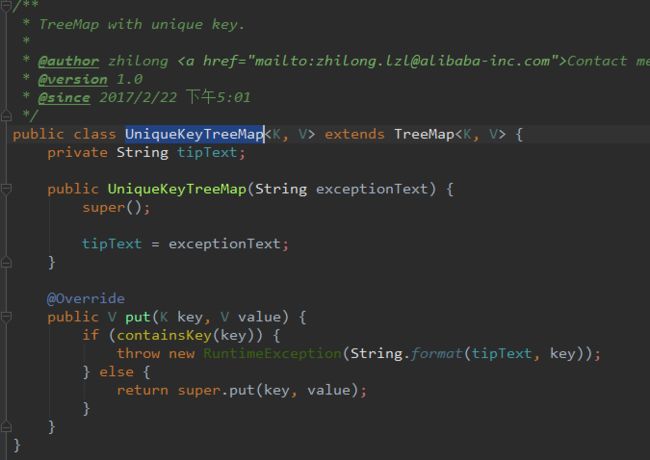
我们再看看这里存储拦截器的集合,UniqueKeyTreeMap,这个类是存储拦截器的,我们看看它做了什么?
原来,这个UniqueKeyTreeMap,就是继承了TreeMap,哦,我们知道TreeMap是一种有序的集合(底层帮我们排序)所以数值越小,它就优先添加拦截器。这样也就解释了为什么拦截器属性值设置的越低,优先级越高。
综上,针对 _ARouter init( ) 这个初始化的源码我们可以得知以下:
A:初始化这一操作,表面上是_ARouter ,实则是LogisticsCenter 在帮我们管理逻辑
B:LogisticsCenter 内部通过先存储SP,然后遍历、匹配(满足条件则添加到具体的集合中,按照文件的前缀不同,将他们添加到路由映射表Warehouse的groupsIndex、interceptorsIndex、providersIndex 中)
C:具体的路由清单是Warehouse ,不仅保存实例,还给我们提供了缓存。也就是说 同一个目标(RouteMeta、IProvider、IInterceptor)仅会在第一次使用的时候创建一次,然后缓存起来。后面都是直接使用的缓存。
初始化还有一个API,_ARouter.afterInit( ) ; 这个API在上面的截图也有,那么这个API是用来干什么的?我们点进去看看。
首先,它实例化了一个InterceptorService。这里的InterceptorService下面会说。 这里的build方法,最终返回的是一个Postcard对象:
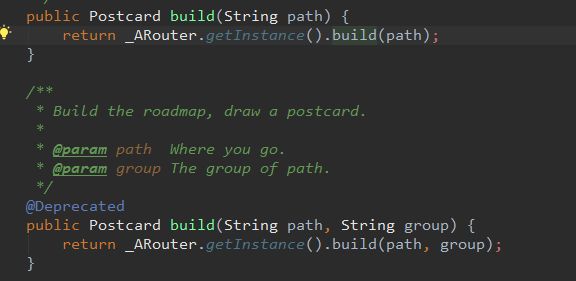
从源码可以得知,实际上它返回的却是,_ARouter.getInstance().build(path)这个方法,这个方法是一个方法重载(一般用的最多的就是这一个,也就是默认分组,不进行自定义分组),跟进去看看(源码很长,分为以下两个截图):
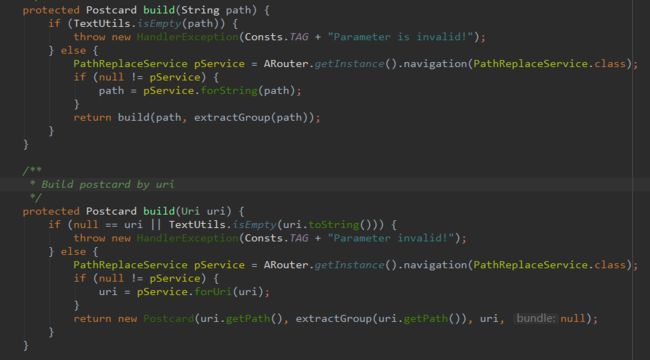
发现这里有一个PathReplaceService(也就是红色矩形),这个PathReplaceService又是什么,点进去看看
这个类注释翻译过来就是:预处理路径。这个接口是IProvider的子类
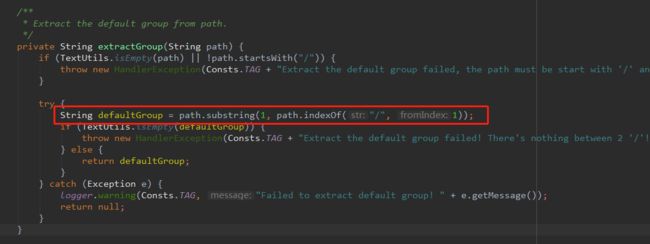
让我们在看回绿色箭头,其中,navigation(clazz)这种方式是属于根据类型查找,而build(path)是根据名称进行查找。如果应用中没有实现PathReplaceService这个接口,则pService=null。PathReplaceService可以对所有的路径进行预处理,然后返回一个新的值(返回一个新的String和Uri)。绿色箭头有一个extractGroup()方法,点进去看看:
extractGroup(path)这个方法,核心逻辑是红色矩形内的代码,这个方法主要是获取分组名称。切割path字符串,默认为path中第一部分为组名。这就证明了如果我们不自定义分组,默认就是第一个分号的内容。
分析完了build,我们在看看navigation
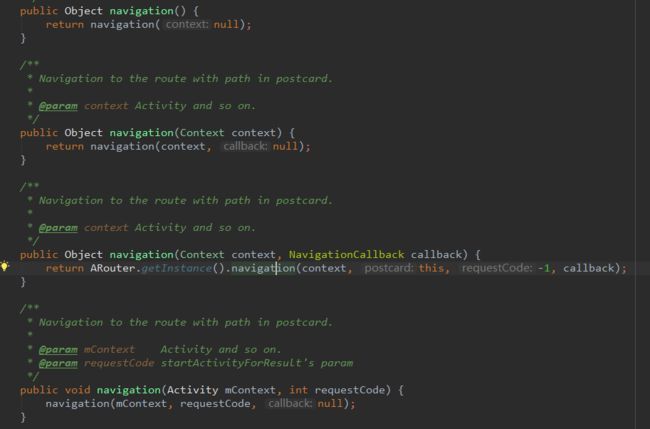
继续点进源码看看,发现进入了_ARouter这个类里面的navigation方法:
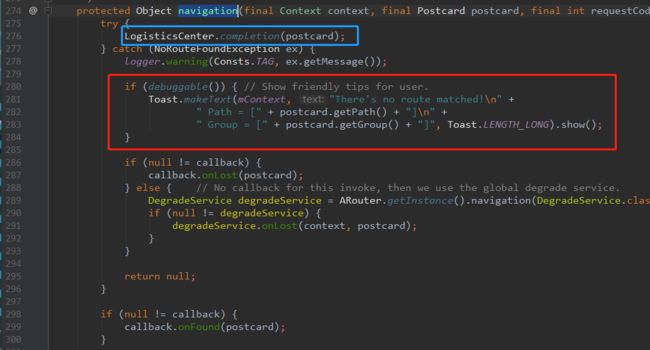
其中,navigation - 1这幅图中的红色矩形代表的意思是,如果(两个)路径没写对,ARouter会Toast提示客户端,路径不对。
navigation - 2这幅图中的红色矩形代表的是忽略拦截器。interceptorService实例化对象的时机,是在_ARouter这类中的afterInit( )进行实例化的。这幅图中的蓝色矩形和箭头的方法真实逻辑是调用了下图的方法:
通过这段代码我们可以得知:
1:如果navigation()不传入Activity作为context,则使用Application作为context
2:内部使用了Intent来进行传递
3:如果在跳转时,设置了flags,且没有设置Activity作为context,则下面的startActivity()方法会发生错误,因为缺少Activity的Task栈;
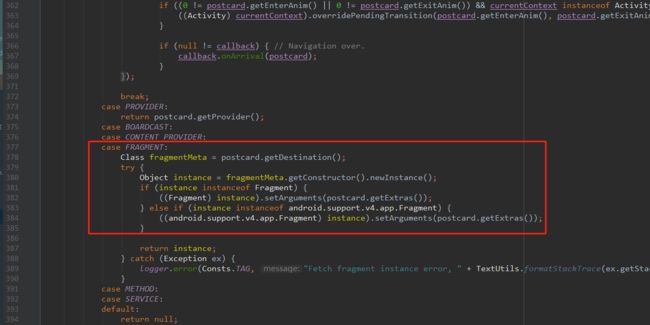
4:Fragment的判断根据版本不同进行了相应的判断
看到了这里,我们在看回navigation - 2这幅图。如果(两个)路径匹配的话,会执行到截图中的蓝色矩形,点进蓝色矩形里面去看看(也就是 LogisticsCenter.completion( Postcard )):
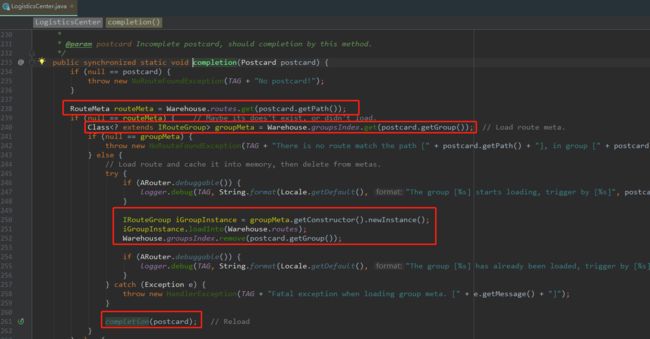
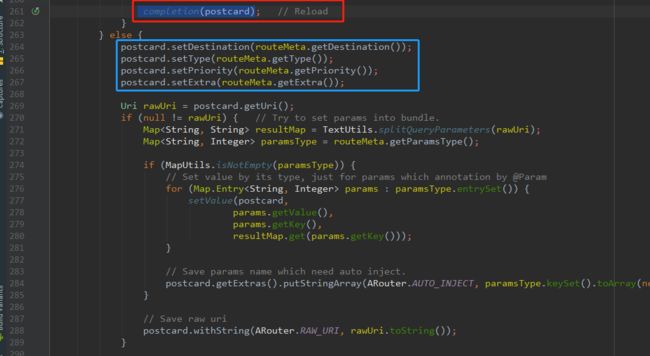
首先,根据path在Warehouse.routes映射表中查找对应的RouteMeta。但是,第一次加载的时候,是没有数据的。(而第一次加载是在LogisticsCenter.init()中,上面也说了。因此只有`Warehouse`的`groupsIndex、interceptorsIndex、providersIndex` 有数据),因此这个时候routeMeta=null。所以,这个时候会先从Warehouse.groupsIndex中取出类名前缀为com.alibaba.android.arouter.routes.ARouter$$Group$$group的文件;接着,将我们添加@Route注解的类映射到Warehouse.routes中;然后将已经加载过的组从Warehouse.groupsIndex中移除,这样也避免了重复添加进Warehouse.routes;注意,这个时候Warehouse.routes已经有值了,所以重新调用本方法(completion(postcard))执行了else代码块。
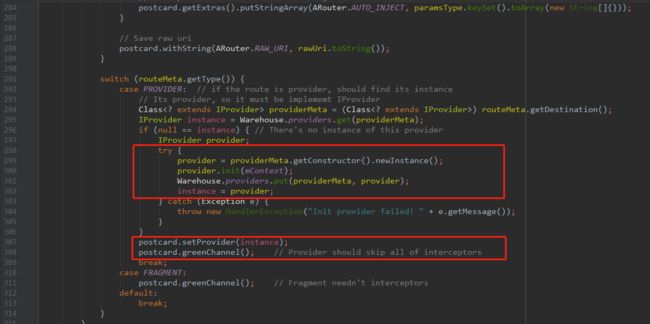
然后,LogisticsCenter.completion - 2 图中就是具体的设置属性值;然后在 LogisticsCenter.completion - 3 图中,对 IProvider的子类进行初始化 provider.init(mContext); 初始化完毕以后,将IProvider的子类添加进Warehouse.providers中;最后将IProvider的实现类保存在postcard中,因此可以从postcard获取IProvider的实例对象,其中,greenChannel()会忽略拦截器这个前面也说了。
小结:
在LogisticsCenter.completion这个方法里面完成了对Warehouse.providers、Warehouse.routes的赋值。那么Warehouse.interceptors又是在哪里赋值的呢?
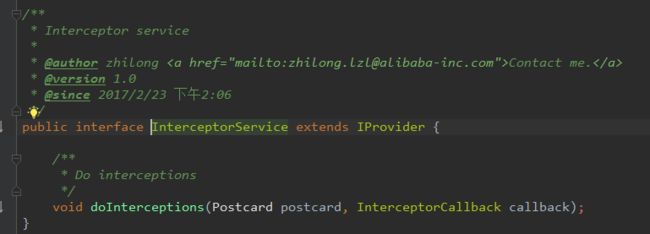
IProvider有个子类接口,InterceptorService(在文章的上面,也简单提到过这个接口)
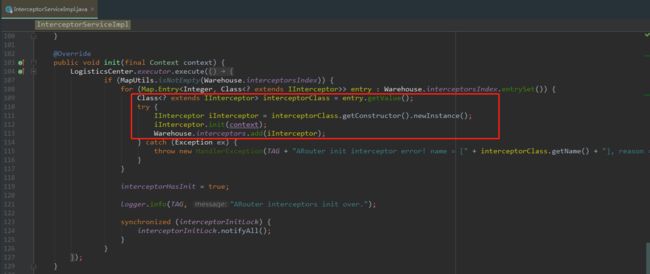
因此InterceptorServiceImpl也是IProvider的子类;在LogisticsCenter.completion()中,有provider.init(context)的初始化 ;那么,我们看看InterceptorServiceImpl这个拦截器的实现类,
在InterceptorServiceImpl这个类里面的红色矩形中,完成了具体拦截器的初始化以及将拦截器添加到Warehouse.interceptors映射表中。
写到这里,ARouter框架的源码基本上就分析完毕了。可能你说,这不是只是初始化嘛,是的这只是初始化,但是界面跳转的源码都涵盖在上面了,你可能不信,我们点击跳转的API去看看:
点击build,又跳进熟悉的build里面来了:
同样,点击navigation,也回到了上面的navigation中去了。
源码基本上就写到这里,内容有点绕。个人建议自己对着源码好好过一遍,这样理解的效果可能会比较好。
