MongoDB分片集群介绍以及安装
文章目录
- 架构概述
- 分片集群原理
- 分片集群搭建
- 环境准备
- mongs路由安装
- 配置服务器可复制集安装
- 分片集群安装
- 分片1、分片3安装
- 分片2安装
- 初始化两个可复制集
- 分片配置
- 针对集合分片
- 启动和停止命令
- 分片注意点和建议
架构概述
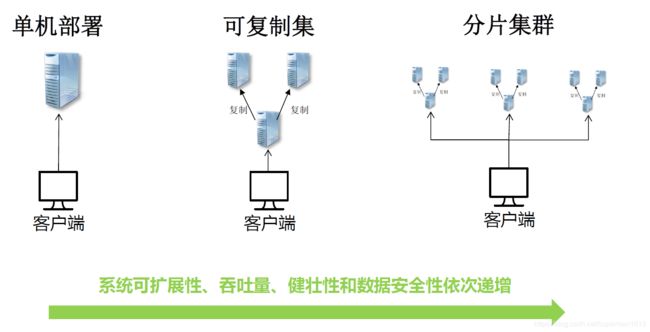
MongoDB部署架构分为单机、可复制集、分片集群,单机适合学习使用;分片集群比较复杂、运维难度高,在数据量达到一定瓶颈的时候才考虑使用,要慎重选择;可复制集是非常适合用于生产环境的一种架构
本文讲解的是分片集群架构的原理和搭建
分片集群原理
分片是把大型数据集进行分区成更小的可管理的片,这些数据片分散到不同的mongoDB节点,这些节点组成了分片集群
分片集群是个双刃剑,在提高系统可扩展性和性能的同时,增大了系统的复杂性,所以在实施之前请确定是必须的
mongoDB分片集群推荐的模式是:分片集合,它是一种基于分片键的逻辑对文档进行分组
以order集合为例,使用useCode作为分片键:
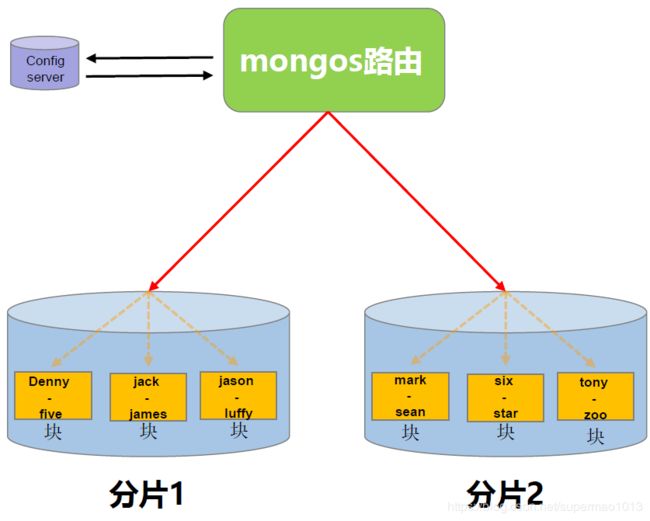
分片1和分片2相当于mongodb节点服务器,内部的块是将order集合再切割的结果
随着数据量的的增大,分片会分割和迁移,以满足数据的均匀分布
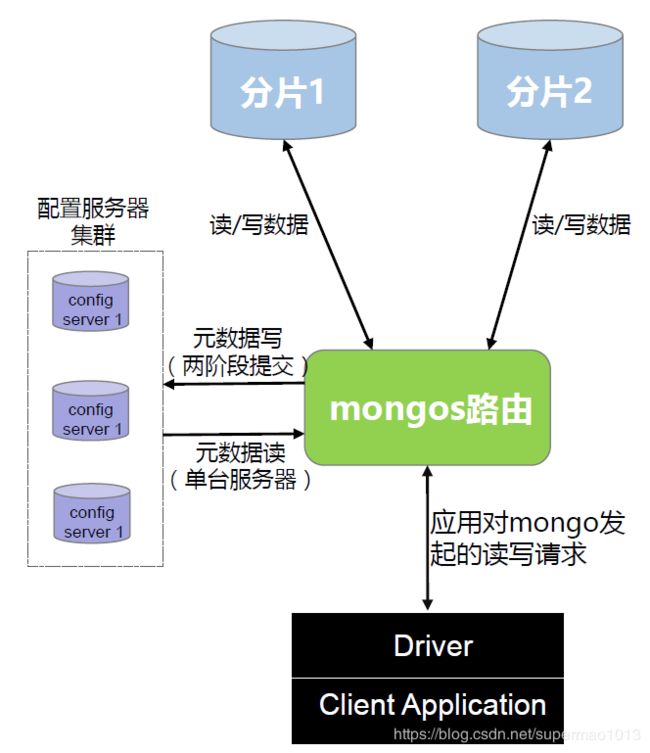
- 请求分流:通过路由节点将请求分发到对应的分片和块中
- 数据分流:内部提供平衡器保证数据的均匀分布,这是数据平均分布式、请求平均分布的前提
- 块的拆分:3.4版本块的最大容量为64M或者10w的数据,当到达这个阈值,触发块的拆分,一分为二
- 块的迁移:为保证数据在分片节点服务器分片节点服务器均匀分布,块会在节点之间迁移。一般相差8个分块的时候触发
- 分片:在集群中唯一存储数据的位置,可以是单个mongo服务器,也可以是可复制集,每个分片上存储部分数据。生产环境推荐使用可复制集
- mongos路由:由于分片只存储部分数据,需要mongos路由将读写操作路由到对应的分区上。mongos提供了单点连接集群的方式,轻量级、非持久化,所以通常mongos和应用部署在同一台服务器上
- 配置服务器:存储集群的元数据,元数据包括数据库、集合、分片的范围位置以及跨片数据分割和迁移的日志信息。mongos启动时会从配置服务器读取元数据信息在内存中。配置服务器最低3台
分片集群搭建
环境准备
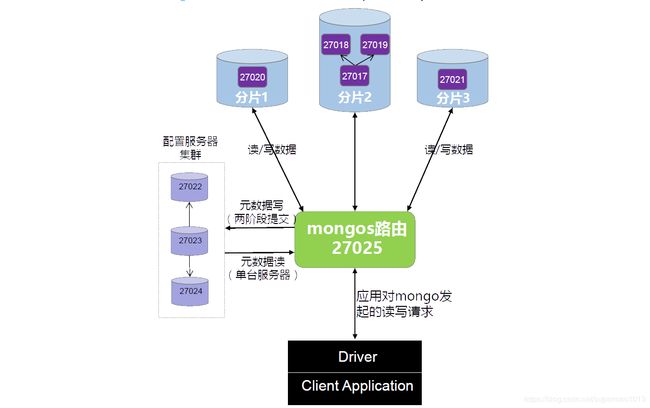
这里都在同一台机器上搭建伪分布式,在生产环境一定要分开搭建!!!
mongos路由 192.168.31.41:27025
配置服务器3台
- 192.168.31.41:27022
- 192.168.31.41:27023
- 192.168.31.41:27024
分片服务器3台,其中有一台是可复制集架构,其他两台是单机架构(生产环境最好三个分片都是可复制集架构)
- 分片1 192.168.31.41:27020
- 分片2 192.168.31.41:27017 192.168.31.41:27018 192.168.31.41:27019
- 分片3 192.168.31.41:27021
单机安装参考:MongoDB在CentOS7下的yum方式和压缩包方式安装
可复制集安装参考:MongoDB可复制集架构介绍以及安装
mongs路由安装
属于单机安装,直接参考上面的地址
安装目录:/usr/local/mongodb/sharding/mongos
配置文件mongodb.conf如下:
storage:
   dbPath: "/usr/local/mongodb/sharding/mongos/data"
   journal:
      enabled: true
   directoryPerDB: true
   engine: wiredTiger
   wiredTiger:
        engineConfig:
            cacheSizeGB: 1
            journalCompressor: snappy
            directoryForIndexes: false
        collectionConfig:
            blockCompressor: snappy
        indexConfig:
            prefixCompression: true
systemLog:
   destination: file
   path: "/usr/local/mongodb/sharding/mongos/log/mongodb.logs"
net:
   port: 27025
   http:
      RESTInterfaceEnabled: true
processManagement:
   fork: false
配置服务器可复制集安装
每个节点都属于可复制集安装,直接参考上面的地址
安装路径
- 192.168.31.41:27022 /usr/local/mongodb/sharding/config/node1
- 192.168.31.41:27023 /usr/local/mongodb/sharding/config/node2
- 192.168.31.41:27024 /usr/local/mongodb/sharding/config/node3
列举node1的配置文件mongodb.conf如下(node2、node3的配置文件只有端口号、数据目录、日志目录不同外,其他配置相同):
storage:
   dbPath: "/usr/local/mongodb/sharding/config/node1/data"
   journal:
      enabled: true
   directoryPerDB: true
   engine: wiredTiger
   wiredTiger:
        engineConfig:
            cacheSizeGB: 1
            journalCompressor: snappy
            directoryForIndexes: false
        collectionConfig:
            blockCompressor: snappy
        indexConfig:
            prefixCompression: true
systemLog:
   destination: file
   path: "/usr/local/mongodb/sharding/config/node1/log/mongodb.logs"
net:
   port: 27022
   http:
      RESTInterfaceEnabled: true
processManagement:
   fork: false
replication:
   replSetName: shardingConfig
   oplogSizeMB: 500
sharding:
   clusterRole: configsvr
注意:
因为这三台是可复制集,所以配置文件里一定都要加上:
replication:
   replSetName: shardingConfig
   oplogSizeMB: 500
因为这三台是配置服务器,所以配置文件里一定都要加上:
sharding:
   clusterRole: configsvr
分片集群安装
分片1、分片3安装
分片1、分片3都属于单机安装,直接参考上面的地址
安装路径
- 分片1 192.168.31.41:27020 /usr/local/mongodb/sharding/cluster/sharding1
- 分片3 192.168.31.41:27021 /usr/local/mongodb/sharding/cluster/sharding3
列举分片1的配置文件mongodb.conf如下(分片的配置文件只有端口号、数据目录、日志目录不同外,其他配置相同):
storage:
   dbPath: "/usr/local/mongodb/sharding/cluster/sharding1/data"
   journal:
      enabled: true
   directoryPerDB: true
   engine: wiredTiger
   wiredTiger:
        engineConfig:
            cacheSizeGB: 1
            journalCompressor: snappy
            directoryForIndexes: false
        collectionConfig:
            blockCompressor: snappy
        indexConfig:
            prefixCompression: true
systemLog:
   destination: file
   path: "/usr/local/mongodb/sharding/cluster/sharding1/log/mongodb.logs"
net:
   port: 27020
   http:
      RESTInterfaceEnabled: true
processManagement:
   fork: false
sharding:
   clusterRole: shardsvr
注意:
因为这两台是分片服务器,所以配置文件里一定都要加上:
sharding:
   clusterRole: shardsvr
分片2安装
分片2属于可复制集安装,直接参考上面的地址
安装路径
- 分片2 192.168.31.41:27017 /usr/local/mongodb/sharding/cluster/sharding2/master
- 分片2 192.168.31.41:27018 /usr/local/mongodb/sharding/cluster/sharding2/slave1
- 分片2 192.168.31.41:27019 /usr/local/mongodb/sharding/cluster/sharding2/slave2
列举分片2其中一台master的配置文件mongodb.conf如下(其他两个slave配置文件只有端口号、数据目录、日志目录不同外,其他配置相同):
storage:
   dbPath: "/usr/local/mongodb/sharding/cluster/sharding2/master/data"
   journal:
      enabled: true
   directoryPerDB: true
   engine: wiredTiger
   wiredTiger:
        engineConfig:
            cacheSizeGB: 1
            journalCompressor: snappy
            directoryForIndexes: false
        collectionConfig:
            blockCompressor: snappy
        indexConfig:
            prefixCompression: true
systemLog:
   destination: file
   path: "/usr/local/mongodb/sharding/cluster/sharding2/master/log/mongodb.logs"
net:
   port: 27017
   http:
      RESTInterfaceEnabled: true
processManagement:
   fork: false
replication:
   replSetName: configRS
   oplogSizeMB: 500
sharding:
   clusterRole: shardsvr
注意:
因为这三台是可复制集,所以配置文件里一定都要加上:
replication:
   replSetName: configRS
   oplogSizeMB: 500
因为这两台是分片服务器,所以配置文件里一定都要加上:
sharding:
   clusterRole: shardsvr
初始化两个可复制集
创建一个启动脚本
cd /usr/local/mongodb/sharding

mkdir logs

vim start-sharding-mongo.sh

#输入如下内容
nohup  ./cluster/sharding1/bin/mongod -f ./cluster/sharding1/bin/mongodb.conf >./logs/cluster-sharding1.log 2>&1 &
nohup  ./cluster/sharding3/bin/mongod -f ./cluster/sharding3/bin/mongodb.conf >./logs/cluster-sharding3.log 2>&1 &
nohup  ./cluster/sharding2/master/bin/mongod -f ./cluster/sharding2/master/bin/mongodb.conf >./logs/cluster-sharding2-master.log  2>&1 &
nohup  ./cluster/sharding2/slave1/bin/mongod -f ./cluster/sharding2/slave1/bin/mongodb.conf >./logs/cluster-sharding2-slave1.log  2>&1 &
nohup  ./cluster/sharding2/slave2/bin/mongod -f ./cluster/sharding2/slave2/bin/mongodb.conf >./logs/cluster-sharding2-slave2.log  2>&1 &
nohup  ./config/node1/bin/mongod -f ./config/node1/bin/mongodb.conf >./logs/config-node1.log 2>&1 &
nohup  ./config/node2/bin/mongod -f ./config/node2/bin/mongodb.conf >./logs/config-node2.log 2>&1 &
nohup  ./config/node3/bin/mongod -f ./config/node3/bin/mongodb.conf >./logs/config-node3.log 2>&1 &

#保存后修改为可执行
chmod u+x start-sharding-mongo.sh
紧接着运行启动脚本
./start-sharding-mongo.sh
登陆分片2主节点(192.168.31.41:27017)进行可复制集的初始化:
cd /usr/local/mongodb/sharding/cluster/sharding2/master/bin
mongo 127.0.0.1:27017

rs.initiate({
      _id: "configRS",
      version: 1,
      members: [{ _id: 0, host : "192.168.31.41:27017" }]});
rs.add("192.168.31.41:27018");
rs.add("192.168.31.41:27019");
登陆任意一台配置服务器,进行配置服务器可复制集初始化
cd /usr/local/mongodb/sharding/config/node1/bin/
mongo 127.0.0.1:27022

rs.initiate({
      _id: "shardingConfig",
      version: 1,
      members: [{ _id: 0, host : "192.168.31.41:27022" }]});
rs.add("192.168.31.41:27023");
rs.add("192.168.31.41:27024");
分片配置
最后,启动mongos路由开始分片配置,启动命令:
nohup ./mongos/bin/mongos --configdb shardingConfig/192.168.31.41:27022,192.168.31.41:27023,192.168.31.41:27024 --port 27025 --logpath=/usr/local/mongodb/sharding/mongos/log/mongodb.logs >./logs/mongos.log 2>&1 &
连接mongos,增加分片:
cd /usr/local/mongodb/sharding/mongos/bin
mongo --port 27025

use admin;
sh.addShard("192.168.31.41:27020");
sh.addShard("192.168.31.41:27021");	   sh.addShard("configRS/192.168.31.41:27017,192.168.31.41:27018,192.168.31.41:27019");
说明:configRS这个是分片中节点2的可复制集的名称
针对集合分片
以上所有都配置完毕后,接下来就是根据实际情况对数据库和集合进行分片了
比如现在要对 数据库dalomao中的集合orders进行分片,应该进行如下操作:
cd /usr/local/mongodb/sharding/mongos/bin
mongo --port 27025

use admin;
sh.enableSharding("dalomao")  #对dalomao这个库启用分片
sh.shardCollection("dalomao.orders",{"useCode":1,"_id":1});  #对orders集合进行分片,分片键为{"useCode":1,"_id":1}
可以使用sh.status()或图形化工具查看分片结果:
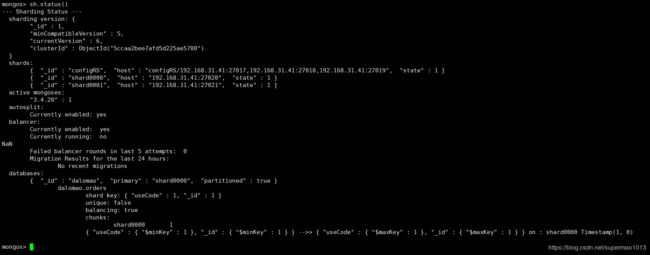
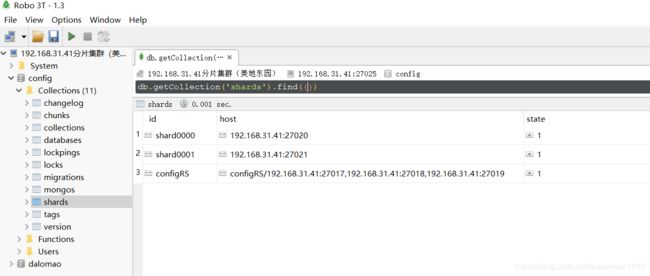
测试一下吧,在mongos中插入数据:
use dalomao

db.orders.insertMany([{"useCode":"1"},{"useCode":"10"},{"useCode":"100"},{"useCode":"1000"},{"useCode":"10000"}])
然后登陆到3台分片机器上,查看这些数据落在哪些机器上(笔者是全部落在27020这台分片1上)
启动和停止命令
当全部搭建完毕后,其实可以将mongos的启动命令也加入到sh脚本中,因此最终的启动脚本start-sharding-mongo.sh应该是这样的:
nohup  ./cluster/sharding1/bin/mongod -f ./cluster/sharding1/bin/mongodb.conf >./logs/cluster-sharding1.log 2>&1 &
nohup  ./cluster/sharding3/bin/mongod -f ./cluster/sharding3/bin/mongodb.conf >./logs/cluster-sharding3.log 2>&1 &
nohup  ./cluster/sharding2/master/bin/mongod -f ./cluster/sharding2/master/bin/mongodb.conf >./logs/cluster-sharding2-master.log  2>&1 &
nohup  ./cluster/sharding2/slave1/bin/mongod -f ./cluster/sharding2/slave1/bin/mongodb.conf >./logs/cluster-sharding2-slave1.log  2>&1 &
nohup  ./cluster/sharding2/slave2/bin/mongod -f ./cluster/sharding2/slave2/bin/mongodb.conf >./logs/cluster-sharding2-slave2.log  2>&1 &
nohup  ./config/node1/bin/mongod -f ./config/node1/bin/mongodb.conf >./logs/config-node1.log 2>&1 &
nohup  ./config/node2/bin/mongod -f ./config/node2/bin/mongodb.conf >./logs/config-node2.log 2>&1 &
nohup  ./config/node3/bin/mongod -f ./config/node3/bin/mongodb.conf >./logs/config-node3.log 2>&1 &
nohup  ./mongos/bin/mongos --configdb shardingConfig/192.168.31.41:27022,192.168.31.41:27023,192.168.31.41:27024 --port 27025 --logpath=/usr/local/mongodb/sharding/mongos/log/mongodb.logs >./logs/mongos.log 2>&1 &
停止脚本stop-sharding-mongo.sh应该是这样的:
ps -ef|grep mongos | awk '{print($2)}' |xargs kill -9
./cluster/sharding1/bin/mongod --shutdown -f ./cluster/sharding1/bin/mongodb.conf
./cluster/sharding3/bin/mongod --shutdown -f ./cluster/sharding3/bin/mongodb.conf
./cluster/sharding2/master/bin/mongod --shutdown -f ./cluster/sharding2/master/bin/mongodb.conf
./cluster/sharding2/slave1/bin/mongod --shutdown -f ./cluster/sharding2/slave1/bin/mongodb.conf
./cluster/sharding2/slave2/bin/mongod --shutdown -f ./cluster/sharding2/slave2/bin/mongodb.conf
./config/node1/bin/mongod --shutdown -f ./config/node1/bin/mongodb.conf
./config/node2/bin/mongod --shutdown -f ./config/node2/bin/mongodb.conf
./config/node3/bin/mongod --shutdown -f ./config/node3/bin/mongodb.conf
分片注意点和建议
分片注意点
-
热点 :某些分片键会导致所有的读或者写请求都操作在单个数据块或者分片上,导致单个分片服务器严重不堪重负。自增长的分片键容易导致写热点问题
-
不可分割数据块:过于粗粒度的分片键可能导致许多文档使用相同的分片键,这意味着这些文档不能被分割为多个数据块,限制了mongoDB均匀分布数据的能力
-
查询障碍:分片键与查询没有关联,造成糟糕的查询性能
分片建议
-
不要使用自增长的字段作为分片键,避免热点问题
-
不能使用粗粒度的分片键,避免数据块无法分割
-
不能使用完全随机的分片键值,造成查询性能低下
-
使用与常用查询相关的字段作为分片键,而且包含唯一字段(如业务主键,id等)
-
索引对于分区同样重要,每个分片集合上要有同样的索引,分片键默认成为索引。分片集合只允许在id和分片键上创建唯一索引
