spring boot + 策略模式消除代码中过多的ifelse结构
利用spring boot + 策略模式消除代码中过多的if~else结构
 // 结构示例:
		if (warnType == A) {
			System.out.println("A");

		} else if (warnType == B) {
			System.out.println("B");

		} else if (warnType == C) {
			System.out.println("C");

		} else if (warnType == D) {
			System.out.println("D");
		} ....
当代码中的if~else结构过多时存在以下的问题:
1、代码可读性太差,每次看需要从头到尾浏览一遍才可以理解这段代码的作用。
2、不好维护,当要增加一个判断条件或修改代码时,需要仔细核对代码,不然可能会出现差错。
接下来,以我们项目举例。
在我们项目中的一个接口大量使用了这个if判断结构。
注意:以下只是项目中1/3的 if~else 结构
		if (warnType == ModuleConstant.ALARM_HANDLE) {
			if (dataAnalyseDao.getOneDeviceHandleNum(mac) == null) {
				WarnNumber warnNumber =  new WarnNumber();
				warnNumber.setHandled(0);
				warnNumber.setUnhandled(0);
				result.setAlarmHandle(warnNumber);

			} else {
				result.setAlarmHandle(dataAnalyseDao.getOneDeviceHandleNum(mac));
			}

			//报警原因
		} else if (warnType == ModuleConstant.ALARM_REASON) {
			List<TypeCount> param = dataAnalyseDao.getOneDeviceAlarmReason(mac);
			if (param == null || param.size() == 0) {
				result.setAlarmReason(alaReason);
			} else {
				result.setAlarmReason(param);
			}
			//报警总次数
		} else if (warnType == ModuleConstant.ALARM_NUM) {
			List<TypeCount> param = dataAnalyseDao.getOneDeviceAlarmNum(mac, time);
			if (param == null || param.size() == 0) {
				result.setAlarmNum(typeCountList);
			} else {

				result.setAlarmNum(resultHandle(param, time).subList(0, time));
			}

			//各种报警类型分别统计
		} else if (warnType < ModuleConstant.DEVICE_STATE) {
			List<TypeCount> param = dataAnalyseDao.listOneDeviceWarnNumber(mac, warnType, time);
			if (param == null || param.size() == 0) {
				result.setWarnTypeCount(typeCountList);
			} else {

				result.setWarnTypeCount(resultHandle(param, time).subList(0, time));
			}

			//单独计算电压超限次数
		} else if (warnType == ModuleConstant.VOLTAGE_OVER_RUN) {
			List<TypeCount> param = dataAnalyseDao.getOneVoltageOverRunNum(mac, time);
			if (param == null || param.size() == 0) {
				result.setVoltageOver(typeCountList);
			} else {

				result.setVoltageOver(resultHandle(param, time).subList(0, time));
			}

			//远控次数统计
		} else if (warnType == ModuleConstant.REMOTE_CONTROLLER_NUM) {
			if (dataAnalyseDao.getOneDeviceRemoteNum(mac, time, 1) == null) {
				result.setRemoteControl(remoteControlCounts);
			} else {
				List<RemoteControlCount> resultList = new ArrayList<>();
				for (int i = 1; i < 5; i ++) {

					resultList.add(dataAnalyseDao.getOneDeviceRemoteNum(mac, time, i));
				}
				result.setRemoteControl(resultList);
			}

		}
优化代码结束后,整个代码量不到之前的三分之一,并且整个项目也清晰了很多。
// 普通用户
		if (auth == UserConstant.SIMPLE_USER) {

			if (warnType < ModuleConstant.DEVICE_STATE) {

				return alarmCount(deviceList, typeCountList, result, warnType, module);
			} else {

				// 普通用户(某一个用户)的所有设备处理
				if (DeviceConstant.MODULE_DEVICE.equals(module.getDevice())) {
					return simpleContext.getResourse(result, userId, deviceType, alaReason, deviceList, typeCountList, module, remoteControlCounts);

					// 普通用户(某一个用户)的单台设备处理
				} else {

					oneDeviceCountMsg(warnType, module.getDevice(), result, module.getTime(), alaReason, remoteControlCounts, typeCountList);
					return result;

				}
			}

		//全局用户统计
	} else {

			if (warnType < ModuleConstant.DEVICE_STATE) {
				return allAlarmCount(typeCountList, result, warnType, module);
			} else {

			// 全局用户多台设备处理
			if (DeviceConstant.MODULE_DEVICE.equals(module.getDevice())) {
				return specialContext.getResourse(result, userId, deviceType, alaReason, typeCountList, module, remoteControlCounts);

				// 全局用户单台设备处理
			} else {

				oneDeviceCountMsg(warnType, mac, result, module.getTime(), alaReason, remoteControlCounts, typeCountList);
				return result;

          			}
			}

		}
优化思路:
- 定义一个
ISimpleUserCommand接口,其中有一个dataCount函数交给具体的业务实现,下图中的每个实现类都包含dataCount函数。 - 根据自己的业务,会有多个类实现
ISimpleUserCommand接口;这些实现类都会注册到Spring Bean容器中供之后使用。 - 通过客户端输入命令,从
Spring Bean容器中获取一个ISimpleUserCommand实例。 - 执行最终的
dataCount函数。
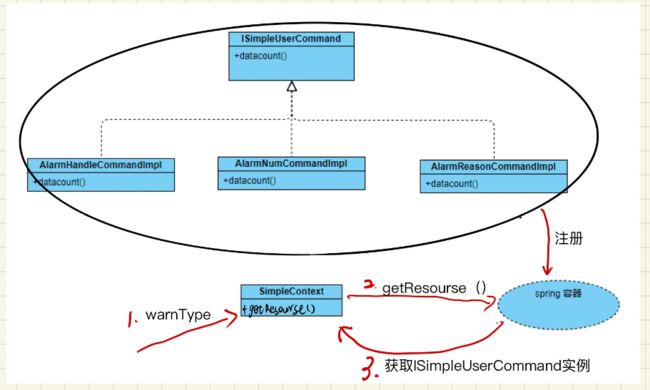
利用SimpleContext 类动态获取ISimpleUserCommand的以下实例。


每个实现类利用注解@Component中的不同value来区分管理实现类,然后spring根据传入的不同命令返回不同的实现类实例。以后需要添加新的操作时,只需要添加一个实现类,让其实现ISimpleUserCommand接口就行了。