spring boot 项目实战
前言
Spring Boot 是由 Pivotal 团队提供的全新框架,其设计目的是用来简化新 Spring 应用的初始搭建以及开发过程。该框架使用了特定的方式来进行配置,从而使开发人员不再需要定义样板化的配置。
1.创建maven项目 修改pom文件如下
	4.0.0

	com.xue
	demo
	0.0.1-SNAPSHOT
	jar

	demo
	Demo project for Spring Boot


		org.springframework.boot
		spring-boot-starter-parent
		1.5.9.RELEASE


		UTF-8
		UTF-8
		1.7


			org.springframework.boot
			spring-boot-starter


			org.springframework.boot
			spring-boot-starter-test
			test


			org.springframework.boot
			spring-boot-starter-data-jpa


	        org.springframework.boot
	        spring-boot-starter-web


			org.apache.cxf
			cxf-spring-boot-starter-jaxws
			3.1.11


			mysql
			mysql-connector-java
			runtime


			org.apache.httpcomponents
			httpclient
			4.5


			org.apache.httpcomponents
			httpcore
			4.4.1


			org.apache.httpcomponents
			fluent-hc
			4.3.1


			org.apache.httpcomponents
			httpmime
			4.3.1


					commons-logging
					commons-logging


			commons-lang
			commons-lang
			2.0


		${project.artifactId}


				org.springframework.boot
				spring-boot-maven-plugin

                    true
2.项目配置文件
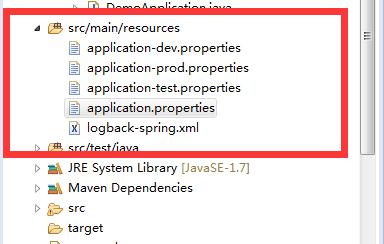
application.properties是主配置文件项目启动时会加载该文件,主要是放公共配置
dev是本地配置,prod是生产环境配置,test是测试环境配置
这样配置的好处是启动时可以默认加载某个配置文件,启动命令如下
java -jar project-name.jar --spring.config.location=/project-name/config/application.properties --spring.profiles.active=dev
application.properties配置如下
#激活哪一个环境的配置文件
spring.profiles.active=dev
#公共配置
spring.jackson.date-format=yyyy-MM-dd HH:mm:ss:
application-dev.properties配置如下
#端口号
server.port=8080

#数据库连接
spring.jpa.show-sql = true
spring.jpa.hibernate.ddl-auto= update

spring.datasource.url=jdbc:mysql://127.0.0.1:3306/shop?useUnicode=true&autoReconnect=true&failOverReadOnly=false&characterEncoding=UTF-8
spring.datasource.username=root
spring.datasource.password=admin
spring.datasource.driver-class-name=com.mysql.jdbc.Driver
spring.datasource.initialSize=10
spring.datasource.minIdle=10
spring.datasource.maxActive=30
spring.datasource.maxWait=60000
spring.datasource.timeBetweenEvictionRunsMillis=60000
spring.datasource.minEvictableIdleTimeMillis=300000
spring.datasource.validationQuery=SELECT 1 FROM DUAL
spring.datasource.testWhileIdle=true
spring.datasource.testOnBorrow=false
spring.datasource.testOnReturn=false
application-test.properties配置和application-prod.properties配置如上
3.项目目录结构 如下图
启动类 DemoApplication官方建议放在最外层
4. 日志配置
    	back.log


            back.%d{yyyy-MM-dd}.log

            30


            %-20(%d{yyyy-MM-dd HH:mm:ss.SSS}) [%thread] %-5level %logger{80}.%method - %msg%nn


        back.log

            back.%d{yyyy-MM-dd}.log
            30


            %-20(%d{yyyy-MM-dd HH:mm:ss.SSS}) [%thread] %-5level %logger{80}.%method - %msg%n


          %-20(%d{yyyy-MM-dd HH:mm:ss.SSS}) [%thread] %-5level %logger{80}.%method - %msg%n
5. 实战测试
springboot只需要在pom中引入jpa和MySQL依赖就可以实现增删改查
controller 层
@RestController
public class HelloWorldController {
	@Autowired
	private GoodsRepository  goodsService;
	private final Logger logger = LoggerFactory.getLogger(this.getClass());

    @SuppressWarnings("deprecation")
	@RequestMapping("/hello")
    public String index() {
    	List findByName = goodsService.findByName("哈哈");
    	logger.debug("This is a debug message");
        logger.info("This is an info message");
        logger.warn("This is a warn message");
        logger.error("This is an error message");

        logger.info(findByName.toString());
        return findByName.toString();
    }
}
@RestController 注解 相当于 @Controller 和 @ResponseBody 的二合一 很方便吧service 层
@Service
public class GoodsService {
	@Autowired(required=true)
	private GoodsRepository  goodsDao;
	public List findByName(String name){
		return goodsDao.findByName(name);
	}
}
repository 层 继承 JapRepository 就可以实现基本的crud
@Repository
public interface GoodsRepository extends JpaRepository {
}
6.启动项目测试
总结,springboot出现的目标就是减少配置文件,轻量级的框架,比如要想集成redis 只需要在pom中加入
依赖,然后直接引入如下
@Autowired
private StringRedisTemplate stringTemplate;
就可以使用redis了,就是这么的方便,是不是瞬间感觉开发简单了好多
项目源码 springboot项目源码


