基于boot2docker部署Docker环境
Docker轻量级的特性使得我们可以快速打包开发环境:一处编译,到处使用。我们可以在第一次编译好需要的开发环境,然后把镜像导出打包,只有有docker环境,便可以快速还原原来的开发环境。
为什么使用 boot2docker
在 Ubuntu 等环境,我们可以一键安装Docker(服务端、客户端),但是在 Mac、Windows 环境却无法直接安装 Docker 服务端。这种情况下,我们有3种选择:
1、在虚拟机安装 CentOS 或者 Ubuntu:比较费时。
2、使用 docker-for-mac 或者 docker-for-windows (仅Windows10专业版支持)客户端,这种体积会比较大,一般300M左右。可配置性不高,出了问题不好排查。
3、使用 boot2docker,配合 docker-machine 客户端,轻松部署Docker环境。需要提前安装VirtualBox(约90M)。(推荐,可玩性较高)
使用boot2docker安装Docker
准备工作
1、下载并安装VirtualBox
https://www.virtualbox.org/wiki/Downloads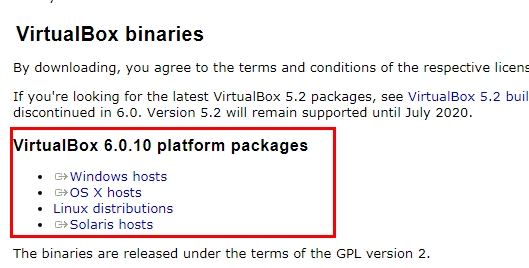
2、下载 最新版boot2docker.iso
https://github.com/boot2docker/boot2docker/releases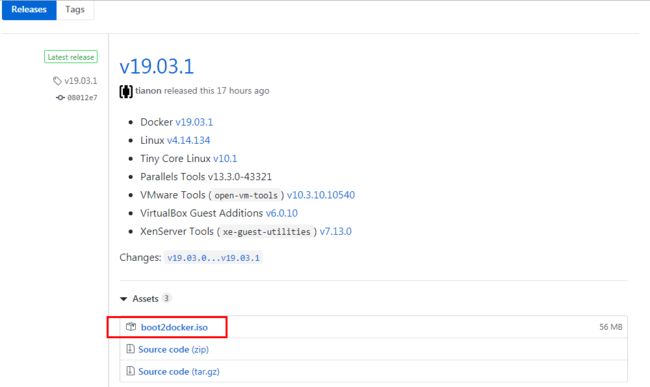
从上面的截图可以看出,boot2docker.iso是由好几个组件组成的:Docker + Tiny Core Linux + VirtualBox Guest Additions等。
3、下载 docker-machine (可选,后面会讲如何直接用VirtualBox安装docker)
Mac 直接使用 brew 下载:
brew install docker-machine
或者:
curl -L https://github.com/docker/machine/releases/download/v0.14.0/docker-machine-`uname -s`-`uname -m` >/usr/local/bin/docker-machine && \ chmod +x /usr/local/bin/docker-machineWindows 打开 GitBash:
if [[ ! -d "$HOME/bin" ]]; then mkdir -p "$HOME/bin"; fi && \ curl -L https://github.com/docker/machine/releases/download/v0.14.0/docker-machine-Windows-x86_64.exe > "$HOME/bin/docker-machine.exe" && \ chmod +x "$HOME/bin/docker-machine.exe"使用docker-machine搭建docker
docker-machine 其实是辅助我们一键在virtualbox 里创建好了docker。
打开Bash命令行:
$ docker-machine create --driver virtualbox   default

Running pre-create checks...
(default) Default Boot2Docker ISO is out-of-date, downloading the latest release...
(default) Latest release for github.com/boot2docker/boot2docker is v18.09.7
(default) Downloading C:\Users\YJC\.docker\machine\cache\boot2docker.iso from https://github.com/boot2docker/boot2docker/releases/download/v18.09.7/boot2docker.iso...
如果下载不来,使用其它工具先下载好,然后放到C:\Users\YJC\.docker\machine\cache覆盖,再执行创建语句就ok了。路径自行修改为本机的路径。
提示:
--virtualbox-boot2docker-url可以手动指定boot2docker.iso位置。
docker-machine create --driver virtualbox --virtualbox-boot2docker-url=/c/Users/YJC/.docker/machine/cache/boot2docker.iso default如果没有出错,就可以进入这个虚拟机里面的Docker Linux里了:
$ docker-machine start default

Starting "default"...
(default) Check network to re-create if needed...
(default) Waiting for an IP...
Machine "default" was started.
Waiting for SSH to be available...
Detecting the provisioner...
Waiting for SSH to be available...
Detecting the provisioner...
Restarted machines may have new IP addresses. You may need to re-run the `docker-machine env` command.

$ docker-machine ls

NAME      ACTIVE   DRIVER       STATE     URL                         SWARM   DOCKER    ERRORS
default   -        virtualbox   Running   tcp://192.168.99.101:2376           Unknown   Unable to query docker version: Get https://192.168.99.101:2376/v1.15/version: x509: certificate is valid for 192.168.99.100, not 192.168.99.101

$ docker-machine ssh default
                        ##         .
                  ## ## ##        ==
               ## ## ## ## ##    ===
           /"""""""""""""""""\___/ ===
      ~~~ {~~ ~~~~ ~~~ ~~~~ ~~~ ~ /  ===- ~~~
           \______ o           __/
             \    \         __/
              \____\_______/
 _                 _   ____     _            _
| |__   ___   ___ | |_|___ \ __| | ___   ___| | _____ _ __
| '_ \ / _ \ / _ \| __| __) / _` |/ _ \ / __| |/ / _ \ '__|
| |_) | (_) | (_) | |_ / __/ (_| | (_) | (__|   <  __/ |
|_.__/ \___/ \___/ \__|_____\__,_|\___/ \___|_|\_\___|_|
Boot2Docker version 18.01.0-ce, build HEAD : 0bb7bbd - Thu Jan 11 16:32:39 UTC 2018
Docker version 18.01.0-ce, build 03596f5
docker@default:~$
docker-machine命令:
Commands:
  active                Print which machine is active
  config                Print the connection config for machine
  create                Create a machine
  env                   Display the commands to set up the environment for the Docker client
  inspect               Inspect information about a machine
  ip                    Get the IP address of a machine
  kill                  Kill a machine
  ls                    List machines
  provision             Re-provision existing machines
  regenerate-certs      Regenerate TLS Certificates for a machine
  restart               Restart a machine
  rm                    Remove a machine
  ssh                   Log into or run a command on a machine with SSH.
  scp                   Copy files between machines
  start                 Start a machine
  status                Get the status of a machine
  stop                  Stop a machine
  upgrade               Upgrade a machine to the latest version of Docker
  url                   Get the URL of a machine
  version               Show the Docker Machine version or a machine docker version
  help                  Shows a list of commands or help for one command
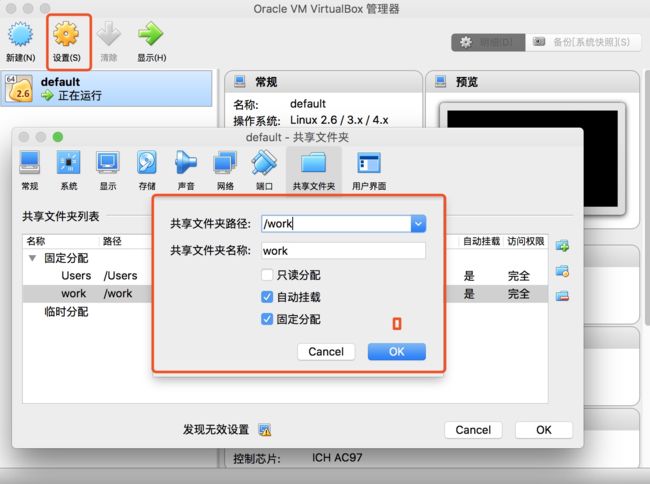
默认会配置c/Users。配置共享目录前需要先:
docker-machine stop default
配置选项:自动挂载、固定分配。
如果需要手动挂载目录:
mount -t vboxsf work /work
/www是容器内挂载点。
配置好后:
docker-machine start default
以后重启电脑后只需运行上面一句即可。
直接使用VirtualBox搭建docker
如果已经下载了boot2docker.iso,其实可以不用docker-machine。docker-machine启动,有时候会遇到一些奇怪的问题,还不如直接使用VirtualBox搭建docker,这样还可以自定义,修改磁盘大小、网络驱动。
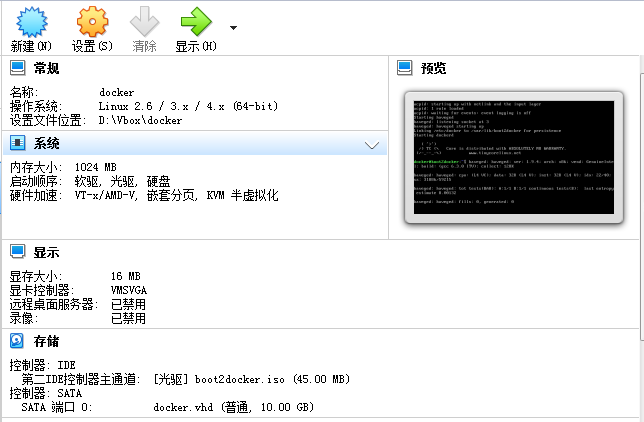
1、新建虚拟机,名称docker;
2、虚拟机类型:Linux, Linux 2.6/3.x/4.x(64bit)
3、内存大小1024M
4、虚拟硬盘:现在创建虚拟硬盘,文件类型默认,动态分配,大小看情况,10G就够了。
5、点击创建。
6、设置网络:网卡1 连接方式:网络地址转换(NAT),高级里端口转发配上,用于命令行ssh或者xshell连接用。
名称:ssh,协议:TCP,主机IP:127.0.0.1,主机端口:9634,子系统端口:22。
7、设置共享文件夹,共享文件夹路径是主机目录,例如:D:\work,共享文件夹名称:work,自动挂载;挂载点是虚拟机内路径,例如:/work,固定分配。
8、启动虚拟机即可。
9、如果使用ssh连接,命令:ssh -p 9634 [email protected],密码是 tcuser 。
后续启动虚拟机可以选择无界面启动,这样专注命令行操作。
拓展
在虚拟机机中安装docker-compose
方法
sudo curl -L https://github.com/docker/compose/releases/download/1.18.0/docker-compose-`uname -s`-`uname -m` -o /usr/local/bin/docker-compose -k

chmod 777 -R /usr/local/bin/docker-compose
chmod +x /usr/local/bin/docker-compose
重点
1.最后的-k 是免认证的请求方式,如果不加-k,会报SLL认证失败导致下载失败。
2.网络问题,经常超时,多试几次。
宿主机直接使用docker
每次都要docker-machine ssh 到虚拟机里面还是挺麻烦的,其实可以直接在宿主机操作docker。首先需要安装docker客户端:
brew install docker
然后:
eval $(docker-machine env)
假设已经启动了docker,想进入容器(假设是yphp),每次都得:
eval $(docker-machine env) docker exec -it yphp /bin/bash
挺繁琐的。可以借助shell搞定:
在.bashrc里加上:
eval $(docker-machine env); alias yphp="winpty docker exec -it yphp bash"
以后直接输入yphp就可以进入容器了。
xshell连接docker
默认的git-bash连接docker,vim实在是太难用了。可以使用xhsell连接docker。IP是127.0.0.1,端口可以在virtual Box里看到: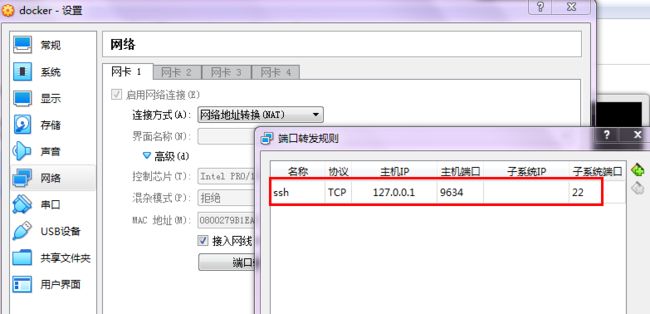
默认用户名是docker,密码tcuser。
参考:https://blog.csdn.net/ltyzsd/article/details/79041616
解决docker终端宽度、高度显示不正确
方法一(操作简单,但是每次都要输入环境变量):
docker exec -it --env COLUMNS=`tput cols` --env LINES=`tput lines` your_container_name /bin/bash
方法二(将环境变量追加到容器内的.bashrc中,一劳永逸):
# 进入容器 docker exec -it your_container_name /bin/bash # 追加配置 echo -e "export COLUMNS=\`tput cols\` \nexport LINES=\`tput lines\`" >> ~/.bashrc # 退出容器,以后再进入容器,就正常了 exit # 再次进入即可看到容器宽高正确 docker exec -it your_container_name /bin/bashMac换机后docker报错
VBoxManage: error: Failed to create the host-only adapter - Stack Overflow
参考:
https://stackoverflow.com/questions/21069908/vboxmanage-error-failed-to-create-the-host-only-adapter
