AndroidUI绘制流程
UI绘制流程

	1、Measure

		MeasureSpec:在Measure流程中,系统将View的LayoutParams根据父容器所施加的规则转换成对应的MeasureSpec,
		在onMeasure中根据这个MeasureSpec来确定view的测量宽高

		1)、测量模式
		EXACTLY :父容器已经测量出所需要的精确大小,这也是childview的最终大小
				------match_parent,精确值

		ATMOST : child view最终的大小不能超过父容器的给的
				------wrap_content

		UNSPECIFIED: 不确定,源码内部使用
				-------一般在ScrollView,ListView

		2)、测量大小:根据测量模式来确定测量大小


		3)源码里面的位运算
		&:取出对应Mask类型的属性值
		|:添加对应的属性值
		& =~与非  或者(^异或):去掉Mask类型的属性值

	2、View的测量

		onMeasure方法里面调用setMeasuredDimension()确定当前View的大小

	3、ViewGroup的测量

		1、遍历测量Child,可以通过下面三个方法来遍历测量Child
			measureChildWithMargins
			measureChild
			measureChildren


		2、setMeasuredDimension 确定当前ViewGroup的大小


	4、假如去自定义View,ViewGroup,要如何做好Measure?

		1、View

			套路:最终调用setMeasuredDimession方法来保存自己的测量宽高
			final int specMode = MeasureSpec.getMode(measureSpec);
			final int specSize =  MeasureSpec.getSize(measureSpec);
			switch (specMode) {
            case MeasureSpec.UNSPECIFIED:
                /* Parent says we can be as big as we want. Just don't be larger
                   than max size imposed on ourselves.
                */
                result = Math.min(desiredSize, maxSize);
                break;
            case MeasureSpec.AT_MOST:
                // Parent says we can be as big as we want, up to specSize.
                // Don't be larger than specSize, and don't be larger than
                // the max size imposed on ourselves.
                result = Math.min(Math.min(desiredSize, specSize), maxSize);
                break;
            case MeasureSpec.EXACTLY:
                // No choice. Do what we are told.
                result = specSize;
                break;
        }
        return result;

		2、ViewGroup
		套路:
		1、测量子view的规格大小
			measureChildWithMargins
			measureChild
			measureChildren

		2、通过子view的规格大小来确定自己的大小 setMeasuredDimession


	2、Layout布局过程

		套路和我们Measure类似
getChildMeasureSpec方法分析
问题总结:
1、requestWindowFeature()方法为什么要在setcontentView之前调用
从这个方法可以看出,我们在Activity里面调用requestWindowFeature(xxx),实际上就是设定了先关参数的状态(布尔值)!
但是每个case语句首先都调用了 throwFeatureRequestIfSubDecorInstalled() ;
private void throwFeatureRequestIfSubDecorInstalled() {
if (mSubDecorInstalled) {
throw new AndroidRuntimeException(
"Window feature must be requested before adding content");
}
}
上面提到 mSubDecorInstalled 这个标志初始为false,在我们调用setContentView()的函数内部 变成了true。
所以当在 setContentView() 方法后面再次调用 requestWindowFeature(xxx) 时,就会抛出运行时异常!
所以说在Activity中onCreate() 函数中,requestWindowFeature() 要写在setContentView() 的前面!
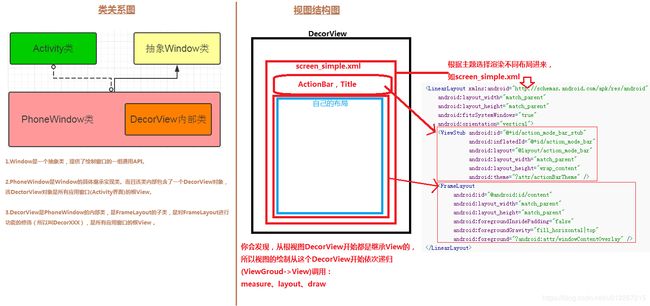
2、setContentView到底做了些什么,为什么调用后就可以显示出我们想要的布局页面?
我们平时在Activity中调用的setContentView方法其实都是调用的PhoneWindow中的setContentView方法,
其首先会判断mContentParent是否为null,如果为null,则执行installDecor()方法,在installDecor()方法中会对mDecor进行判断是否为null,为null则进行初始化,mDecor为DecorView类型,DecorView继承自FrameLayout。
接下来继续判断mContentParent是否为null,为null则执行generateLayout方法,在generateLayout方法中最重要的逻辑就是根据我们设置的不同feature找到对应布局文件,并且inflate为View,
通过addView方法加入到mDecor中,然后找到布局文件中ID为content的View作为generateLayout方法最终返回值返回。接下来回到installDecor方法将generateLayout返回值赋值给mContentParent,最后回到setContentView,
将我们自己的布局文件layoutResID加载到mContentParent中。
 标题
标题
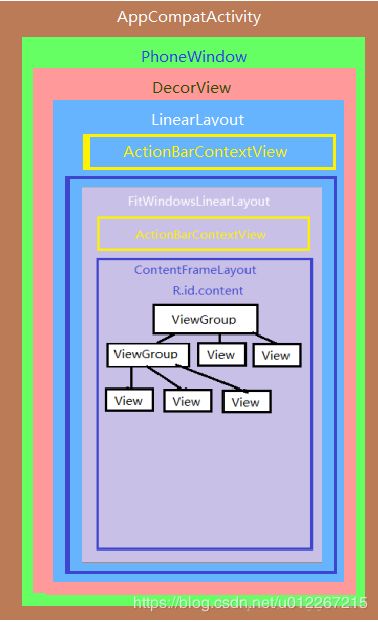
- 系统 Launcher 界面:每一个 App 的图标都是在系统 Launcher 里面的一个按钮,通过按钮打开我们自己的 App,所以 Activity 外面就是 Launcher 的界面的了;
- 应用窗口(mWindow):这个就是一个 Activity 内容的容器,是区分不同的 Activity 界面的最小单位,也是 PhoneWindow 的一个实例,Activity 加载过程中调用
attach方法的时候被实例化; - 顶级 View :如果说 Window 知识一个容器,那么从 mDecor 开始就能够真的显示一些东西了,这是一个 DecorView 对象,定义在 PhoneWindow 中,用来加载包括状态栏和导航栏在内的所有布局;
- 系统状态栏:statusbar,PhoneWindow 会加载其背景进行占位,但并不具体绘制其内容;
- 导航栏:navigationbar,与状态栏一样,PhoneWindow 会加载其背景进行占位,但并不具体绘制其内容;
- mContentParent:这个就是可以经由我们自由添加和修改的布局了,其中可以添加和隐藏标题栏,而如果没有标题栏,大小就会跟 mDecor 相同;
而 setContentView 的过程,就是实例化 mWindow、mDecor、mContentParent 的过程,在这个过程中,根据 window 的主题、属性特征的不同,会加载不同的布局和 UI,包括是否显示状态栏、导航栏甚至是标题栏。经过这个过程,一个基本的 Activity 就可以显示出来,在这个基础上,我们就可以去按照自己的需求对 mContentParent 进行定制来充实自己的 App。
3、
devorview有了视图,它又是怎样展示到了我们的activity上的呢?它们之间怎么关联在一起的呢?那就去activity的启动过程寻找看看了。
来到ActivityThread类中handleLaunchActivity方法中,Activity a =performLaunchActivity(r, customIntent);进入performLaunchActivity方法通过反射创建了该Activity实例,之后调用了该实例的attach方法,此方法中执行了一些与window有关的代码
        mWindow = new PhoneWindow(this, window);
        mWindow.setWindowControllerCallback(this);
        mWindow.setCallback(this);
该Activity对象实例化了一个PhoneWindow的成员变量,并设置了该windos对象的callback就是此Activity。然后执行了此代码,调用了activity的onCreate函数,mInstrumentation.callActivityOnCreate(activity, r.state);而onCreate中调用了我们熟悉的setContentView(R.layout.activity_main);完成了我们上面DecorView初始化,并把布局添加到DecorView中的framelayout中。
回到handleLaunchActivity方法中,初始化完Activity
if (a != null) {
            r.createdConfig = new Configuration(mConfiguration);
            reportSizeConfigurations(r);
            Bundle oldState = r.state;
            handleResumeActivity(r.token, false, r.isForward,
                    !r.activity.mFinished && !r.startsNotResumed, r.lastProcessedSeq, reason);
}
此时a!=null成立,进入if执行了handleResumeActivity方法,重点看此方法中的这一段代码
                r.window = r.activity.getWindow();
                View decor = r.window.getDecorView();
                decor.setVisibility(View.INVISIBLE);
                ViewManager wm = a.getWindowManager();
                WindowManager.LayoutParams l = r.window.getAttributes();
                a.mDecor = decor;
                l.type = WindowManager.LayoutParams.TYPE_BASE_APPLICATION;
                l.softInputMode |= forwardBit;
                if (r.mPreserveWindow) {
                    a.mWindowAdded = true;
                    r.mPreserveWindow = false;
                    ViewRootImpl impl = decor.getViewRootImpl();
                    if (impl != null) {
                        impl.notifyChildRebuilt();
                    }
                }
                if (a.mVisibleFromClient && !a.mWindowAdded) {
                    a.mWindowAdded = true;
                    wm.addView(decor, l);
                }
主要看此段代码的最后一行,获取到Activity的windowmanger对象,执行wm.addView(decor, l);WindowManager是个接口,他的实现类是WindowManagerImpl,所以看它的addView方法,他的addView方法又调用了WindowManagerGlobal的addView。所以,直接查看WindowManagerGlobal的addView方法
 public void addView(View view, ViewGroup.LayoutParams params,
            Display display, Window parentWindow) {
          //......
          ViewRootImpl root;
          View panelParentView = null;
          //......

            root = new ViewRootImpl(view.getContext(), display);

            view.setLayoutParams(wparams);

            mViews.add(view);
            mRoots.add(root);
            mParams.add(wparams);
        }

        // do this last because it fires off messages to start doing things
        try {
            root.setView(view, wparams, panelParentView);
        } catch (RuntimeException e) {
            // BadTokenException or InvalidDisplayException, clean up.
            synchronized (mLock) {
                final int index = findViewLocked(view, false);
                if (index >= 0) {
                    removeViewLocked(index, true);
                }
            }
            throw e;
        }
    }
创建了一个ViewRootImpl类的实例,把decorview, viewRootImpl, wparams添加到相应的集合中,接着执行了root.setView方法,此方法重点有三部分代码
1> requestLayout();:会执行scheduleTraversals方法,此方法又会执行一个TraversalRunnable的runnable对象,此对象run方法的实现是一个doTraversal();方法,它又会执行performTraversals();而此方法会依次执行performMeasure、performLayout、performDraw来进行绘制。
2>
res = mWindowSession.addToDisplay(mWindow, mSeq, mWindowAttributes,
                            getHostVisibility(), mDisplay.getDisplayId(),
                            mAttachInfo.mContentInsets, mAttachInfo.mStableInsets,
                            mAttachInfo.mOutsets, mInputChannel);
通过跨进程方式通知WindowManagerService来添加此window.
3> view.assignParent(this);将此ViewRootImpl的实例设置为该decorview的mParent。所以每个view调用requestLayout()方法进行重绘的时候,都会调用到父类的requestLayout,会一直调用到ViewRootImpl的requestLayout,而去执行scheduleTraversals()方法进行重绘。可以看到,
- Windowmanager是单例的,它对所有的Window进行管理的类。它内部管理着ViewRootImpl,View,WindowManager.LayoutParams
- window是描述窗口的抽象类,它是一个抽象的概念,没有具体的体现。所有的视图都依附它而存在。他的实现类PhoneWindow提供了操作窗口的实现。它包含一个decorview实例。
- Decorview是所有布局的根view,它承载着对我们要显示布局的修饰。
- ViewRootImpl是视图树的顶级view,是绘制的起点。它是window与view之间的桥梁
内容引自
https://www.jianshu.com/p/97bf8476d559
https://www.jianshu.com/p/02191698f106 分析Activity中的setContentView的流程。
https://blog.csdn.net/crazy1235/article/details/72229175 分析AppCompatActivity中的setContentView的流程。


