在Kubernetes集群上部署高可用Harbor镜像仓库
一、实验环境
harbor的工作节点
10.142.71.120   paasm1
10.142.71.121   paasm2
10.142.71.123   paashar
操作系统:CentOS Linux release 7.2.1511 (Core)
Harbor版本: v1.2.0
GlusterFS: 4.1
redis:4.9.105
docker版本与docker-compose的版本
# docker version
Client:
 Version:      1.12.3
 API version:  1.24
 Go version:   go1.6.3
 Git commit:   6b644ec
 Built:
 OS/Arch:      linux/amd64

Server:
 Version:      1.12.3
 API version:  1.24
 Go version:   go1.6.3
 Git commit:   6b644ec
 Built:
 OS/Arch:      linux/amd64

# docker-compose -v
docker-compose version 1.13.0, build 1719ceb
二、方案思路
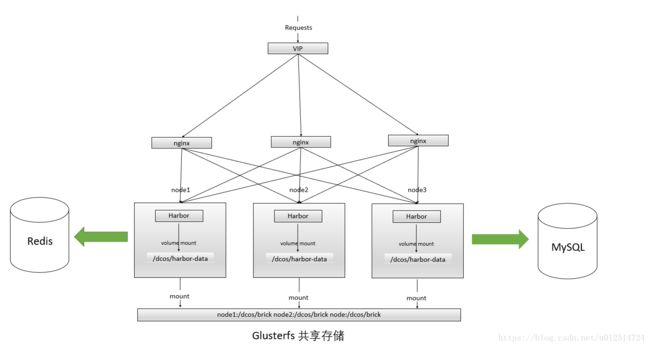
- MySQL多个实例无法共享一份mysql数据文件,所以考虑将harbor连接的mysql放到外面来。
- 利用GlusterFS对registry中存储的镜像数据进行实时同步。
- 利用keepalived实现虚拟IP,nginx 做负载均衡,以此实现harbor的高可用。
- 利用redis做共享存储
三、部署MySQL
# vi mysql-harbor.yaml
apiVersion: v1
kind: Service
metadata:
  name: mysql-harbor
  namespace: kube-system
  labels:
    app: mysql-harbor
spec:
  type: NodePort
  ports:
    - name: mysql
      port: 3306
      protocol: TCP
      targetPort: 3306
      nodePort: 32089
  selector:
    app: mysql-harbor
---
apiVersion: extensions/v1beta1
kind: Deployment
metadata:
  name: mysql-harbor
  namespace: kube-system
  labels:
    app: mysql-harbor
spec:
  strategy:
    type: Recreate
  template:
    metadata:
      labels:
        app: mysql-harbor
    spec:
      containers:
      - command:
        - docker-entrypoint.sh
        - mysqld
        - --character-set-server=utf8mb4
        - --collation-server=utf8mb4_unicode_ci
        image: hub.cmss.com:5000/vmware/harbor-db:v1.2.0
        imagePullPolicy: IfNotPresent
        name: mysql-harbor
        env:
        - name: MYSQL_ROOT_PASSWORD
          value: "123456"
        ports:
        - containerPort: 3306
          name: mysql-harbor
        volumeMounts:
        - name: mysql-storage
          mountPath: /var/lib/mysql
      volumes:
      - name: mysql-storage
        hostPath:
          path: "/dcos/mysql"
      nodeSelector:
        kubernetes.io/hostname: nodeName
# kubectl apply -f mysql-harbor.yaml
四、 部署GlusterFS
1、下载地址
https://buildlogs.centos.org/centos/7/storage/x86_64/gluster-4.1/
2、所需的RPM安装包
glusterfs-4.1.0-0.1.rc0.el7.x86_64.rpm
glusterfs-api-4.1.0-0.1.rc0.el7.x86_64.rpm
glusterfs-cli-4.1.0-0.1.rc0.el7.x86_64.rpm
glusterfs-fuse-4.1.0-0.1.rc0.el7.x86_64.rpm
glusterfs-libs-4.1.0-0.1.rc0.el7.x86_64.rpm
glusterfs-server-4.1.0-0.1.rc0.el7.x86_64.rpm
glusterfs-client-xlators-4.1.0-0.1.rc0.el7.x86_64.rpm
userspace-rcu-0.10.0-3.el7.x86_64.rpm
3、软件安装
# yum -y install userspace-rcu-0.10.0-3.el7.x86_64.rpm
# yum -y install glusterfs-*
4、启动服务
# systemctl start glusterd.service
# systemctl enable glusterd.service
5、添加GlusterFS节点
# gluster peer probe paasm1
# gluster peer probe paasm2
# gluster peer probe paasher
查看节点状态
# gluster peer status

Number of Peers: 2

Hostname: paasm2
Uuid: 9eeadb95-650e-4dd2-8901-83afaf153cb4
State: Peer in Cluster (Connected)

Hostname: paashar
Uuid: 620ce509-b5c5-4118-a866-0a9385dc47a1
State: Peer in Cluster (Connected)
不显示自身
6、创建分布复制卷
gluster volume create har-val replica 3 paasm1:/dcos/brick paasm2:/dcos/brick paashar:/dcos/brick
三个节点所以副本是3
/启/停/删除卷
# gluster volume start har-val
# gluster volume stop har-val
# gluster volume delete har-val
查看所有卷
# gluster volume list

  har-val
查看卷信息
# gluster volume status har-val

Status of volume: har-val
Gluster process                             TCP Port  RDMA Port  Online  Pid
------------------------------------------------------------------------------
Brick paasm1:/dcos/brick                    49152     0          Y       9639
Brick paasm2:/dcos/brick                    49152     0          Y       26666
Brick paashar:/dcos/brick                   49152     0          Y       5963
Self-heal Daemon on localhost               N/A       N/A        Y       9662
Self-heal Daemon on paashar                 N/A       N/A        Y       5953
Self-heal Daemon on paasm2                  N/A       N/A        Y       26689

Task Status of Volume har-val
------------------------------------------------------------------------------
There are no active volume tasks
扩展收缩卷
# gluster volume add-brick har-val [strip|repli ] brick1...
# gluster volume remove-brick har-val [repl ] brick1...
扩展或收缩卷时,也要按照卷的类型,加入或减少的brick个数必须满足相应的要求。
迁移卷(替换)
volume replace-brick {commit force}
7、glusterfs方式挂载(每个节点)
挂载
# mount -t glusterfs paasm1:har-val /dcos/harbor-data/
# echo "paasm1:har-val /dcos/harbor-data/ glusterfs defaults 0 0" >> /etc/fstab
# mount -a
文档
https://gluster.readthedocs.io/en/latest/
五、部署redis
# docker pull redis:5.0-rc5-alpine3.8 // 官方镜像
1. 创建glusterfs存储
gluster volume create redis-vol-0 replica 3 paasm1:/dcos/redis-brick/pv0 paasm2:/dcos/redis-brick/pv0 paashar:/dcos/redis-brick/pv0;
gluster volume start redis-vol-0;
2. 创建GlusterFS端点定义
# vi glusterfs-endpoints.yml
---
kind: Endpoints
apiVersion: v1
metadata:
  name: glusterfs-cluster
  namespace: kube-system
subsets:
- addresses:
  - ip: 10.142.71.120
  ports:
  - port: 7096
- addresses:
  - ip: 10.142.71.121
  ports:
  - port: 7096
- addresses:
  - ip: 10.142.71.123
  ports:
  - port: 7096
# kubectl apply -f glusterfs-endpoints.yml
3. 配置 service
# vi glusterfs-service.yml
---
kind: Service
apiVersion: v1
metadata:
  name: glusterfs-cluster
  namespace: kube-system
spec:
  ports:
  - port: 7096
# kubectl apply -f glusterfs-service.yml
4. 创建PV
# vi glusterfs-pv.yml
apiVersion: v1
kind: PersistentVolume
metadata:
  name: pv000
  namespace: kube-system
spec:
  capacity:
    storage: 2Gi
  accessModes:
    - ReadWriteMany
  glusterfs:
    endpoints: "glusterfs-cluster"
    path: "redis-vol-0"
    readOnly: false
# kubectl apply -f glusterfs-pv.yml
5. 创建PVC
# vi glusterfs-pvc.yml
apiVersion: v1
kind: PersistentVolumeClaim
metadata:
  name: pvc000
  namespace: kube-system
spec:
  accessModes:
    - ReadWriteMany
  resources:
    requests:
      storage: 2Gi
# kubectl apply -f glusterfs-pvc.yml
6. 创建redis
# vi redis.yml
apiVersion: v1
kind: Service
metadata:
  name: redis
  namespace: kube-system
  labels:
    name: redis
spec:
  selector:
    name: redis
  ports:
  - port: 6379
    targetPort: 6379

---
apiVersion: v1
kind: ReplicationController
metadata:
  name: redis
  namespace: kube-system
  labels:
    name: redis
spec:
  replicas: 1
  selector:
    name: redis
  template:
    metadata:
      labels:
        name: redis
    spec:
      containers:
      - name: redis
        image: hub.cmss.com:5000/registry.paas/library/redis:5.0
        command:
          - "redis-server"
        args:
          - "--protected-mode"
          - "no"
          - "--appendonly"
          - "yes"
          - "--appendfsync"
          - "always"
        resources:
          requests:
            cpu: "100m"
            memory: "100Mi"
        ports:
        - containerPort: 6379
        volumeMounts:
          - name: data
            mountPath: /data/
      volumes:
        - name: data
          persistentVolumeClaim:
            claimName: pvc000
      tolerations:
        - effect: NoSchedule
          operator: Exists
# kubectl apply -f redis.yml
查看服务
# kubectl get svc -n kube-system |grep redis
redis ClusterIP 10.233.2.253 6379/TCP 16h
此时可以通过 10.233.2.253:6379访问redis
六、部署Harbor
1. 修改harbor的配置文件
- common/templates/adminserver/env:
MYSQL_HOST= # 由于mysql是nodePort形式,ip可以是集群中任一主机ip
MYSQL_PORT=32089 # 第三步中mysql的Service中定义的nodePort

RESET=true # 如果之前部署过,不设true不会生效
- common/templates/ui/env:
_REDIS_URL=10.233.2.253:6379,100,,0
- docker-compose.yml:
删除mysql相关部分
mysql:
    image: vmware/harbor-db:v1.2.0
    container_name: harbor-db
    restart: always
    volumes:
      - /data/database:/var/lib/mysql:z
    networks:
      - harbor
    env_file:
      - ./common/config/db/env
    depends_on:
      - log
    logging:
      driver: "syslog"
      options:
        syslog-address: "tcp://127.0.0.1:1514"
        tag: "mysql"
及proxy下的depends_on里面的- mysql部分。
修改proxy对外暴露端口为81
    ports:
      - 81:80
2. 修改镜像存储路径
- /data/registry:/storage:z 修改为 - /dcos/harbor-data/registry:/storage:z
3. 安装
# ./install.sh --with-clair
七、部署keepalived
# yum install keepalived -y
选定一台harbor主机作为优先级比较高的master,另一台作为优先级比较低的master。
1. 修改配置文件 /etc/keepalived/keepalived.conf:
! Configuration File for keepalived

global_defs {
   notification_email {
     [email protected]
     [email protected]
     [email protected]
   }
   notification_email_from [email protected]
   smtp_server 192.168.200.1 # SMTP服务器地址
   smtp_connect_timeout 30
   router_id LVS_DEVEL
}

vrrp_script chk_ngx_port {
    script "/etc/harbor_chk.sh"  # harbor 的check脚本
    interval 2
    weight -20
}

vrrp_instance VI_1 {
    state MASTER
    interface eth0       # 网卡名称
    virtual_router_id 51
    priority 100         # 主节点写100,从节点写99
    advert_int 2
    authentication {
        auth_type PASS
        auth_pass 1111
    }
    virtual_ipaddress {
        192.168.200.16   # vip地址
    }
}
/etc/harbor_chk.sh脚本的具体内容如下:
#!/bin/bash
status=`curl -s -o /dev/null -w "%{http_code}" http://127.0.0.1/api/repositories/top`
if [ $status == 200 ]; then
  exit 0
else
  exit 1
fi
# systemctl restart keepalived
# systemctl enable keepalived
八、 部署nginx
1. 编写配置文件
# vi /etc/har-nginx/nginx.conf
error_log stderr notice;

worker_processes auto;
events {
    multi_accept on;
    use epoll;
    worker_connections 1024;
}

stream {
    upstream har_server {
        least_conn;
        server 10.142.71.123:81 max_fails=0 fail_timeout=10s;
        server 10.142.71.121:81 max_fails=0 fail_timeout=10s;
    }

    server {
        listen 80;
	proxy_pass har_server;
        proxy_timeout 1m;
        proxy_connect_timeout 1s;
    }
}
2. 启动nginx
docker run -d --name har-nginx --restart=always -v /etc/har-nginx/:/etc/nginx/ --net=host registry.paas/library/nginx:1.11.4-alpine

