spring boot + mybatis + mysql + mycat 动态分离 四
主题思路是:
通过aop技术,根据请求后台的方式进行切换datasource 源,是写还是读数据。
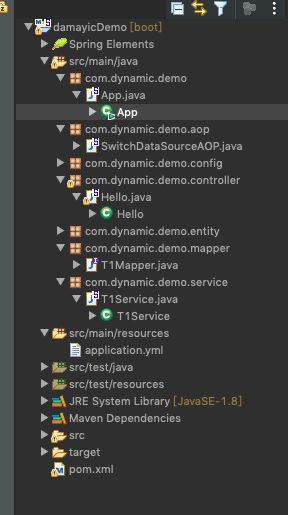
1、上篇博文说明了mysql 的动态分离。现在需要整合spring boot 进行整合搭建服务,demo项目
2、回忆下mybatis ,一般都是把mybatis 做dao层。
首先需要引入pom.xml
  4.0.0
  com.mycat.demo
  damayicDemo
  0.0.1-SNAPSHOT

	org.springframework.boot
	spring-boot-starter-parent
	2.0.4.RELEASE


			org.springframework.boot
			spring-boot-starter-aop


			org.springframework.boot
			spring-boot-starter-web


			org.mybatis.spring.boot
			mybatis-spring-boot-starter
			1.3.2


            org.yaml
            snakeyaml
            1.23


    com.alibaba
    fastjson
    1.2.62


			mysql
			mysql-connector-java
			runtime


			org.springframework.boot
			spring-boot-starter-test
			test


			com.alibaba
			druid
			1.0.23


				org.springframework.boot
				spring-boot-maven-plugin
2、配置application.yml 读写对象
spring:
  datasource:
    ###可读数据源
    select:
      jdbc-url: jdbc:mysql://nginx.fandong.com:8066/testdb
      driver-class-name: com.mysql.jdbc.Driver
      username: user
      password: user
    ####可写数据源
    update:
      jdbc-url: jdbc:mysql://nginx.fandong.com:8066/testdb
      driver-class-name: com.mysql.jdbc.Driver
      username: root
      password: root
    type: com.alibaba.druid.pool.DruidDataSource
3、配置datasource 源
/**
 *
 */
package com.dynamic.demo.config;

import javax.sql.DataSource;

import org.springframework.boot.context.properties.ConfigurationProperties;
import org.springframework.boot.jdbc.DataSourceBuilder;
import org.springframework.context.annotation.Bean;
import org.springframework.context.annotation.Configuration;

/**
 * @author fandong
 *
 */
@Configuration
public class DataSourceConfig {

	@Bean(name="selectDataSource")
	@ConfigurationProperties(prefix = "spring.datasource.select")
	public DataSource dataSource1() {
		return DataSourceBuilder.create().build();
	}

	@Bean(name="updateDataSource")
	@ConfigurationProperties(prefix = "spring.datasource.update")
	public DataSource  dataSource2() {
		return DataSourceBuilder.create().build();
	}
}
4、缓存数据源
/**
 *
 */
package com.dynamic.demo.config;

import org.springframework.context.annotation.Lazy;
import org.springframework.stereotype.Component;

/**
 * @author fandong
 *
 */
@Component
@Lazy(false)
public class DataSourceContextHolder {
	private static final ThreadLocal contextHolder = new ThreadLocal<>();
	// 设置数据源类型
	public static void setDbType(String dbType) {
		contextHolder.set(dbType);
	}

	public static String getDbType() {
		return contextHolder.get();
	}

	public static void clearDbType() {
		contextHolder.remove();
	}
}
5、使用AbstractRoutingDataSource 进行路由当前的数据源。
package com.dynamic.demo.config;

import java.util.HashMap;
import java.util.Map;

import javax.sql.DataSource;

import org.springframework.beans.factory.annotation.Autowired;
import org.springframework.beans.factory.annotation.Qualifier;
import org.springframework.context.annotation.Primary;
import org.springframework.jdbc.datasource.lookup.AbstractRoutingDataSource;
import org.springframework.stereotype.Component;

@Component
@Primary
public class DynamicDataSource extends AbstractRoutingDataSource {
	@Autowired
	@Qualifier("selectDataSource")
	private DataSource selectDataSource;

	@Autowired
	@Qualifier("updateDataSource")
	private DataSource updateDataSource;

	/**
	 * 这个是主要的方法,返回的是生效的数据源名称
	 */
	@Override
	protected Object determineCurrentLookupKey() {
		System.out.println("DataSourceContextHolder:::" + DataSourceContextHolder.getDbType());
		return DataSourceContextHolder.getDbType();
	}

	/**
	 * 配置数据源信息
	 */
	@Override
	public void afterPropertiesSet() {
		Map map = new HashMap<>();
		map.put("selectDataSource", selectDataSource);
		map.put("updateDataSource", updateDataSource);
		setTargetDataSources(map);
		setDefaultTargetDataSource(updateDataSource);
		super.afterPropertiesSet();
	}
}
6、使用aop 在进行方法执行时进行拦截
package com.dynamic.demo.aop;

import org.aspectj.lang.JoinPoint;
import org.aspectj.lang.annotation.Aspect;
import org.aspectj.lang.annotation.Before;
import org.springframework.context.annotation.Lazy;
import org.springframework.core.annotation.Order;
import org.springframework.stereotype.Component;

import com.dynamic.demo.config.DataSourceContextHolder;


// 使用AOP动态切换不同的数据源
@Aspect
@Component
@Lazy(false)
@Order(0) // Order设定AOP执行顺序 使之在数据库事务上先执行
public class SwitchDataSourceAOP {
	// 这里切到你的方法目录
	@Before("execution(* com.dynamic.demo.service.*.*(..))")
	public void process(JoinPoint joinPoint) {
		String methodName = joinPoint.getSignature().getName();
		if (methodName.startsWith("get") || methodName.startsWith("count") || methodName.startsWith("find")
				|| methodName.startsWith("list") || methodName.startsWith("select") || methodName.startsWith("check")) {
			DataSourceContextHolder.setDbType("selectDataSource");
		} else {
			// 切换dataSource
			DataSourceContextHolder.setDbType("updateDataSource");
		}
	}
}
---调用过程
1、 首先把两个数据源进行实例化。
2、在调用select、update 方法是使用aop进行拦截,获取拦截的方法名称判断调用哪个数据实例,将数据实例key添加到ThreadLocal 中。
3、 在AbstractRoutingDataSource 调用 determineTargetDataSource 方法进行获取当前的实例。
在determineTargetDataSource 方法中调用了determineCurrentLookupKey 获取当前执行的方法数据key值。
在重写的方法
protected DataSource determineTargetDataSource() {
		Assert.notNull(this.resolvedDataSources, "DataSource router not initialized");
		Object lookupKey = determineCurrentLookupKey();
		DataSource dataSource = this.resolvedDataSources.get(lookupKey);
		if (dataSource == null && (this.lenientFallback || lookupKey == null)) {
			dataSource = this.resolvedDefaultDataSource;
		}
		if (dataSource == null) {
			throw new IllegalStateException("Cannot determine target DataSource for lookup key [" + lookupKey + "]");
		}
		return dataSource;
	}
重写的方法,把数据示例注入中。
	/**
	 * 配置数据源信息
	 */
	@Override
	public void afterPropertiesSet() {
		Map map = new HashMap<>();
		map.put("selectDataSource", selectDataSource);
		map.put("updateDataSource", updateDataSource);
		setTargetDataSources(map);
		setDefaultTargetDataSource(updateDataSource);
		super.afterPropertiesSet();
	}
这样即可动态切换数据。
剩下就是mybatis 的创建entity
/**
 *
 */
package com.dynamic.demo.entity;

import org.springframework.stereotype.Component;

/**
 * @author fandong
 *
 */
@Component
public class T1Entity {

	private String name;

	public String getName() {
		return name;
	}

	public void setName(String name) {
		this.name = name;
	}

}
创建mapper 接口方法
/**
 *
 */
package com.dynamic.demo.mapper;

import java.util.List;

import javax.websocket.server.PathParam;

import org.apache.ibatis.annotations.Insert;
import org.apache.ibatis.annotations.Select;

import com.dynamic.demo.entity.T1Entity;


/**
 * @author fandong
 *
 */
public interface T1Mapper {

	@Select("select name from t1")
	List findT1();

	@Insert("insert into t1 (name) values(#{name})")
	void update(@PathParam("entity") T1Entity entity);
}
创建service
/**
 *
 */
package com.dynamic.demo.service;

import java.util.List;

import org.springframework.beans.factory.annotation.Autowired;
import org.springframework.stereotype.Service;

import com.dynamic.demo.entity.T1Entity;
import com.dynamic.demo.mapper.T1Mapper;

/**
 * @author fandong
 *
 */
@Service
public class T1Service {

    @Autowired
	public T1Mapper t1Mapper;

    public List getEntities(){
    	System.out.println("打印kkkk");
    	return t1Mapper.findT1();
    }

    public void update(T1Entity entity) {
    	System.out.println("插入。。。");
    	t1Mapper.update(entity);
    }
}
创建Controller 方法
/**
 *
 */
package com.dynamic.demo.controller;

import java.util.ArrayList;
import java.util.List;

import org.springframework.beans.factory.annotation.Autowired;
import org.springframework.web.bind.annotation.PathVariable;
import org.springframework.web.bind.annotation.RequestMapping;
import org.springframework.web.bind.annotation.ResponseBody;
import org.springframework.web.bind.annotation.RestController;

import com.alibaba.fastjson.JSON;
import com.dynamic.demo.entity.T1Entity;
import com.dynamic.demo.service.T1Service;

/**
 * @author fandong
 *
 */
@RestController
public class Hello {

	@Autowired
	private T1Service t1Service;


	@RequestMapping("/findEntities")
	public String getEntity() {
		List entities = t1Service.getEntities();

	    for(T1Entity entity : entities) {
	    	System.out.println(entity.getName());
	    }
	   String  jsonString =   JSON.toJSONString(entities);
		return jsonString;

	}

	@RequestMapping("/insert/{name}")
	public void  insert(@PathVariable("name") String name) {
        System.out.println("insert value:"+ name);
        T1Entity t1Entity = new T1Entity();
        t1Entity.setName(name);
        t1Service.update(t1Entity);
	}

}
测试:

