QT5串口编程——编写简单的上位机
注:更新自2018年12月13日(我回看了一年多前写的这篇博客,觉得不是很好,故翻新了一遍。)
最近在学习嵌入式,而上位机又是一个不可缺少的工具,于是就开始接触QT,学习编写上位机。刚开始的时候什么都不懂,发现《Qt 学习之路 2》有比较好的入门教程。学习了前面部分,对QT有了大概的了解后,就开始在网上寻找串口编程的方法。通过好几天的学习,终于写出了一个用于串口通信的上位机。下面开始介绍串口类的使用。
首先,QT5是自带QSerialPort这个类的,使用时需要在pro文件里面添加一行:
QT += serialport然后直接引用头文件就可以了。
#include         //提供访问串口的功能
#include     //提供系统中存在的串口的信息
在QT5中,串口通信是借助一个QSerialPort的对象来实现的,在设置QSerialPort对象对串口的名称、波特率、数据位、校验位、停止位等参数后,方能对串口进行读写。下面,我总结了一下借助QSerailPort对串口进行设置、打开、读、写和关闭的过程。
一、设置和打开串口
//创建串口对象
QSerialPort serial;
//设置串口名
serial.setPortName("COM3");
//设置波特率
serial.setBaudRate(QSerialPort::Baud9600);
//设置数据位数
serial.setDataBits(QSerialPort::Data8);
//设置奇偶校验
serial.setParity(QSerialPort::NoParity);
//设置停止位
serial.setStopBits(QSerialPort::OneStop);
//设置流控制
serial.setFlowControl(QSerialPort::NoFlowControl);
//打开串口
serial.open(QIODevice::ReadWrite);
以上代码是QSerialPort对象的设置示例,作用是:
- 设置串口名为 COM3
- 设置波特率为9600
- 设置数据位为8位
- 设置没有奇偶校验位
- 设置停止位为1位
- 设置没有流控制
- 以可读写的方式打开串口
设置完这些就能进行读写操作了。如果遇到不理解的地方,可以选择QT的类或函数,然后按F1查阅手册。举个例子,如果我们想查看QSerialPort的其它的属性,可以选择QSerialPort的类名或成员函数,然后按F1。
二、读取数据
//从接收缓冲区中读取数据
QByteArray buffer = serial.readAll();
串口在收到数据后,会将数据存入接收缓冲区。此时,我们可以通过readAll()函数将接收缓冲区的数据读出来。当串口的接收缓冲区有数据时,QSerilaPort对象会发出一个readyRead()的信号。因此,我们可以编写一个槽函数来读数据,例如:
//连接信号和槽
QObject::connect(&serial, &QSerialPort::readyRead, this, &MainWindow::serialPort_readyRead);

……

//编写的槽函数
void MainWindow::serialPort_readyRead()
{
    //从接收缓冲区中读取数据
    QByteArray buffer = serial.readAll();

    //处理数据
    //……
}
三、发送数据
serial->write(data);使用write函数便可以把字节数组中的字节发送出去。
四、关闭串口
serial->close();串口不用时,可通过close()函数将其关闭。
接下来是一个实例
1、创建一个新的Widgets Appliaction工程
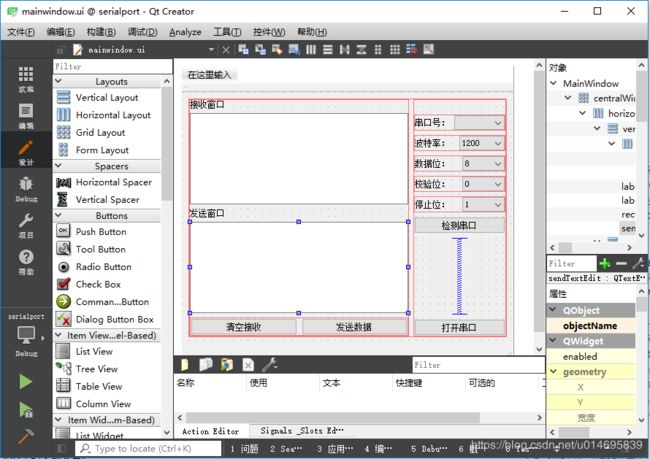
2、使用QtCreator的ui文件来设计上位机的界面,设计如下:
3、mainwindow.h文件内容如下:
//mainwindow.h

#ifndef MAINWINDOW_H
#define MAINWINDOW_H

#include
#include
#include

namespace Ui {
class MainWindow;
}

class MainWindow : public QMainWindow
{
    Q_OBJECT

public:
    explicit MainWindow(QWidget *parent = 0);
    ~MainWindow();

private slots:
    void serialPort_readyRead();

    void on_searchButton_clicked();

    void on_openButton_clicked();

    void on_sendButton_clicked();

    void on_clearButton_clicked();

private:
    Ui::MainWindow *ui;
    QSerialPort serial;
};

#endif // MAINWINDOW_H
4、mainwindow.cpp文件内容如下:
//mainwindow.cpp

#include "mainwindow.h"
#include "ui_mainwindow.h"
#include

MainWindow::MainWindow(QWidget *parent) :
    QMainWindow(parent),
    ui(new Ui::MainWindow)
{
    ui->setupUi(this);

    //连接信号和槽
    QObject::connect(&serial, &QSerialPort::readyRead, this, &MainWindow::serialPort_readyRead);

    //发送按键失能
    ui->sendButton->setEnabled(false);
    //波特率默认选择下拉第三项:9600
    ui->baudrateBox->setCurrentIndex(3);
}

MainWindow::~MainWindow()
{
    delete ui;
}

void MainWindow::serialPort_readyRead()
{
    //从接收缓冲区中读取数据
    QByteArray buffer = serial.readAll();
    //从界面中读取以前收到的数据
    QString recv = ui->recvTextEdit->toPlainText();
    recv += QString(buffer);
    //清空以前的显示
    ui->recvTextEdit->clear();
    //重新显示
    ui->recvTextEdit->append(recv);
}


void MainWindow::on_searchButton_clicked()
{
    ui->portNameBox->clear();
    //通过QSerialPortInfo查找可用串口
    foreach(const QSerialPortInfo &info, QSerialPortInfo::availablePorts())
    {
        ui->portNameBox->addItem(info.portName());
    }
}

void MainWindow::on_openButton_clicked()
{
    if(ui->openButton->text()==QString("打开串口"))
    {
        //设置串口名
        serial.setPortName(ui->portNameBox->currentText());
        //设置波特率
        serial.setBaudRate(ui->baudrateBox->currentText().toInt());
        //设置数据位数
        switch(ui->dataBitsBox->currentIndex())
        {
        case 8: serial.setDataBits(QSerialPort::Data8); break;
        default: break;
        }
        //设置奇偶校验
        switch(ui->ParityBox->currentIndex())
        {
        case 0: serial.setParity(QSerialPort::NoParity); break;
        default: break;
        }
        //设置停止位
        switch(ui->stopBitsBox->currentIndex())
        {
        case 1: serial.setStopBits(QSerialPort::OneStop); break;
        case 2: serial.setStopBits(QSerialPort::TwoStop); break;
        default: break;
        }
        //设置流控制
        serial.setFlowControl(QSerialPort::NoFlowControl);

        //打开串口
        if(!serial.open(QIODevice::ReadWrite))
        {
            QMessageBox::about(NULL, "提示", "无法打开串口!");
            return;
        }

        //下拉菜单控件失能
        ui->portNameBox->setEnabled(false);
        ui->baudrateBox->setEnabled(false);
        ui->dataBitsBox->setEnabled(false);
        ui->ParityBox->setEnabled(false);
        ui->stopBitsBox->setEnabled(false);

        ui->openButton->setText(QString("关闭串口"));
        //发送按键使能
        ui->sendButton->setEnabled(true);
    }
    else
    {
        //关闭串口
        serial.close();

        //下拉菜单控件使能
        ui->portNameBox->setEnabled(true);
        ui->baudrateBox->setEnabled(true);
        ui->dataBitsBox->setEnabled(true);
        ui->ParityBox->setEnabled(true);
        ui->stopBitsBox->setEnabled(true);

        ui->openButton->setText(QString("打开串口"));
        //发送按键失能
        ui->sendButton->setEnabled(false);
    }
}

void MainWindow::on_sendButton_clicked()
{
    //获取界面上的数据并转换成utf8格式的字节流
    QByteArray data = ui->sendTextEdit->toPlainText().toUtf8();
    serial.write(data);
}

void MainWindow::on_clearButton_clicked()
{
    ui->recvTextEdit->clear();
}
5、main.cpp文件内容如下:
#include "mainwindow.h"
#include

int main(int argc, char *argv[])
{
    QApplication a(argc, argv);
    MainWindow w;
    w.show();

    return a.exec();
}
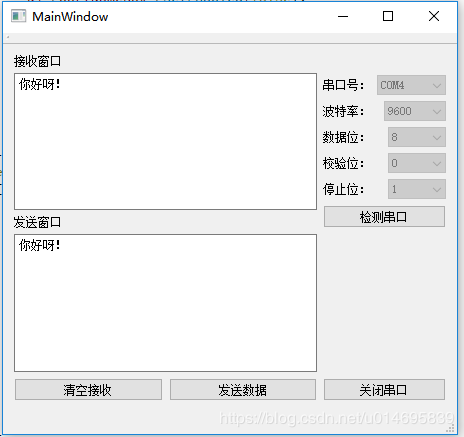
4、测试(将USB转TTL模块发送和接收引脚短接,自己发自己收)
新的工程已经上传至:https://download.csdn.net/download/u014695839/10881180 (2018年12月27日更新)
以前的工程在这里可以下载:http://download.csdn.net/detail/u014695839/9763670
以上内容若有问题,大家务必提醒,我定会马上更正!
希望能与大家多多交流。