MyBatis(六)——MyBatis的逆向工程
一、概述
MyBatis的逆向工程指利用MyBatis Generator,可以快速的根据表生成对应的映射文件,接口,以及bean类。
MyBatis Generator,简称MBG,是一个专门为MyBatis框架使用者定制的代码生成器,可以快速的根据表生成对应的映射文件,接口,以及bean类。支持基本的增删改查,以及QBC风格的条件查询。但是表连接、存储过程等这些复杂sql的定义需要我们手工编写。
官方文档地址:
http://www.mybatis.org/generator/
官方工程地址:
https://github.com/mybatis/generator/releases
二、MBG的使用
在使用MBG之前,我们先来看一下数据库中的表与表结构。

OK,MBG使用的使用其实非常简单,只需要两步操作就可以快速的根据表生成对应的映射文件,接口,以及bean类。
一、导入jar包
由于本项目是使用Maven构建的Web项目,所以只需配置pom文件,即可完成对jar包的管理。
在pom文件中加入以下配置。
    <dependency>
      <groupId>org.mybatis.generatorgroupId>
      <artifactId>mybatis-generator-coreartifactId>
      <version>1.3.5version>
    dependency>
二、编写MBG的配置文件
编写MBG的配置文件,这是使用MBG快速生成映射文件,接口,以及bean类的主要操作,也是最重要的步骤。在工程目录下新建MBG的配置文件,命名为mbg.xml。如下所示:

接下来完成对MBG的配置文件的编写。在编写MBG的配置文件的时候,需要注意五处重要的配置,这五个配置也是编写MBG的配置文件最基本的五个步骤。
1)jdbcConnection:配置数据库连接信息
2)javaModelGenerator:配置javaBean的生成策略
3)sqlMapGenerator :配置sql映射文件生成策略
4)javaClientGenerator:配置Mapper接口的生成策略
5)table :配置要逆向解析的数据表
tableName:表名
domainObjectName:对应的javaBean名
MBG的配置文件的示例代码如下所示:
<generatorConfiguration>


    <context id="DB2Tables" targetRuntime="MyBatis3Simple">

        <commentGenerator>
            <property name="suppressAllComments" value="true" />
        commentGenerator>

        <jdbcConnection driverClass="com.mysql.jdbc.Driver"
                        connectionURL="jdbc:mysql://localhost:3306/ssm"
                        userId="root"
                        password="1234">
        jdbcConnection>

        <javaTypeResolver >
            <property name="forceBigDecimals" value="false" />
        javaTypeResolver>


        <javaModelGenerator targetPackage="com.ssm.pojo"
                            targetProject=".\src\main\java">
            <property name="enableSubPackages" value="true" />
            <property name="trimStrings" value="true" />
        javaModelGenerator>


        <sqlMapGenerator targetPackage="mapper"  targetProject=".\src\main\resources">
            <property name="enableSubPackages" value="true" />
        sqlMapGenerator>


        <javaClientGenerator type="XMLMAPPER"
                             targetPackage="com.ssm.dao"
                             targetProject=".\src\main\java">
            <property name="enableSubPackages" value="true" />
        javaClientGenerator>


        <table tableName="tbl_emp" domainObjectName="Employee">table>
        <table tableName="tbl_dept" domainObjectName="Department">table>

    context>
generatorConfiguration>
注1:上面代码的五处配置信息是需要根据实际的项目做更改的。
注2: 在Context标签之下:targetRuntime=“MyBatis3“可以生成带条件的增删改查,targetRuntime=“MyBatis3Simple“可以生成基本的增删改查。如果再次生成,建议将之前生成的数据删除,避免xml向后追加内容出现的问题。
这里有一个讲解MBG配置的blog,传送门——>>>Mybatis Generator最完整配置详解
三、运行代码生成器生成代码
在编写好了MBG的配置文件之后,就可以运行代码生成器生成代码了。
代码生成器代码如下:
@org.junit.Test
public void MBG() throws Exception{
List warnings = new ArrayList();
boolean overwrite = true;
File configFile = new File("mbg.xml");
ConfigurationParser cp = new ConfigurationParser(warnings);
Configuration config = cp.parseConfiguration(configFile);
DefaultShellCallback callback = new DefaultShellCallback(overwrite);
MyBatisGenerator myBatisGenerator = new MyBatisGenerator(config, callback, warnings);
myBatisGenerator.generate(null);
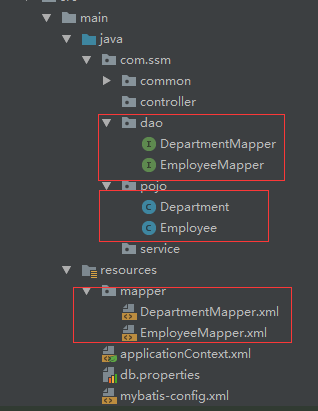
} 在运行成功后,我们可以看到MBG已经根据表的结构为我们自动生成对应的映射文件,接口,以及bean类。
OK,接下来就是对生成文件的测试了。
三、测试
下面只对Employee表的操作做简单测试。测试代码如下:
import com.ssm.dao.EmployeeMapper;
import com.ssm.pojo.Employee;
import org.apache.ibatis.io.Resources;
import org.apache.ibatis.session.SqlSession;
import org.apache.ibatis.session.SqlSessionFactory;
import org.apache.ibatis.session.SqlSessionFactoryBuilder;
import org.junit.runner.RunWith;
import org.mybatis.generator.api.MyBatisGenerator;
import org.mybatis.generator.config.Configuration;
import org.mybatis.generator.config.xml.ConfigurationParser;
import org.mybatis.generator.internal.DefaultShellCallback;
import org.springframework.beans.factory.annotation.Autowired;
import org.springframework.test.context.ContextConfiguration;
import org.springframework.test.context.junit4.SpringJUnit4ClassRunner;

import java.io.File;
import java.io.IOException;
import java.io.InputStream;
import java.util.ArrayList;
import java.util.List;

@ContextConfiguration(locations = {"classpath:applicationContext.xml"})
@RunWith(SpringJUnit4ClassRunner.class)
public class Test {
    @org.junit.Test
    public void MBG() throws Exception{
        List warnings = new ArrayList();
        boolean overwrite = true;
        File configFile = new File("mbg.xml");
        ConfigurationParser cp = new ConfigurationParser(warnings);
        Configuration config = cp.parseConfiguration(configFile);
        DefaultShellCallback callback = new DefaultShellCallback(overwrite);
        MyBatisGenerator myBatisGenerator = new MyBatisGenerator(config, callback, warnings);
        myBatisGenerator.generate(null);
    }

    @Autowired
    private EmployeeMapper employeeMapper;

    @org.junit.Test
    public void selectByPrimaryKey() throws IOException {
        Employee employee = employeeMapper.selectByPrimaryKey(1);
        System.out.println(employee);
    }

    @org.junit.Test
    public void deleteByPrimaryKey() throws IOException {
        employeeMapper.deleteByPrimaryKey(3);
    }

    @org.junit.Test
    public void insert() throws IOException {
        Employee employee = new Employee();
        employee.setEmpName("LiMing");
        employee.setEmail("[email protected]");
        employee.setGender("M");
        employee.setdId(2);
        employeeMapper.insert(employee);
    }

}
上面代码只对Employee表的增删查做了基本测试,经测试生成的代码是可用的,测试结果如下:

![]()