如何在i.MX6平台上编译Nginx
本文主要介绍如何在IMX6平台上编译Nginx。
1、主机开发环境
Ubuntu12.04 32位 arm-fsl-linux-gnueabi-gcc 4.6.2 即arm-none
可以应用在imx6平台。
编译pcre-8.30.tar
cheng@cheng-virtual-machine:~/samba/IAC-IMX6-KIT/ngix-php/install-pcre$ ./configure -host=arm-fsl-linux-gnueabi prefix=/home/cheng/samba/IAC-IMX6-KIT/ngix-php/install-pcre
Make make install
下载地址:https://sourceforge.net/projects/pcre/
2、编译zlib
tar zxvf zlib-1.2.3.tar.gz -C .
cd zlib-1.2.3/
export CC=arm-none-linux-gnueabi-gcc
export CXX=arm-none-linux-gnueabi-g++
export LD=arm-none-linux-gnueabi-ld
export AR=arm-none-linux-gnueabi-ar
export NGX_SYSTEM=linux
./configure --prefix=/home/cheng/samba/QY-imx6s/1.2.4.5-zlib-install
make&&make install
3、编译nginx-1.9.1.tar.gz,具体的修改查看补丁文件
vim src/os/unix/ngx_errno.h 重复定义问题NGX_SYS_NERR (可能出现)
vim auto/lib/pcre/make
交叉编译器配置arm-fsl 就是arm-none
export CC=arm-none-linux-gnueabi-gcc
export CXX=arm-none-linux-gnueabi-g++
export LD=arm-none-linux-gnueabi-ld
export AR=arm-none-linux-gnueabi-ar
export NGX_SYSTEM=linux
export NGX_RELEASE=3.2-XT6
export NGX_MACHINE=arm
我的配置信息
cheng@cheng-virtual-machine:~/samba/IAC-IMX6-KIT/ngix-php/nginx-1.9.1$ ./configure --with-http_stub_status_module --prefix=/home/cheng/samba/IAC-IMX6-KIT/install-ngix --without-http_gzip_module --with-pcre=/home/cheng/samba/IAC-IMX6-KIT/ngix-php/install-pcre --with-cc-opt=" -O2 -Wall -I/home/cheng/samba/IAC-IMX6-KIT/ngix-php/install-pcre/include -L/home/cheng/samba/IAC-IMX6-KIT/ngix-php/install-pcre/lib" --with-zlib=/home/cheng/QY-IMX6S/fsl-linaro-toolchain
备注:zlib的安装包已经被我移动到编译器路径下了
4、错误信息
解决方法:
cheng@cheng-virtual-machine:~/samba/IAC-IMX6-KIT/ngix-php/install-pcre$ cp lib/libpcre.a libpcre.a
cheng@cheng-virtual-machine:~/samba/IAC-IMX6-KIT/ngix-php/install-pcre$ cp lib/libpcre.a libpcre.la
cheng@cheng-virtual-machine:~/samba/IAC-IMX6-KIT/ngix-php/install-pcre$ mkdir -p .libs
cheng@cheng-virtual-machine:~/samba/IAC-IMX6-KIT/ngix-php/install-pcre/.libs$ cp ../lib/libpcre.a libpcre.a
cheng@cheng-virtual-machine:~/samba/IAC-IMX6-KIT/ngix-php/install-pcre/.libs$ cp ../lib/libpcre.a libpcre.la
5、经过上面的修改编译成功
6、运行nginx过程
root@qiyang ~/nginx$ mount -t nfs -o nolock 192.168.1.166:/home/cheng/ /mnt/ 挂载虚拟机到开发板
root@qiyang /mnt/samba/IAC-IMX6-KIT/install-ngix$ cp -r * /root/nginx/ 将安装包拷贝到开发板中
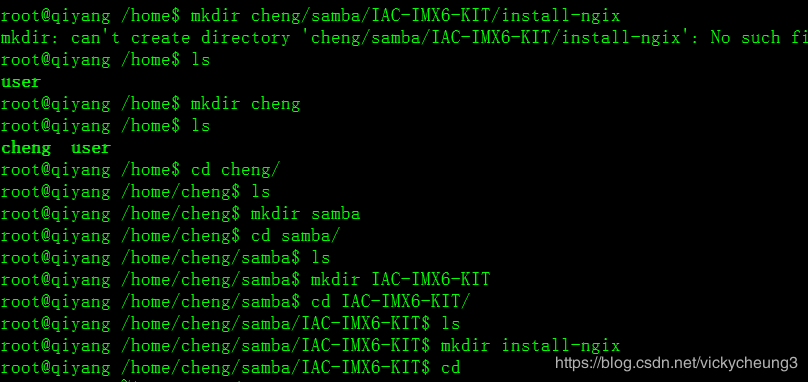
在开发板中创建目录,路径和虚拟机中的安装路径一样
root@qiyang ~/nginx$ cp -r * /home/cheng/samba/IAC-IMX6-KIT/install-ngix/
输入命令运行nginx
root@qiyang /home/cheng/samba/IAC-IMX6-KIT/install-ngix/sbin$ ./nginx
浏览器中输入http://192.168.1.168:80 出现下面的提示表明运行成功。
7、参考链接
https://blog.csdn.net/lili72/article/details/43346655
https://blog.csdn.net/lz_obj/article/details/65447321
http://blog.chinaunix.net/uid-31408117-id-5754560.html
https://blog.csdn.net/zbc415766331/article/details/77987095 最后的配置
8、编译PHP
下载http://www.php.net/downloads.php
export CC=arm-none-linux-gnueabi-gcc
export CXX=arm-none-linux-gnueabi-g++
export LD=arm-none-linux-gnueabi-ld
export AR=arm-none-linux-gnueabi-ar
sudo apt-get install xml2
sudo apt-get install libxml2-dev
sudo apt-get install xml2rfc
配置1
./configure --host=arm-none-linux-gnueabi --prefix=/home/cheng/samba/IAC-IMX6-KIT/ppp/install-php --build=arm-linux --enable-sockets --enable-pdo --disable-all
配置2
./configure --host=arm-none-linux-gnueabi --prefix=/home/cheng/samba/IAC-IMX6-KIT/install-php5.6.4 --build=arm-linux --enable-sockets --enable-pdo --disable-all
编译成功
9、拷贝到开发板。 路径要和你的安装路径保持一样
root@qiyang /mnt/samba/IAC-IMX6-KIT/ppp/php-5.6.40$ cp php.ini-development /home
/cheng/samba/IAC-IMX6-KIT/install-php5.6.4/lib/php.ini
cp php.ini-development /home
/cheng/samba/IAC-IMX6-KIT/install-php5.6.4/lib/php.ini
如有错漏 欢迎指正!!!


