SpringBoot集成Thymeleaf模板引擎实现数据的增删改查
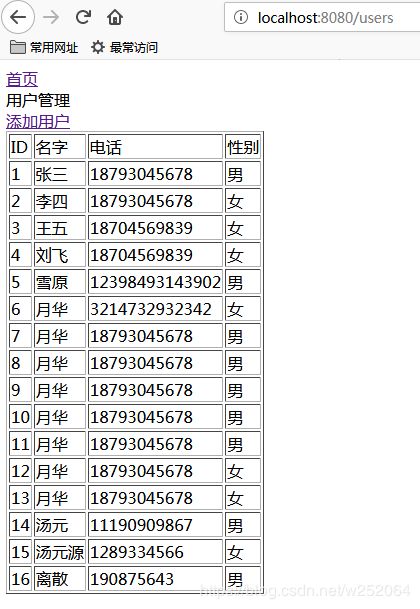
本篇是在上一篇“SpringBoot快速集成MyBatis+MySQL”的基础上,视图层通过集成Thymeleaf,数据持久层通过集成MyBatis从而完成数据的增删改查。
Thymeleaf是什么
简单说, Thymeleaf 是一个跟 Velocity、FreeMarker 类似的模板引擎,它可以完全替代 JSP 。
它的优点:
- 开箱即用,它提供标准和spring标准两种方言,可以直接套用模板实现JSTL、 OGNL表达式效果,避免每天套模板、改jstl、改标签的困扰。同时开发人员也可以扩展和创建自定义的方言;
- Thymeleaf 提供spring标准方言和一个与 SpringMVC 完美集成的可选模块,可以快速的实现表单绑定、属性编辑器、国际化等功能。
使用之前需在pom.xml中先引入依赖
      org.springframework.boot
      spring-boot-starter-thymeleaf
还需要在springboot项目的application.properties做如下配置
#Thymeleaf配置
spring.thymeleaf.cache=false
spring.thymeleaf.encoding=utf-8
spring.thymeleaf.mode=HTML5
spring.thymeleaf.prefix=classpath:/templates/
spring.thymeleaf.suffix=.html
//封装的头部header.html
Title
//首页index.html
ID
名字
电话
性别
没有用户信息!
//添加用户add.html
controller层
package com.example.springboot.controller;

import com.example.springboot.pojo.UserInfo;
import com.example.springboot.service.ExportService;
import com.example.springboot.util.Log4j2Util;
import org.springframework.beans.factory.annotation.Autowired;
import org.springframework.ui.Model;
import org.springframework.web.bind.annotation.GetMapping;
import org.springframework.web.bind.annotation.PostMapping;
import org.springframework.web.bind.annotation.RequestMapping;
import org.springframework.web.bind.annotation.RestController;
import org.springframework.web.servlet.ModelAndView;

import java.util.List;

@RestController
@RequestMapping("/users")
public class UserInfoController {
    @Autowired
    private ExportService userservice;
    /**
     *获取用户列表
     * @author qqg
     * @date
     * @param  * @param model
     * @return
     */
    private List getUserList(){
        List lists = userservice.getUserList();
        Log4j2Util.logger.info("查询到的用户信息:\n"+lists);
        return lists;
    }
   @GetMapping
    public ModelAndView userList(Model model){
    model.addAttribute("userList",getUserList());
    model.addAttribute("title","用户管理");
    return new ModelAndView("index","userModel",model);
   }
   /**
    *创建表单
    * @author qqg
    * @date
    * @param  * @param model
    * @return
    */
   @GetMapping("/form")
    public ModelAndView createForm(Model model){
    model.addAttribute("user",new UserInfo());
    model.addAttribute("title","添加用户");
    return new ModelAndView("add","userModel",model);
   }
   /**
    *功能描述 添加用户
    * @author qqg
    * @date
    * @param  * @param user
    * @return
    */
  @PostMapping("/add")
    public ModelAndView addUser(UserInfo user){
    int result = userservice.saveUserInfo(user);
    Log4j2Util.logger.info("添加结果:\n"+result);
    return new ModelAndView("redirect:/users");
  }

}
服务层service
package com.example.springboot.service;

import com.example.springboot.pojo.UserInfo;

import java.util.List;

public interface ExportService {

    List getUserList();

    Integer saveUserInfo(UserInfo user);
}
//服务实现impl
package com.example.springboot.service.impl;

import com.example.springboot.dao.UserInfoMapper;
import com.example.springboot.pojo.UserInfo;
import com.example.springboot.service.ExportService;
import org.springframework.beans.factory.annotation.Autowired;
import org.springframework.stereotype.Service;

import java.util.List;
@Service
public class ExportServiceImpl implements ExportService{
    @Autowired
    private UserInfoMapper userinfomapper;

    @Override
    public List getUserList() {
        List lists = userinfomapper.getAllUserInfo();
        return lists;
    }

    @Override
    public Integer saveUserInfo(UserInfo user) {
        return userinfomapper.saveUserInfo(user);
    }
}
数据持久层dao
package com.example.springboot.dao;

import com.example.springboot.pojo.UserInfo;

import java.util.List;
@Mapper
public interface UserInfoMapper {

    List getAllUserInfo();

    Integer saveUserInfo(UserInfo user);
}
UserInfoMapper.xml
USER_ID, USER_NAME, PHONE, SEX
INSERT INTO user_info(USER_ID,USER_NAME,PHONE,SEX)
VALUES (#{userId},#{userName},#{phone},#{sex})
实体类pojo
package com.example.springboot.pojo;

public class UserInfo {
    private Integer userId;
    private String userName;
    private String phone;
    private String sex;

    public Integer getUserId() {
        return userId;
    }

    public void setUserId(Integer userId) {
        this.userId = userId;
    }

    public String getUserName() {
        return userName;
    }

    public void setUserName(String userName) {
        this.userName = userName;
    }

    public String getPhone() {
        return phone;
    }

    public void setPhone(String phone) {
        this.phone = phone;
    }

    public String getSex() {
        return sex;
    }

    public void setSex(String sex) {
        this.sex = sex;
    }

    public UserInfo() {
    }

    public UserInfo(Integer userId, String userName, String phone, String sex) {
        this.userId = userId;
        this.userName = userName;
        this.phone = phone;
        this.sex = sex;
    }

    @Override
    public String toString() {
        return "UserInfo{" +
                "userId=" + userId +
                ", userName='" + userName + '\'' +
                ", phone='" + phone + '\'' +
                ", sex='" + sex + '\'' +
                '}';
    }
}
启动类SpringbootApplication
package com.example.springboot;

import org.springframework.boot.SpringApplication;
import org.springframework.boot.autoconfigure.SpringBootApplication;
import org.springframework.boot.autoconfigure.jdbc.DataSourceAutoConfiguration;
import org.springframework.transaction.annotation.EnableTransactionManagement;

@SpringBootApplication
@EnableTransactionManagement
public class SpringbootApplication {

	public static void main(String[] args) {
		SpringApplication.run(SpringbootApplication.class, args);
		System.out.println("启动成功");
	}
}
除了上面这些基本的操作之外,springboot项目还要做些配置,程序才能够正常运行起来,
package com.example.springboot.config;

import org.apache.ibatis.type.TypeAliasRegistry;
import org.mybatis.spring.SqlSessionFactoryBean;
import org.springframework.context.ApplicationContext;
import org.springframework.context.annotation.Bean;
import org.springframework.context.annotation.Configuration;

import javax.annotation.Resource;
import javax.sql.DataSource;
import java.io.IOException;
/**
 *配置与连接池的会话
 * @author Lrd
 * @date 2018/10/30
 * @param  * @param null
 * @return
 */
@Configuration
public class MyBatisConfig {
    @Resource
    private DataSource dataSource;
    @Bean(name = "sqlSessionFactory")
    public SqlSessionFactoryBean sqlSessionFactoryBean(ApplicationContext applicationContext)throws IOException{
        SqlSessionFactoryBean sqlSessionFactory = new SqlSessionFactoryBean();
        sqlSessionFactory.setDataSource(dataSource);
        sqlSessionFactory.setMapperLocations(applicationContext.getResources("classpath*:mapping/*.xml"));
        sqlSessionFactory.setTypeAliasesPackage("com.example.springboot.pojo");
        //别名注册器
        TypeAliasRegistry typeAliasRegistry = new TypeAliasRegistry();
        typeAliasRegistry.registerAlias("STDOUT_LOGGING", MyBatisConfig.class);
        return sqlSessionFactory;
    }

}
application.properties
server.port=8080
# 数据库访问配置
spring.datasource.type=com.alibaba.druid.pool.DruidDataSource
spring.datasource.driver-class-name=com.mysql.jdbc.Driver
spring.datasource.url=jdbc:mysql://localhost:3306/shop?useUnicode=true&characterEncoding=gbk&zeroDateTimeBehavior=convertToNull&useSSL=false
spring.datasource.username=root
spring.datasource.password=root
# 下面为连接池的补充设置,应用到上面所有数据源中
spring.datasource.initialSize=5
spring.datasource.minIdle=5
spring.datasource.maxActive=20
# 配置获取连接等待超时的时间
spring.datasource.maxWait=60000
# 配置间隔多久才进行一次检测,检测需要关闭的空闲连接,单位是毫秒
spring.datasource.timeBetweenEvictionRunsMillis=60000
# 配置一个连接在池中最小生存的时间,单位是毫秒
spring.datasource.minEvictableIdleTimeMillis=300000
spring.datasource.validationQuery=SELECT 1 FROM DUAL
spring.datasource.testWhileIdle=true
spring.datasource.testOnBorrow=false
spring.datasource.testOnReturn=false
#Thymeleaf配置
spring.thymeleaf.cache=false
spring.thymeleaf.encoding=utf-8
spring.thymeleaf.mode=HTML5
spring.thymeleaf.prefix=classpath:/templates/
spring.thymeleaf.suffix=.html
日志log4j2的配置
先引入依赖
 org.springframework.boot
spring-boot-starter


	org.springframework.boot
	spring-boot-starter-logging


org.springframework.boot
spring-boot-starter-log4j2
然后,创建log4j2.xml
            %d{yyyy-MM-dd HH:mm:ss.SSS} %5p ${hostName} --- [%15.15t] %-40.40c{1.} : %m%n%ex

        logs


                ${LOG_PATTERN}
最后,在util中创建工具类Log4j2Util
package com.example.springboot.util;

import org.apache.logging.log4j.LogManager;
import org.apache.logging.log4j.Logger;

public class Log4j2Util {
    public static final Logger logger = LogManager.getLogger(Log4j2Util.class);
}


