FFMPEG 之视频播放
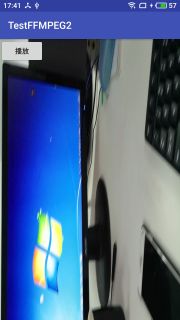
先看界面效果,虽然有点low,但是效果实现了
一、实现原理
1、使用ffmpeg解码视频
2、然后使用libyuv播放解码的视频
二、实现
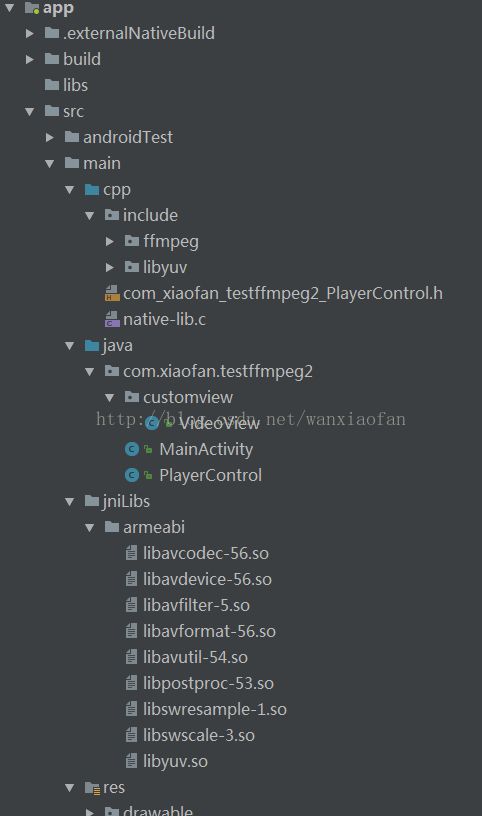
1、先看目录结构
2、ffmpeg编译以及引用,在之前的篇章已经说过了,不知道得可以看看之前的文章
3、编译libyuv
1、首先在https://chromium.googlesource.com/external/libyuv下载源码,然后上传至Linux服务器下(因为我是在Linux下编译的)
2、这是libyuv的目录

3、创建libyuv目录,在下边创建jni目录,把libyuv源码拷入jni目录下
4、编译libyuv,进入jni目录下输入ndk-build命令,编译即可,然后会生成相应的so和头文件
![]()
这是生成好的目录,在libs中就有生成好的so文件
![]()
5、把生成好的so放入对应的文件,把源码中include文件的源码放入Android项目中
4、创建native方法PlayerControl.java
package com.xiaofan.testffmpeg2;

import android.view.Surface;

public class PlayerControl {
    public native void render(String input, Surface surface);


    static {
        System.loadLibrary("avutil-54");
        System.loadLibrary("swresample-1");
        System.loadLibrary("avcodec-56");
        System.loadLibrary("avformat-56");
        System.loadLibrary("swscale-3");
        System.loadLibrary("postproc-53");
        System.loadLibrary("avfilter-5");
        System.loadLibrary("avdevice-56");
        System.loadLibrary("native-lib");
    }
}
5、使用javah命令生成头文件
com_xiaofan_testffmpeg2_PlayerControl.h
/* DO NOT EDIT THIS FILE - it is machine generated */
#include
/* Header for class com_xiaofan_testffmpeg2_PlayerControl */

#ifndef _Included_com_xiaofan_testffmpeg2_PlayerControl
#define _Included_com_xiaofan_testffmpeg2_PlayerControl
#ifdef __cplusplus
extern "C" {
#endif
/*
 * Class:     com_xiaofan_testffmpeg2_PlayerControl
 * Method:    render
 * Signature: (Ljava/lang/String;)V
 */
JNIEXPORT void JNICALL Java_com_xiaofan_testffmpeg2_PlayerControl_render
  (JNIEnv *, jobject, jstring, jobject);
#ifdef __cplusplus
}
#endif
#endif VideoView.java
package com.xiaofan.testffmpeg2.customview;
import android.content.Context;
import android.graphics.PixelFormat;
import android.util.AttributeSet;
import android.view.SurfaceHolder;
import android.view.SurfaceView;
public class VideoView extends SurfaceView{

    public VideoView(Context context) {
        super(context);
        init();
    }

    public VideoView(Context context, AttributeSet attrs) {
        super(context, attrs);
        init();
    }

    public VideoView(Context context, AttributeSet attrs, int defStyleAttr) {
        super(context, attrs, defStyleAttr);
        init();
    }
    private void init(){
        //初始化,SurfaceView绘制的像素格式
        SurfaceHolder holder=getHolder();
        //RGBA_8888 色彩丰富,但是占用的内存大
        holder.setFormat(PixelFormat.RGBA_8888);
    }
}
MainActivity.java
package com.xiaofan.testffmpeg2;
import android.os.Bundle;
import android.os.Environment;
import android.support.v7.app.AppCompatActivity;
import android.util.Log;
import android.view.View;
import com.xiaofan.testffmpeg2.customview.VideoView;
import java.io.File;
public class MainActivity extends AppCompatActivity {
    VideoView myVideoView;
    private PlayerControl playerControl;
    private String inputStr="";

    @Override
    protected void onCreate(Bundle savedInstanceState) {
        super.onCreate(savedInstanceState);
        setContentView(R.layout.activity_main);
        playerControl=new PlayerControl();
        myVideoView = findViewById(R.id.myVideoView);
        inputStr= new File(Environment.getExternalStorageDirectory(), "aaaa.mp4").getAbsolutePath();
        findViewById(R.id.test).setOnClickListener(new View.OnClickListener() {
            @Override
            public void onClick(View v) {
                playerControl.render(inputStr,myVideoView.getHolder().getSurface());
            }
        });
    }

}
native-lib.c
#include "com_xiaofan_testffmpeg2_PlayerControl.h"
#include
#include
#include
#include
#include

#define LOGI(FORMAT, ...) __android_log_print(ANDROID_LOG_INFO,"wanxiaofan",FORMAT,##__VA_ARGS__);
#define LOGE(FORMAT, ...) __android_log_print(ANDROID_LOG_ERROR,"wanxiaofan",FORMAT,##__VA_ARGS__);
//封装格式
#include "include/ffmpeg/libavformat/avformat.h"
//解码
#include "include/ffmpeg/libavcodec/avcodec.h"
//缩放
#include "include/ffmpeg/libswscale/swscale.h"
#include "include/ffmpeg/libavutil/avutil.h"
#include "include/ffmpeg/libavutil/frame.h"

#include "include/libyuv/libyuv.h"
#include


JNIEXPORT void JNICALL Java_com_xiaofan_testffmpeg2_PlayerControl_render
        (JNIEnv *env, jobject obj, jstring input_jstr, jobject surface) {
    const char *input_cstr = (*env)->GetStringUTFChars(env, input_jstr,
                                                       JNI_FALSE);
    //1、注册组件
    av_register_all();
    //2、打开输入视频文件
    AVFormatContext *pFormatCtx = avformat_alloc_context();
    LOGE("%s", input_cstr);
    if (avformat_open_input(&pFormatCtx, input_cstr, NULL, NULL) != 0) {
        LOGE("%s", "打开输入视频文件失败!");
        return;
    };
    //3、获取视频信息
    if (avformat_find_stream_info(pFormatCtx, NULL) < 0) {
        LOGE("%s", "获取视频信息失败!");
        return;
    }
    //视频解码,需要找到视频对应的AVStream所在pFormatCtx->streams的索引位置
    int video_stream_idx = -1;
    int i = 0;
    for (; i < pFormatCtx->nb_streams; i++) {
        if (pFormatCtx->streams[i]->codec->codec_type == AVMEDIA_TYPE_VIDEO) {
            video_stream_idx = i;
            break;
        }
    }
    //4.获取视频解码器
    AVCodecContext *pCodeCtx =
            pFormatCtx->streams[video_stream_idx]->codec;
    AVCodec *pCodec = avcodec_find_decoder(pCodeCtx->codec_id);
    if (pCodec == NULL) {
        LOGE("%s", "无法解码!");
        return;
    }
    //5、打开解码器
    if (avcodec_open2(pCodeCtx, pCodec, NULL) < 0) {
        LOGE("%s", "无法打开解码器!");
        return;
    };
    //压缩数据
    AVPacket *packet = (AVPacket *) av_malloc(sizeof(AVPacket));
    //像素数据(解码数据)
    AVFrame *yuvFrame = av_frame_alloc();
    AVFrame *rgbFrame = av_frame_alloc();
    //native绘制
    ANativeWindow *nativeWindow = ANativeWindow_fromSurface(env, surface);

    //只有指定了AVFrame的像素格式、画面大小才能真正分配内存
    //缓冲区分配内存
    uint8_t *out_buffer = (uint8_t *) av_malloc
            (avpicture_get_size(AV_PIX_FMT_YUV420P, pCodeCtx->width, pCodeCtx->height));
    //初始化缓冲区
    avpicture_fill((AVPicture *) yuvFrame, out_buffer, AV_PIX_FMT_YUV420P,
                   pCodeCtx->width, pCodeCtx->height);
    ANativeWindow_Buffer outBuffer;
    //6、一帧一帧读取压缩的视频数据AVPacket
    int len, got_frame, framecount = 0;
    while (av_read_frame(pFormatCtx, packet) >= 0) {
        //AVPacket
        len = avcodec_decode_video2(pCodeCtx, yuvFrame, &got_frame, packet);
        //非零,正在解码
        if (got_frame) {

            LOGI("解码%d帧", framecount++);
            //lock
            //设置缓冲区的宽、高、像素格式
            ANativeWindow_setBuffersGeometry(nativeWindow, pCodeCtx->width, pCodeCtx->height,
                                             WINDOW_FORMAT_RGBA_8888);
            ANativeWindow_lock(nativeWindow, &outBuffer, NULL);
            //设置yuvFrame的缓冲区,像素格式

            //rgb_fragme缓冲区与outBuffer.bits是同一块内存
            avpicture_fill((AVPicture *) rgbFrame, outBuffer.bits, PIX_FMT_RGBA, pCodeCtx->width,
                           pCodeCtx->height);
            //YUV->RGBA_8888
            I420ToARGB(yuvFrame->data[0], yuvFrame->linesize[0],
                       yuvFrame->data[2], yuvFrame->linesize[2],
                       yuvFrame->data[1], yuvFrame->linesize[1],
                       rgbFrame->data[0], rgbFrame->linesize[0],
                       pCodeCtx->width, pCodeCtx->height);

            //fix buffer


            //unlock
            ANativeWindow_unlockAndPost(nativeWindow);


            usleep(1000 * 16);
        }
        av_free_packet(packet);
    }
    ANativeWindow_release(nativeWindow);
    avcodec_close(pCodeCtx);
    avformat_free_context(pFormatCtx);
    (*env)->ReleaseStringUTFChars(env, input_jstr, input_cstr);
}
9、CMakeLists.txt
cmake_minimum_required(VERSION 3.4.1)


add_library(native-lib
             SHARED
             src/main/cpp/native-lib.c )
find_library(log-lib
              log )


add_library(libavcodec-56
            SHARED
            IMPORTED)

set_target_properties(libavcodec-56
                      PROPERTIES IMPORTED_LOCATION
                      ${CMAKE_CURRENT_SOURCE_DIR}/src/main/jniLibs/armeabi/libavcodec-56.so)

add_library(libavdevice-56
            SHARED
            IMPORTED)
set_target_properties(libavdevice-56
                      PROPERTIES IMPORTED_LOCATION
                      ${CMAKE_CURRENT_SOURCE_DIR}/src/main/jniLibs/armeabi/libavdevice-56.so)

add_library(libavfilter-5
            SHARED
            IMPORTED)
set_target_properties(libavfilter-5
                      PROPERTIES IMPORTED_LOCATION
                      ${CMAKE_CURRENT_SOURCE_DIR}/src/main/jniLibs/armeabi/libavfilter-5.so)

add_library(libavformat-56
            SHARED
            IMPORTED)
set_target_properties(libavformat-56
                      PROPERTIES IMPORTED_LOCATION
                      ${CMAKE_CURRENT_SOURCE_DIR}/src/main/jniLibs/armeabi/libavformat-56.so)
add_library(libavutil-54
            SHARED
            IMPORTED)
set_target_properties(libavutil-54
                      PROPERTIES IMPORTED_LOCATION
                      ${CMAKE_CURRENT_SOURCE_DIR}/src/main/jniLibs/armeabi/libavutil-54.so)
add_library(libpostproc-53
            SHARED
            IMPORTED)
set_target_properties(libpostproc-53
                      PROPERTIES IMPORTED_LOCATION
                      ${CMAKE_CURRENT_SOURCE_DIR}/src/main/jniLibs/armeabi/libpostproc-53.so)

add_library(libswresample-1
            SHARED
            IMPORTED)
set_target_properties(libswresample-1
                      PROPERTIES IMPORTED_LOCATION
                      ${CMAKE_CURRENT_SOURCE_DIR}/src/main/jniLibs/armeabi/libswresample-1.so)
add_library(libswscale-3
           SHARED
           IMPORTED)
set_target_properties(libswscale-3
                      PROPERTIES IMPORTED_LOCATION
                      ${CMAKE_CURRENT_SOURCE_DIR}/src/main/jniLibs/armeabi/libswscale-3.so)

add_library(libyuv
            SHARED
            IMPORTED)
set_target_properties(libyuv
                      PROPERTIES IMPORTED_LOCATION
                      ${CMAKE_CURRENT_SOURCE_DIR}/src/main/jniLibs/armeabi/libyuv.so)

target_link_libraries(  native-lib
                        android
                        libavcodec-56
                        libavdevice-56
                        libavfilter-5
                        libavformat-56
                        libavutil-54
                        libpostproc-53
                        libswresample-1
                        libswscale-3
                        libyuv
                       ${log-lib} )
这样就可以播放视频了,支持的格式还挺多,比如mp4、mkv、avi、flv等格式都支持
我会在我的资源里边附上libyuv的源码和编译好的so文件