docker 编排
docker compose 单机 docker swarm 集群 docker machine 预处理工具
mesos 资源分配工具,不能直接运行容器 marathon 运行容器框架
kubernetes(k8s) 重点学习的编排软件

主流的场景应用
DevOps MicroServices(微服务),Blockchain(区块链)
DevOps 应用模式的开发模式,现在主流的开发模式,其实就是一个生态环境,一个协作的生态环境
DevOps 的名称解释
CI 持续集成
CD 持续交付 DELIVERY
CD 持续部署 Deployment
容器技术的形成,让DevOps 更加方便,所以容器的编排是势在必行的一种方案,这样k8s的强势发布
k8s 是基于谷歌的Borg 的理论构建的项目
自动部署,自我修复,自动扩展,服务发现和负载均衡,自动发布和回滚
密钥和配置管理, 存储编排, 批处理运行
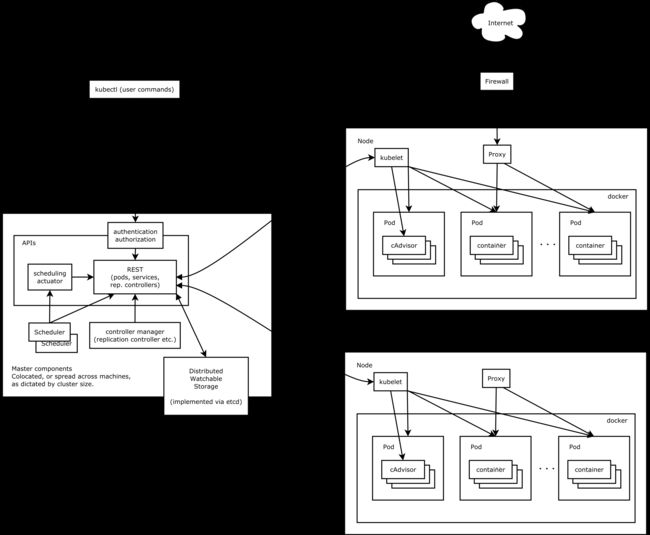
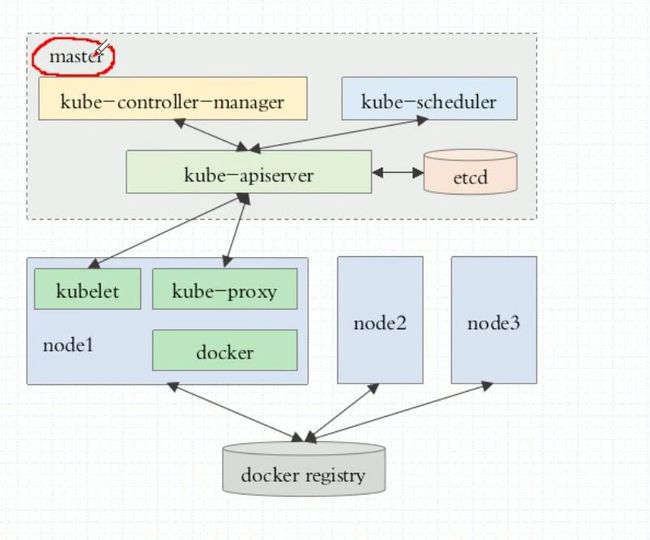
k8s(集群架构)Master/Nodes
Master: API server Scheduler Controller-Manager 3个守护进程
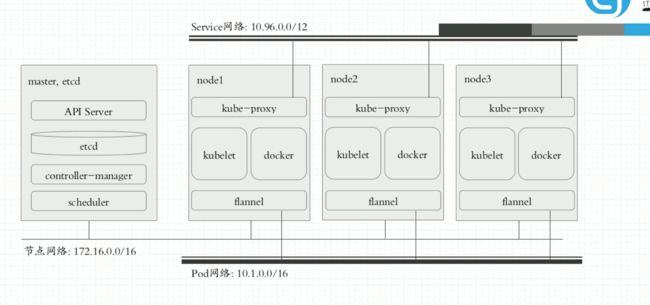
Node: kubelet Pod docker(3个核心组件)kube-proxy flannel(pod网络组件)
pod: Label(key=value),Label Selector 标签选择器
*自主式Pod
*控制器管理的Pod
ReplicationController(RC) Replica Set(RS) Deployment
DaemonSet(后台支撑服务集) PetSet Job(任务) StatefulSet(有状态服务集)
注:Horizontal Pod Autoscaling可以根据CPU使用率或应用自定义metrics自动扩展
Pod数量(支持replication controller、deployment和replica set)
etcd 保存了整个集群的状态
所有master的持续状态都存在etcd的一个实例中。这可以很好地存储配置数据。
因为有watch(观察者)的支持,各部件协调中的改变可以很快被察觉。
注:为了足够安全,所有的交互都需要HTTPS,所以生产环境中最好都是HTTPS
k8s网络

Pod 网络 内部网络
同一Pod内的通信:lo
各Pod之间的通信通过插件overlay network(叠加网络)访问
pod与service 之间的通信 通过iptables规则来实现(创建service自动生成的)
server 网络 集群网络 通过kube-proxy管控和分发
node 网络 实际使用的节点网络
CNI:网络解决方案遵循的API插件,以下是常用组件:
flannel:网络配置
calico:网络配置 网络策略 这种模式比较繁杂
canel:以上两种的综合体 用上面的配置,下面的策略
可以当节点守护进程运行,也可以通过POD运行
参考的文档:https://www.kubernetes.org.cn/kubernetes%e8%ae%be%e8%ae%a1%e6%9e%b6%e6%9e%84
k8s 安装
手动安装:都按系统级的守护进程运行,唯一的复杂点是配置HTTPS
ansibe安装:就是通过ansibe安装的,也是运行成系统级的守护进程
kubeadm安装:前提在安装之前,安装kubelet,docker,flannel
因为的所有的进程和组件都运行成POD(静态),也可以运行成托管的,这个比较复杂
https://github.com/kubernetes/kubeadm/blob/master/docs/design/design_v1.10.md
环境:
k8s-master: etcd: 10.211.55.11
k8s-node1: 10.211.55.12
k8s-node2: 10.211.55.13
初始化:
本环境centos 7.6 7.6.1810
1.基于主机名通信:/etc/hosts
10.211.55.11 k8s-master
10.211.55.12 k8s-node1
10.211.55.13 k8s-node2
2.时间同步;
0 1 * * * /usr/sbin/ntpdate pool.ntp.org
3.关闭系统防火墙,selinux
service firewalld stop
chkconfig firewalld off
service iptables stop
iptalbes -F
chkconfig iptalbes on
selinux=disable
4.优化内核
vm.swappiness = 0
net.bridge.bridge-nf-call-ip6tables=1
net.bridge.bridge-nf-call-iptables=1
net.ipv4.ip_forward = 1
5.yum 配置
安装扩展源
yum -y install epel-release(如pip这种包就在扩展源里面)
配置docker-ce.repo k8s.repo
去阿里云下载相应的yum仓库
cd /etc/yum.repos.d/
wget https://mirrors.aliyun.com/docker-ce/linux/centos/docker-ce.repo
vim k8s.repo
[kubernetes]
name=k8s
gpgcheck=1
gpgkey=https://mirrors.aliyun.com/kubernetes/yum/doc/yum-key.gpg \
https://mirrors.aliyun.com/kubernetes/yum/doc/rpm-package-key.gpg
enable=1
yum repolist
yum install docker-ce kubeadm kubectl -y
6.默认是不推荐用交换分区
swapoff -a 可以在fstab 里面不加入交换分区,或者开机启动里面去加入改命令
不过通过设置初始化参数可以让交换分区存在
reboot 让优化生效
k8s-master配置:
service docker restart
chkconfig docker on
chkcofig kubelet on
[root@k8s-master yum.repos.d]# cat /etc/sysconfig/kubelet
KUBELET_EXTRA_ARGS=
如果交换分区没有关闭配置如下
KUBELET_EXTRA_ARGS="--fail-swap-on=false" 同时在kubeadm init
初始化的时候也指定一个--ignore-preflight-errors=Swap
因为初始化涉及到海外的镜像,天朝访问不了,两种方式做代理
1.代理方式来实现镜像的下载
参考文档
https://www.cnblogs.com/cheyunhua/p/8683956.html
https://i.jakeyu.top/2017/03/16/centos%E4%BD%BF%E7%94%A8SS%E7%BF%BB%E5%A2%99/
实验的前提是我们通过能访问外网节点通过s+privoxy实现全局代理
也就是给docker设置代理后,能直接从谷歌官网拉取集群所需的镜像。
vim /usr/lib/systemd/system/docker.service
Environment="HTTPS_PROXY=http://127.0.0.1:8118"
Environment="NO_PROXY=127.0.0.0/8,127.20.0.0/16"
systemctl daemon-reload
service docker restart
这种方式不推荐,配置比较麻烦
2.通过别人已经提供的国内镜像,然后pull到本地,修改对应的tag
查看kubeadm需要的镜像版本
[root@k8s-master ~]# kubeadm config images list
k8s.gcr.io/kube-apiserver:v1.13.4
k8s.gcr.io/kube-controller-manager:v1.13.4
k8s.gcr.io/kube-scheduler:v1.13.4
k8s.gcr.io/kube-proxy:v1.13.4
k8s.gcr.io/pause:3.1
k8s.gcr.io/etcd:3.2.24
k8s.gcr.io/coredns:1.2.6
这个是网上提供的镜像仓库,完成以后自己把这些镜像做成私有仓库,或者打包,到时直接导入使用
https://github.com/openthings/kubernetes-tools/tree/master/kubeadm/2-images
我们是1.13.4 所以下载kubernetes-pull-aliyun-1.13.4.sh
或者复制下面的内容
echo "Pull Kubernetes v1.13.4 Images from aliyuncs.com ......"
MY_REGISTRY=registry.cn-hangzhou.aliyuncs.com/openthings
## 拉取镜像
docker pull ${MY_REGISTRY}/k8s-gcr-io-kube-apiserver:v1.13.4
docker pull ${MY_REGISTRY}/k8s-gcr-io-kube-controller-manager:v1.13.4
docker pull ${MY_REGISTRY}/k8s-gcr-io-kube-scheduler:v1.13.4
docker pull ${MY_REGISTRY}/k8s-gcr-io-kube-proxy:v1.13.4
docker pull ${MY_REGISTRY}/k8s-gcr-io-etcd:3.2.24
docker pull ${MY_REGISTRY}/k8s-gcr-io-pause:3.1
docker pull ${MY_REGISTRY}/k8s-gcr-io-coredns:1.2.6
## 添加Tag
docker tag ${MY_REGISTRY}/k8s-gcr-io-kube-apiserver:v1.13.4 k8s.gcr.io/kube-apiserver:v1.13.4
docker tag ${MY_REGISTRY}/k8s-gcr-io-kube-scheduler:v1.13.4 k8s.gcr.io/kube-scheduler:v1.13.4
docker tag ${MY_REGISTRY}/k8s-gcr-io-kube-controller-manager:v1.13.4 k8s.gcr.io/kube-controller-manager:v1.13.4
docker tag ${MY_REGISTRY}/k8s-gcr-io-kube-proxy:v1.13.4 k8s.gcr.io/kube-proxy:v1.13.4
docker tag ${MY_REGISTRY}/k8s-gcr-io-etcd:3.2.24 k8s.gcr.io/etcd:3.2.24
docker tag ${MY_REGISTRY}/k8s-gcr-io-pause:3.1 k8s.gcr.io/pause:3.1
docker tag ${MY_REGISTRY}/k8s-gcr-io-coredns:1.2.6 k8s.gcr.io/coredns:1.2.6
#删除原始镜像
docker rmi registry.cn-hangzhou.aliyuncs.com/openthings/k8s-gcr-io-kube-apiserver:v1.13.4
docker rmi registry.cn-hangzhou.aliyuncs.com/openthings/k8s-gcr-io-kube-controller-manager:v1.13.4
docker rmi registry.cn-hangzhou.aliyuncs.com/openthings/k8s-gcr-io-kube-scheduler:v1.13.4
docker rmi registry.cn-hangzhou.aliyuncs.com/openthings/k8s-gcr-io-kube-proxy:v1.13.4
docker rmi registry.cn-hangzhou.aliyuncs.com/openthings/k8s-gcr-io-etcd:3.2.24
docker rmi registry.cn-hangzhou.aliyuncs.com/openthings/k8s-gcr-io-pause:3.1
docker rmi registry.cn-hangzhou.aliyuncs.com/openthings/k8s-gcr-io-coredns:1.2.6
echo "Pull Kubernetes v1.13.4 Images FINISHED."
[root@k8s-master ~]# docker images
REPOSITORY TAG IMAGE ID CREATED SIZE
k8s.gcr.io/kube-proxy v1.13.4 fadcc5d2b066 2 weeks ago 80.3MB
k8s.gcr.io/kube-controller-manager v1.13.4 40a817357014 2 weeks ago 146MB
k8s.gcr.io/kube-scheduler v1.13.4 dd862b749309 2 weeks ago 79.6MB
k8s.gcr.io/kube-apiserver v1.13.4 fc3801f0fc54 2 weeks ago 181MB
k8s.gcr.io/coredns 1.2.6 f59dcacceff4 4 months ago 40MB
k8s.gcr.io/etcd 3.2.24 3cab8e1b9802 5 months ago 220MB
k8s.gcr.io/pause 3.1 da86e6ba6ca1 15 months ago 742kB
下载镜像已经到本地了,可以初始化了
kubeadm init --help 查看响应的参数
如果没有禁用交换分区
#kubeadm init --pod-network-cidr=10.244.0.0/16 --ignore-preflight-errors=Swap
如果运行的有问题,可以重置,重新初始化 kubeadm reset
[root@k8s-master ~]#kubeadm init --pod-network-cidr=10.244.0.0/16
下面初始化的输出内容:
[init] Using Kubernetes version: v1.13.4
[preflight] Running pre-flight checks
[WARNING SystemVerification]: this Docker version is not on the list of validated versions: 18.09.3. Latest validated version: 18.06
[preflight] Pulling images required for setting up a Kubernetes cluster
[preflight] This might take a minute or two, depending on the speed of your internet connection
[preflight] You can also perform this action in beforehand using 'kubeadm config images pull'
[kubelet-start] Writing kubelet environment file with flags to file "/var/lib/kubelet/kubeadm-flags.env"
[kubelet-start] Writing kubelet configuration to file "/var/lib/kubelet/config.yaml"
[kubelet-start] Activating the kubelet service
[certs] Using certificateDir folder "/etc/kubernetes/pki"
[certs] Generating "front-proxy-ca" certificate and key
[certs] Generating "front-proxy-client" certificate and key
[certs] Generating "etcd/ca" certificate and key
[certs] Generating "etcd/server" certificate and key
[certs] etcd/server serving cert is signed for DNS names [k8s-master localhost] and IPs [10.211.55.11 127.0.0.1 ::1]
[certs] Generating "apiserver-etcd-client" certificate and key
[certs] Generating "etcd/peer" certificate and key
[certs] etcd/peer serving cert is signed for DNS names [k8s-master localhost] and IPs [10.211.55.11 127.0.0.1 ::1]
[certs] Generating "etcd/healthcheck-client" certificate and key
[certs] Generating "ca" certificate and key
[certs] Generating "apiserver" certificate and key
[certs] apiserver serving cert is signed for DNS names [k8s-master kubernetes kubernetes.default kubernetes.default.svc kubernetes.default.svc.cluster.local] and IPs [10.96.0.1 10.211.55.11]
[certs] Generating "apiserver-kubelet-client" certificate and key
[certs] Generating "sa" key and public key
[kubeconfig] Using kubeconfig folder "/etc/kubernetes"
[kubeconfig] Writing "admin.conf" kubeconfig file
[kubeconfig] Writing "kubelet.conf" kubeconfig file
[kubeconfig] Writing "controller-manager.conf" kubeconfig file
[kubeconfig] Writing "scheduler.conf" kubeconfig file
[control-plane] Using manifest folder "/etc/kubernetes/manifests"
[control-plane] Creating static Pod manifest for "kube-apiserver"
[control-plane] Creating static Pod manifest for "kube-controller-manager"
[control-plane] Creating static Pod manifest for "kube-scheduler"
[etcd] Creating static Pod manifest for local etcd in "/etc/kubernetes/manifests"
[wait-control-plane] Waiting for the kubelet to boot up the control plane as static Pods from directory "/etc/kubernetes/manifests". This can take up to 4m0s
[apiclient] All control plane components are healthy after 18.003047 seconds
[uploadconfig] storing the configuration used in ConfigMap "kubeadm-config" in the "kube-system" Namespace
[kubelet] Creating a ConfigMap "kubelet-config-1.13" in namespace kube-system with the configuration for the kubelets in the cluster
[patchnode] Uploading the CRI Socket information "/var/run/dockershim.sock" to the Node API object "k8s-master" as an annotation
[mark-control-plane] Marking the node k8s-master as control-plane by adding the label "node-role.kubernetes.io/master=''"
[mark-control-plane] Marking the node k8s-master as control-plane by adding the taints [node-role.kubernetes.io/master:NoSchedule]
[bootstrap-token] Using token: nhuc7d.5ylujsvpkzaozf1q
[bootstrap-token] Configuring bootstrap tokens, cluster-info ConfigMap, RBAC Roles
[bootstraptoken] configured RBAC rules to allow Node Bootstrap tokens to post CSRs in order for nodes to get long term certificate credentials
[bootstraptoken] configured RBAC rules to allow the csrapprover controller automatically approve CSRs from a Node Bootstrap Token
[bootstraptoken] configured RBAC rules to allow certificate rotation for all node client certificates in the cluster
[bootstraptoken] creating the "cluster-info" ConfigMap in the "kube-public" namespace
[addons] Applied essential addon: CoreDNS
[addons] Applied essential addon: kube-proxy
Your Kubernetes master has initialized successfully!
To start using your cluster, you need to run the following as a regular user:
mkdir -p $HOME/.kube
sudo cp -i /etc/kubernetes/admin.conf $HOME/.kube/config
sudo chown $(id -u):$(id -g) $HOME/.kube/config
You should now deploy a pod network to the cluster.
Run "kubectl apply -f [podnetwork].yaml" with one of the options listed at:
https://kubernetes.io/docs/concepts/cluster-administration/addons/
You can now join any number of machines by running the following on each node
as root:
kubeadm join 10.211.55.11:6443 --token nhuc7d.5ylujsvpkzaozf1q --discovery-token-ca-cert-hash sha256:819b8e62790e1a8880e7d9f948a6154c7f006f278d5dd2d8300ea89b94a03f87
这条保存好比较重要,其他节点加入要用
按提示设置用户配置消息,用于和API apiserver 交换,生产环境建议不要用root
mkdir -p $HOME/.kube
cp -i /etc/kubernetes/admin.conf $HOME/.kube/config
chown $(id -u):$(id -g) $HOME/.kube/config
如果没有设置运行的客户端和API 交换的时候报错
kubectl get nodes
The connection to the server localhost:8080 was refused - did you specify the right host or port?
[root@k8s-master ~]# kubectl get cs
NAME STATUS MESSAGE ERROR
scheduler Healthy ok
controller-manager Healthy ok
etcd-0 Healthy {"health": "true"}
表示配置没有问题
[root@k8s-master ~]# kubectl get node
NAME STATUS ROLES AGE VERSION
k8s-master NotReady master 15m v1.13.4
当前我们只有一个节点是master,状态是NotReady
You should now deploy a pod network to the cluster.
Run "kubectl apply -f [podnetwork].yaml" with one of the options listed at:
https://kubernetes.io/docs/concepts/cluster-administration/addons/
从上面的消息中我们还可以看到状态是NoReady是因为需要配置一个网络附件,
calico 的安装
kubectl apply -f \
https://docs.projectcalico.org/v3.1/getting-started/kubernetes/installation/hosted/kubeadm/1.7/calico.yaml
相关文档

https://docs.projectcalico.org/v3.1/getting-started/kubernetes/#create-a-single-host-kubernetes-cluster
我们这里安装flannel
kubernetes 1.7 + 可以通过下面方式安装
kubectl apply -f https://raw.githubusercontent.com/coreos/flannel/master/Documentation/kube-flannel.yml
注:因为里面涉及到海外的镜像,所以我们需要下载其他人提供的镜像然后修改tag 满足dockerfile文件需要的镜像格式
文件里面的初始镜像
initContainers:
- name: install-cni
image: quay.io/coreos/flannel:v0.11.0-amd64
按要求修改就可以:
docker pull registry.cn-hangzhou.aliyuncs.com/wader-k8s/flannel:v0.11.0-amd64
docker tag registry.cn-hangzhou.aliyuncs.com/wader-k8s/flannel:v0.11.0-amd64 quay.io/coreos/flannel:v0.11.0-amd64
docker rmi registry.cn-hangzhou.aliyuncs.com/wader-k8s/flannel:v0.11.0-amd64
[root@k8s-master ~]# docker images
REPOSITORY TAG IMAGE ID CREATED SIZE
k8s.gcr.io/kube-proxy v1.13.4 fadcc5d2b066 2 weeks ago 80.3MB
k8s.gcr.io/kube-controller-manager v1.13.4 40a817357014 2 weeks ago 146MB
k8s.gcr.io/kube-apiserver v1.13.4 fc3801f0fc54 2 weeks ago 181MB
k8s.gcr.io/kube-scheduler v1.13.4 dd862b749309 2 weeks ago 79.6MB
quay.io/coreos/flannel v0.11.0-amd64 ff281650a721 6 weeks ago 52.6MB
k8s.gcr.io/coredns 1.2.6 f59dcacceff4 4 months ago 40MB
k8s.gcr.io/etcd 3.2.24 3cab8e1b9802 5 months ago 220MB
quay.io/coreos/flannel v0.10.0-amd64 f0fad859c909 13 months ago 44.6MB
k8s.gcr.io/pause 3.1 da86e6ba6ca1 15 months ago 742kB
可以看到里面有符合要求的镜像
这样按要求运行
[root@k8s-master ~]# kubectl apply -f https://raw.githubusercontent.com/coreos/flannel/master/Documentation/kube-flannel.yml
podsecuritypolicy.extensions/psp.flannel.unprivileged created
clusterrole.rbac.authorization.k8s.io/flannel created
clusterrolebinding.rbac.authorization.k8s.io/flannel created
serviceaccount/flannel created
configmap/kube-flannel-cfg created
daemonset.extensions/kube-flannel-ds-amd64 created
daemonset.extensions/kube-flannel-ds-arm64 created
daemonset.extensions/kube-flannel-ds-arm created
daemonset.extensions/kube-flannel-ds-ppc64le created
daemonset.extensions/kube-flannel-ds-s390x created
所有附件都是以POD运行的,不在默认的名称空间里面所以需要查看所有的名称空间,默认是default
[root@k8s-master ~]# kubectl get ns
NAME STATUS AGE
default Active 53m
kube-public Active 53m
kube-system Active 53m
指定 kubectl get pods -n kub-system 确定启动起来 或者
[root@k8s-master ~]# kubectl get pods --all-namespaces
NAMESPACE NAME READY STATUS RESTARTS AGE
kube-system coredns-86c58d9df4-k8mdg 1/1 Running 1 39m
kube-system coredns-86c58d9df4-vgh7n 1/1 Running 1 39m
kube-system etcd-k8s-master 1/1 Running 0 38m
kube-system kube-apiserver-k8s-master 1/1 Running 0 38m
kube-system kube-controller-manager-k8s-master 1/1 Running 0 38m
kube-system kube-flannel-ds-amd64-8pcdm 1/1 Running 0 3m16s
kube-system kube-proxy-cjp9k 1/1 Running 0 39m
kube-system kube-scheduler-k8s-master 1/1 Running 0 38m
[root@k8s-master ~]# kubectl get nodes
NAME STATUS ROLES AGE VERSION
k8s-master Ready master 41m v1.13.4
现在看集群状态正常
[root@k8s-master ~]# kubectl cluster-info
Kubernetes master is running at https://10.211.55.11:6443
KubeDNS is running at https://10.211.55.11:6443/api/v1/namespaces/kube-system/services/kube-dns:dns/proxy
现在整个master 基本完成配置
打包用到的镜像,可以拷贝到其他节点用,通过命令组合吧需要的都打包起来,也可以自己弄私有仓库
#docker save $(docker images |egrep -v "REPOSITORY"|awk 'BEGIN{OFS=":";ORS=" "}{print $1,$2}') -o k8s-1.13.4.gz
拷贝到其他节点
配置k8s的各节点
service docker restart
chkconfig docker on
chkcofig kubelet on
docker load -i k8s-1.13.4.gz
为了方便,镜像和master一样,其实节点不需要这么多镜像,只需要kube-proxy pause flannel
[root@k8s-node2 ~]# docker images |egrep k8s.gcr
k8s.gcr.io/kube-proxy v1.13.4 fadcc5d2b066 2 weeks ago 80.3MB
k8s.gcr.io/kube-scheduler v1.13.4 dd862b749309 2 weeks ago 79.6MB
k8s.gcr.io/kube-apiserver v1.13.4 fc3801f0fc54 2 weeks ago 181MB
k8s.gcr.io/kube-controller-manager v1.13.4 40a817357014 2 weeks ago 146MB
k8s.gcr.io/coredns 1.2.6 f59dcacceff4 4 months ago 40MB
k8s.gcr.io/etcd 3.2.24 3cab8e1b9802 5 months ago 220MB
k8s.gcr.io/pause 3.1 da86e6ba6ca1 15 months ago 742kB
加入的时候一定要保证各节点和master时间一致,因为是https 证书验证的,对时间要求一致比较高
[root@k8s-node2 ~]# kubeadm join 10.211.55.11:6443 --token nhuc7d.5ylujsvpkzaozf1q --discovery-token-ca-cert-hash sha256:819b8e62790e1a8880e7d9f948a6154c7f006f278d5dd2d8300ea89b94a03f87
输出的详细信息
[preflight] Running pre-flight checks
[WARNING SystemVerification]: this Docker version is not on the list of validated versions: 18.09.3. Latest validated version: 18.06
[discovery] Trying to connect to API Server "10.211.55.11:6443"
[discovery] Created cluster-info discovery client, requesting info from "https://10.211.55.11:6443"
[discovery] Requesting info from "https://10.211.55.11:6443" again to validate TLS against the pinned public key
[discovery] Cluster info signature and contents are valid and TLS certificate validates against pinned roots, will use API Server "10.211.55.11:6443"
[discovery] Successfully established connection with API Server "10.211.55.11:6443"
[join] Reading configuration from the cluster...
[join] FYI: You can look at this config file with 'kubectl -n kube-system get cm kubeadm-config -oyaml'
[kubelet] Downloading configuration for the kubelet from the "kubelet-config-1.13" ConfigMap in the kube-system namespace
[kubelet-start] Writing kubelet configuration to file "/var/lib/kubelet/config.yaml"
[kubelet-start] Writing kubelet environment file with flags to file "/var/lib/kubelet/kubeadm-flags.env"
[kubelet-start] Activating the kubelet service
[tlsbootstrap] Waiting for the kubelet to perform the TLS Bootstrap...
[patchnode] Uploading the CRI Socket information "/var/run/dockershim.sock" to the Node API object "k8s-node2" as an annotation
This node has joined the cluster:
* Certificate signing request was sent to apiserver and a response was received.
* The Kubelet was informed of the new secure connection details.
Run 'kubectl get nodes' on the master to see this node join the cluster.
去master 查看加入的节点
[root@k8s-master ~]# kubectl get nodes
NAME STATUS ROLES AGE VERSION
k8s-master Ready master 79m v1.13.4
k8s-node1 Ready
k8s-node2 Ready
[root@k8s-master ~]# kubectl get node -o wide
NAME STATUS ROLES AGE VERSION INTERNAL-IP EXTERNAL-IP OS-IMAGE KERNEL-VERSION CONTAINER-RUNTIME
k8s-master Ready master 81m v1.13.4 10.211.55.11
k8s-node1 Ready
k8s-node2 Ready
[root@k8s-master ~]# kubectl get pods -n kube-system -o wide
NAME READY STATUS RESTARTS AGE IP NODE NOMINATED NODE READINESS GATES
coredns-86c58d9df4-k8mdg 1/1 Running 10 81m 10.244.0.6 k8s-master
coredns-86c58d9df4-vgh7n 1/1 Running 10 81m 10.244.0.7 k8s-master
etcd-k8s-master 1/1 Running 0 80m 10.211.55.11 k8s-master
kube-apiserver-k8s-master 1/1 Running 0 80m 10.211.55.11 k8s-master
kube-controller-manager-k8s-master 1/1 Running 0 80m 10.211.55.11 k8s-master
kube-flannel-ds-amd64-5227m 1/1 Running 0 14m 10.211.55.13 k8s-node2
kube-flannel-ds-amd64-8pcdm 1/1 Running 0 44m 10.211.55.11 k8s-master
kube-flannel-ds-amd64-ljkdk 1/1 Running 0 13m 10.211.55.12 k8s-node1
kube-proxy-2jngh 1/1 Running 0 13m 10.211.55.12 k8s-node1
kube-proxy-cjp9k 1/1 Running 0 81m 10.211.55.11 k8s-master
kube-proxy-zsh42 1/1 Running 0 14m 10.211.55.13 k8s-node2
kube-scheduler-k8s-master 1/1 Running 0 80m 10.211.55.11 k8s-master
开启IPVS
默认没加载IPVS 就会退到iptables
modprobe -- ip_vs
modprobe -- ip_vs_rr
modprobe -- ip_vs_wrr modprobe -- ip_vs_sh modprobe -- nf_conntrack_ipv4
yum install ipvsadm -y
cat > /etc/sysconfig/modules/ipvs.modules <<EOF #!/bin/bash modprobe -- ip_vs modprobe -- ip_vs_rr modprobe -- ip_vs_wrr modprobe -- ip_vs_sh modprobe -- nf_conntrack_ipv4
modprobe br_netfilter
EOF
chmod 755 /etc/sysconfig/modules/ipvs.modules && bash /etc/sysconfig/modules/ipvs.modules && lsmod | grep -e ip_vs -e nf_conntrack_ipv4
如果以上前提条件如果不满足,则即使kube-proxy的配置开启了ipvs模式,也会退回到iptables模式。
修改ConfigMap的kube-system/kube-proxy中的config.conf,mode: “ipvs”:
kubectl edit cm kube-proxy -n kube-system
ipvs:
excludeCIDRs: null
minSyncPeriod: 0s
scheduler: ""
syncPeriod: 30s
kind: KubeProxyConfiguration
metricsBindAddress: 127.0.0.1:10249
mode: "ipvs"
kubectl get configmap kube-proxy -o yaml -n kube-system |egrep mode
mode: ipvs
重启各个节点上的kube-proxy pod:
kubectl get pod -n kube-system | grep kube-proxy | awk '{system("kubectl delete pod "$1" -n kube-system")}'
kubectl get pod -n kube-system | grep kube-proxy kube-proxy-pf55q 1/1 Running 0 9s kube-proxy-qjnnc 1/1 Running 0 14s kubectl logs kube-proxy-pf55q -n kube-system I1208 06:12:23.516444 1 server_others.go:189] Using ipvs Proxier.
日志中打印出了Using ipvs Proxier,说明ipvs模式已经开启。
用Kubeadm安装K8s后,kube-flannel一直CrashLoopBackOff
则可能是安装Kubeadm Init的时候,没有增加 --pod-network-cidr 10.244.0.0/16参数。
注意,安装Flannel时,kubectl create -f https://raw.githubusercontent.com/coreos/flannel/master/Documentation/kube-flannel.yml
如果yml中的"Network": "10.244.0.0/16"和--pod-network-cidr不一样,就修改成一样的。不然可能会使得Node间Cluster IP不通。
相关的安装文档
https://www.kubernetes.org.cn/4956.html
https://cloud.tencent.com/developer/article/1380902
