转自: http://my.oschina.net/renguijiayi/blog/293317?p=1
Ceph uniquely delivers object, block, and file storage in one unified system.
ceph提供了filesystem, block device, object store三种使用方式.
准确来说下面我们只讲它的block device,由于他们的基础都是要有一个可工作的Ceph Storage Cluster,因此这里先补充说明一些命令.
1.ceph相关命令
1)查看监控集群状态:
|
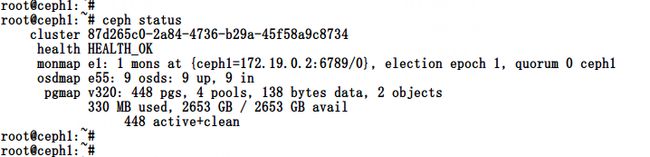
ceph health
ceph status
ceph osd stat
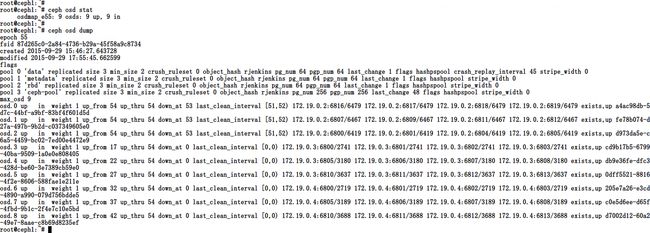
ceph osd dump
ceph osd tree
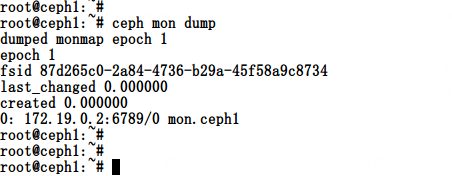
ceph mon dump
ceph quorum_status
ceph mds stat
ceph mds dump
|


![]()

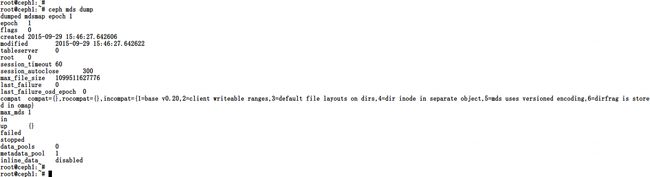
root@ceph1:~#
root@ceph1:~# ceph status
    cluster 87d265c0-2a84-4736-b29a-45f58a9c8734
     health HEALTH_OK
     monmap e1: 1 mons at {ceph1=172.19.0.2:6789/0}, election epoch 1, quorum 0 ceph1
     osdmap e55: 9 osds: 9 up, 9 in
      pgmap v320: 448 pgs, 4 pools, 138 bytes data, 2 objects
            330 MB used, 2653 GB / 2653 GB avail
                 448 active+clean
root@ceph1:~#
root@ceph1:~#
root@ceph1:~#
root@ceph1:~#
root@ceph1:~# ceph osd stat
     osdmap e55: 9 osds: 9 up, 9 in
root@ceph1:~#
root@ceph1:~# ceph osd dump
epoch 55
fsid 87d265c0-2a84-4736-b29a-45f58a9c8734
created 2015-09-29 15:46:27.643728
modified 2015-09-29 17:55:45.662599
flags
pool 0 'data' replicated size 3 min_size 2 crush_ruleset 0 object_hash rjenkins pg_num 64 pgp_num 64 last_change 1 flags hashpspool crash_replay_interval 45 stripe_width 0
pool 1 'metadata' replicated size 3 min_size 2 crush_ruleset 0 object_hash rjenkins pg_num 64 pgp_num 64 last_change 1 flags hashpspool stripe_width 0
pool 2 'rbd' replicated size 3 min_size 2 crush_ruleset 0 object_hash rjenkins pg_num 64 pgp_num 64 last_change 1 flags hashpspool stripe_width 0
pool 3 'ceph-pool' replicated size 3 min_size 2 crush_ruleset 0 object_hash rjenkins pg_num 256 pgp_num 256 last_change 48 flags hashpspool stripe_width 0
max_osd 9
osd.0 up   in  weight 1 up_from 54 up_thru 54 down_at 53 last_clean_interval [51,52) 172.19.0.2:6816/6479 172.19.0.2:6817/6479 172.19.0.2:6818/6479 172.19.0.2:6819/6479 exists,up a4ac98db-5d7c-44bf-a9bf-83bf4f601d5d
osd.1 up   in  weight 1 up_from 54 up_thru 54 down_at 53 last_clean_interval [51,52) 172.19.0.2:6807/6467 172.19.0.2:6809/6467 172.19.0.2:6811/6467 172.19.0.2:6812/6467 exists,up fe78b074-d27a-497b-9b2d-c037349605e0
osd.2 up   in  weight 1 up_from 54 up_thru 54 down_at 53 last_clean_interval [51,52) 172.19.0.2:6800/6419 172.19.0.2:6801/6419 172.19.0.2:6804/6419 172.19.0.2:6805/6419 exists,up d973da5e-c6a5-4459-bc02-7ed00e4472e9
osd.3 up   in  weight 1 up_from 17 up_thru 54 down_at 0 last_clean_interval [0,0) 172.19.0.3:6800/2741 172.19.0.3:6801/2741 172.19.0.3:6802/2741 172.19.0.3:6803/2741 exists,up cd9b17b5-6799-40ba-9509-1a0e0e808405
osd.4 up   in  weight 1 up_from 22 up_thru 54 down_at 0 last_clean_interval [0,0) 172.19.0.3:6805/3180 172.19.0.3:6806/3180 172.19.0.3:6807/3180 172.19.0.3:6808/3180 exists,up db9e36fe-dfc3-428d-be60-3e7389cb59e0
osd.5 up   in  weight 1 up_from 27 up_thru 54 down_at 0 last_clean_interval [0,0) 172.19.0.3:6810/3637 172.19.0.3:6811/3637 172.19.0.3:6812/3637 172.19.0.3:6813/3637 exists,up 0dff5521-8816-4f2e-8606-588fae1e211e
osd.6 up   in  weight 1 up_from 32 up_thru 54 down_at 0 last_clean_interval [0,0) 172.19.0.4:6800/2719 172.19.0.4:6801/2719 172.19.0.4:6802/2719 172.19.0.4:6803/2719 exists,up 205e7a26-e3cd-4890-a990-079d756bdde5
osd.7 up   in  weight 1 up_from 37 up_thru 54 down_at 0 last_clean_interval [0,0) 172.19.0.4:6805/3189 172.19.0.4:6806/3189 172.19.0.4:6807/3189 172.19.0.4:6808/3189 exists,up c0e5d6ee-d65f-4fbd-9b1c-2f4e7c10e5bd
osd.8 up   in  weight 1 up_from 42 up_thru 54 down_at 0 last_clean_interval [0,0) 172.19.0.4:6810/3688 172.19.0.4:6811/3688 172.19.0.4:6812/3688 172.19.0.4:6813/3688 exists,up d7002d12-60a2-49e7-8aae-c8b69d8235ef
root@ceph1:~#
root@ceph1:~#
root@ceph1:~#
root@ceph1:~#
root@ceph1:~# ceph osd tree
# id    weight    type name    up/down    reweight
-1    2.61    root default
-2    0.87        host ceph1
0    0.29            osd.0    up    1
1    0.29            osd.1    up    1
2    0.29            osd.2    up    1
-3    0.87        host ceph2
3    0.29            osd.3    up    1
4    0.29            osd.4    up    1
5    0.29            osd.5    up    1
-4    0.87        host ceph3
6    0.29            osd.6    up    1
7    0.29            osd.7    up    1
8    0.29            osd.8    up    1
root@ceph1:~#
root@ceph1:~#
root@ceph1:~#
root@ceph1:~# ceph mon dump
dumped monmap epoch 1
epoch 1
fsid 87d265c0-2a84-4736-b29a-45f58a9c8734
last_changed 0.000000
created 0.000000
0: 172.19.0.2:6789/0 mon.ceph1
root@ceph1:~#
root@ceph1:~#
root@ceph1:~# ceph status
    cluster 87d265c0-2a84-4736-b29a-45f58a9c8734
     health HEALTH_OK
     monmap e1: 1 mons at {ceph1=172.19.0.2:6789/0}, election epoch 1, quorum 0 ceph1
     osdmap e55: 9 osds: 9 up, 9 in
      pgmap v320: 448 pgs, 4 pools, 138 bytes data, 2 objects
            330 MB used, 2653 GB / 2653 GB avail
                 448 active+clean
root@ceph1:~#
root@ceph1:~# ceph mon dump
dumped monmap epoch 1
epoch 1
fsid 87d265c0-2a84-4736-b29a-45f58a9c8734
last_changed 0.000000
created 0.000000
0: 172.19.0.2:6789/0 mon.ceph1
root@ceph1:~#
root@ceph1:~#
root@ceph1:~# ceph quorum_status
{"election_epoch":1,"quorum":[0],"quorum_names":["ceph1"],"quorum_leader_name":"ceph1","monmap":{"epoch":1,"fsid":"87d265c0-2a84-4736-b29a-45f58a9c8734","modified":"0.000000","created":"0.000000","mons":[{"rank":0,"name":"ceph1","addr":"172.19.0.2:6789\/0"}]}}
root@ceph1:~#
root@ceph1:~#
root@ceph1:~#
root@ceph1:~#
root@ceph1:~# ceph mds stat
e1: 0/0/1 up
root@ceph1:~#
root@ceph1:~# ceph mds dump
dumped mdsmap epoch 1
epoch    1
flags    0
created    2015-09-29 15:46:27.642606
modified    2015-09-29 15:46:27.642622
tableserver    0
root    0
session_timeout    60
session_autoclose    300
max_file_size    1099511627776
last_failure    0
last_failure_osd_epoch    0
compat    compat={},rocompat={},incompat={1=base v0.20,2=client writeable ranges,3=default file layouts on dirs,4=dir inode in separate object,5=mds uses versioned encoding,6=dirfrag is stored in omap}
max_mds    1
in
up    {}
failed
stopped
data_pools    0
metadata_pool    1
inline_data    disabled
root@ceph1:~#
root@ceph1:~# Write failed: Broken pipe
lxl@ubuntu:~$
你可以分别试试看这些命令.
2)pools 大概可以理解为命名空间
查看已经存在的pools
|
[root@test-2 ~]# ceph osd lspools
0 data,1 metadata,2 rbd,
|
查看data pool中的pg_num属性
|
[root@test-1 ~]# ceph osd pool get data pg_num
pg_num: 256
|
查看data pool中的pgp_num属性
|
[root@test-1 ~]# ceph osd pool get data pgp_num
pgp_num: 256
|
创建一个pool ‘test-pool’
|
[root@test-1 ~]# ceph osd pool create test-pool 256 256
pool 'test-pool' created
[root@test-1 ~]# ceph osd lspools
0 data,1 metadata,2 rbd,3 test-pool,
|
删除 ‘test-pool’
|
[root@test-1 ~]# ceph osd pool delete test-pool test-pool --yes-i-really-really-mean-it
pool 'test-pool' deleted
[root@test-1 ~]# ceph osd lspools
0 data,1 metadata,2 rbd,
|
3)CRUSH map相关
获取现有集群的crush map
|
[root@test-1 ~]# ceph osd getcrushmap -o crush.map
got crush map from osdmap epoch 734
|
反编译
|
[root@test-1 ~]# cat crush.txt
# begin crush map
# devices
device 0 osd.0
device 1 osd.1
device 2 osd.2
# types
type 0 osd
type 1 host
type 2 rack
type 3 row
type 4 room
type 5 datacenter
type 6 root
# buckets
host test-1 {
id -2 # do not change unnecessarily
# weight 1.000
alg straw
hash 0 # rjenkins1
item osd.0 weight 1.000
}
host test-2 {
id -4 # do not change unnecessarily
# weight 1.000
alg straw
hash 0 # rjenkins1
item osd.1 weight 1.000
}
host test-3 {
id -5 # do not change unnecessarily
# weight 1.000
alg straw
hash 0 # rjenkins1
item osd.2 weight 1.000
}
rack unknownrack {
id -3 # do not change unnecessarily
# weight 3.000
alg straw
hash 0 # rjenkins1
item test-1 weight 1.000
item test-2 weight 1.000
item test-3 weight 1.000
}
root default {
id -1 # do not change unnecessarily
# weight 3.000
alg straw
hash 0 # rjenkins1
item unknownrack weight 3.000
}
# rules
rule data {
ruleset 0
type replicated
min_size 1
max_size 10
step take default
step chooseleaf firstn 0 type host
step emit
}
rule metadata {
ruleset 1
type replicated
min_size 1
max_size 10
step take default
step chooseleaf firstn 0 type host
step emit
}
rule rbd {
ruleset 2
type replicated
min_size 1
max_size 10
step take default
step chooseleaf firstn 0 type host
step emit
}
# end crush map
|
仔细观察这个输出信息,是不是发现了些什么有意思的事?请看官方文档的说明CRUSH
当你修改好了以后编译crush map
|
crushtool -c crush.txt -o crush.map
|
将这个生成的crush map设置到集群中
|
ceph osd setcrushmap -i crush.map
|
2.ceph block device相关命令
1)基本操作
创建一个block device image
|
[root@test-1 ~]# rbd create test-image --size 1024 --pool test-pool
[root@test-1 ~]# rbd ls test-pool
test-image
|
查看这个image的详细信息
|
[root@test-1 ~]# rbd --image test-image info --pool test-pool
rbd image 'test-image':
size 1024 MB in 256 objects
order 22 (4096 kB objects)
block_name_prefix: rb.0.1483.6b8b4567
format: 1
|
删除这个image
|
[root@test-1 ~]# rbd rm test-image -p test-pool
Removing image: 100% complete...done.
|
2)Kernel Modules
有时候我们需要将image挂载到本地,同时修改image中的一些信息,这就需要用到了map操作.
首先我们需要在内核中载入rbd模块(请确保之前内核升级的时候已选上了rbd相关)
|
modprobe rbd
|
map test-image
|
rbd map test-image --pool test-pool --id admin
|
查看mapped的设备
|
[root@test-1 mycephfs]# rbd showmapped
id pool image snap device
1 test-pool test-image - /dev/rbd1
|
我们看下/dev/rbd1的磁盘信息,然后mkfs,再挂载到/mnt/mycephfs目录下,在向里面创建一个包含’hello world’字符串的文件
|
[root@test-1 ~]# fdisk -lu /dev/rbd1
Disk /dev/rbd1: 1073 MB, 1073741824 bytes
255 heads, 63 sectors/track, 130 cylinders, total 2097152 sectors
Units = sectors of 1 * 512 = 512 bytes
Sector size (logical/physical): 512 bytes / 512 bytes
I/O size (minimum/optimal): 4194304 bytes / 4194304 bytes
Disk identifier: 0x00000000
[root@test-1 ~]# mkfs.ext4 /dev/rbd1
mke2fs 1.41.12 (17-May-2010)
Filesystem label=
OS type: Linux
Block size=4096 (log=2)
Fragment size=4096 (log=2)
Stride=1024 blocks, Stripe width=1024 blocks
65536 inodes, 262144 blocks
13107 blocks (5.00%) reserved for the super user
First data block=0
Maximum filesystem blocks=268435456
8 block groups
32768 blocks per group, 32768 fragments per group
8192 inodes per group
Superblock backups stored on blocks:
32768, 98304, 163840, 229376
Writing inode tables: done
Creating journal (8192 blocks): done
Writing superblocks and filesystem accounting information: done
This filesystem will be automatically checked every 33 mounts or
180 days, whichever comes first. Use tune2fs -c or -i to override.
[root@test-1 ~]# mount /dev/rbd1 /mnt/mycephfs/
[root@test-1 ~]# ll /mnt/mycephfs/
total 16
drwx------ 2 root root 16384 Nov 27 13:40 lost+found
[root@test-1 ~]# cd /mnt/mycephfs/
[root@test-1 mycephfs]# ls
lost+found
[root@test-1 mycephfs]# echo 'hello' > hello.txt
[root@test-1 mycephfs]# ls
hello.txt lost+found
[root@test-1 mycephfs]# df -h /mnt/mycephfs/
Filesystem Size Used Avail Use% Mounted on
/dev/rbd1 976M 1.3M 908M 1% /mnt/mycephfs
|
我们同时也可以改变image的容量大小
|
[root@test-1 mycephfs]# rbd resize --size 2048 test-image
rbd: error opening image test-image: (2) No such file or directory
2013-11-27 13:48:24.290564 7fcf3b185760 -1 librbd::ImageCtx: error finding header: (2) No such file or directory
[root@test-1 mycephfs]# rbd resize --size 2048 test-image --pool test-pool
Resizing image: 100% complete...done.
[root@test-1 mycephfs]# df -h /mnt/mycephfs/
Filesystem Size Used Avail Use% Mounted on
/dev/rbd1 976M 1.3M 908M 1% /mnt/mycephfs
[root@test-1 mycephfs]# blockdev --getsize64 /dev/rbd1
2147483648
[root@test-1 mycephfs]# resize2fs /dev/rbd1
resize2fs 1.41.12 (17-May-2010)
Filesystem at /dev/rbd1 is mounted on /mnt/mycephfs; on-line resizing required
old desc_blocks = 1, new_desc_blocks = 1
Performing an on-line resize of /dev/rbd1 to 524288 (4k) blocks.
The filesystem on /dev/rbd1 is now 524288 blocks long.
[root@test-1 mycephfs]# df -h /mnt/mycephfs/
Filesystem Size Used Avail Use% Mounted on
/dev/rbd1 2.0G 1.6M 1.9G 1% /mnt/mycephfs
[root@test-1 mycephfs]# ls
hello.txt lost+found
|
当我们修改完毕image内容后就可以unmap掉它了,之前你需要执行umount操作,当你下次map的时候之前创建的hello.txt依然会存在挂载目录下.
|
[root@test-1 mnt]# umount /dev/rbd1
[root@test-1 mnt]# rbd unmap /dev/rbd1
|
3)快照相关
有些时候我们需要对image进行snapshot操作,以便将来可以随时恢复到当时状态.
好我们对test-pool下的test-image进行snap操作
|
[root@test-1 mnt]# rbd snap create test-pool/test-image@mysnap
rbd: failed to create snapshot: (22) Invalid argument
2013-11-27 14:56:53.109819 7f5bea81d760 -1 librbd: failed to create snap id: (22) Invalid argument
|
提示错误:Invalid argument,搞了半天才知道问题出在’test-pool’, ‘test-image’名字中的’-’上面,
我们新建个pool叫’mypool’同时在下面创建一个’myimage’
|
[root@test-1 ceph]# ceph osd pool create mypool 256 256
pool 'mypool' created
[root@test-1 ceph]# rbd create myimage --size 1024 --pool mypool
[root@test-1 ceph]# rbd --pool mypool ls
myimage
|
好,接下来创建snap,快照名字叫’snapimage’
|
[root@test-1 ceph]# rbd snap create mypool/myimage@snapimage
|
查看myimage的snap
|
[root@test-1 ceph]# rbd snap ls mypool/myimage
SNAPID NAME SIZE
2 snapimage 1024 MB
|
接下来我们测试下这个snap吧
|
[root@test-1 ceph]# rbd snap create mypool/myimage@snapimage3
[root@test-1 ceph]# rbd map mypool/myimage
[root@test-1 ceph]# mount /dev/rbd1 /mnt/mycephfs/
[root@test-1 ceph]# ls /mnt/mycephfs/
hello.txt lost+found
[root@test-1 ceph]# echo 'welcome to zhengtianbao.com ' > /mnt/mycephfs/info.txt
[root@test-1 ceph]# ls /mnt/mycephfs/
hello.txt info.txt lost+found
[root@test-1 ceph]# umount /dev/rbd1
[root@test-1 ceph]# rbd unmap /dev/rbd1
[root@test-1 ceph]# rbd snap rollback mypool/myimage@snapimage3
Rolling back to snapshot: 100% complete...done.
[root@test-1 ceph]# rbd map mypool/myimage
[root@test-1 ceph]# mount /dev/rbd1 /mnt/mycephfs/
[root@test-1 ceph]# ls /mnt/mycephfs/
hello.txt lost+found
|
是不是如预计的那样myimage回到了snapimage3时候的状态,之后创建的info.txt已经消失了.
删除snap
|
[root@test-1 ceph]# rbd snap ls mypool/myimage
SNAPID NAME SIZE
2 snapimage 1024 MB
3 snapimage2 1024 MB
4 snapimage3 1024 MB
[root@test-1 ceph]# rbd snap rm mypool/myimage@snapimage
[root@test-1 ceph]# rbd snap ls mypool/myimage
SNAPID NAME SIZE
3 snapimage2 1024 MB
4 snapimage3 1024 MB
|
删除myimage的全部snapshot
|
[root@test-1 ceph]# rbd snap purge mypool/myimage
Removing all snapshots: 100% complete...done.
|
4)libvirt
与libvirt配合使用,libvirt中定义domain的device使用ceph block device.
关于libvirt,大体的就是一个中间层,与rbd配合使用的关系大概如下:
|
libvirt-->qemu-->librbd-->librados-->osds
|--->monitors
|
有关libvirt和qemu以后有机会再补上.
另外,请确保qemu在configure的时候enable rbd.
首先需要有一个制作好的镜像,我这里用centos6的一个镜像
|
[root@test-1 ~]# file centos6
centos6: x86 boot sector; GRand Unified Bootloader, stage1 version 0x3, boot drive 0x80, 1st sector stage2 0x849d4, GRUB version 0.94; partition 1: ID=0x83, active, starthead 32, startsector 2048, 1024000 sectors; partition 2: ID=0x8e, starthead 221, startsector 1026048, 19945472 sectors, code offset 0x48
|
通过qemu-img convert命令将这个镜像放置到mypool中,取名为centos
|
[root@test-1 ceph]# qemu-img convert ~/centos6 rbd:mypool/centos
[root@test-1 ceph]# rbd ls --pool mypool
centos
myimage
[root@test-1 ceph]# rbd info centos --pool mypool
rbd image 'centos':
size 10240 MB in 2560 objects
order 22 (4096 kB objects)
block_name_prefix: rb.0.14d4.6b8b4567
format: 1
|
然后我们创建一个libvirt需要用到的domain xml文件,这里只是个简单的例子
test.xml
|
|
接下来通过virsh命令创建虚拟机,查看vnc端口
|
[root@test-1 ceph]# virsh define test.xml
[root@test-1 ceph]# virsh list --all
Id Name State
----------------------------------------------------
- test-ceph shut off
[root@test-1 ceph]# virsh start test-ceph
Domain test-ceph started
[root@test-1 ceph]# virsh list
Id Name State
----------------------------------------------------
1 test-ceph running
[root@test-1 ceph]# virsh vncdisplay 1
:0
|
ok,现在我们可以通过vnc客户端连接到host:5900端口的虚拟机中进行操作了,同时你也可以在虚拟机中测试下ceph的读写性能如何…
一些链接:
- Ceph 官方文档: http://docs.ceph.com/docs/master/cephfs/kernel/
- IBM关于ceph的说明: http://www.ibm.com/developerworks/cn/linux/l-ceph/
- ceph架构方面: http://www.ustack.com/blog/ceph_infra/
- ceph性能测试: http://tech.uc.cn/?p=1223#more-1223