介绍
GitHub Packages是GitHub提供的类似npm包管理工具或平台,通过GitHub Packages,我们可以直接使用npm相关的命令、功能,并且不用将自己的npm包发布到npm仓库。也就是说,我们的npm包将托管在github上,并且可以和我们相应的仓库保持同步。之前,我们介绍了如何发布代码到npm官方仓库、verdaccio+ngrok发布npm私有仓库以及基于github实现npm私有库的搭建,通过这篇文章:基于github实现npm私有库的搭建可以知道,我们可以创建自己的npm私有库,但是我们只能通过链接的方式安装npm私有包,不能使用npm的相关命令,比如npm version patch等等。今天,我们还继续讲npm私有库,还是基于github,与基于github实现npm私有库的搭建不同的是,今天我们要讲的npm私有库是GitHub官方于2019年5月推出的GitHub Packages--类似npm包管理器,通过GitHub Packages,我们不仅可以创建npm私有包,使用私有仓库,并且还可以使用npm的相关命令,也能通过以包名的形式来安装依赖,更重要的是,我们还可以将多个包(packages)放在同一个私有仓库当中,这样就可以统一管理,而不必一个npm私有包对应一个github仓库,简直太完美了。
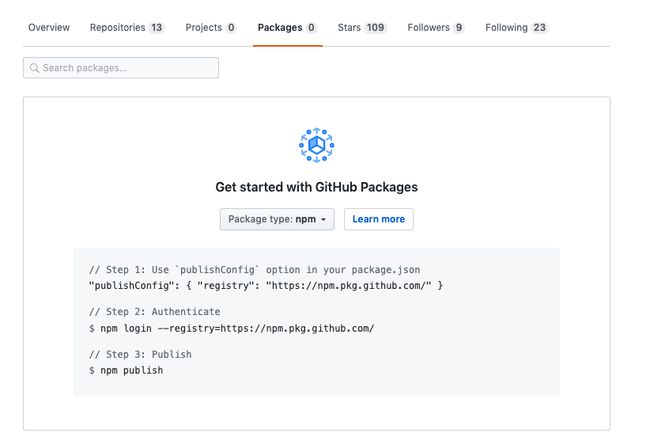
GitHub Packages看起来是这个样子
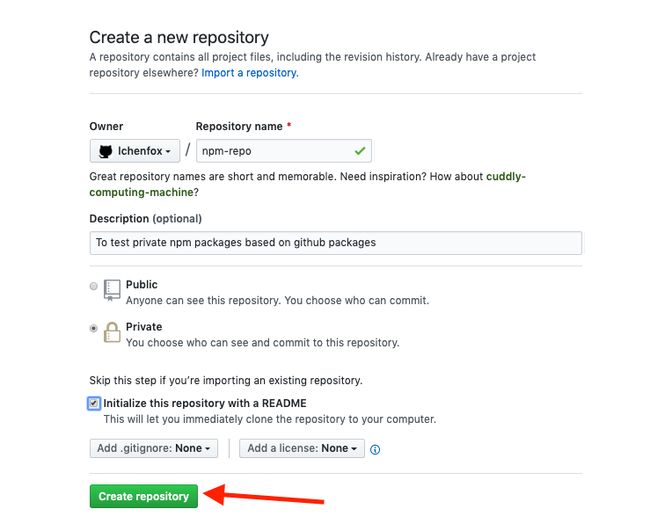
创建私有仓库
步骤
私有仓库看起来是下面这个样子
如果你还是不清楚怎么创建私有仓库,那就只能自己
百度了。
克隆私有仓库到本地
git clone [email protected]:lchenfox/npm-repo.git
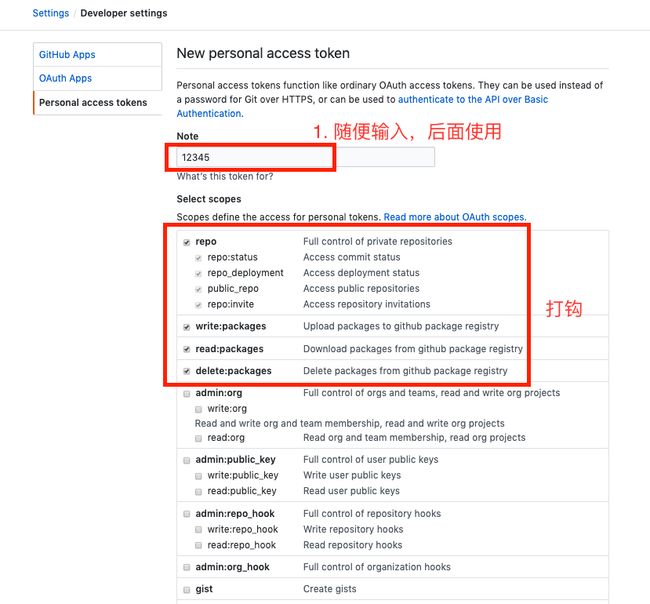
创建Personal access tokens
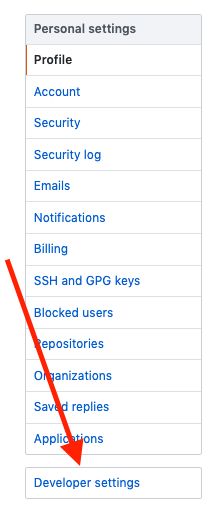
进入github设置,点击Developer settings
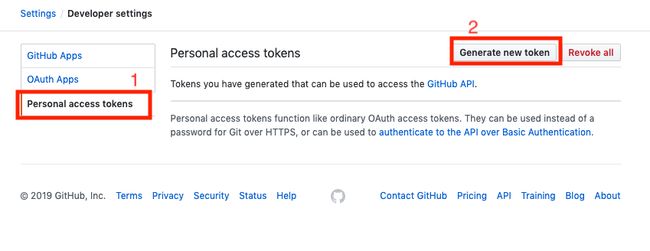
依次点击1、2
如下图,然后往下滑,点击底部按钮 Generate token
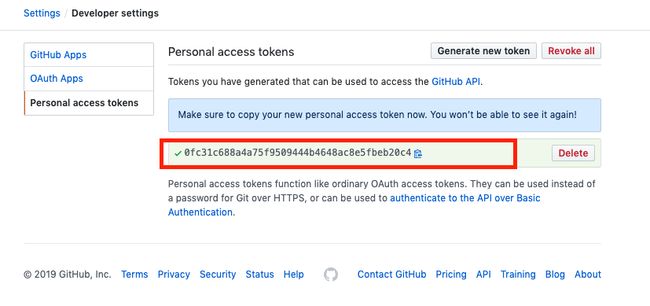
保存token
注意:图中红框的
token必须保存,因为只会在生成的时候显示一次,后面你是看不到的,而这个token一定会用到!!!
创建npm包
初始化
命令npm init --scope=lchenfox中的lchenfox必须是你的github用户名,其他随便填写一些description和author,然后一路回车就好。
配置
有2中配置方式,第一种是在package.json所在目录创建一个.npmrc文件,另一种方式是直接修改package.json文件并增加publishConfig项,任选其一即可。
- 方式1, 创建
.npmrc(推荐)
创建.npmrc文件,并添加以下内容
registry=https://npm.pkg.github.com/lchenfox
再次提醒一次,
lchenfox是你的github用户名。
- 方式2, 添加
publishConfig
在package.json中添加以下内容
"publishConfig": {
    "registry":"https://npm.pkg.github.com/"
},
添加后package.json看起来内容类似下面
{
  "name": "@lchenfox/npm-repo",
  "version": "1.0.0",
  "description": "A npm demo",
  "main": "index.js",
  "scripts": {
    "test": "echo \"Error: no test specified\" && exit 1"
  },
  "repository": {
    "type": "git",
    "url": "git+https://github.com/lchenfox/npm-repo.git"
  },
  "publishConfig": {
    "registry":"https://npm.pkg.github.com/"
  },
  "author": "langke",
  "license": "ISC",
  "bugs": {
    "url": "https://github.com/lchenfox/npm-repo/issues"
  },
  "homepage": "https://github.com/lchenfox/npm-repo#readme"
}
登录
- 方式1(推荐)
刚才已经创建了.npmrc文件,现在为了授权,我们可以继续添加以下内容
//npm.pkg.github.com/:_authToken=0fc31c688a4a75f9509444b4648ac8e5fbeb20c4
添加以后,.npmrc内容应该包含两行,如下
registry=https://npm.pkg.github.com/lchenfox
//npm.pkg.github.com/:_authToken=0fc31c688a4a75f9509444b4648ac8e5fbeb20c4
注意:
0fc31c688a4a75f9509444b4648ac8e5fbeb20c4是token,另外前缀//一定不能少,否则授权一定失败。事实上,无论是发布npm包还是在项目里面安装npm包,当前目录下的.npmrc里面的//npm.pkg.github.com/:_authToken=0fc31c688a4a75f9509444b4648ac8e5fbeb20c4只针对当前npm包或当前项目有效,你在另一个npm包目录下或另一个项目下是不生效的。比如,如果在first-package目录下的.npmrc中添加//npm.pkg.github.com/:_authToken=0fc31c688a4a75f9509444b4648ac8e5fbeb20c4的话,你在second-package里面也必须单独添加来授权特定的包。问题来了,这样做岂不是很麻烦?如果我想要我的所有项目都生效的情况下怎么办?我们还有另一个办法,就是将//npm.pkg.github.com/:_authToken=0fc31c688a4a75f9509444b4648ac8e5fbeb20c4添加到~/.npmrc用户目录里面,这样的话,它就属于一个全局变量,在这台电脑上无论是哪一个项目或npm包,都可以使用了。
- 方式2
$ npm login --registry=https://npm.pkg.github.com
> Username: USERNAME
> Password: TOKEN
> Email: PUBLIC-EMAIL-ADDRESS
USERNAME是你的github用户名,Password就是刚才的token,邮箱虽然可以随便填写,为了规范,最好填写你的github邮箱。
登录成功类似以下输出
➜  npm-repo git:(master) ✗ npm login --registry=https://npm.pkg.github.com
Username: lchenfox
Password:
Email: (this IS public) [email protected]
Logged in as lchenfox on https://npm.pkg.github.com/.
发布
执行npm publish命令发布
➜  npm-repo git:(master) ✗ npm publish
npm notice
npm notice   @lchenfox/[email protected]
npm notice === Tarball Contents ===
npm notice 536B package.json
npm notice 65B  README.md
npm notice === Tarball Details ===
npm notice name:          @lchenfox/npm-repo
npm notice version:       1.0.0
npm notice package size:  437 B
npm notice unpacked size: 601 B
npm notice shasum:        ac8fe26f6cdd65d9bf8f992d56e5f30cc09697ec
npm notice integrity:     sha512-qMlraog/O+uv1[...]GC4/dRBwXgOnA==
npm notice total files:   2
npm notice
+ @lchenfox/[email protected]
从上面可以看到,@lchenfox/[email protected]发布成功,包名是@lchenfox/npm-repo,版本号是1.0.0。
提示:当使用
npm publish发布结束后,一般也会将代码修改同步提供到github仓库,这样的话,npm包和github仓库的内容就一直会保持一致。当然,如果你说我只需要npm包,又不需要管github仓库是什么,那也可以,但是,如果你不提交到github仓库,使其和npm包保持一致的话,那么当你换一台电脑要修改并且发布这个npm包时,就有可能出现版本和内容在两台电脑上都不一样的情况。比如,你在当前电脑发布了一个v1.1.0版本的npm包,在此之前,版本号是v1.0.3,发布v1.1.0之后,你没有提交到github远程仓库,当你在另一台电脑上把仓库克隆下来,package.json版本依然是v1.0.3(因为你的v1.1.0并没有提交),你修改了点内容,然后npm version patch将版本号修改为v1.0.4,然后npm publish发布后,你远程的npm包将以最新的一次发布即v1.0.4的内容为准,那么之前修改的v1.1.0的内容不起任何作用,这样的话,我们就难以保证版本号和内容的统一。因此,强烈建议发布npm包后,立即将改动的代码提交到远程的github仓库。
查看发布的npm包
点击npm-repo,查看到npm详情
提交代码到远程私有仓库
为了方便演示,添加一个index.js文件,并添加以下内容
export function printHello() {
    console.warn("Hello");
}
然后将代码提供到远程私有仓库
git add . && git commit -m "init commit" && git push
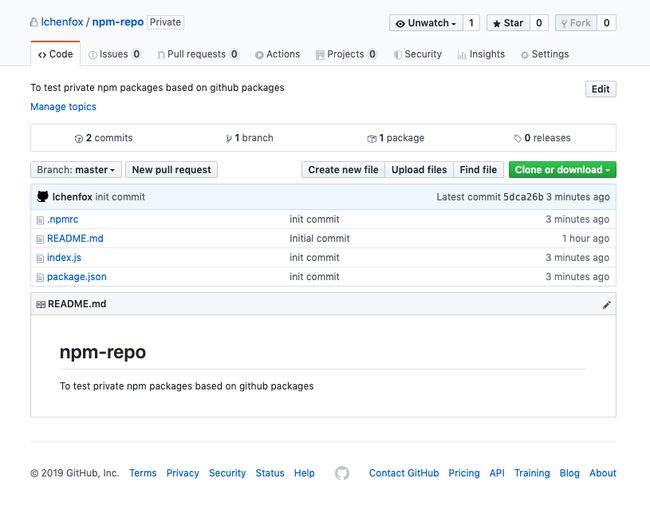
远程仓库看起来是这样
使用npm包
创建.npmrc
这里在项目里面创建.npmrc和上面的.npmrc完全一样,你也可以直接复制到项目中就行。
项目根目录下(node_modules所在的目录),创建.npmrc文件,并添加以下内容
registry=https://npm.pkg.github.com/lchenfox
登录(同创建npm包一样,有2种方式)
npm login --registry=https://npm.pkg.github.com
如果在同一台电脑上登录过就不用再登录了。
安装npm包
执行
npm install @lchenfox/[email protected]
还可以按照上图中的修改
package.json安装。
安装成功如下
➜  testdemo npm install @lchenfox/[email protected]
+ @lchenfox/[email protected]
added 1 package from 1 contributor in 9.556s
使用
import {printHello} from '@lchenfox/npm-repo';

printHello(); // Hello
发布多个npm包到同一个私有仓库
上面我们只讲了如何发布一个npm包到一个私有仓库, 但是有时候,我们想将多个npm包发布到同一个github私有仓库中存放,因为一个npm包创建一个私有仓库简直太TM麻烦了,一个私有仓库管理多个npm包在使用上非常方便,也便于管理。
创建npm包
首先我们把仓库克隆到本地,比如这里的仓库名是npm-repo,进入到/npm-repo目录下,目前我们只有一个README.md文件,这个是创建github私有仓库的时候初始化的一个文件。然后,我们创建2个文件夹来作为2个npm包的目录,分别为first-package、second-package
mkdir first-pacakge second-package
进入到first-package里面
➜  first-pacakge git:(master) npm init --scope=lchenfox
This utility will walk you through creating a package.json file.
It only covers the most common items, and tries to guess sensible defaults.

See `npm help json` for definitive documentation on these fields
  1 {
and exactly what they do.
  1 export function printHello1() {

  1 # Getting started
Use `npm install ` afterwards to install a package and
  1 registry=https://npm.pkg.github.com/lchenfox
save it as a dependency in the package.json file.

Press ^C at any time to quit.
package name: (@lchenfox/first-pacakge)
version: (1.0.0)
description: first-pacakge
entry point: (index.js)
test command:
git repository: [email protected]:lchenfox/npm-repo.git
keywords: npmdemo
author: langke
license: (ISC)
About to write to /Users/langke/TestReactNative/github-packages/npm-repo/first-pacakge/package.json:

{
  "name": "@lchenfox/first-pacakge",
  "version": "1.0.0",
  "description": "first-pacakge",
  "main": "index.js",
  "scripts": {
    "test": "echo \"Error: no test specified\" && exit 1"
  },
  "repository": {
    "type": "git",
    "url": "git+ssh://[email protected]/lchenfox/npm-repo.git"
  },
  "keywords": [
    "npmdemo"
  ],
  "author": "langke",
  "license": "ISC",
  "bugs": {
    "url": "https://github.com/lchenfox/npm-repo/issues"
  },
  "homepage": "https://github.com/lchenfox/npm-repo#readme"
}

Is this OK? (yes)
上面我选填了description、author、keywords,其实这些项也可以不填,但是必须注意的是 git repository: [email protected]:lchenfox/npm-repo.git 是必填项,[email protected]:lchenfox/npm-repo.git是你的github私有仓库地址。如果你忘记填写git repository,也没有关系,可以初始化结束后编辑pacage.json文件,添加以下内容
"repository" : {
    "type" : "git",
    "url": "ssh://[email protected]/lchenfox/npm-repo.git",
},
其中,type就是git, url就是私有仓库地址,其中,lchenfox是github用户名, npm-repo是私有仓库名。
然后按照上面的步骤依次添加publishConfig到pacage.json、创建.npmrc文件、登录,另外为了方便演示,分别在
first-package、second-package创建README.md和index.js文件。
最终,first-package共有4个文件:.npmrc、README.md、index.js、package.json,内容如下
➜  first-pacakge git:(master) ✗ l
total 32
drwxr-xr-x  6 langke  staff   192B Dec 27 09:32 .
drwxr-xr-x  6 langke  staff   192B Dec 27 09:22 ..
-rw-r--r--  1 langke  staff    45B Dec 27 09:32 .npmrc
-rw-r--r--  1 langke  staff    33B Dec 27 09:32 README.md
-rw-r--r--  1 langke  staff    59B Dec 27 09:32 index.js
-rw-r--r--  1 langke  staff   581B Dec 27 09:31 package.json

➜  first-pacakge git:(master) ✗ cat .npmrc
registry=https://npm.pkg.github.com/lchenfox

➜  first-pacakge git:(master) ✗ cat README.md
# Getting started

first package

➜  first-pacakge git:(master) ✗ cat index.js
export function printHello1() {
    console.warn("hello1");
}

➜  first-pacakge git:(master) ✗ cat package.json
{
  "name": "@lchenfox/first-pacakge",
  "version": "1.0.0",
  "description": "first-pacakge",
  "main": "index.js",
  "scripts": {
    "test": "echo \"Error: no test specified\" && exit 1"
  },
  "publishConfig": {
    "registry":"https://npm.pkg.github.com/"
  },
  "repository": {
    "type": "git",
    "url": "git+ssh://[email protected]/lchenfox/npm-repo.git"
  },
  "keywords": [
    "npmdemo"
  ],
  "author": "langke",
  "license": "ISC",
  "bugs": {
    "url": "https://github.com/lchenfox/npm-repo/issues"
  },
  "homepage": "https://github.com/lchenfox/npm-repo#readme"
}
second-package内容如下
➜  second-package git:(master) ✗ l
total 32
drwxr-xr-x  6 langke  staff   192B Dec 27 10:05 .
drwxr-xr-x  6 langke  staff   192B Dec 27 09:22 ..
-rw-r--r--  1 langke  staff    45B Dec 27 10:05 .npmrc
-rw-r--r--  1 langke  staff    34B Dec 27 09:54 README.md
-rw-r--r--  1 langke  staff    59B Dec 27 09:54 index.js
-rw-r--r--  1 langke  staff   583B Dec 27 09:54 package.json

➜  second-package git:(master) ✗ cat .npmrc
registry=https://npm.pkg.github.com/lchenfox

➜  second-package git:(master) ✗ cat README.md
# Getting started

second package

➜  second-package git:(master) ✗ cat index.js
export function printHello2() {
    console.warn("hello2");
}

➜  second-package git:(master) ✗ cat package.json
{
  "name": "@lchenfox/second-pacakge",
  "version": "1.0.0",
  "description": "second-pacakge",
  "main": "index.js",
  "scripts": {
    "test": "echo \"Error: no test specified\" && exit 1"
  },
  "publishConfig": {
    "registry":"https://npm.pkg.github.com/"
  },
  "repository": {
    "type": "git",
    "url": "git+ssh://[email protected]/lchenfox/npm-repo.git"
  },
  "keywords": [
    "npmdemo"
  ],
  "author": "langke",
  "license": "ISC",
  "bugs": {
    "url": "https://github.com/lchenfox/npm-repo/issues"
  },
  "homepage": "https://github.com/lchenfox/npm-repo#readme"
}
另外一般会添加一个
.gitignore文件用于忽略掉如.idea、.DS_Store文件,还会添加一个CHANGELOG.md文件用于描述每一个版本的变更,这样才更方便npm使用者。
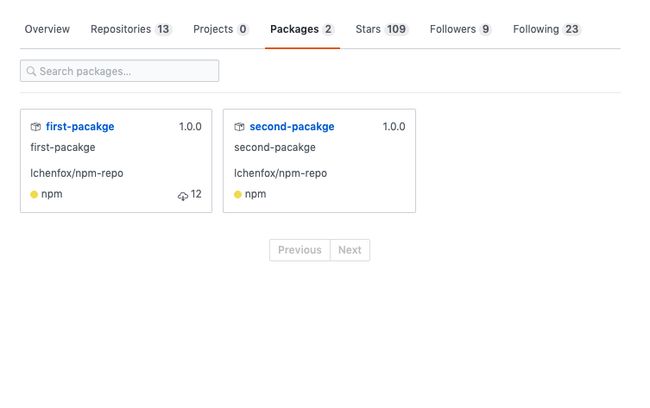
然后执行npm publish发布到GitHub Packages, 如图
可以看到,两个npm包分别为first-package、second-package,都发布到了GitHub Packages,并且都放到同一个仓库(npm-repo)当中,最后别忘记了将代码提交到远程的私有仓库中。
使用
和上面的使用是一样的,我们来安装一下
npm install @lchenfox/[email protected]
npm install @lchenfox/[email protected]
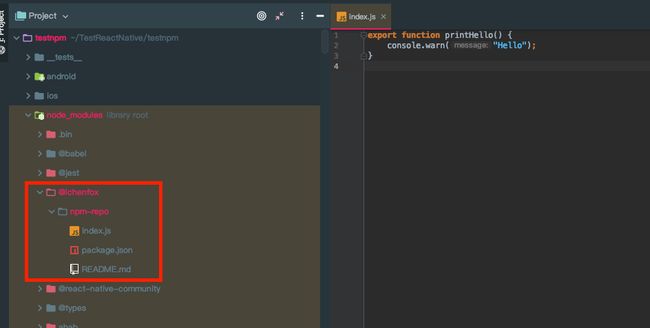
安装成功后,在项目的node_modules里面看起来如下
导入使用
import {printHello1} from '@lchenfox/first-pacakge';
import {printHello2} from '@lchenfox/second-pacakge';

printHello1(); // hello1
printHello2(); // hello2
到此,我们就知道如何使用GitHub Packages来创建npm私有库了。
总结
必须注意:本文所有lchenfox一定是你自己的github用户名,所有_authToken一定是你自己的Personal access tokens。
发布npm包必须满足两个条件
- 第
1点,要么创建.npmrc文件,里面添加registry=https://npm.pkg.github.com/lchenfox,要么就直接在package.json中添加publishConfig - 第
2点,要么在.npmrc(如果没有就创建一个)文件中添加//npm.pkg.github.com/:_authToken=0fc31c688a4a75f9509444b4648ac8e5fbeb20c4授权,要么使用npm login --registry=https://npm.pkg.github.com登录授权
安装npm包必须满足两个条件
- 第
1点,必须在项目根目录下(node_modules所在目录)创建.npmrc并且添加registry=https://npm.pkg.github.com/lchenfox - 第
2点,同以上发布npm包的第2点
使用GitHub Packages来创建和托管npm包非常方便,我们可以使用npm的相关命令,发布、安装方式基本和npm一样,使用这种方式来创建属于我们自己的私有库,维护起来也很简单,和之前的几种方式比起来,我个人觉得这种方式很适合搭建(或许只能说创建?)公司内部的npm私有库。
更多详情,请查看官方:Managing packages with GitHub Packages。
个人博客地址
