UIImage 和 base64 相互转化
1. UIImage 转换为 base64
// UIimage 对象
UIImage *image = [UIImage imageNamed:@"7th.png"];

// 创建 NSData 对象
// UIImageJPEGRepresentation 函数:以JPEG格式返回指定图像的数据。
// 参数一:image 对象
// 参数二:compressionQuality 图像压缩率(0.0~1.0)
NSData *imageData = UIImageJPEGRepresentation(image, 1.0);

// 1.UIImage ——> base64 String
NSString *encodedString = [imageData base64EncodedStringWithOptions:NSDataBase64Encoding64CharacterLineLength];
// 2.UIImage ——> base64 Data
NSData *encodedData = [imageData base64EncodedDataWithOptions:NSDataBase64Encoding64CharacterLineLength];

NSLog(@"encodedString:%@",encodedString);
NSLog(@"encodedData:%@",encodedData);
2. base64 转换为 UIImage
// 1.base64 String  ——> NSData
NSData *decodedImageData1 = [[NSData alloc] initWithBase64EncodedString:encodedString options:NSDataBase64DecodingIgnoreUnknownCharacters];
// 2.base64 Data  ——> NSData
NSData *decodedImageData2 = [[NSData alloc] initWithBase64EncodedData:encodedData options:NSDataBase64DecodingIgnoreUnknownCharacters];

// NSData  ——> UIImage
UIImage *decodedImage = [UIImage imageWithData:decodedImageData1];

if (!decodedImage) {
    NSLog(@"初始化图片失败了");
}else {
    // 图片尺寸
    NSLog(@"Decoded image size: %@", NSStringFromCGSize(decodedImage.size));
}
生成的base64数据打印出来后可以拷贝到网上测试 在线图片转换Base64
加载图片
- IOS如何选择图片加载方式:imageNamed和imageWithContentsOfFile的区别
- iOS 加载图片imageNamed 和imageWithContentsOfFile的区别
方法一 imageNamed:
+ (nullable UIImage *)imageNamed:(NSString *)name;
- 该方法 首先会在系统缓存中根据指定的名字查找图片,如果找到了就返回。如果没有在缓存中找到图片,该方法会从指定的文件中加载图片数据并缓存,然后返回结果。下次再使用该图片时就省去了从硬盘中加载图片的过程。对于相同名称的图片,系统只会把它缓存到内存一次。
- 因此,
imageNamed的优点是加载时会缓存图片。所以当图片会频繁的使用时,那么用imageNamed的方法会比较好。
使用示例:
// 加载名称为 7th.png 的图片对象
UIImage *image = [UIImage imageNamed:@"7th"];
方法二 imageWithContentsOfFile 或 imageWithData
+ (nullable UIImage *)imageWithContentsOfFile:(NSString *)path;
+ (nullable UIImage *)imageWithData:(NSData *)data;
- 这两个方法 不会缓存图片对象。图像会被系统以数据方式加载到程序。
- 因此,对于较大的图片以及使用情况较少时,可以用该方法,降低内存消耗。
使用示例:
// 指定路径
NSString *path = [[NSBundle mainBundle] pathForResource:@"7th" ofType:@"png"];
UIImage *fileImage = [UIImage imageWithContentsOfFile:path];
正确设定背景图片
在视图中添加背景图片有很多方法:
- 在视图中添加一个 UIImageView 作为子视图;
- 使用 UIColor 的
colorWithPatternImage方法设置背景图片;
方法一:在视图中添加一个 UIImageView 作为子视图
如果你使用全画幅的背景图,你就必须使用 UIImageView, 因为UIColor 的 colorWithPatternImage 方法是用来创建小的重复的图片作为背景的。这种情形下使用 UIImageView 可以节约不少的内存:
// You could also achieve the same result in Interface Builder
UIImageView *backgroundView = [[UIImageView alloc] initWithImage:[UIImage imageNamed:@"background"]];
[self.view addSubview:backgroundView];
方法二:使用 UIColor 的 colorWithPatternImage 方法
当你想要使用小图平铺来创建背景时,你就需要使用 UIColor 的colorWithPatternImage 方法了,它会更快地完成渲染也不会花费很多内存:
self.view.backgroundColor = [UIColor colorWithPatternImage:[UIImage imageNamed:@"background"]];
为图片设置圆角
关于为图片设置圆角参考了几篇文章:
- iOS 高效添加圆角效果实战讲解
- 老生常谈的圆角图片优化,结合SDWebImage的解决方案。
- 图片圆角设置
方法一:设置 cornerRadius 属性
代码方式设置 cornerRadius 属性
imgView.layer.cornerRadius = 5;
imgView.layer.masksToBounds = YES;
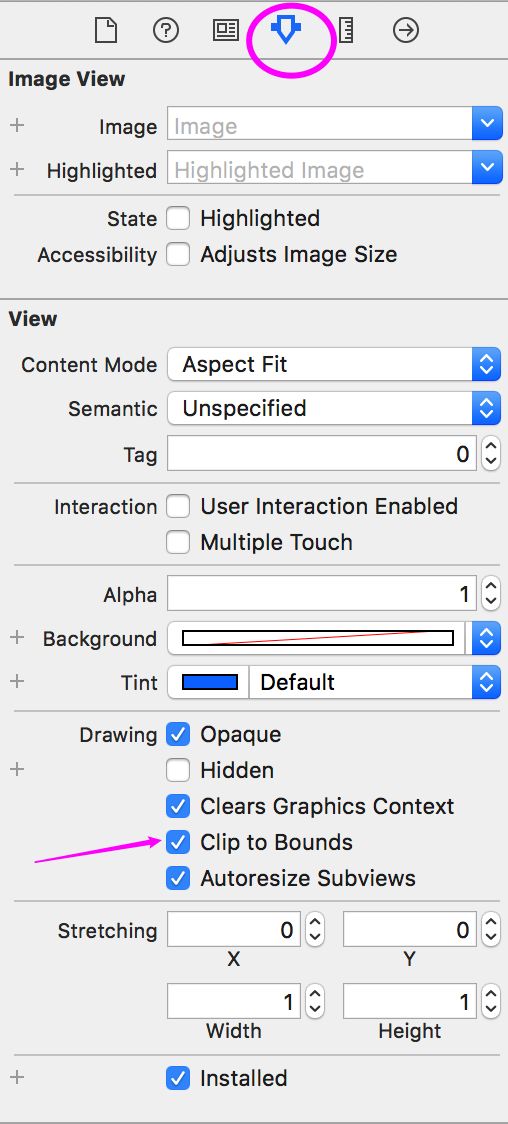
设置cornerRadius 只会影响视图的背景颜色和 border。问题在于碰到需要裁剪的视图,用到View.layer.masksToBounds = YES、或者 View.clipsToBounds = YES; 会产生离屏渲染。
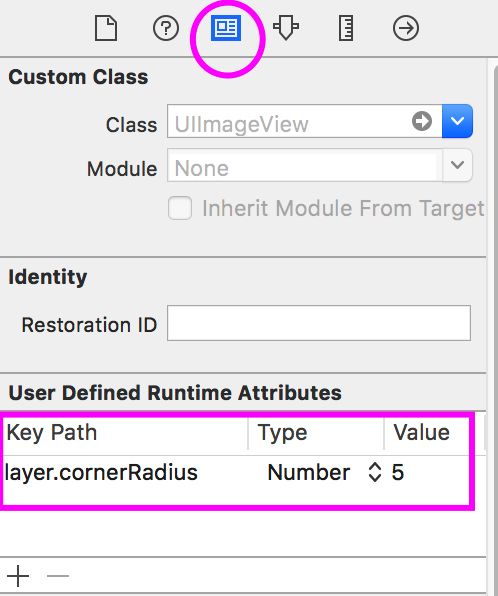
XIB 方式设置 cornerRadius 属性
方法二:使用 Core Graphics 框架
- 实现方式一:调用四次
CGContextAddArcToPoint函数绘制圆角矩形,再从当前的绘图上下文中获取图片。 - 实现方式二:使用贝塞尔曲线截取图片
bezierPathWithRoundedRect: byRoundingCorners: cornerRadii: - 实现方式三:直接获取圆形图片:
CGContextAddEllipseInRect() - ...
摘自:YYWebImage
使用 UIBezierPath 截取图片:
- (UIImage *)imageByRoundCornerRadius:(CGFloat)radius
                              corners:(UIRectCorner)corners
                          borderWidth:(CGFloat)borderWidth
                          borderColor:(UIColor *)borderColor
                       borderLineJoin:(CGLineJoin)borderLineJoin {

    if (corners != UIRectCornerAllCorners) {
        UIRectCorner tmp = 0;
        if (corners & UIRectCornerTopLeft) tmp |= UIRectCornerBottomLeft;
        if (corners & UIRectCornerTopRight) tmp |= UIRectCornerBottomRight;
        if (corners & UIRectCornerBottomLeft) tmp |= UIRectCornerTopLeft;
        if (corners & UIRectCornerBottomRight) tmp |= UIRectCornerTopRight;
        corners = tmp;
    }

    UIGraphicsBeginImageContextWithOptions(self.size, NO, self.scale);
    CGContextRef context = UIGraphicsGetCurrentContext();
    CGRect rect = CGRectMake(0, 0, self.size.width, self.size.height);
    CGContextScaleCTM(context, 1, -1);
    CGContextTranslateCTM(context, 0, -rect.size.height);

    CGFloat minSize = MIN(self.size.width, self.size.height);
    if (borderWidth < minSize / 2) {
        UIBezierPath *path = [UIBezierPath bezierPathWithRoundedRect:CGRectInset(rect, borderWidth, borderWidth) byRoundingCorners:corners cornerRadii:CGSizeMake(radius, borderWidth)];
        [path closePath];

        CGContextSaveGState(context);
        [path addClip];
        CGContextDrawImage(context, rect, self.CGImage);
        CGContextRestoreGState(context);
    }

    if (borderColor && borderWidth < minSize / 2 && borderWidth > 0) {
        CGFloat strokeInset = (floor(borderWidth * self.scale) + 0.5) / self.scale;
        CGRect strokeRect = CGRectInset(rect, strokeInset, strokeInset);
        CGFloat strokeRadius = radius > self.scale / 2 ? radius - self.scale / 2 : 0;
        UIBezierPath *path = [UIBezierPath bezierPathWithRoundedRect:strokeRect byRoundingCorners:corners cornerRadii:CGSizeMake(strokeRadius, borderWidth)];
        [path closePath];

        path.lineWidth = borderWidth;
        path.lineJoinStyle = borderLineJoin;
        [borderColor setStroke];
        [path stroke];
    }

    UIImage *image = UIGraphicsGetImageFromCurrentImageContext();
    UIGraphicsEndImageContext();
    return image;
}
设置 UIImageView 灰色圆角边框
// 添加边框效果
[self.uploadImageView.layer setMasksToBounds:YES];
// 设置层的圆角半径
[self.uploadImageView.layer setCornerRadius:5.0];
// 设置边框的宽度
[self.uploadImageView.layer setBorderWidth:2.0];
// 设置边框的颜色
CGColorSpaceRef colorSpace = CGColorSpaceCreateDeviceRGB();
CGColorRef colorRef = CGColorCreate(colorSpace, (CGFloat[]){ 142/255.0, 142/255.0, 142/255.0, 1 });
[self.uploadImageView.layer setBorderColor:colorRef];
保存图片到本地
使用 UIImageWriteToSavedPhotosAlbum 函数:
// 将照片添加到已保存的照片相册。The optional completionSelector should have the form:
//  - (void)image:(UIImage *)image didFinishSavingWithError:(NSError *)error contextInfo:(void *)contextInfo;
void UIImageWriteToSavedPhotosAlbum(UIImage *image, id completionTarget, SEL completionSelector, void *contextInfo);
| 参数 | 含义 |
|---|---|
| image | 要保存到相册的图片对象 |
| completionTarget | 可选,图片保存到相册后,选择器的回调对象。 |
| completionSelector | completionTarget 回调对象要调用的的方法选择器。 此可选方法应符合以下形式: (void)image:(UIImage *)image didFinishSavingWithError:(NSError *)error contextInfo:(void *)contextInfo; |
| contextInfo | 指向要传递给 Completion Selector 的任何上下文相关数据的可选指针。 |
使用示例:
- (void)saveImageToPhotosAlbum:(UIImage *)image {
    // 保存到本地
    UIImageWriteToSavedPhotosAlbum(image, self, @selector(image:didFinishSavingWithError:contextInfo:),(__bridge void *)self));
}

- (void)image:(UIImage *)image didFinishSavingWithError:(NSError *)error contextInfo:(void *)contextInfo {
    if (!error) {
        NSLog(@"成功保存图片到相册!");
    }else {
        NSLog(@"保存图片到相册失败!");
        NSLog(@"image = %@, error = %@, contextInfo = %@", image, error, contextInfo);
    }
}
使用 Photos 框架的 PHPhotoLibrary 类
#import  // iOS9.0彻底弃用,用下面这个吧,拿出来只是提醒你一下
#import  // iOS8.0开始,我们最好用这个咯

- (IBAction)save {
    // 0.判断状态
    PHAuthorizationStatus status = [PHPhotoLibrary authorizationStatus];
    if (status == PHAuthorizationStatusDenied) {
        BSLog(@"用户拒绝当前应用访问相册,我们需要提醒用户打开访问开关");
    }else if (status == PHAuthorizationStatusRestricted){
        BSLog(@"家长控制,不允许访问");
    }else if (status == PHAuthorizationStatusNotDetermined){
        BSLog(@"用户还没有做出选择");
        [self saveImage];
    }else if (status == PHAuthorizationStatusAuthorized){
        BSLog(@"用户允许当前应用访问相册");
        [self saveImage];
    }
}

/**
 *  返回相册
 */
- (PHAssetCollection *)collection{
    // 先获得之前创建过的相册
    PHFetchResult *collectionResult = [PHAssetCollection fetchAssetCollectionsWithType:PHAssetCollectionTypeAlbum subtype:PHAssetCollectionSubtypeAlbumRegular options:nil];
    for (PHAssetCollection *collection in collectionResult) {
        if ([collection.localizedTitle isEqualToString:BSCollectionName]) {
            return collection;
        }
    }

    // 如果相册不存在,就创建新的相册(文件夹)
    __block NSString *collectionId = nil; // __block修改block外部的变量的值
    // 这个方法会在相册创建完毕后才会返回
    [[PHPhotoLibrary sharedPhotoLibrary] performChangesAndWait:^{
        // 新建一个PHAssertCollectionChangeRequest对象, 用来创建一个新的相册
        collectionId = [PHAssetCollectionChangeRequest creationRequestForAssetCollectionWithTitle:BSCollectionName].placeholderForCreatedAssetCollection.localIdentifier;
    } error:nil];

    return [PHAssetCollection fetchAssetCollectionsWithLocalIdentifiers:@[collectionId] options:nil].firstObject;
}


/**
 *  返回相册,避免重复创建相册引起不必要的错误
 */
- (void)saveImage{
    /*
     PHAsset : 一个PHAsset对象就代表一个资源文件,比如一张图片
     PHAssetCollection : 一个PHAssetCollection对象就代表一个相册
     */

    __block NSString *assetId = nil;
    // 1. 存储图片到"相机胶卷"
    [[PHPhotoLibrary sharedPhotoLibrary] performChanges:^{ // 这个block里保存一些"修改"性质的代码
        // 新建一个PHAssetCreationRequest对象, 保存图片到"相机胶卷"
        // 返回PHAsset(图片)的字符串标识
        assetId = [PHAssetCreationRequest creationRequestForAssetFromImage:self.imageView.image].placeholderForCreatedAsset.localIdentifier;
    } completionHandler:^(BOOL success, NSError * _Nullable error) {
        if (error) {
            BSLog(@"保存图片到相机胶卷中失败");
            return;
        }

        BSLog(@"成功保存图片到相机胶卷中");

        // 2. 获得相册对象
        PHAssetCollection *collection = [self collection];

        // 3. 将“相机胶卷”中的图片添加到新的相册
        [[PHPhotoLibrary sharedPhotoLibrary] performChanges:^{
            PHAssetCollectionChangeRequest *request = [PHAssetCollectionChangeRequest changeRequestForAssetCollection:collection];

            // 根据唯一标示获得相片对象
            PHAsset *asset = [PHAsset fetchAssetsWithLocalIdentifiers:@[assetId] options:nil].firstObject;
            // 添加图片到相册中
            [request addAssets:@[asset]];
        } completionHandler:^(BOOL success, NSError * _Nullable error) {
            if (error) {
                BSLog(@"添加图片到相册中失败");
                return;
            }

            BSLog(@"成功添加图片到相册中");
            [[NSOperationQueue mainQueue] addOperationWithBlock:^{
                [SVProgressHUD showSuccessWithStatus:@"保存成功"];
            }];
        }];
    }];
}
保存 WKScriptMessage 中的图片
    // 保存支付凭证?
    if ([message.name isEqualToString:@"saveBase64"]) {
        NSLog(@"%@:%@",message.name,message.body);
        // 截取并删除起始无效字符串
        NSString *subString = [message.body substringFromIndex:22];
        // base64字符串 转换为 UIImage 对象
        NSData *decodedImageData = [[NSData alloc] initWithBase64EncodedString:subString options:NSDataBase64DecodingIgnoreUnknownCharacters];
        UIImage *decodedImage = [UIImage imageWithData:decodedImageData];
        if (!decodedImage) {
            NSLog(@"获取图片失败!");
            return;
        }
        // 保存到本地
        UIImageWriteToSavedPhotosAlbum(decodedImage, self, @selector(image:didFinishSavingWithError:contextInfo:),nil);
    }
根据全尺寸图片生成缩略图
- (void)setThumbnailFromImage:(UIImage *)image {
    CGSize origImageSize = image.size;
    // 缩略图的大小
    CGRect newRect = CGRectMake(0, 0, 40, 40);
    // 确定缩放倍数并保持宽高比不变
    float ratio = MAX(newRect.size.width / origImageSize.width,
                      newRect.size.height/origImageSize.height);

    // 根据当前设备的屏幕 scailing factor 创建透明的位图上下文
    UIGraphicsBeginImageContextWithOptions(newRect.size, NO, 0.0);
    // 创建表示圆角矩形的 UIBezierPath
    UIBezierPath *path = [UIBezierPath bezierPathWithRoundedRect:newRect
                                                    cornerRadius:5.0];
    // 根据 UIBezierPath 对象裁剪图形上下文
    [path addClip];
    // 让图片在缩略图绘制范围内居中
    CGRect projectRect;
    projectRect.size.width = ratio * origImageSize.width;
    projectRect.size.height = ratio * origImageSize.height;
    projectRect.origin.x = (newRect.size.width - projectRect.size.width) / 2.0;
    projectRect.origin.y = (newRect.size.height - projectRect.size.height) / 2.0;
    // 在上下文中绘制图片
    [image drawInRect:projectRect];
    // 通过图形上下文得到 UIImage 对象,并将其赋给 thumbnail 属性
    UIImage *smallImage = UIGraphicsGetImageFromCurrentImageContext();
    self.thumbnail = smallImage;

    // 清理图形上下文
    UIGraphicsEndImageContext();
}
使用指定颜色创建图片
摘自 YYKit:
+ (UIImage *)imageWithColor:(UIColor *)color {
    return [self imageWithColor:color size:CGSizeMake(1, 1)];
}

+ (UIImage *)imageWithColor:(UIColor *)color size:(CGSize)size {
    if (!color || size.width <= 0 || size.height <= 0) return nil;
    CGRect rect = CGRectMake(0.0f, 0.0f, size.width, size.height);
    UIGraphicsBeginImageContextWithOptions(rect.size, NO, 0);
    CGContextRef context = UIGraphicsGetCurrentContext();
    CGContextSetFillColorWithColor(context, color.CGColor);
    CGContextFillRect(context, rect);
    UIImage *image = UIGraphicsGetImageFromCurrentImageContext();
    UIGraphicsEndImageContext();
    return image;
}
给一个视图截图
摘自:多年iOS开发经验总结(一)—16
UIGraphicsBeginImageContextWithOptions(view.bounds.size, YES, 0.0);
[view.layer renderInContext:UIGraphicsGetCurrentContext()];
UIImage *img = UIGraphicsGetImageFromCurrentImageContext();
UIGraphicsEndImageContext();
画水印
摘自:多年iOS开发经验总结(一)—75
- (void) setImage:(UIImage *)image withWaterMark:(UIImage *)mark inRect:(CGRect)rect {
    if ([[[UIDevice currentDevice] systemVersion] floatValue] >= 4.0)
    {
        UIGraphicsBeginImageContextWithOptions(self.frame.size, NO, 0.0);
    }
    //原图
    [image drawInRect:self.bounds];
    //水印图
    [mark drawInRect:rect];
    UIImage *newPic = UIGraphicsGetImageFromCurrentImageContext();
    UIGraphicsEndImageContext();
    self.image = newPic;
}
参考
- iOS 常用组件-高效切圆角方法总结
- iOS 处理图片的一些小 Tip
- iOS图片转base64字符串和字符串转回图片
- [译]iOS 7: 使用Base64编解码NSData和NSString对象
- iOS下将照片保存到相册的三种方法
- iOS保存图片到相册
- 多年iOS开发经验总结(一)

