《循序渐进Linux(第2版) 基础知识 服务器搭建 系统管理 性能调优 虚拟化与集群应用》——4.3 文件管理与编辑...
本节书摘来自异步社区《循序渐进Linux(第2版) 基础知识 服务器搭建 系统管理 性能调优 虚拟化与集群应用》一书中的第4章,第4.3节,作者:高俊峰著,更多章节内容可以访问云栖社区“异步社区”公众号查看
4.3 文件管理与编辑
4.3.1 mkdir命令
1.功能说明
mkdir命令用于创建一个目录。mkdir是make directory的缩写。其格式如下。
mkdir [选项] 目录名
2.举例
在/home下创建user1目录,同时在user1下创建user2目录,也就是说,连续创建两个目录。
[root@mylinux~]#mkdir –p /home/user1/user2
这样就在/home目录下创建了嵌套目录user1/user2。
4.3.2 more命令
1.功能说明
如果一个文本文件比较长,一屏无法显示完毕,就需要使用more命令。more命令读取文本文件时,每次显示一屏,并且在每屏后暂停,同时在屏幕底部显示单词“More”。如果此时按Enter键,more命令就会接着再显示文本的一行,依此类推;如果按空格键,more命令就继续显示文本文件的另一屏信息。其格式如下。
more [选项] 文件名
2.举例
1)要以分页的方式显示Makefile文件的内容,可使用以下命令。
[root@mylinux~]#more Makefile
2)要显示Makefile文件的内容,每10行显示一屏,同时清除屏幕,使用以下命令。
[root@mylinux~]#more –c -10 Makefile
4.3.3 cat命令
1.功能说明
cat命令用来将文件的内容输出到标准输出,类似于DOS下的type命令,同时cat还可以用于连接合并文件。其格式如下。
cat [选项] 文件名
或者:
cat 文件1 文件2 >文件3
cat命令的选项及其说明如表4.16所示。
2.举例
1)要查看Kconfig文件的内容,同时将文件中的制表符显示为“^I”,并对非空行进行编号输出,可以使用以下命令。
[root@mylinux~]#cat –Ab Kconfig
2)以下命令将文件file1.txt和file1.txt的内容合并后输出到文件file3.txt。
[root@WEBServer base]# ls
file1.txt file2.txt
[root@WEBServer base]# cat file1.txt
This is file1.txt
[root@WEBServer base]# cat file2.txt
This is file2.txt
[root@WEBServer base]# cat file1.txt file2.txt >file3.txt
[root@WEBServer base]# more file3.txt
This is file1.txt
This is file2.txt
[root@WEBServer base]# ls
file1.txt file2.txt file3.txt
4.3.4 diff命令
1.功能说明
diff命令用来比较文件的差异。diff以逐行的方式比较文本文件的异同,如果指定比较的是目录,则diff会比较目录中相同文件名的文件,但不会比较其中的子目录。其格式如下。
diff [选项] 文件1 文件2
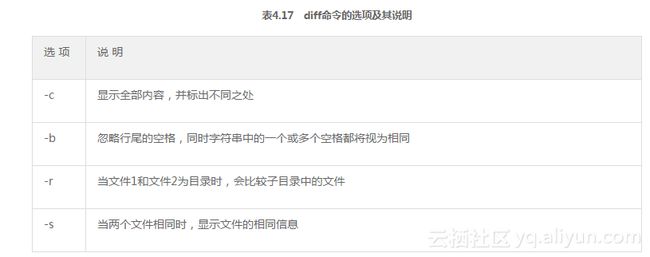
diff命令的选项及其说明如表4.17所示。
2.输出格式
通常输出信息由如下格式组成。
n1 a n3,n4
n1,n2 d n3
n1,n2 c n3,n4
其中,字母a、d、c之前的n1和n2代表文件1的行号,字母a、d、c之后的n3和n4代表文件2的行号,字母a、d、c分别表示附加、删除和修改操作。在上面输出形式的每行后紧跟着两个文件的若干不同行,其中以“<”打头的行属于文件1,以“>”打头的行属于文件2。
3.举例
比较文件file1.txt和文件file2.txt的异同,同时将/home/admin/file3.txt文件和当前目录下的file2.txt文件进行比较。
[root@WEBServer opt]# ls
file1.txt file2.txt
[root@WEBServer opt]# cat file1.txt
This is file1.txt
[root@WEBServer opt]# cat file2.txt
This is file2.txt
[root@WEBServer opt]# cat/home/admin/file3.txt
This is file3.txt
[root@WEBServer opt]# diff file1.txt file2.txt
1c1
< This is file1.txt
---
> This is file2.txt
[root@WEBServer opt]# diff /home/admin/file3.txt  file2.txt
1c1
< This is file3.txt
---
> This is file2.txt
[root@WEBServer opt]# diff -c/home/admin/file3.txt  file2.txt
*** /home/admin/file3.txt 2008-07-20 14:15:48.000000000 +0800
***file2.txt2008-07-20 14:14:21.000000000 +0800
--- 1 ---
! This is file3.txt
--- 1 ----
! This is file2.txt
4.3.5 grep命令
1.功能说明
grep命令是Linux下的文本过滤工具,grep根据指定的字符串,对文件的每一行进行搜索,如果找到了这个字符串,就输出该行的内容。其格式如下。
grep [选项] 需要查找的字符串文件名
2.举例
1)列出install.log文件中含有RPM字符串的行。
[root@WEBServer ~]# grepRPMinstall.log
Installing RPM
2)列出install.log文件中含有rpm字符串的行,忽略大小写,并标识出每行的具体行号。
[root@WEBServer ~]# grep -ni rpm install.log
386:Installing rpm - 4.4.2-47.el5.x86_64
412:Installing rpm-libs - 4.4.2-47.el5.x86_64
413:Installing rpm-python - 4.4.2-47.el5.x86_64
580:Installing rpm-libs - 4.4.2-47.el5.i386
792:Installing redhat-rpm-config - 8.0.45-22.el5.noarch
1191:Installing rpm-devel - 4.4.2-47.el5.x86_64
1192:Installing rpm-build - 4.4.2-47.el5.x86_64
1194:Installing rpm-devel - 4.4.2-47.el5.i386
1337:Installing RPM
4.3.6 rm命令
功能说明
rm命令用来删除某个目录及其下的所有文件及子目录。对于链接文件,只是断开了链接,原文件保持不变。其格式如下。
rm [选项] 文件或者目录
注意
使用rm命令要特别小心,“rm-rf”组合要慎用,因为一旦文件被删除,就不能被恢复。Linux没有类似于Windows的回收站。因此,为了防止文件或者目录被误删除,可以使用rm的“-i”选项,来逐个确认要删除的文件。使用“-i”选项时,如果用户输入“y”,文件将被删除;如果输入其他任何信息,文件则不被删除。
4.3.7 touch命令
1.功能说明
touch命令用来改变指定文件的访问时间和修改时间,若指定文件不存在则创建此文件。如果没有指定时间,则使用当前时间。其格式如下。
touch [选项] 设定的时间文件
2.举例
下面是touch命令的一个操作实例,“#”号后面的内容为命令注释。
[root@mylinux~]# touch test.txt#创建一个文件test.txt
[root@mylinux~]# ls -l#显示文件创建时间(修改时间)
total 0
-rw-r--r-- 1 root root 0 Jul 18 06:44 test.txt
[root@mylinux~]# ls –lu#显示文件的访问时间
total 0
-rw-r--r-- 1 root root 0 Jul 18 06:44 test.txt
[root@mylinux~]# date   #显示系统当前时间
Fri Jul 18 06:45:21 CST 2008
[root@mylinux~]# touch -a test.txt #改变文件的访问时间为系统当前时间
[root@mylinux~]# ls -lu
total 0
-rw-r--r-- 1 root root 0 Jul 18 06:45 test.txt
[root@mylinux~]# ls -l
total 0
-rw-r--r-- 1 root root 0 Jul 18 06:44 test.txt
[root@mylinux~]# touch -m test.txt #改变文件的修改时间为系统当前时间
[root@mylinux~]# ls -l
total 0
-rw-r--r-- 1 root root 0 Jul 18 06:46 test.txt
[root@mylinux~]# touch linux.txt
[root@mylinux~]# ls -l
total 0
-rw-r--r-- 1 root root 0 Jul 18 06:47 linux.txt
-rw-r--r-- 1 root root 0 Jul 18 06:46 test.txt
[root@mylinux~]# ls -lu
total 0
-rw-r--r-- 1 root root 0 Jul 18 06:47 linux.txt
-rw-r--r-- 1 root root 0 Jul 18 06:45 test.txt
[root@mylinux~]# touch -a -r linux.txt test.txt
#将test.txt文件的访问时间修改为linux.txt文件的访问时间
[root@mylinux~]# ls -lu
total 0
-rw-r--r-- 1 root root 0 Jul 18 06:47 linux.txt
-rw-r--r-- 1 root root 0 Jul 18 06:47 test.txt
[root@mylinux~]# touch -d "20080718 06:40" linux.txt
#将linux.txt文件的修改时间设定为2008年7月18日6点40分
[root@mylinux~]# ls -l
total 0
-rw-r--r-- 1 root root 0 Jul 18 06:40 linux.txt
-rw-r--r-- 1 root root 0 Jul 18 06:46 test.txt
4.3.8 ln命令
1.功能说明
ln命令用来在文件或目录之间创建链接。
Linux下的链接有两种,一种是硬链接(Hard Link),另一种是符号链接(Symbolic Link),默认情况下ln命令产生的是硬链接。
硬链接:是指通过文件的inode来进行链接。在Linux的文件系统中,保存在磁盘的所有类型的文件都会分配一个编号,这个编号称为inode号(Inode Index)。多个文件指向同一个inode在Linux系统中是允许的,这就是所谓的硬链接。硬链接的作用是允许一个文件拥有多个有效的路径名,这样用户就可以对一些重要文件建立硬链接,以防止误删除操作。因为对应该文件的inode有一个以上的链接,所以只删除一个链接并不影像inode本身和其他链接,只有当最后一个链接被删除后,文件的数据块及目录的链接才会释放,也就是说,此时文件才会被真正删除。
符号链接:也叫软链接,软链接类似于Windows中的快捷方式,因此软链接是一个指向真正的文件或者目录位置的符号连接。
ln命令的格式如下。
ln [选项] 源文件目标链接名
ln命令的选项及其说明如表4.21所示。
2.举例
1)将/etc/inittab文件进行硬链接到/opt/backup目录下,此时/opt/backup下就生成了一个inittab文件。可以看到,两个文件没有任何不同。
[root@mylinux ~]#ln /etc/inittab /opt/backup
[root@mylinux ~]#ll /opt/backup/inittab
total 8
-rw-r--r-- 2 root root 1666 Jul 19 11:17 /opt/backup/inittab
[root@mylinux ~]#ll /etc/inittab
-rw-r--r-- 2 root root 1666 Jul 19 11:17 /etc/inittab
2)在当前目录下有两个文件mylinux1.txt和mylinux.txt,现在将mylinux1.txt硬链接到当前目录下,链接名为mylinux.txt。当前目录下存在相同的文件名mylinux.txt,如果使用ln的“-f”选项,就会删除mylinux.txt文件。因此这里使用“-b”选项先备份mylinux.txt文件,然后再把mylinux1.txt硬链接到mylinux.txt。下面的mylinux.txt~文件就是“-b”选项备份产生的文件。
[root@mylinux oracle]# ls
mylinux1.txt mylinux.txt
[root@mylinux oracle]# more mylinux.txt
This is mylinux!
[root@mylinux oracle]# more mylinux1.txt
This is mylinux1!
[root@mylinux oracle]# ln -b mylinux1.txt mylinux.txt
[root@mylinux oracle]# ls
mylinux1.txt mylinux.txt mylinux.txt~
[root@mylinux oracle]# more mylinux.txt
This is mylinux1!
[root@mylinux oracle]# more mylinux.txt~
This is mylinux!
3)将/etc/inittab文件符号链接到/opt下。
[root@mylinux ~]#ln -s /etc/inittab /opt
[root@mylinux ~]#ll /opt/inittab
total 4
lrwxrwxrwx 1 root root 12 Jul 20 17:57 /opt/inittab -> /etc/inittab
4.3.9 file命令
1.功能说明
file命令用来显示文件的类型。对于长度为0的文件,将识别为空文件;对于符号连接文件,默认情况下将显示符号链接引用的真实文件路径。其格式如下。
file [选项] 文件名
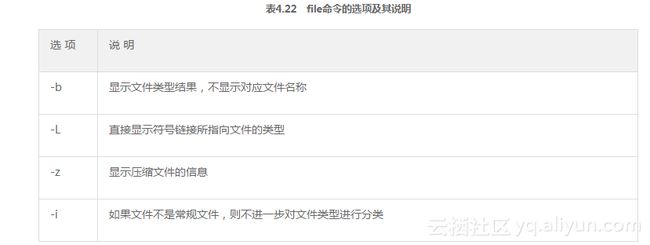
file命令的选项及其说明如表4.22所示。
2.举例
1)显示/etc/init.d/halt文件的类型,显示结果为shell可执行文件。
[root@WEBServer bin]# file /etc/init.d/halt
/etc/init.d/halt: Bourne-Again shell script text executable
2)显示/bin/sh文件的类型,显示结果为符号链接文件。
[root@WEBServer bin]# file /bin/sh
/bin/sh: symbolic link to 'bash'
3)显示/opt/file1.txt文件的类型,显示结果为ASCII文本文件。
[root@WEBServer opt]# file file1.txt
file1.txt: ASCII text
4)显示/dev/had文件的类型,显示结果为块设备文件。
[root@WEBServer cicro]# file /dev/hda
/dev/hda: block special (3/0)
4.3.10 cp命令
1.功能说明
cp命令用来将给出的文件或者目录复制到另一个文件或者目录中。cp与Windows下的copy命令类似,但是cp命令更加强大。其格式如下。
cp [选项] 源文件或目录目标文件或目录
2.举例
1)将当前目录下的所有文件复制到/tmp目录下,“./*”表示当前目录下所有文件和目录。
[root@mylinux~]#cp –r ./* /tmp
2)将/home/oracle目录及其子目录下的全部内容复制到/home/ixdba下。
[root@mylinux~]#cp –r /home/oracle /home/ixdba
4.3.11 find命令
1.功能说明
find命令用来在指定的路径下查找指定的文件。其格式如下。
find path-name[-options] [-print –exec -ok命令 {} \;]
具体的选项说明如下。
path-name:find命令查找的目录路径,例如,可以用“.”表示当前目录,用“/”表示系统根目录。
-options:find命令的这个选项主要用来控制搜索的方式。
2.举例
1)在系统根目录下,查找文件类型为普通文件,属于ixdba用户,两天以前,并且查找时不包含/usr/bin目录的文件名为main.c的文件,并将结果输出到屏幕。
[root@mylinux~]#find / -path "/usr/bin" -prune -o -name "main.c" -user ixdba -type f
-mtime +2 -print
2)对上例中搜索的结果进行删除操作。
[root@mylinux~]#find / -path "/usr/bin" -prune -o -name "main.c" -user ixdba -type f
-mtime +2 –print–exec rm {} \;
3)在系统根目录下查找不在/var/log和/usr/bin目录下的所有普通文件。
[root@mylinux~]#find / \( -path /var/log –o –path /usr/bin \) –prune –o –name
"main.c"–print
表示引用,告诉shell不对后面的字符做特殊解释,而留给find命令去解释其意义。
注意
“( -path”中,在“(”和“-path”之间是有空格的,同时“/usr/bin )”在“bin”和“”之间也是有空格的。
4)查找系统中所有大小为0的普通文件,并列出它们的完整路径。
[root@mylinux~]#find / -type f –size 0 –exec ls –al {} \;
5)查找系统/var/logs目录中修改时间在7天以前的普通文件,然后以交互方式删除。
[root@mylinux~]#find /var/log –type f –mtime +7 –ok rm {} \;
 ? y
 ? y
 ? y
 ? y
 ? y
 ? y
 ? y
6)在当前目录及子目录下查找所有“*.txt”文件。
[root@mylinux~]#find .–name "*.txt"–print`
7)在用户自己的根目录下查找文件名以一个大写字母开头,紧接着是一个小写字母和两个数字,最后以“.txt”结尾的文件。
[root@mylinux~]$ find ~ -name “[A-Z][a-z][0--9][0--9]*.txt” -print
8)在/etc目录下查找文件属主为ixdba用户的文件。
[root@mylinux~]#find /etc –user ixdba -print
4.3.12 split命令
1.功能说明
split命令用来分割文档,将一个文件分成数个。其格式如下。
split [选项] [input_file] [output_file]
input_file:需要分割的文件。
output_file:分割出来的文件序列,split命令分割后生成的文件序列名依次为output_fileaa、output_fileab、output_fileac等。如果没有指定output_file,系统默认以“x”作为输出文件名。
2.举例
1)将access_log文件进行分割,设定每个分割文件的大小为10MB。
[root@mylinux ~]#split –b 10Maccess_logaccess_log_bak
执行完毕,在当前目录下就生成类似access_log_bakaa、access_log_bakab和access_log_bakah等分割文件,每个文件大小10MB。
2)将/opt/etc.zip文件进行分割,指定每个文件大小为2MB,输出文件序列以数字形式显示,序列长度为3。
[root@mylinux ~]#split –b 2M–d –a 3 /opt/etc.zip /opt/etc.zip_bak
split命令执行完毕,在/opt/目录下生成类似etc.zip_bak001、etc.zip_bak002和etc.zip_bak003等文件。
4.3.13 mv命令
1.功能说明
mv命令用来将文件或目录改名或将文件由一个目录移入另一个目录中。如果源类型和目标类型都是文件或者目录,mv将进行目录重命名。如果源类型为文件,而目标类型为目录,mv将进行文件的移动。如果源类型为目录,则目标类型只能是目录,不能是文件,此时完成目录重命名。其格式如下。
mv [选项] 源文件或目录目标文件或目录
2.举例
创建一个myDocument目录和一个Document文件,然后将Document文件移动到myDocument目录下,最后修改myDocument目录为myDocument_1。
[root@dbbackup oracle]# mkdir myDocument
[root@dbbackup oracle]# touch Document
[root@dbbackup oracle]# ls
Document myDocument
[root@dbbackup oracle]# mv Document myDocument
[root@dbbackup oracle]# mv myDocument myDocument_1
[root@dbbackup oracle]# ls
myDocument_1
[root@dbbackup oracle]#
