为什么80%的码农都做不了架构师?>>> ![]()
go 性能测试
基准测试
基准测试主要是通过测试CPU和内存的效率问题,来评估被测试代码的性能,进而找到更好的解决方案。
编写基准测试
func BenchmarkSprintf(b *testing.B){
	num:=10
	b.ResetTimer()
for i:=0;i- 基准测试的代码文件必须以_test.go结尾
- 基准测试的函数必须以Benchmark开头,必须是可导出的
- 基准测试函数必须接受一个指向Benchmark类型的指针作为唯一参数
- 基准测试函数不能有返回值
- b.ResetTimer是重置计时器,这样可以避免for循环之前的初始化代码的干扰
- 最后的for循环很重要,被测试的代码要放到循环里
- b.N是基准测试框架提供的,表示循环的次数,因为需要反复调用测试的代码,才可以评估性能
➜  go test -bench=. -run=none
BenchmarkSprintf-8      20000000               117 ns/op
PASS
ok      flysnow.org/hello       2.474s
使用 go test 命令,加上 -bench= 标记,接受一个表达式作为参数, .表示运行所有的基准测试
因为默认情况下 go test 会运行单元测试,为了防止单元测试的输出影响我们查看基准测试的结果,可以使用-run=匹配一个从来没有的单元测试方法,过滤掉单元测试的输出,我们这里使用none,因为我们基本上不会创建这个名字的单元测试方法。
也可以使用 -run=^$, 匹配这个规则的,但是没有,所以只会运行benchmark
go test -bench=. -run=^$
有些时候在benchmark之前需要做一些准备工作,并且,我们不希望这些准备工作纳入到计时里面,我们可以使用 b.ResetTimer(),代表重置计时为0,以调用时的时刻作为重新计时的开始。
看到函数后面的-8了吗?这个表示运行时对应的GOMAXPROCS的值。
接着的20000000表示运行for循环的次数也就是调用被测试代码的次数
最后的117 ns/op表示每次需要话费117纳秒。(执行一次操作话费的时间)
以上是测试时间默认是1秒,也就是1秒的时间,调用两千万次,每次调用花费117纳秒。
如果想让测试运行的时间更长,可以通过-benchtime指定,比如3秒。
➜  hello go test -bench=. -benchtime=3s -run=none
// Benchmark 名字 - CPU     循环次数          平均每次执行时间
BenchmarkSprintf-8      50000000               109 ns/op
PASS
//  哪个目录下执行go test         累计耗时
ok      flysnow.org/hello       5.628s
可以发现,我们加长了测试时间,测试的次数变多了,但是最终的性能结果:每次执行的时间,并没有太大变化。一般来说这个值最好不要超过3秒,意义不大。
性能对比
上面那个基准测试的例子,其实是一个int类型转为string类型的例子,标准库里还有几种方法,我们看下哪种性能更加.
func BenchmarkSprintf(b *testing.B){
	num:=10
	b.ResetTimer()
	for i:=0;i
➜ hello go test -bench=. -run=none
BenchmarkSprintf-8 20000000 117 ns/op
BenchmarkFormat-8 50000000 33.3 ns/op
BenchmarkItoa-8 50000000 34.9 ns/op
PASS
ok flysnow.org/hello 5.951s
从结果上看strconv.FormatInt函数是最快的,其次是strconv.Itoa,然后是fmt.Sprintf最慢,前两个函数性能达到了最后一个的3倍多。那么最后一个为什么这么慢的,我们再通过-benchmem找到根本原因。
➜  hello go test -bench=. -benchmem -run=none
BenchmarkSprintf-8      20000000               110 ns/op              16 B/op          2 allocs/op
BenchmarkFormat-8       50000000                31.0 ns/op             2 B/op          1 allocs/op
BenchmarkItoa-8         50000000                33.1 ns/op             2 B/op          1 allocs/op
PASS
ok      flysnow.org/hello       5.610s
-benchmem可以提供每次操作分配内存的次数,以及每次操作分配的字节数。从结果我们可以看到,性能高的两个函数,每次操作都是进行1次内存分配,而最慢的那个要分配2次;性能高的每次操作分配2个字节内存,而慢的那个函数每次需要分配16字节的内存。从这个数据我们就知道它为什么这么慢了,内存分配都占用都太高。
在代码开发中,对于我们要求性能的地方,编写基准测试非常重要,这有助于我们开发出性能更好的代码。不过性能、可用性、复用性等也要有一个相对的取舍,不能为了追求性能而过度优化。
结合 pprof
pprof 性能监控
package bench
import "testing"
func Fib(n int) int {
    if n < 2 {
      return n
    }
    return Fib(n-1) + Fib(n-2)
}
func BenchmarkFib10(b *testing.B) {
    // run the Fib function b.N times
    for n := 0; n < b.N; n++ {
      Fib(10)
    }
}
go test -bench=. -benchmem -cpuprofile profile.out
还可以同时看内存
go test -bench=. -benchmem -memprofile memprofile.out -cpuprofile profile.out
然后就可以用输出的文件使用pprof
go tool pprof profile.out
File: bench.test
Type: cpu
Time: Apr 5, 2018 at 4:27pm (EDT)
Duration: 2s, Total samples = 1.85s (92.40%)
Entering interactive mode (type "help" for commands, "o" for options)
(pprof) top
Showing nodes accounting for 1.85s, 100% of 1.85s total
      flat  flat%   sum%        cum   cum%
     1.85s   100%   100%      1.85s   100%  bench.Fib
         0     0%   100%      1.85s   100%  bench.BenchmarkFib10
         0     0%   100%      1.85s   100%  testing.(*B).launch
         0     0%   100%      1.85s   100%  testing.(*B).runN
这个是使用cpu 文件, 也可以使用内存文件
然后你也可以用list命令检查函数需要的时间
(pprof) list Fib
     1.84s      2.75s (flat, cum) 148.65% of Total
         .          .      1:package bench
         .          .      2:
         .          .      3:import "testing"
         .          .      4:
     530ms      530ms      5:func Fib(n int) int {
     260ms      260ms      6:   if n < 2 {
     130ms      130ms      7:           return n
         .          .      8:   }
     920ms      1.83s      9:   return Fib(n-1) + Fib(n-2)
         .          .     10:}
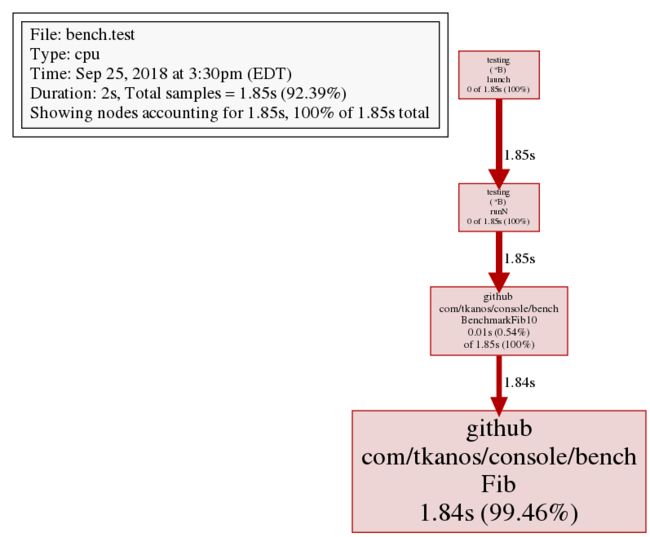
或者使用web命令生成图像(png,pdf,...)
报错:Failed to execute dot. Is Graphviz installed? Error: exec: "dot": executable file not found in %PATH%
是你电脑没有安装gvedit导致的
fq进入gvedit官网https://graphviz.gitlab.io/_pages/Download/Download_windows.html 下载稳定版
mac 安装, 安装好后就可以使用web进行展现了
brew install graphviz
火焰图
火焰图(Flame Graph)是 Bredan Gregg 创建的一种性能分析图表,因为它的样子近似火焰而得名。
火焰图 svg 文件可以通过浏览器打开,它对于调用图的最优点是它是动态的:可以通过点击每个方块来 zoom in 分析它上面的内容。
火焰图的调用顺序从下到上,每个方块代表一个函数,它上面一层表示这个函数会调用哪些函数,方块的大小代表了占用 CPU 使用的长短。火焰图的配色并没有特殊的意义,默认的红、黄配色是为了更像火焰而已。
runtime/pprof分析项目, 会在当前文件夹内导出profile文件。然后用火焰图去分析,就不能指定域名了,要指定文件。
go-torch
网上介绍大部分使用uber的开源工具
go-torch。这是 uber 开源的一个工具,可以直接读取 golang profiling 数据,并生成一个火焰图的 svg 文件。
go-torch 工具的使用非常简单,没有任何参数的话,它会尝试从 http://localhost:8080/debug/pprof/profile 获取 profiling 数据。它有三个常用的参数可以调整:
- -u --url:要访问的 URL,这里只是主机和端口部分
- -s --suffix:pprof profile 的路径,默认为 /debug/pprof/profile
- --seconds:要执行 profiling 的时间长度,默认为 30s
原生支持
从 Go 1.11 开始, 火焰图被集成进入 Go 官方的 pprof 库.
# This will listen on :8081 and open a browser.
# Change :8081 to a port of your choice.
$ go tool pprof -http=":8081" [binary] [profile]
如果低于1.11版本那么请从git pprof
# Get the pprof tool directly
$ go get -u github.com/google/pprof

$ pprof -http=":8081" [binary] [profile]
pprof README.md
一个web 小例子
package main

import (
	"fmt"
	"log"
	"net/http"
	_ "net/http/pprof"
	"time"
)

func sayHelloHandler(w http.ResponseWriter, r *http.Request) {
	hellowold(10000)
	fmt.Println("path", r.URL.Path)
	fmt.Println("scheme", r.URL.Scheme)
	fmt.Fprintf(w, "Hello world!\n") //这个写入到w的是输出到客户端的
}

func main() {
	http.HandleFunc("/", sayHelloHandler) //	设置访问路由
	log.Fatal(http.ListenAndServe(":8080", nil))
}

func hellowold(times int) {
	time.Sleep(time.Second)
	var counter int
	for i := 0; i < times; i++ {
		for j := 0; j < times; j++ {
			counter++
		}
	}
}
使用下面的命令开启监控,然后访问几次localhost:8080
go tool pprof -http=":8081" http://localhost:8080/debug/pprof/profile
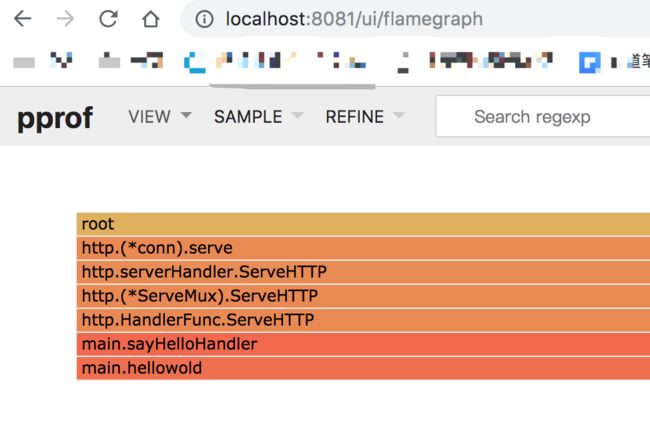
过一会儿会产生个web窗口, 选择 VIEW->Flame Graph 得到火焰图形
http://localhost:8081/ui/flamegraph
Testing flags
go 测试后面可以跟哪些参数
Testing flags
常用flag
- -bench regexp:性能测试,支持表达式对测试函数进行筛选。-bench .则是对所有的benchmark函数测试
- -benchmem:性能测试的时候显示测试函数的内存分配的统计信息
- -count n:运行测试和性能多少此,默认一次
- -run regexp:只运行特定的测试函数, 比如-run ABC只测试函数名中包含ABC的测试函数
- -timeout t:测试时间如果超过t, panic,默认10分钟
- -v:显示测试的详细信息,也会把Log、Logf方法的日志显示出来
Go 1.7中开始支持 sub-test的概念。
测试注意和调优
golang性能测试与调优
- 避免频繁调用timer
- 避免测试数据过大
参考
Go语言实战笔记(二十一)| Go 单元测试
Go语言实战笔记(二十二)| Go 基准测试
Profile your golang benchmark with pprof
深入Go语言 - 12
Go单元测试&性能测试
golang性能测试与调优
go pprof 性能分析
go tool pprof
Go 性能测试工具PProf--火焰图
PS: 觉得不错的请点个赞吧!! (ง •̀_•́)ง

