手把手教你用TensorFlow实现看图说话 | 教程+代码
看图说话这种技能,我们人类在幼儿园时就掌握了,机器们前赴后继学了这么多年,也终于可以对图像进行最简单的描述。
O’reilly出版社和TensorFlow团队联合发布了一份教程,详细介绍了如何在Google的Show and Tell模型基础上,用Flickr30k数据集来训练一个图像描述生成器。模型的创建、训练和测试都基于TensorFlow。
如果你一时想不起O’reilly是什么,量子位很愿意帮你回忆:
好了,看教程:
准备工作
- 装好TensorFlow;
- 安装pandas、opencv2、Jupyter库;
- 下载Flicker30k数据集的图像嵌入和图像描述
在教程对应的GitHub代码介绍( https://github.com/mlberkeley/oreilly-captions )里,有库、图像嵌入、图像描述的下载链接。
图像描述生成模型
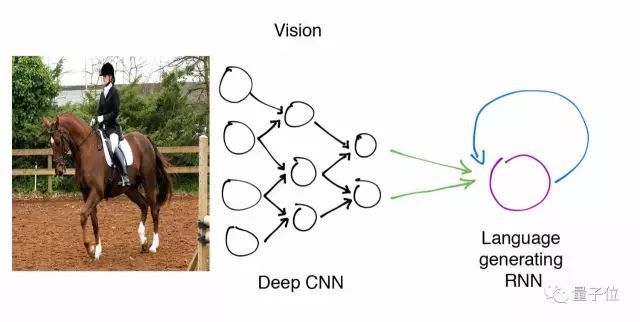
△ 图像描述生成模型的网络示意图。
该网络输入马的图像,经由深度卷积神经网络Deep CNN和语言生成模型RNN(循环神经网络)学习训练,最终得到字幕生成网络的模型。
这就是一个我们将要训练的网络结构示意图。深度卷积神经网络将每个输入图像进行编码表示成一个4,096维的矢量,利用循环神经网络的语言生成模型解码该矢量,生成对输入图像的描述。
图像描述生成是图像分类的扩展
图像分类是一种经典的计算机视觉任务,可以使用很多强大的经典分类模型。分类模型是通过将图像中存在的形状和物体的相关视觉信息拼凑在一起,以实现对图像中物体的识别。
机器学习模型可以被应用到计算机视觉任务中,例如物体检测和图像分割,不仅需要识别图像中的信息,而且还要学习和解释呈现出的2D空间结构,融合这两种信息,来确定物体在图像中的位置信息。想要实现字幕生成,我们需要解决以下两个问题:
1. 我们如何在已有成功的图像分类模型的基础上,从图像中获取重要信息?
2. 我们的模型如何在理解图像的基础上,融合信息实现字幕生成?
运用迁移学习
我们可以利用现有的模型来帮助提取图像信息。迁移学习允许我们用现有用于训练不同任务的神经网络,通过数据格式转换,将这些网络应用到我们的数据之中。
在我们的实验中,该vgg-16图像分类模型的输入图像格式为224×224像素,最终会产生一个4096维的特征向量,连接到多层全连接网络进行图像分类。
我们可以使用vgg-16网络模型的特征提取层,用来完善我们的字幕生成网络。在这篇文章的工作中,我们抽象出vgg-16网络的特征提取层和预先计算的4096维特征,这样就省去了图像的预训练步骤,来加速全局网络训练进程。
载入VGG网络特征和实现图像标注功能的代码是相对简单的:
def get_data(annotation_path, feature_path):
    annotations = pd.read_table(annotation_path, sep='\t', header=None, names=['image', 'caption'])    return np.load(feature_path,'r'), annotations['caption'].values
理解图像描述
现在,我们对图像标注了多个物体标签,我们需要让模型学习将表示标签解码成一个可理解的标题。
由于文本具有连续性,我们利用RNN及LSTM网络,来训练在给定已有前面单词的情况下网络预测后续一系列描述图像的句子的功能。
由于长短期记忆模型(LSTM)单位的存在,使得模型更好地在字幕单词序列中提取到关键信息,选择性记住某些内容以及忘记某些无用的信息。TensorFlow提供了一个封装函数,用于在给定输入和确定输出维度的条件下生成一个LSTM网络层。
为了将单词转化成适合于LSTM网络输入的具有固定长度的表示序列,我们使用一个嵌入层来学习如何将单词映射到256维特征,即词语嵌入操作。词语嵌入帮助将我们的单词表示为向量形式,那么类似的单词向量就说明对应的句子在语义上也是相似的。
在VGG-16网络所构建的图像分类器中,卷积层提取到的4,096维矢量表示将通过softmax层进行图像分类。由于LSTM单元更支持用256维文本特征作为输入,我们需要将图像表示格式转换为用于描述序列的表示格式。因此,我们添加了嵌入层,该层能够将4,096维图像特征映射到另一个256维文本特征的矢量空间。
建立和训练模型
下图展示了看图说话模型的原理:
在该图中,{s0,s1,…,sN}表示我们试图预测的描述单词,{wes0,wes1,…,wesN-1}是每个单词的字嵌入向量。LSTM的输出{p1,p2,…,pN}是由该模型基于原有的单词序列为下一个单词生成的概率分布。该模型的训练目标是为了最大化每个单词对数概率的总和指标。
def build_model(self):
        # declaring the placeholders for our extracted image feature vectors, our caption, and our mask
        # (describes how long our caption is with an array of 0/1 values of length `maxlen`
        img = tf.placeholder(tf.float32, [self.batch_size, self.dim_in])
        caption_placeholder = tf.placeholder(tf.int32, [self.batch_size, self.n_lstm_steps])
        mask = tf.placeholder(tf.float32, [self.batch_size, self.n_lstm_steps])        # getting an initial LSTM embedding from our image_imbedding
        image_embedding = tf.matmul(img, self.img_embedding) + self.img_embedding_bias        # setting initial state of our LSTM
        state = self.lstm.zero_state(self.batch_size, dtype=tf.float32)

       total_ loss = 0.0
        with tf.variable_scope("RNN"):            for i in range(self.n_lstm_steps):
                if i > 0:                   #if this isn't the first iteration of our LSTM we need to get the word_embedding corresponding
                   # to the (i-1)th word in our caption
                    with tf.device("/cpu:0"):
                        current_embedding = tf.nn.embedding_lookup(self.word_embedding, caption_placeholder[:,i-1]) + self.embedding_bias                else:                     #if this is the first iteration of our LSTM we utilize the embedded image as our input
                     current_embedding = image_embedding                if i > 0:
                    # allows us to reuse the LSTM tensor variable on each iteration
                    tf.get_variable_scope().reuse_variables()

                out, state = self.lstm(current_embedding, state)                print (out,self.word_encoding,self.word_encoding_bias)                if i > 0:                    #get the one-hot representation of the next word in our caption
                    labels = tf.expand_dims(caption_placeholder[:, i], 1)
                    ix_range=tf.range(0, self.batch_size, 1)
                    ixs = tf.expand_dims(ix_range, 1)
                    concat = tf.concat([ixs, labels],1)
                    onehot = tf.sparse_to_dense(
                            concat, tf.stack([self.batch_size, self.n_words]), 1.0, 0.0)                    #perform a softmax classification to generate the next word in the caption
                    logit = tf.matmul(out, self.word_encoding) + self.word_encoding_bias
                    xentropy = tf.nn.softmax_cross_entropy_with_logits(logits=logit, labels=onehot)
                    xentropy = xentropy * mask[:,i]

                    loss = tf.reduce_sum(xentropy)
                    total_loss += loss

            total_loss = total_loss / tf.reduce_sum(mask[:,1:])            return total_loss, img,  caption_placeholder, mask
通过推断生成描述
训练后,我们得到一个模型,能够根据图像和标题的已有单词给出下一个单词出现的概率。 那么我们该如何用这个网络来产生新的字幕?
最简单的方法是根据输入图像并迭代输出下一个最可能的单词,来构建单个标题。
def build_generator(self, maxlen, batchsize=1):
        #same setup as `build_model` function
        img = tf.placeholder(tf.float32, [self.batch_size, self.dim_in])
        image_embedding = tf.matmul(img, self.img_embedding) + self.img_embedding_bias
        state = self.lstm.zero_state(batchsize,dtype=tf.float32)       #declare list to hold the words of our generated captions
        all_words = []        print (state,image_embedding,img)        with tf.variable_scope("RNN"):           # in the first iteration we have no previous word, so we directly pass in the image embedding
           # and set the `previous_word` to the embedding of the start token ([0]) for the future iterations
            output, state = self.lstm(image_embedding, state)
            previous_word = tf.nn.embedding_lookup(self.word_embedding, [0]) + self.embedding_bias            for i in range(maxlen):
                tf.get_variable_scope().reuse_variables()

                out, state = self.lstm(previous_word, state)               # get a one-hot word encoding from the output of the LSTM
                logit = tf.matmul(out, self.word_encoding) + self.word_encoding_bias
                best_word = tf.argmax(logit, 1)                with tf.device("/cpu:0"):                   # get the embedding of the best_word to use as input to the next iteration of our LSTM
                    previous_word = tf.nn.embedding_lookup(self.word_embedding, best_word)

                previous_word += self.embedding_bias

                all_words.append(best_word)        return img, all_words
在许多情况下,这种方法是比较有效的。但是通过贪心算法来选取最可能的单词序列,我们可能不会得到一句连贯通顺的字幕序列。
为避免这种情况,一个解决办法是使用一种叫做“集束搜索(Beam Search)”的算法。该算法迭代地使用k个长度为t的最佳句子集合来生成长度为t+1的候选句子,并且能够自动找到最优的k值。这个算法在易于处理推理计算的同时,也在探索生成更合适的标题长度。在下面的示例中,在搜索每个垂直时间步长的粗体字路径中,此算法能够列出一系列k=2的最佳候选句子。
局限性和讨论
神经网络实现的图像描述生成器,为学习从图像映射到自然语言图像描述提供了一个有用的框架。通过对大量图像和对应标题的集合进行训练,该模型能够从视觉特征中捕获相关的语义信息。
然而,使用静态图像时,字幕生成器将专注于提取对图像分类有用的图像特征,而不一定是对字幕生成有用的特征。为了提高每个特征中所包含相关任务信息的数量,我们可以将图像嵌入模型,即用于编码特征的VGG-16网络,来作为字幕生成模型进行训练,使网络在反向传播过程中对图像编码器进行微调,以更好地实现字幕生成的功能。
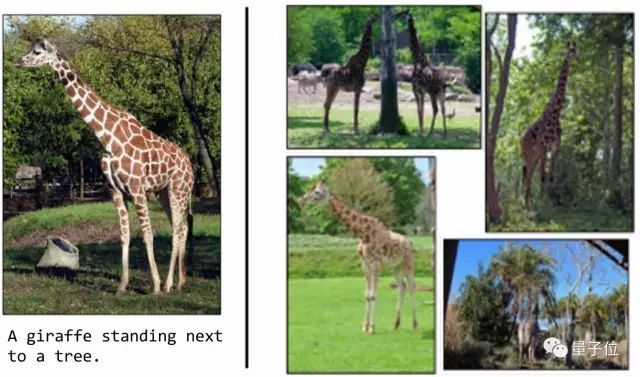
此外,如果我们真正仔细研读生成的字幕序列,我们会注意到都是比较普通而且变化不大的句子。拿如下的图像作为例子:
△ 一只长颈鹿站在树的旁边
此图片的对应生成字幕是“长颈鹿站在树旁边”。但是如果我们观察其他图片,我们可能会注意到,对于任何带有长颈鹿照片,它可能都会生成标题“一只长颈鹿站在树的旁边”,因为在训练集中,带有长颈鹿的图像样本经常出现在树林附近。
后续工作
首先,如果你想改进这里字幕生成的模型,可以看看谷歌的开源项目Show and Tell network,是利用MS COCO数据集和一个三层图像嵌入模型进行训练生成的预测网络。
目前最先进的图像字幕模型引入了视觉注意机制,其允许模型关注图像中特定的区域并且生成字幕时选择性地关注特定类别的信息。
此外,如果您对这种最先进的字幕生成功能实现感兴趣,请查看Yoshua Bengio的论文:Show, Attend, and Tell: Neural Image Caption Generation with Visual Attention。


