Spring AOP和Spring整合Mybatis
文章目录
- 1、AOP
- 1.1、什么是AOP
- 1.2 Aop在Spring中的作用
- 1.3 使用Spring实现Aop
- 2、Spring 整合 Mybatis
- 2.1、回忆Mybatis的用法:
- 2.2、Mybatis-Spring整合
- 3、声明式事务
- 3.1、回顾事务
- 3.2、Spring中的事务管理:
- 4、代理模式
- 4.1、静态代理
- 4.2、加深代理模式的理解:
- 4.3、动态代理?(AOP的底层实现)
- 5、面对对象7大原则(待补充~)
1、AOP
1.1、什么是AOP
AOP(Aspect Oriented Programming)意为:面向切面编程,通过预编译方式和运行期动态代理实现程序功能的统一维护的一种技术。AOP是OOP的延续,是软件开发中的一个热点,也是Spring框架中的一个重要内容,是函数式编程的一种衍生范型。利用AOP可以对业务逻辑的各个部分进行隔离,从而使得业务逻辑各部分之间的耦合度降低,提高程序的可重用性,同时提高了开发的效率。
1.2 Aop在Spring中的作用
提供声明式事务;允许用户自定义切面
-
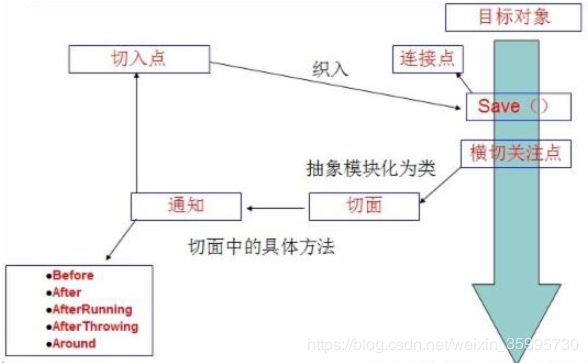
横切关注点:跨越应用程序多个模块的方法或功能。即是,与我们业务逻辑无关的,但是我们需要关注的部分,就是横切关注点。如日志 , 安全 , 缓存 , 事务等等 …
-
切面(ASPECT):Aspect切面表示Pointcut(切入点)和Advice(增强/通知)的结合。
-
通知(Advice):所谓通知是指拦截到Joinpoint之后所要做的事情就是通知,通知分为前置通知、后置通知、异常通知、最终通知和环绕通知(切面要完成的功能)。
-
目标(Target):被通知对象。
-
代理(Proxy):向目标对象应用通知之后创建的对象。
-
切入点(PointCut):切入点是与连接点匹配的表达式,用于确定是否需要执行通知。切入点使用与连接点匹配的不同类型的表达式,Spring框架使用AspectJ切入点表达式语言。我们可以将切入点理解为需要被拦截的Join point。
-
连接点(JointPoint):程序执行过程中的一个点,如方法的执行或异常的处理。在Spring AOP中,连接点总是表示方法的执行。通俗的讲,连接点即表示类里面可以被增强的方法。
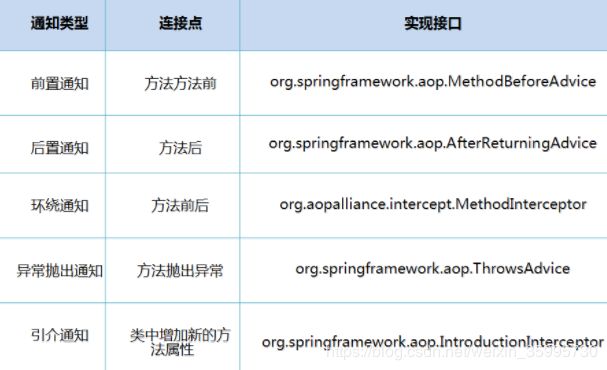
SpringAOP中,通过Advice定义横切逻辑,Spring中支持5种类型的Advice:
核心作用: Aop 在 不改变原有代码的情况下 , 去增加新的功能 .
1.3 使用Spring实现Aop
环境:
-
普通Maven项目
-
需要导入的依赖文件:
<dependencies> <dependency> <groupId>org.aspectjgroupId> <artifactId>aspectjweaverartifactId> <version>1.9.4version> dependency> <dependency> <groupId>junitgroupId> <artifactId>junitartifactId> <version>4.11version> <scope>testscope> dependency> <dependency> <groupId>org.springframeworkgroupId> <artifactId>spring-webmvcartifactId> <version>5.1.9.RELEASEversion> dependency> dependencies> -
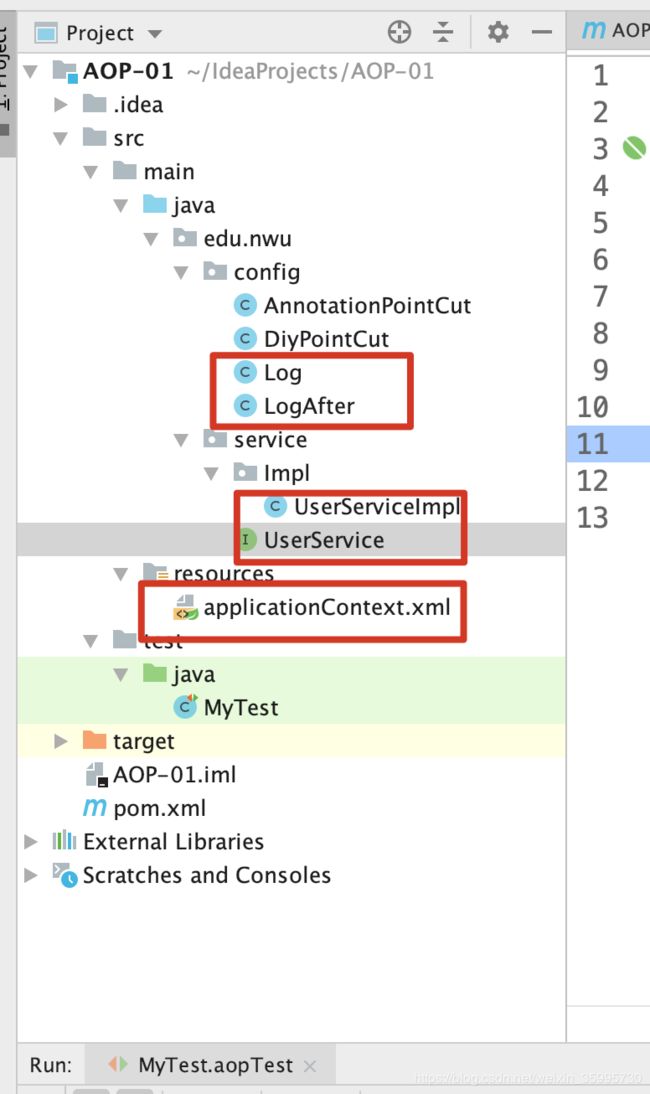
创建如图所示的目录结构:
其中,UserService.java:(相当于定义了一些业务逻辑!)
package edu.nwu.service;

public interface UserService {
    public void add();

    public void delete();

    public void update();

    public void search();

}
Impl/UserServiceImpl.java:(写出了业务逻辑的具体实现)
package edu.nwu.service.Impl;

import edu.nwu.service.UserService;

public class UserServiceImpl implements UserService {
    public void add() {
        System.out.println("增加用户");
    }

    public void delete() {
        System.out.println("删除用户");
    }

    public void update() {
        System.out.println("更新用户");
    }

    public void search() {
        System.out.println("查询用户");
    }
}
方式一:使用Spring的API 接口 【主要SpringAPI接口实现】
1、编写需要切入的方法:Log.java (Before)
package edu.nwu.config;

import org.springframework.aop.MethodBeforeAdvice;

import java.lang.reflect.Method;

public class Log implements MethodBeforeAdvice {
    public void before(Method method, Object[] args, Object target) throws Throwable {
        System.out.println(target.getClass().getName()+"的"+method.getName()+"方法被执行了!");
    }
}
2、编写需要切入的方法:LogAfter.java (After)
package edu.nwu.config;

import org.springframework.aop.AfterReturningAdvice;

import java.lang.reflect.Method;

public class LogAfter implements AfterReturningAdvice {
    public void afterReturning(Object returnvalue, Method method, Object[] args, Object target) throws Throwable {
        System.out.println(target.getClass().getName()+"的"+method.getName()+"方法,返回了"+returnvalue);
    }
}
3、创建applicationContext.xml配置文件:(注意头部文件中的各种约束等)
<beans xmlns="http://www.springframework.org/schema/beans"
       xmlns:context="http://www.springframework.org/schema/context"
       xmlns:aop="http://www.springframework.org/schema/aop"
       xmlns:xsi="http://www.w3.org/2001/XMLSchema-instance"
       xsi:schemaLocation="http://www.springframework.org/schema/beans
        https://www.springframework.org/schema/beans/spring-beans.xsd
        http://www.springframework.org/schema/context
        https://www.springframework.org/schema/context/spring-context.xsd
        http://www.springframework.org/schema/aop
        https://www.springframework.org/schema/aop/spring-aop.xsd">


    <bean id="userService" class="edu.nwu.service.Impl.UserServiceImpl"/>
    <bean id="log" class="edu.nwu.config.Log"/>
    <bean id="afterlog" class="edu.nwu.config.LogAfter"/>


    <aop:config>

        <aop:pointcut id="pc-userserice" expression="execution(* edu.nwu.service.Impl.UserServiceImpl.*(..))"/>


        <aop:advisor advice-ref="log" pointcut-ref="pc-userserice"/>
        <aop:advisor advice-ref="afterlog" pointcut-ref="pc-userserice"/>

    aop:config>

beans>
4、编写测试类进行测试:
@Test
public void aopTest(){
    ApplicationContext context = new ClassPathXmlApplicationContext("applicationContext.xml");
    UserService userService = (UserService) context.getBean("userService");
    userService.add();
    System.out.println("==============");
    userService.delete();
}
5、查看结果:(可以看到在每一个切入点前后都有相应的方法执行了!)
edu.nwu.service.Impl.UserServiceImpl的add方法被执行了!
增加用户
edu.nwu.service.Impl.UserServiceImpl的add方法,返回了null
==============
edu.nwu.service.Impl.UserServiceImpl的delete方法被执行了!
删除用户
edu.nwu.service.Impl.UserServiceImpl的delete方法,返回了null
方式二:自定义来实现AOP 【主要是切面定义】
1、在config下新建一个DiyPointCut.java文件:(实现切入前后的方法)
package edu.nwu.config;

public class DiyPointCut {

    public void before(){
        System.out.println("=========方法执行前===========");
    }

    public void after(){
        System.out.println("=========方法执行后===========");
    }
}
2、编写applicationContext.xml配置文件:
<beans xmlns="http://www.springframework.org/schema/beans"
       xmlns:context="http://www.springframework.org/schema/context"
       xmlns:aop="http://www.springframework.org/schema/aop"
       xmlns:xsi="http://www.w3.org/2001/XMLSchema-instance"
       xsi:schemaLocation="http://www.springframework.org/schema/beans
        https://www.springframework.org/schema/beans/spring-beans.xsd
        http://www.springframework.org/schema/context
        https://www.springframework.org/schema/context/spring-context.xsd
        http://www.springframework.org/schema/aop
        https://www.springframework.org/schema/aop/spring-aop.xsd">


    <bean id="userService" class="edu.nwu.service.Impl.UserServiceImpl"/>

    <bean id="diy" class="edu.nwu.config.DiyPointCut"/>


    <aop:config>
        <aop:aspect ref="diy">

            <aop:pointcut id="pc-userserice" expression="execution(* edu.nwu.service.Impl.UserServiceImpl.*(..))"/>

            <aop:before method="before" pointcut-ref="pc-userserice"/>
            <aop:after method="after" pointcut-ref="pc-userserice"/>
        aop:aspect>
    aop:config>

beans>
3、编写测试类:
public class MyTest {
    @Test
    public void aopTest(){
        ApplicationContext context = new ClassPathXmlApplicationContext("applicationContext.xml");
        UserService userService = (UserService) context.getBean("userService");
        userService.add();
        System.out.println("==============");
        userService.delete();
    }
}
4、得到测试结果:(可以看到切入成功了!)
=========方法执行前===========
增加用户
=========方法执行后===========
==============
=========方法执行前===========
删除用户
=========方法执行后===========
方式三 : 使用注解实现!
1、在config 新建一个文件:annotationPointCut.java
package edu.nwu.config;

import org.aspectj.lang.annotation.After;
import org.aspectj.lang.annotation.Aspect;
import org.aspectj.lang.annotation.Before;
import org.springframework.context.annotation.Bean;


@Aspect // 相当于在配置文件中写明切面
public class AnnotationPointCut {
    // 相当于在配置文件中写明切入的地方
    @Before("execution(* edu.nwu.service.Impl.UserServiceImpl.*(..))")
    public void before(){
        System.out.println("====方法执行前=======");
    }

    @After("execution(* edu.nwu.service.Impl.UserServiceImpl.*(..))")
    public void after(){
        System.out.println("=======方法之前后==========");
    }
}
2、编写配置文件:applicationContext.xml:(简化了配置文件的写法)
<beans xmlns="http://www.springframework.org/schema/beans"
       xmlns:context="http://www.springframework.org/schema/context"
       xmlns:aop="http://www.springframework.org/schema/aop"
       xmlns:xsi="http://www.w3.org/2001/XMLSchema-instance"
       xsi:schemaLocation="http://www.springframework.org/schema/beans
        https://www.springframework.org/schema/beans/spring-beans.xsd
        http://www.springframework.org/schema/context
        https://www.springframework.org/schema/context/spring-context.xsd
        http://www.springframework.org/schema/aop
        https://www.springframework.org/schema/aop/spring-aop.xsd">


    <bean id="userService" class="edu.nwu.service.Impl.UserServiceImpl"/>


    <bean id="annotationPointCut" class="edu.nwu.config.AnnotationPointCut"/>

    <aop:aspectj-autoproxy/>

beans>
3、编写测试类:
public class MyTest {
    @Test
    public void aopTest(){
        ApplicationContext context = new ClassPathXmlApplicationContext("applicationContext.xml");
        UserService userService = (UserService) context.getBean("userService");
        userService.add();
        System.out.println("==============");
        userService.delete();
    }
}
4、测试结果:结果显示切入成功了!
====方法执行前=======
增加用户
=======方法之前后==========
==============
====方法执行前=======
删除用户
=======方法之前后==========
2、Spring 整合 Mybatis
2.1、回忆Mybatis的用法:
-
构建环境目录:
-
导入相关依赖,并设置读取xml/*.xml文件:
<dependencies> <dependency> <groupId>org.projectlombokgroupId> <artifactId>lombokartifactId> <version>1.18.8version> dependency> <dependency> <groupId>junitgroupId> <artifactId>junitartifactId> <version>4.12version> dependency> <dependency> <groupId>org.mybatisgroupId> <artifactId>mybatisartifactId> <version>3.5.2version> dependency> <dependency> <groupId>mysqlgroupId> <artifactId>mysql-connector-javaartifactId> <version>5.1.47version> dependency> <dependency> <groupId>org.springframeworkgroupId> <artifactId>spring-webmvcartifactId> <version>5.1.10.RELEASEversion> dependency> <dependency> <groupId>org.springframeworkgroupId> <artifactId>spring-jdbcartifactId> <version>5.1.10.RELEASEversion> dependency> <dependency> <groupId>org.aspectjgroupId> <artifactId>aspectjweaverartifactId> <version>1.9.4version> dependency> <dependency> <groupId>org.mybatisgroupId> <artifactId>mybatis-springartifactId> <version>2.0.2version> dependency> dependencies> <build> <resources> <resource> <directory>src/main/javadirectory> <includes> <include>**/*.propertiesinclude> <include>**/*.xmlinclude> includes> <filtering>truefiltering> resource> resources> build> -
编写实体类
package edu.nwu.pojo; import lombok.AllArgsConstructor; import lombok.Data; import lombok.NoArgsConstructor; @Data @AllArgsConstructor @NoArgsConstructor public class User { private int id; private String name; private String pwd; } -
编写核心配置文件:mybatis-config.xml
<configuration> <properties resource="db.properties"/> <settings> <setting name="logImpl" value="STDOUT_LOGGING"/> <setting name="cacheEnabled" value="true"/> settings> <typeAliases> <package name="edu.nwu.pojo"/> typeAliases> <environments default="development"> <environment id="development"> <transactionManager type="JDBC"/> <dataSource type="POOLED"> <property name="driver" value="com.mysql.jdbc.Driver"/> <property name="url" value="jdbc:mysql://localhost:3306/mybatis? useSSL=true&useUnicode=true&characterEncoding=utf8"/> <property name="username" value="root"/> <property name="password" value="123456"/> dataSource> environment> environments> <mappers> <mapper resource="edu/nwu/mapper/xml/UserMapper.xml"/> mappers> configuration> -
编写接口
package edu.nwu.mapper; import edu.nwu.pojo.User; import java.util.List; public interface UserMapper { public List<User> getUserList(); public int addUser(User user); public int deleteUser(int id); } -
编写Mapper.xml
<?xml version="1.0" encoding="UTF-8" ?> <!DOCTYPE mapper PUBLIC "-//mybatis.org//DTD Mapper 3.0//EN" "http://mybatis.org/dtd/mybatis-3-mapper.dtd"> <mapper namespace="edu.nwu.mapper.UserMapper"> <select id="getUserList" resultType="User"> select * from user; </select> <insert id="addUser" parameterType="User"> insert into user (id,name,pwd) values (#{id},#{name},#{pwd}) </insert> <delete id="deleteUser" parameterType="int"> delete from user where id = #{id} </delete> </mapper> -
测试
@Test public void test01() throws IOException { SqlSessionFactory sqlSessionFactory = new SqlSessionFactoryBuilder().build(Resources.getResourceAsStream("mybatis-config.xml")); SqlSession sqlSession = sqlSessionFactory.openSession(); UserMapper mapper = sqlSession.getMapper(UserMapper.class); for (User user : mapper.getUserList()) { System.out.println(user); } } -
查看结果:
Setting autocommit to false on JDBC Connection [com.mysql.jdbc.JDBC4Connection@7ed7259e]
==>  Preparing: select * from user;
==> Parameters:
<==    Columns: id, name, pwd
<==        Row: 2, 周颖, 1asdfasd
<==        Row: 3, 小波, 1ssssfasd
<==        Row: 4, xiaoduo, 123456
<==        Row: 8, 嘿嘿, ssssss
<==        Row: 10, 超级可爱的佳露宝, xuankulanzuan9
<==      Total: 5
User(id=2, name=周颖, pwd=1asdfasd)
User(id=3, name=小波, pwd=1ssssfasd)
User(id=4, name=xiaoduo, pwd=123456)
User(id=8, name=嘿嘿, pwd=ssssss)
User(id=10, name=超级可爱的佳露宝, pwd=xuankulanzuan9)
2.2、Mybatis-Spring整合
为何要整合?
-
我们知道,Mybatis的作用,其实是简化了JDBC编写的复杂性,而且使用ORM(关系对象映射),使得一个查询结果对应一个类,最大的好处在于,我们可以将sql和业务代码解耦,修改SQL代码不需要改动业务逻辑,这样也更安全。而且还支持了缓存查询、动态SQL等等一些高级的特性,使得我们使用数据库效率倍增。
-
而使用Mybatis查询数据,总是要想2.1节中第6步那样,每次都需要创建一个工厂类对象,再创建一个对象等等,这样的操作很繁琐,将Mybatis配合Spring,就可以做到这一点!
-
恰好,Spring为了实现控制反转理念所利用的依赖注入方法使得创建对象这种事可以交给IOC容器来作,我们直接去IOC容器中获取创建好的对象就好了,只要配置文件写好,以后每次拿对象,都可以直接获取该Sesssion对象,非常方便。
整合过程:
1、需要给接口加实现类:(进一步封装)
这里可以看到UserMapperImpl实现了sqlSession的set方法,等待IOC容器调用无参构造函数并注入相应的参数对象即可完成对象的注入过程。
package edu.nwu.mapper.impl;

import edu.nwu.mapper.UserMapper;
import edu.nwu.pojo.User;
import org.apache.ibatis.session.SqlSession;

import java.util.List;

public class UserMapperImpl implements UserMapper {

    private SqlSession sqlSession;

    public List<User> getUserList() {
        UserMapper mapper = sqlSession.getMapper(UserMapper.class);
        return mapper.getUserList();
    }

    public int addUser(User user) {
        UserMapper mapper = sqlSession.getMapper(UserMapper.class);
        return mapper.addUser(user);
    }

    public int deleteUser(int  id) {
        UserMapper mapper = sqlSession.getMapper(UserMapper.class);
        return mapper.deleteUser(id);
    }

    public  void setSqlSession(SqlSession sqlSession){
        this.sqlSession  = sqlSession;
    }
}
2、编写applicationContext配置文件:(注意头部约束)
<beans xmlns="http://www.springframework.org/schema/beans"
       xmlns:aop="http://www.springframework.org/schema/aop"
       xmlns:tx="http://www.springframework.org/schema/tx"
       xmlns:xsi="http://www.w3.org/2001/XMLSchema-instance"
       xsi:schemaLocation="http://www.springframework.org/schema/beans
        https://www.springframework.org/schema/beans/spring-beans.xsd
        http://www.springframework.org/schema/aop
        https://www.springframework.org/schema/aop/spring-aop.xsd
        http://www.springframework.org/schema/tx
        https://www.springframework.org/schema/tx/spring-tx.xsd">


    <bean id="dataSource" class="org.springframework.jdbc.datasource.DriverManagerDataSource">
        <property name="driverClassName" value="com.mysql.jdbc.Driver"/>
        <property name="url" value="jdbc:mysql://localhost:3306/mybatis?useSSL=false&useUnicode=true&characterEncoding=utf8"/>
        <property name="username" value="root"/>
        <property name="password" value="123456"/>
    bean>


    <bean id="sqlSessionFactory" class="org.mybatis.spring.SqlSessionFactoryBean">
        <property name="dataSource" ref="dataSource" />


        <property name="typeAliasesPackage" value="edu.nwu.pojo"/>
        <property name="mapperLocations" value="classpath:edu/nwu/mapper/xml/*.xml"/>
    bean>


    <bean id="sqlSession" class="org.mybatis.spring.SqlSessionTemplate">
        <constructor-arg index="0" ref="sqlSessionFactory"/>
    bean>


    <bean id="userMapperImpl" class="edu.nwu.mapper.impl.UserMapperImpl">
        <property name="sqlSession" ref="sqlSession"/>
    bean>

beans>
3、编写测试类::
@Test
public void test2(){
      ApplicationContext context = new ClassPathXmlApplicationContext("applicationContext.xml");
      UserMapper userMapperImpl = (UserMapper) context.getBean("userMapperImpl");
      for (User user : userMapperImpl.getUserList()) {
        System.out.println(user);
      }
}
4、查看结果:(整合成功!)
User(id=2, name=周颖, pwd=1asdfasd)
User(id=3, name=小波, pwd=1ssssfasd)
User(id=4, name=xiaoduo, pwd=123456)
User(id=8, name=嘿嘿, pwd=ssssss)
User(id=10, name=超级可爱的佳露宝, pwd=xuankulanzuan9)
3、声明式事务
3.1、回顾事务
事务的作用:
- 把一组业务当成一个业务来做;要么都成功,要么都失败!
- 事务在项目开发中,十分的重要,涉及到数据的一致性问题,不能马虎!
- 确保完整性和一致性;
事务ACID原则:
- 原子性
- 一致性
- 隔离性
- 多个业务可能操作同一个资源,防止数据损坏
- 持久性
- 事务一旦提交,无论系统发生什么问题,结果都不会再被影响,被持久化的写到存储器中!
3.2、Spring中的事务管理:
概念:
- 声明式事务 :
- 声明式事务是建立在AOP之上的。
- 其本质是对方法前后进行拦截,然后在目标方法开始之前创建或者加入一个事务,在执行完目标方法之后根据执行情况提交或者回滚事务。
- 声明式事务最大的优点就是不需要通过编程的方式管理事务,这样就不需要在业务逻辑代码中掺杂事务管理的代码,只需在配置文件中做相关的事务规则声明(或通过基于@Transactional注解的方式),便可以将事务规则应用到业务逻辑中。
- 编程式事务: 需要在代码中,进行事务的管理(要动手写代码)
为什么需要声明式事务?
- 如果不配置事务,可能存在数据提交不一致的情况下;
- 如果我们不在SPRING中去配置声明式事务,我们就需要在代码中手动配置事务!(这样直接在业务逻辑上为了增添事务而修改的做法不提倡,不利于企业架构的逻辑)
- 事务在项目的开发中十分重要,设计到数据的一致性和完整性问题,不容马虎!
小结:显然声明式事务管理要优于编程式事务管理,这正是spring倡导的非侵入式的开发方式。
实现方法:
1、在配置文件中实现AOP事务的配置:(加入事务管理的配置)
<beans xmlns="http://www.springframework.org/schema/beans"
       xmlns:aop="http://www.springframework.org/schema/aop"
       xmlns:tx="http://www.springframework.org/schema/tx"
       xmlns:xsi="http://www.w3.org/2001/XMLSchema-instance"
       xsi:schemaLocation="http://www.springframework.org/schema/beans
        https://www.springframework.org/schema/beans/spring-beans.xsd
        http://www.springframework.org/schema/aop
        https://www.springframework.org/schema/aop/spring-aop.xsd
        http://www.springframework.org/schema/tx
        https://www.springframework.org/schema/tx/spring-tx.xsd">


    <bean id="dataSource" class="org.springframework.jdbc.datasource.DriverManagerDataSource">
        <property name="driverClassName" value="com.mysql.jdbc.Driver"/>
        <property name="url" value="jdbc:mysql://localhost:3306/mybatis?useSSL=false&useUnicode=true&characterEncoding=utf8"/>
        <property name="username" value="root"/>
        <property name="password" value="123456"/>
    bean>


    <bean id="transactionManager" class="org.springframework.jdbc.datasource.DataSourceTransactionManager">
        <constructor-arg ref="dataSource" />
    bean>


    <tx:advice id="txAdvice" transaction-manager="transactionManager">
        <tx:attributes>

            <tx:method name="*" propagation="REQUIRED"/>
        tx:attributes>
    tx:advice>


    <aop:config>
        <aop:pointcut id="txPointCut" expression="execution(* edu.nwu.mapper.*.*(..))"/>
        <aop:advisor advice-ref="txAdvice" pointcut-ref="txPointCut"/>
    aop:config>


    <bean id="sqlSessionFactory" class="org.mybatis.spring.SqlSessionFactoryBean">
        <property name="dataSource" ref="dataSource" />


        <property name="typeAliasesPackage" value="edu.nwu.pojo"/>
        <property name="mapperLocations" value="classpath:edu/nwu/mapper/xml/*.xml"/>
    bean>


    <bean id="sqlSession" class="org.mybatis.spring.SqlSessionTemplate">
        <constructor-arg index="0" ref="sqlSessionFactory"/>
    bean>


    <bean id="userMapperImpl" class="edu.nwu.mapper.impl.UserMapperImpl">
        <property name="sqlSession" ref="sqlSession"/>
    bean>

beans>
2、修改一下UserMapperImpl的执行逻辑:
package edu.nwu.mapper.impl;

import edu.nwu.mapper.UserMapper;
import edu.nwu.pojo.User;
import org.apache.ibatis.session.SqlSession;

import java.util.List;

public class UserMapperImpl implements UserMapper {

    private SqlSession sqlSession;

    public List<User> getUserList() {
        UserMapper mapper = sqlSession.getMapper(UserMapper.class);

        //错误操作:
        User user = new User(5, "lisi", "123456");
        mapper.addUser(user);
        mapper.deleteUser(4);

        return mapper.getUserList();
    }

    public int addUser(User user) {
        UserMapper mapper = sqlSession.getMapper(UserMapper.class);
        return mapper.addUser(user);
    }

    public int deleteUser(int  id) {
        UserMapper mapper = sqlSession.getMapper(UserMapper.class);
        return mapper.deleteUser(id);
    }

    public  void setSqlSession(SqlSession sqlSession){
        this.sqlSession  = sqlSession;
    }
}
将SQL的delete语句写成:(专门写错sql语句,来查看事务的效果!)
<mapper namespace="edu.nwu.mapper.UserMapper">

    <select id="getUserList" resultType="User">
        select * from user
    select>

    <insert id="addUser" parameterType="User">
        insert into user (id,name,pwd) values (#{id},#{name},#{pwd})
    insert>

    <delete id="deleteUser" parameterType="int">

        deletes from user where id = #{id}
    delete>

mapper>
然后进行事务测试:
@Test
public void test2(){
    ApplicationContext context = new ClassPathXmlApplicationContext("applicationContext.xml");
    UserMapper userMapperImpl = (UserMapper) context.getBean("userMapperImpl");
    for (User user : userMapperImpl.getUserList()) {
      System.out.println(user);
    }
}
查看结果:(我们可以看到SQL报错了)
### Error updating database.  Cause: com.mysql.jdbc.exceptions.jdbc4.MySQLSyntaxErrorException: You have an error in your SQL syntax; check the manual that corresponds to your MySQL server version for the right syntax to use near 'deletes from user where id = 4' at line 1
### The error may exist in file [/Users/zhengjiaxiang/IdeaProjects/Spring-Mybatis/target/classes/edu/nwu/mapper/xml/UserMapper.xml]
### The error may involve edu.nwu.mapper.UserMapper.deleteUser-Inline
### The error occurred while setting parameters
### SQL: deletes from user where id = ?
### Cause: com.mysql.jdbc.exceptions.jdbc4.MySQLSyntaxErrorException: You have an error in your SQL syntax; check the manual that corresponds to your MySQL server version for the right syntax to use near 'deletes from user where id = 4' at line 1
; bad SQL grammar []; nested exception is com.mysql.jdbc.exceptions.jdbc4.MySQLSyntaxErrorException: You have an error in y
去查看一下数据库里的内容:(发现id为5的用户记录并没有插入进来,事务执行成功了!)
+----+--------------------------+----------------+
| id | name                     | pwd            |
+----+--------------------------+----------------+
|  2 | 周颖                     | 1asdfasd       |
|  3 | 小波                     | 1ssssfasd      |
|  4 | xiaoduo                  | 123456         |
|  8 | 嘿嘿                     | ssssss         |
| 10 | 超级可爱的佳露宝         | xuankulanzuan9 |
+----+--------------------------+----------------+
5 rows in set (0.00 sec)
4、代理模式
4.1、静态代理
角色分析:
- 抽象角色 :一般会使用接口或者抽象类来解决
- 真实角色 :被代理的角色
- 代理角色 :代理真实角色 , 代理真实角色后,我们一般会做一些附属操作
- 客户 : 访问代理对象的人!
代码步骤:
-
接口
//租房 public interface Rent { public void rent(); } -
真实角色
//房东 public class Host implements Rent { public void rent() { System.out.println("房东要出租房子!"); } } -
代理角色
public class Proxy implements Rent { private Host host; public Proxy() { } public Proxy(Host host) { this.host = host; } public void rent() { seeHouse(); host.rent(); hetong(); fare(); } //看房 public void seeHouse(){ System.out.println("中介带你看房"); } //看房 public void hetong(){ System.out.println("签租赁合同"); } //收中介费 public void fare(){ System.out.println("收中介费"); } } -
客户端访问代理角色
public class Client {
    public static void main(String[] args) {
        //房东要租房子
        Host host = new Host();
        //代理,中介帮房东租房子,但是呢?代理角一般会有一些附属操作!
        Proxy proxy = new Proxy(host);

        //你不用面对房东,直接找中介租房即可!
        proxy.rent();
    }
}
静态代理模式的好处:
- 可以使真实角色的操作更加纯粹!不用去关注一些公共的业务(核心业务逻辑简单,完整)
- 公共也就就交给代理角色!实现了业务的分工!(将核业务与附属业务分离)
- 公共业务发生扩展的时候,方便集中管理!(可以代理类中实现公共业务而核心业务不改动,更安全)
静态代理模式的缺点:
- 需要事先写好相应的代理类,而且在接口发生变化时需要对被代理类及代理类进行修改,针对不同的接口,需要实现不同的代理类,难以复用。
静态代理模式的分析:
- 使用流程:
-
创建真实对象:new Host()
-
创建代理对象,将真实对象作为构造函数传入
- 过程分析:
-
以上两部就是创建静态代理对象的一般步骤,很简单,也很容易理解。之所以能够这样new出一个代理对象,是因为Host()的字节码文件在编译期就已经编译好了,于是,第一次访问该类的静态成员时(构造器也是静态成员),JVM的类加载器就将Host.class文件加载之后生成了Class对象存入堆内存中,这样就可以通过该类的Class对象创建具体实例了。
-
这里之所以叫静态代理,原因就是Proxy.class这个字节码文件,是编译器读取你的源码(Proxy.java)生成的并且存放在了磁盘上,你的程序跑起来之后,她只是安静地等待运行过程中需要时被加载。
-
那么相对的,动态代理就是程序运行时, 由特定程序而不是编译器,动态地写出来的类的字节码(或者通过远程传入的),然后加载实例产生的代理对象。通过Javassist等开源框架,程序员们可以方便的在程序中生成字节码,当然,Java底层天然就可以写,只不过相对复杂,而动态代理对象的字节码是Java底层写的。
4.2、加深代理模式的理解:
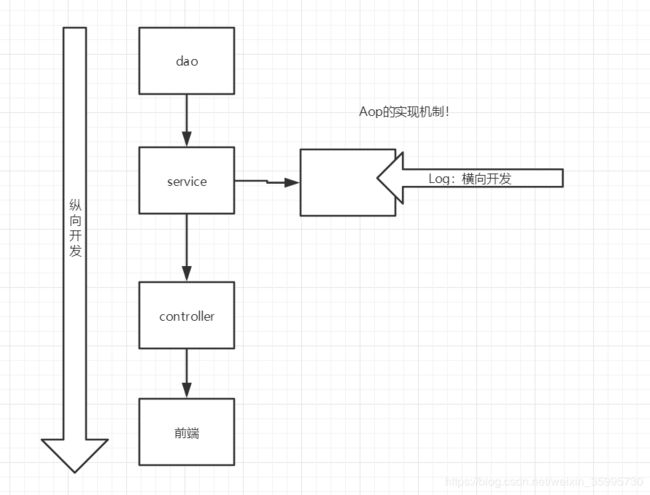
纵向开发:(一般业务开发都是纵向的)
- 我们每一个层次都对应一种功能
- 且这种功能都是连续性的反应
- 所以,都是纵向延伸的。
横向开发:
- 当我们需要对纵向业务中的某一个点进行扩展的时候,就相当于在这个纵向的开发系统中,做了一些横向的业务扩展。
- 这种横向的业务扩展(比如:在业务操作前后加以日志记录)有时更像一种切面,从某个地方切入,然后在这里进行延伸和扩展。
4.3、动态代理?(AOP的底层实现)
1、我们首先创建一个生成动态代理的工具类:
-
这个动态代理类的作用是:记录执行的具体功能及其前后执行的时间
-
特点是:针对各种各样的接口的实现类,都能动态创造其代理类,执行工具方法,这样才能展现动态代理的优势。
package edu.nwu.demo01;

import java.lang.reflect.InvocationHandler;
import java.lang.reflect.Method;
import java.lang.reflect.Proxy;
import java.util.Date;
import java.util.Objects;

//我们会用这个类,自动生成代理类:
public class ProxyInvocationHandler implements InvocationHandler {

    // 被代理的接口:(这里指向的其实是被代理的对象,只不过用接口来指向)
    private Object target;

    public void setRent(Object target) {
        this.target = target;
    }

    // 生成得到代理类:
    public Object getProxy(){
        Object o = Proxy.newProxyInstance(target.getClass().getClassLoader(), target.getClass().getInterfaces(), this);
        return o;
    }


    // 处理代理实例,并返回其结果:(实现InvocationHandler,该类的作用是,对于稍后动态代理类的所有方法的调用,都会重定向到InvocationHandler的invoke方法。)
    @Override
    public Object invoke(Object proxy, Method method, Object[] args) throws Throwable {

        // 增加前缀日志:
        beforeRun(method.getName());
        // 动态代理的本质:就是使用反射机制来操控动态生成的代理类!
        Object result = method.invoke(target, args);
        // 增加后缀日志:
        afterRun(method.getName());

        return result;
    }

    // 在方法执行前:
    public void beforeRun(String methodName){
        System.out.println("开始执行"+methodName+"方法,时间:"+new Date().toString());
    }

    // 在方法执行后:
    public void afterRun(String methodName){
        System.out.println("结束运行"+methodName+"方法,时间:"+new Date().toString());
    }

}
2、测试:
假设我们有一个租房的业务:
租房接口:
package edu.nwu.demo01;

public interface Rent {

    public void rent();

}
房东:(具体的被代理对象)
package edu.nwu.demo01;

public class Host implements Rent{
    @Override
    public void rent() {
        System.out.println("房东要出租房子了");
    }
}
用户租赁房子:
package edu.nwu.demo01;

public class Client {
    public static void main(String[] args) {
        // 真实角色(被代理的对象)
        Host host = new Host();

        // 代理角色:动态生成的代理的方法类对象!
        ProxyInvocationHandler pih = new ProxyInvocationHandler();

        // 通过设置生成代理的程序对象中的属性(一般传入接口的实现类,即:被代理的对象),来控制生成的代理类所对应的接口。
        pih.setRent(host);

        // 生成对应属性的代理类:(动态生成的代理类!!!)
        Rent proxy = (Rent) pih.getProxy();

        // 执行代理类中的方法
        proxy.rent();

    }
}
结果:
开始执行rent方法,时间:Wed Feb 26 23:56:32 CST 2020
房东要出租房子了
结束运行rent方法,时间:Wed Feb 26 23:56:32 CST 2020
假设,我们现在需要更换一个别的业务:卖票
票站的接口:
package edu.nwu.demo01;

public interface TicketStation {
    public void buyTicker();
}
官方售票点:(实现接口的对象,被代理的对象)
package edu.nwu.demo01;

public class OfficeTicketStation implements TicketStation {
    @Override
    public void buyTicker() {
        System.out.println("出售车票!");
    }
}
用户通过代理类来购买票:
package edu.nwu.demo01;

public class Client2 {
    public static void main(String[] args) {
        OfficeTicketStation officeTicketStation = new OfficeTicketStation();
        ProxyInvocationHandler pis = new ProxyInvocationHandler();
        pis.setRent(officeTicketStation);
        TicketStation proxy = (TicketStation) pis.getProxy();
        proxy.buyTicker();
    }
}
运行结果:
开始执行buyTicker方法,时间:Wed Feb 26 23:58:40 CST 2020
出售车票!
结束运行buyTicker方法,时间:Wed Feb 26 23:58:40 CST 2020
小结:
- 我们从上述例子中,看到了动态代理的极大优势,其可以针对各种各样的对象,生成器代理类,执行相同的附属业务逻辑。
- 动态代理技术的底层是通过反射来动态生成一个代理类的字节码对象,然后利用反射来加载并运行它,底层原理有点晦涩难懂,如果以后有了新的理解,再来添补~


