最近想到一个比较好玩的,就是自定义一个相机,通过简单的图像处理算法来改变真实的世界,发现效果还真的挺好玩,所以最后简单的实现了一下。
1 实现准备
要实现这个需要用到几个重要的系统类
- Camera:已经过时,谷歌推荐使用camera2,但是camera2用起来贼麻烦,总体思路是从摄像头获取图像流,然后交给后续来处理,一般来说获取到图像流的数据之后会直接展示到SurfaceView上面进行预览,但是这样就达不到我们得目的了,我们得目的是拿到图像流之后先进行一些处理之后再展示出来,这样的话就需要用到下面讲到的SurfaceTexture了;
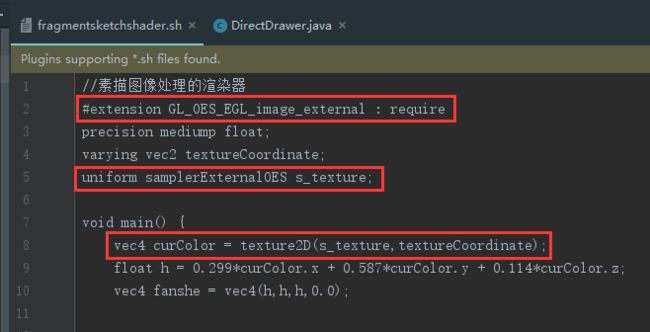
- SurfaceTexture:功能就是获取图像流作为OpenGL ES的纹理,可以接收来自摄像头或者视频解码的图像流,在这里的目的就是接收来自Camera的图像流,然后交给OpenGL ES进行渲染,当updateTexImage()方法被调用时就会刷新最新图像的图像流到OpenGL ES的渲染器上,纹理数据会默认绑定到GL_TEXTURE_EXTERNAL_OES 目标上,我们要做的就是在着色器中声明使用,看下官方文档怎么说
意思是着色器中得加"#extension GL_OES_EGL_image_external : require"这句声明,还有获取纹理数据得使用samplerExternalOES类型,这就导致我们写着色器得按规矩来。这样讲起来比较抽象,来看下代码,Don't bb,show me code!!!Additionally, any OpenGL ES 2.0 shader that samples from the texture must declare its use of this extension using, for example, an "#extension GL_OES_EGL_image_external : require" directive. Such shaders must also access the texture using the samplerExternalOES GLSL sampler type.
- GlSurfaceview:预览使用OpenGL ES渲染后的图像,就是最后的展示效果了,绘制和渲染和着色器加载基本上可以在这里头完成。
2 具体实现
2.1 Camera操作
  /**
     * 打开摄像头
     */
    private void openCamera() {
        try {
            mCamera = getCameraInstance();
            mCamera.setPreviewTexture(mSurface);
            mCamera.startPreview();
        } catch (IOException e) {
            e.printStackTrace();
        }
    }

    /**
     * 关闭摄像头
     */
    private void closeCamera() {
        try {
            mCamera.stopPreview();
            mCamera.release();
        } catch (Exception e) {
            e.printStackTrace();
        }
    }

    public static Camera getCameraInstance() {
        Camera c = null;
        try {
            c = Camera.open(); // attempt to get a Camera instance
        } catch (Exception e) {
            e.printStackTrace();
            // Camera is not available (in use or does not exist)
        }
        return c; // returns null if camera is unavailable
    }
就是Camera的打开和关闭,通过Camera.open()来获取Camera对象,setPreviewTexture(mSurface)中的mSurface就是SurfaceTexture,关键是当关闭应用的时候得及时的释放Camera资源,因为不仅仅是你这个应用会用到摄像头资源。
2.2 SurfaceTexture操作
    @Override
    public void onSurfaceCreated(GL10 gl10, EGLConfig eglConfig) {
        ...
        mSurface = new SurfaceTexture(mTextureID);
        mSurface.setOnFrameAvailableListener(this);
        ...
    }

     /**
     * 纹理配置
     */
    private int createTextureID() {
        int[] texture = new int[1];
        int[] fbo = new int[1];

        GLES20.glGenTextures(1, texture, 0);
        GLES20.glBindTexture(GLES11Ext.GL_TEXTURE_EXTERNAL_OES, texture[0]);
        GLES20.glTexParameterf(GLES11Ext.GL_TEXTURE_EXTERNAL_OES,
                GL10.GL_TEXTURE_MIN_FILTER, GL10.GL_LINEAR);
        GLES20.glTexParameterf(GLES11Ext.GL_TEXTURE_EXTERNAL_OES,
                GL10.GL_TEXTURE_MAG_FILTER, GL10.GL_LINEAR);
        GLES20.glTexParameteri(GLES11Ext.GL_TEXTURE_EXTERNAL_OES,
                GL10.GL_TEXTURE_WRAP_S, GL10.GL_CLAMP_TO_EDGE);
        GLES20.glTexParameteri(GLES11Ext.GL_TEXTURE_EXTERNAL_OES,
                GL10.GL_TEXTURE_WRAP_T, GL10.GL_CLAMP_TO_EDGE);

        GLES20.glGenBuffers(1, fbo, 0);
        GLES20.glBindBuffer(GLES20.GL_FRAMEBUFFER, fbo[0]);
        GLES20.glFramebufferTexture2D(GLES20.GL_FRAMEBUFFER,
        GLES20.GL_COLOR_ATTACHMENT0, GLES20.GL_TEXTURE_2D, texture[0], 0);

        return texture[0];
    }
createTextureID()进行纹理对象的一些参数配置,主要就是纹理采样的设置,得到纹理之后交给SurfaceTexture,SurfaceTexture还需要注册OnFrameAvailableListener回调
    @Override
    public void onFrameAvailable(SurfaceTexture surfaceTexture) {
        this.requestRender();
    }

   @Override
   public void onDrawFrame(GL10 gl10) {
        ...
        mSurface.updateTexImage();
        ...
    }
在有新的一帧图像可用时就会调用onFrameAvailable()方法,这个时候就可以调用GlSurfaceview的requestRender()让OpenGL ES来刷新数据了,就是会调用到GLSurfaceView.Renderer的onDrawFrame()方法,在这里头mSurface.updateTexImage()来获取最新的图像流转换为纹理数据绑定到着色器中,在着色器中我们会对图像流进行图像处理,最后展示出来素描图像。
2.3 GLSurfaceView实现
public class CameraGLSurfaceView extends GLSurfaceView implements GLSurfaceView.Renderer, SurfaceTexture.OnFrameAvailableListener {
    public CameraGLSurfaceView(Context context) {
        super(context);
        mContext = context;
        // 创建一个2.0的context
        setEGLContextClientVersion(2);
        // 设置渲染器来在GLSurfaceView中进行绘制
        setRenderer(this);
        // 只有在用户需要进行绘制时,才会进行真正的重新渲染,配合GLSurfaceView.requestRender()使用
        setRenderMode(RENDERMODE_WHEN_DIRTY);
    }
    /**
     * CameraGLSurfaceView创建只调用一次,用来创建环境
     */
   @Override
    public void onSurfaceCreated(GL10 gl10, EGLConfig eglConfig) {
        mTextureID = createTextureID();
        mSurface = new SurfaceTexture(mTextureID);
        mSurface.setOnFrameAvailableListener(this);
        mDirectDrawer = new DirectDrawer(mContext, mTextureID);
    }
    /**
     * 当物理环境发生改变的时候会进行调用,比如屏幕方向发生改变
     */
    @Override
    public void onSurfaceChanged(GL10 gl10, int width, int height) {
        GLES20.glViewport(0, 0, width, height);
        openCamera();
    }
    /**
     * 每次重绘都会进行调用
     */
    @Override
    public void onDrawFrame(GL10 gl10) {
        GLES20.glClearColor(1.0f, 1.0f, 1.0f, 1.0f);
        GLES20.glClear(GLES20.GL_COLOR_BUFFER_BIT | GLES20.GL_DEPTH_BUFFER_BIT);
        mSurface.updateTexImage();
        float[] mtx = new float[16];
        mSurface.getTransformMatrix(mtx);
       //绘制类封装到DirectDrawer哒
        mDirectDrawer.draw();
    }

    @Override
    public void onFrameAvailable(SurfaceTexture surfaceTexture) {
        Log.i(TAG, "onFrameAvailable...");
        this.requestRender();
    }
}
这里头就是进行一些流程化操作,前面都已经提到过了,重点在于具体的绘制类封装到DirectDrawer,DirectDrawer主要进行了着色器的加载和链接等流水化操作。
DirectDrawer.java
/**
 * Author:xishuang
 * Date:2017.10.26
 * Des:绘制类
 */
public class DirectDrawer {

    private FloatBuffer vertexBuffer, textureVerticesBuffer;
    private ShortBuffer drawListBuffer;
    private final int mProgram;
    private int mPositionHandle;
    private int mTextureCoordHandle;

    /**
     * 顶点坐标的绘制顺序
     */
    private short drawOrder[] = {0, 1, 2, 0, 2, 3};

    // 每个顶点坐标需要两个数表示
    private static final int COORDS_PER_VERTEX = 2;

    /**
     * 获取坐标值的跨度,其中每个数占用4个字节(float)
     */
    private final int vertexStride = COORDS_PER_VERTEX * 4;

    /**
     * 顶点坐标
     */
    private static float squareCoords[] = {
            -1.0f, 1.0f,
            -1.0f, -1.0f,
            1.0f, -1.0f,
            1.0f, 1.0f,
    };

    /**
     * 纹理坐标
     */
    private static float textureVertices[] = {
            0.0f, 1.0f,
            1.0f, 1.0f,
            1.0f, 0.0f,
            0.0f, 0.0f,
    };

    private int texture;

    public DirectDrawer(Context context, int texture) {
        this.texture = texture;
        //初始化需要传入着色器中的顶点坐标缓存数据
        ByteBuffer bb = ByteBuffer.allocateDirect(squareCoords.length * 4);
        bb.order(ByteOrder.nativeOrder());
        vertexBuffer = bb.asFloatBuffer();
        vertexBuffer.put(squareCoords);
        vertexBuffer.position(0);
        //初始化需要传入着色器中的顶点绘制顺序缓存数据
        ByteBuffer dlb = ByteBuffer.allocateDirect(drawOrder.length * 2);
        dlb.order(ByteOrder.nativeOrder());
        drawListBuffer = dlb.asShortBuffer();
        drawListBuffer.put(drawOrder);
        drawListBuffer.position(0);
        //初始化需要传入着色器中的纹理坐标缓存数据
        ByteBuffer bb2 = ByteBuffer.allocateDirect(textureVertices.length * 4);
        bb2.order(ByteOrder.nativeOrder());
        textureVerticesBuffer = bb2.asFloatBuffer();
        textureVerticesBuffer.put(textureVertices);
        textureVerticesBuffer.position(0);
        //从文件中加载和编译顶点着色器
        String vertex = LoadShaderUtil.readShaderFromRawResource(context, R.raw.vertexshader);
        int vertexShader = loadShader(GLES20.GL_VERTEX_SHADER, vertex);
        //从文件中加载和编译片元着色器
        //String fra = LoadShaderUtil.readShaderFromRawResource(context, R.raw.fragmentsketchshader);
        String fra = LoadShaderUtil.readShaderFromRawResource(context, R.raw.fragmentcameoshader);
        int fragmentShader = loadShader(GLES20.GL_FRAGMENT_SHADER, fra);

        mProgram = GLES20.glCreateProgram();             // 创建program
        GLES20.glAttachShader(mProgram, vertexShader);   // 绑定顶点着色器shader到program
        GLES20.glAttachShader(mProgram, fragmentShader); // 绑定片元着色器shader到program
        GLES20.glLinkProgram(mProgram);                  // 链接program
    }

    public void draw() {
        // 使用program
        GLES20.glUseProgram(mProgram);

        GLES20.glActiveTexture(GLES20.GL_TEXTURE0);
        GLES20.glBindTexture(GLES11Ext.GL_TEXTURE_EXTERNAL_OES, texture);

        // 获取顶点着色器中的顶点引用对象
        mPositionHandle = GLES20.glGetAttribLocation(mProgram, "vPosition");
        // 启用顶点引用对象
        GLES20.glEnableVertexAttribArray(mPositionHandle);
        // 顶点缓存数据绑定到顶点引用对象
        GLES20.glVertexAttribPointer(mPositionHandle, COORDS_PER_VERTEX, GLES20.GL_FLOAT, false, vertexStride, vertexBuffer);

        // 获取顶点着色器中的纹理坐标引用对象
        mTextureCoordHandle = GLES20.glGetAttribLocation(mProgram, "inputTextureCoordinate");
        // 纹理坐标引用对象
        GLES20.glEnableVertexAttribArray(mTextureCoordHandle);
        // 纹理坐标的缓存数据绑定到纹理坐标引用对象
        GLES20.glVertexAttribPointer(mTextureCoordHandle, COORDS_PER_VERTEX, GLES20.GL_FLOAT, false, vertexStride, textureVerticesBuffer);

        // 正式渲染
        GLES20.glDrawElements(GLES20.GL_TRIANGLES, drawOrder.length, GLES20.GL_UNSIGNED_SHORT, drawListBuffer);
        // 禁用
        GLES20.glDisableVertexAttribArray(mPositionHandle);
        GLES20.glDisableVertexAttribArray(mTextureCoordHandle);
    }

    private int loadShader(int type, String shaderCode) {

        // 根据着色器得类型创建着色器对象
        // GLES20.GL_VERTEX_SHADER 顶点着色器
        // GLES20.GL_FRAGMENT_SHADER 片元着色器
        int shader = GLES20.glCreateShader(type);
        // 着色器源码加载和编译
        GLES20.glShaderSource(shader, shaderCode);
        GLES20.glCompileShader(shader);

        return shader;
    }
}
尽量注释得清晰了,纹理坐标对应着顶点坐标,顶点的颜色就是通过纹理坐标来获取图像流中的纹理颜色数据,主要讲一下顶点坐标绘制一个矩形。
   /**
     * 顶点坐标
     */
    private static float squareCoords[] = {
            -1.0f, 1.0f,
            -1.0f, -1.0f,
            1.0f, -1.0f,
            1.0f, 1.0f,
    };

   /**
     * 顶点坐标的绘制顺序
     */
    private short drawOrder[] = {0, 1, 2, 0, 2, 3};
顶点坐标有4个顶点,然后drawOrder按照4个顶点的索引来绘制两个三角形产生一个矩形。顶点的绘制顺序就是{0, 1, 2}:(-1.0,1.0)->(-1.0,-1.0)->(1.0,-1.0)然后{0, 2, 3}:(-1.0,1.0)->(1.0,-1.0)->(1.0,1.0)
3 渲染着色器实现图像处理
前面的一切操作就是为了给渲染管线提供图像流数据作为纹理,具体的图像处理操作是在片元着色器中完成的。
3.1 顶点着色器
vertexshader.sh
//顶点着色器
attribute vec4 vPosition;
attribute vec2 inputTextureCoordinate;
varying vec2 textureCoordinate;

void main(){
     gl_Position = vPosition;
     textureCoordinate = inputTextureCoordinate;
   }
顶点着色器的工作很简单,就是接收来自我们代码里传过来的顶点坐标数据和纹理坐标数据,然后把这些数据交给渲染管线处理后交给片元着色器,所以重点还是在于片元着色器,片元着色器相当于对每个像素进行处理。
3.2 片元着色器
fragmentsketchshader.sh
//素描图像处理的渲染器
#extension GL_OES_EGL_image_external : require
precision mediump float;
varying vec2 textureCoordinate;
uniform samplerExternalOES s_texture;

void main() {
    vec4 curColor = texture2D(s_texture,textureCoordinate);
    //1、去色(黑白化)
    float h = 0.299*curColor.x + 0.587*curColor.y + 0.114*curColor.z;
    vec4 fanshe = vec4(h,h,h,0.0);

    //2、获取该纹理附近的上下左右的纹理并求其去色,补色
    vec4 sample0,sample1,sample2,sample3;
    float h0,h1,h2,h3;
    float fstep=0.0015;
    sample0=texture2D(s_texture,vec2(textureCoordinate.x-fstep,textureCoordinate.y-fstep));
    sample1=texture2D(s_texture,vec2(textureCoordinate.x+fstep,textureCoordinate.y-fstep));
    sample2=texture2D(s_texture,vec2(textureCoordinate.x+fstep,textureCoordinate.y+fstep));
    sample3=texture2D(s_texture,vec2(textureCoordinate.x-fstep,textureCoordinate.y+fstep));
    //这附近的4个纹理值同样得进行去色(黑白化)
    h0 = 0.299*sample0.x + 0.587*sample0.y + 0.114*sample0.z;
    h1 = 0.299*sample1.x + 0.587*sample1.y + 0.114*sample1.z;
    h2 = 0.299*sample2.x + 0.587*sample2.y + 0.114*sample2.z;
    h3 = 0.299*sample3.x + 0.587*sample3.y + 0.114*sample3.z;
    //反相,得到每个像素的补色
    sample0 = vec4(1.0-h0,1.0-h0,1.0-h0,0.0);
    sample1 = vec4(1.0-h1,1.0-h1,1.0-h1,0.0);
    sample2 = vec4(1.0-h2,1.0-h2,1.0-h2,0.0);
    sample3 = vec4(1.0-h3,1.0-h3,1.0-h3,0.0);
    //3、对反相颜色值进行均值模糊
    vec4 color=(sample0+sample1+sample2+sample3) / 4.0;
    //4、颜色减淡,将第1步中的像素和第3步得到的像素值进行计算
    vec3 endColor = fanshe.rgb+(fanshe.rgb*color.rgb)/(1.0-color.rgb);
    //最终获取的颜色
    gl_FragColor = vec4(endColor,0.0);
}
对每个像素点都进行了同样得图像处理算法,这个算法参考自Android图片素描效果,只是我这里用的是均值模糊,而不是高斯模糊,因为高斯模糊实现起来复杂,用最简单的方式实现这个素描的效果。
当然如果片元着色器使用不同的处理算法,就可以得到你想要的效果。
github Demo地址:SketchCamera


