记:如何在树莓派上搭建 Web Server 与 File Server 并广播到公网
目录
- 1.目标
- 2.配置
- 2.1 硬件
- 2.2 软件
- 2.3 先决条件
- 3.前情提要与预设置
- 4.本文中为便于表述使用的简便名称
- 5.正文开始
- 5.1 SSH安全性设置
- 5.2 软件安装
- 5.3 nginx配置
- 5.3.1 有关服务
- 5.3.2 配置php
- 5.3.3 测试
- 5.4 vsftpd配置
- 5.4.1 简述
- 5.4.2 虚拟用户的配置
- 5.4.3 安全性配置前
- 5.4.4 使用openssl配置基于md5的密码
- 5.4.5 配置文件
- 5.5 映射到公网
- 5.5.1 路由器端
- 5.5.2 DDNS
- 6.后记
- 7.参考链接
1.目标
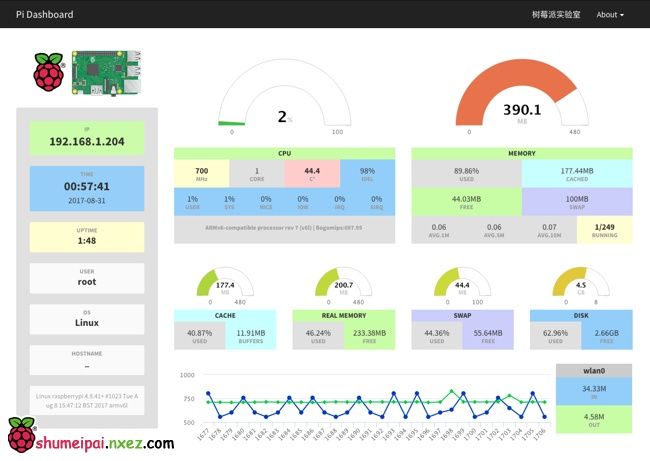
在树莓派上搭建Web服务器以及文件服务器,使用pi-dashboard进行Web访问测试,使用Windows Explorer进行文件服务器访问测试
2.配置
2.1 硬件
树莓派 Raspberry Pi 2 Model B
SD卡 8GB(有1GB就可以)
移动硬盘 1TB(具体大小看需求)
网线 路由器
键盘 显示器 HDMI线
MicroUSB充电线 充电器(确保能供电5V2A)
另外一台能访问局域网的电脑
2.2 软件
操作系统:Ubuntu Server 19.10 armhf
Web Server:nginx 1.16.1
File Server :vsftpd 3.0.3
Oray PeanutHull DDNS 3.0.4
OpenSSH 用于远程访问的电脑(Windows 10 内嵌)
2.3 先决条件
你的路由器要支持端口映射,并且路由器WAN口IP必须是公网IP(不用是静态的)
3.前情提要与预设置
- 为了操作更流畅,已将树莓派超频至arm_freq=1100,设置了over_voltage=4,要保证良好散热,实测加纯铜散热片后被动散热CPU温度45oC左右
- 由于超频后CPU电压升高,再加上移动硬盘抢电,所以推荐使用三星手机的充电器,默认电压高(约5.3V)
- 移动硬盘是MicroUSB 3.0的,可以使用2.0数据线,但要保证能承载2A电流,电流不足会导致硬盘无法起转
- 为了更快速的系统响应,我将系统root分区移动至硬盘上,sd卡上仅保留启动分区(200+MB)
- 之所以采用Ubuntu Server,是因为Raspbian在我的RPi上面总会莫名其妙的问题或者Kernel Panic
- 将设备广播到公网意味着互联网上所有人都可以访问你的树莓派,为了安全起见,请在路由器中设置AP隔离
4.本文中为便于表述使用的简便名称
- 树莓派的ip地址:
$(rpi_ip) - 树莓派开放的自定义端口:
$(rpi_port) - 树莓派系统内本地用户名称:
$(rpi_user) - Oray免费用户的赠送的免费域名:
$(oray_domain) - php版本:
$(php_version) - Web服务器根目录:
$(wwwroot) - 文件服务器根目录:
$(ftproot)
5.正文开始
5.1 SSH安全性设置
广播到公网后我们的树莓派可能会遭受黑客攻击,而默认状态下Linux的SSH部分安全设置没有启动,这就需要我们手动开启。
首先,将显示器和键盘连接到树莓派并登录进入本地账户(后文用$(rpi_user)代替)后运行并输入密码。
sudo su
打开/etc/ssh/sshd_config,找到PubKeyAuthentication项,修改为YES,并取消注释(找到行首 #并删除),找到AuthorizedKeysFile项,取消注释。
在SSH的客户机上面运行,
ssh-keygen -t rsa -C "$(rpi_user)@$(rpi_ip)"
会在主目录下生成.ssh/id_rsa和.ssh/id_rsa.pub两个文件(期间如果有提示输入直接回车)。
将id_rsa.pub复制到树莓派的/tmp目录下。
执行以下内容:
su $(rpi_user)
cd ~
mkdir .ssh
chmod 700 .ssh
cd .ssh
echo /tmp/id_rsa.pub >> authorized_keys
chmod 600 authorized_keys
exit
这样只有拥有id_rsa.pub这个文件的人才有权连接到你的树莓派(免密码),其他人就算拥有密码也无法连接。
5.2 软件安装
推荐使用国内软件源,默认软件源下载速度极慢,下面以修改为USTC源为例:
- 打开
/etc/apt/sources.list - 查找
http://mirrors.ustc.edu.cn/ubuntu-ports - 替换为
http://mirrors.ustc.edu.cn/ubuntu-ports - 保存并退出
执行:
apt-get install -y vsftpd nginx php$(php_version)-fpm php$(php_version)-cli php$(php_version)-curl php$(php_version)-gd php$(php_version)-cgi
5.3 nginx配置
5.3.1 有关服务
安装完成后nginx服务会自动运行,并打开开机自启动
若想停止服务
systemctl stop nginx
若想关闭自启动
systemctl disable nginx
若想重新启动服务
systemctl restart nginx
5.3.2 配置php
打开文件
/etc/nginx/sites-available/default
替换全部内容为
##
# You should look at the following URL's in order to grasp a solid understanding
# of Nginx configuration files in order to fully unleash the power of Nginx.
# https://www.nginx.com/resources/wiki/start/
# https://www.nginx.com/resources/wiki/start/topics/tutorials/config_pitfalls/
# https://wiki.debian.org/Nginx/DirectoryStructure
#
# In most cases, administrators will remove this file from sites-enabled/ and
# leave it as reference inside of sites-available where it will continue to be
# updated by the nginx packaging team.
#
# This file will automatically load configuration files provided by other
# applications, such as Drupal or Wordpress. These applications will be made
# available underneath a path with that package name, such as /drupal8.
#
# Please see /usr/share/doc/nginx-doc/examples/ for more detailed examples.
##

# Default server configuration
#
server {
        listen 80 default_server;
        listen [::]:80 default_server;

        # SSL configuration
        #
        # listen 443 ssl default_server;
        # listen [::]:443 ssl default_server;
        #
        # Note: You should disable gzip for SSL traffic.
        # See: https://bugs.debian.org/773332
        #
        # Read up on ssl_ciphers to ensure a secure configuration.
        # See: https://bugs.debian.org/765782
        #
        # Self signed certs generated by the ssl-cert package
        # Don't use them in a production server!
        #
        # include snippets/snakeoil.conf;

        root $(wwwroot);

        # Add index.php to the list if you are using PHP
        index index.html index.php index.htm index.nginx-debian.html default.html default.htm default.php;

        server_name _;

        location / {
                # First attempt to serve request as file, then
                # as directory, then fall back to displaying a 404.
                try_files $uri $uri/ =404;
        }

        # pass PHP scripts to FastCGI server
        #
        location ~ \.php$ {
                include snippets/fastcgi-php.conf;

                # With php-fpm (or other unix sockets):
                fastcgi_pass unix:/var/run/php/php$(php_version)-fpm.sock;
                fastcgi_param SCRIPT_FILENAME $document_root$fastcgi_script_name;
                include fastcgi_params;
                # With php-cgi (or other tcp sockets):
                #fastcgi_pass 127.0.0.1:9000;
        }

        # deny access to .htaccess files, if Apache's document root
        # concurs with nginx's one
        #
        #location ~ /\.ht {
        #       deny all;
        #}
}


# Virtual Host configuration for example.com
#
# You can move that to a different file under sites-available/ and symlink that
# to sites-enabled/ to enable it.
#
#server {
#       listen 80;
#       listen [::]:80;
#
#       server_name example.com;
#
#       root /var/www/example.com;
#       index index.html;
#
#       location / {
#               try_files $uri $uri/ =404;
#       }
#}
文件修改完毕保存并退出后,执行以下命令重启服务
systemctl restart nginx
5.3.3 测试
执行下面的命令
cd $(wwwroot)
git clone https://github.com/spoonysonny/pi-dashboard.git
或者如果觉得git下载太慢,可以下载代码zip包,下载后解压到$(wwwroot)下
点我下载
尝试在浏览器中打开$(rpi_ip)/pi-dashboard,若能打开看到类似以下图片中内容,即搭建成功
5.4 vsftpd配置
5.4.1 简述
Web服务器由于不涉及用户密码,在安全性配置上较为简单
而FTP服务器每次连接时都涉及到身份验证,为实现更安全的访问,需要对用户密码进行额外设置
5.4.2 虚拟用户的配置
执行以下命令
groupadd virtual
useradd -g virtual -s /sbin/nologin virtual
useradd -G sudo
useradd -G adm
5.4.3 安全性配置前
网上大部分版本搭建vsftpd的教程中,有关虚拟用户验证方式的配置均基于pam_userdb,但此方法不仅过程繁琐且该库在部分Linux发行版中已经不再更新,ArchWiki中的方法是较为简便的。
其中使用了pam_pwdfile,使用下面的命令安装相关软件
apt-get install -y libpam_pwdfile openssl
5.4.4 使用openssl配置基于md5的密码
首先,需要为vsftpd新建配置文件夹
mkdir /etc/vsftpd
touch /etc/vsftpd/.passwd
使用以下命令生成加密的密码
openssl passwd -1
$ openssl passwd -1
Password:
Verifying - Password:
$1$jTX1.wVo$fAEUaY1H6/zr.uG9SbVmL/
以上是运行命令后的结果示例,在提示时输入密码的明文,最后一行即是生成的密码的密文。
将运行命令后输出的最后一行复制到/etc/vsftpd/.passwd文件中并在行首加入想要生成用户的名称,名称与密码用:分隔
格式	user:passwd
例		user01:$1$jTX1.wVo$fAEUaY1H6/zr.uG9SbVmL/
特别注意:复制过程中要复制该行每个字符,可能会包含特殊符号
句点.在密码结尾时极容易忘记
接下来,打开/etc/pam.d/vsftpd文件,删掉或注释所有行,添加以下内容
auth required pam_pwdfile.so pwdfile /etc/vsftpd/.passwd
account required pam_permit.so
保存并退出
下面,需要为/etc/vsftpd/.passwd文件中定义的用户在$(ftproot)下建立各用户的FTP主目录
执行下面的命令修改FTP根目录所有者为虚拟用户
chown -R $(ftproot)
5.4.5 配置文件
执行以下命令将配置文件复制到相应文件夹
mv /etc/vsftpd.conf /etc/vsftpd/vsftpd.conf
ln -s /etc/vsftpd/vsftpd.conf /etc/vsftpd.conf
打开/etc/vsftpd/vsftpd.conf文件并清空文件,添加以下内容,不要修改
pam_service_name=vsftpd
write_enable=YES
hide_ids=YES
listen=YES
connect_from_port_20=YES
anonymous_enable=NO
local_enable=YES
dirmessage_enable=YES
xferlog_enable=YES
chroot_local_user=YES
guest_enable=YES
guest_username=virtual
virtual_use_local_privs=YES
local_root=/srv/ftp/$USER
user_sub_token=$USER
allow_writeable_chroot=YES
执行以下命令重启服务
systemctl restart vsftpd
5.5 映射到公网
5.5.1 路由器端
首先,打开路由器管理页面(多为192.168.1.1或者192.168.0.1)并登录。
打开IP绑定,将树莓派绑定到一个固定的局域网IP便于操作,下文用 $(rpi_ip) 代替。
接下来,在路由器中找到虚拟服务器或者端口映射,将 $(rpi_ip) 的80端口,443端口,20端口,21端口(,22端口用于远程终端连接)设置映射,如果要求设置协议,设置为TCP & UDP或者ALL。
鉴于大多数家用宽带被运营商锁了80端口,可以将一个自定义的端口映射到 $(rpi_ip) 的80端口,下文用 $(rpi_port) 代替。
5.5.2 DDNS
在这里,为了通用,我使用了花生壳的Oray Peanut Hull DDNS,部分路由器支持DDNS设置若正确设置路由器中相关选项或先前已经完成了DDNS的设置,可以忽略此步
首先安装相应软件
apt-get install -y phddns
安装结束后将屏幕上的SN复制下来,打开b.oray.com,输入SN,和密码(默认admin),绑定Oray账号。
打开域名列表,里面的域名就是树莓派广播到公网后的域名,可以复制并记录下来以便以后使用。
6.后记
到这里已经完成了标题中所说的Web Server与File Server的搭建,并且从公网已经可以访问,但是还是有一些需要注意的地方:
- 由于配置以及软件更新,按本文操作不能保证成功,请谨慎操作
- 本文大部分篇幅为省略
sudo命令,均使用root用户操作,Linux下root用户拥有无限权限,误操作可能导致系统损坏甚至硬件损坏,执行操作前请认真完整地看清指令 - nginx没有启用安全连接(https),因为家庭宽带搭建服务器外网无法成功访问80和443端口,签发机构无法验证
- 同理vsftpd中也无法启用安全连接
- 由于家庭宽带为动态ip,切换ip地址时可能会导致ssh的密钥失效
- Windows资源管理器中ftp访问体验并不是很好,仅下载推荐使用浏览器,如需上传请使用Filezilla
- 花生壳免费域名在花生壳服务器访问繁忙时,动态域名会被错误解析到127.0.0.2,导致无法访问,现无解决方案
如果不考虑以上几个问题,这个教程应该对相关需求能较好的解决
7.参考链接
nginx wiki :https://www.nginx.com/resources/wiki/
vsftpd ArchWiki :https://wiki.archlinux.org/index.php/Very_Secure_FTP_Daemon
phddns tutorial :https://service.oray.com/question/4287.html
pi dashboard github :https://github.com/spoonysonny/pi-dashboard
树莓派安装 Nginx + PHP7.0 + Pi Dashboard :https://shumeipai.nxez.com/2018/04/25/install-pi-dashboard-with-nginx-php7-on-pi.html