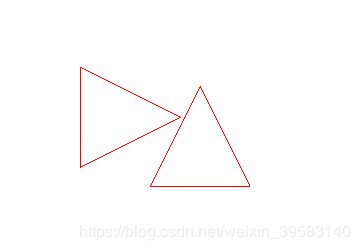
QT自定义图形项中的boundingRect()和shape()函数的理解
QT自定义图形项中的boundingRect()和shape()函数的理解
实现自定义图形项经常需要重绘的函数有boundingRect()、paint()、shape()。
针对霍亚飞的Qt creator中所说,boundingRect()函数具有以下特点:
1.paint绘制的图像必须在boundingRect()函数之中。
2.用来确定哪些区域需要重构(repaint)。
3.用来检测碰撞
其中第二个功能在帮助文档中没有看到(可能英语水平不过关),故而通过一次小测试借以理解以上函数:
对第一点和第二点的理解:为什么图像的绘制必须在boundingRect()函数所确定的Rect之中。
第一个测试:我们把图像画到boundingRect()的所设置的矩形外边,并且想办法观察到重绘的情况
项目建立之类的就不说了,自行参照书本。
首先搭建个测试的框架:
添加一个继承自QGraphicsItem的MyIetm和继承自QGraphicssView的MyView,两个类的内容如下:
//myitem.h内容如下
#ifndef MYITEM_H
#define MYITEM_H
#include
class MyItem : public QGraphicsItem
{
public:
    MyItem();
    QRectF boundingRect()const override;
    void paint(QPainter *painter,const QStyleOptionGraphicsItem *option,QWidget *widget)override;
private:
   void drawRectPath(QPainter *painter);
};

#endif // MYITEM_H
//myitem.cpp内容如下:
#include "myitem.h"
#include
MyItem::MyItem()
{
}
QRectF MyItem::boundingRect()const {
    qreal penwidth=1;
    return QRectF(-50-penwidth/2,-50-penwidth/2,100+penwidth,100+penwidth);
}
void MyItem::drawRectPath(QPainter *painter){
    QPainterPath rectPath;
    rectPath.moveTo(-50,-50);
    rectPath.lineTo(50,-50);
    rectPath.lineTo(50,50);
    rectPath.lineTo(-50,50);
    rectPath.closeSubpath();//返回绘图开始点

    painter->setPen(QPen(Qt::red,20,Qt::SolidLine,Qt::SquareCap,Qt::MiterJoin));//pen参数别设置错了,要不不好看出来
    painter->drawPath(rectPath);

    //在之前的绘图上我们绘制出QboundingRect的虚线方框
    painter->setPen(QPen(Qt::black,1,Qt::DotLine,Qt::SquareCap,Qt::MiterJoin));
    painter->drawRect(-50,-50,100,100);
}
void MyItem::paint(QPainter *painter
                   ,const QStyleOptionGraphicsItem *,QWidget *){
      drawRectPath(painter);
}
//myview.h什么也不需要改动
#ifndef MYVIEW_H
#define MYVIEW_H
#include

class MyView : public QGraphicsView
{
public:
    MyView();
};

#endif // MYVIEW_H
//myview.cpp内容如下:
#include "myview.h"

MyView::MyView()
{
}
//main.cpp文件
#include
#include "myitem.h"
#include
#include "myview.h"

int main(int argv,char* argc[]){
    QApplication app(argv,argc);

    MyItem *item1=new MyItem;
    MyItem *item2=new MyItem;
    item1->setPos(0,0);
    item2->setPos(150,150);


    QGraphicsScene scene;
    scene.addItem(item1);
    scene.addItem(item2);

    MyView view;
    view.setScene(&scene);
    view.resize(600,600);
    view.show();


    return app.exec();
}
绘制的图形如下:
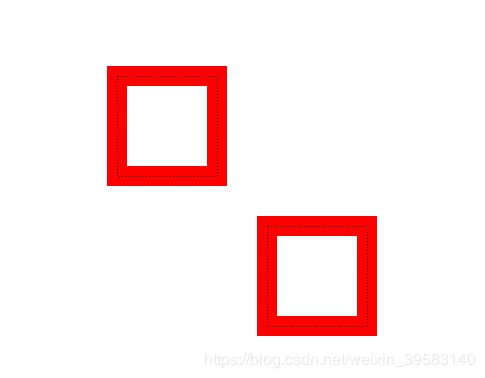
由上图,虽然我们绘制的图像和boundingRect返回的QRect是一样大的,但是因为我们的pen宽度,绘制的图形已经超出了boudingRect.
为了看到视图更新的效果,我们为图形项添加移动效果:
//在myitem.h中:
//添加
protected:
    void keyPressEvent(QKeyEvent *event)override;
    void mousePressEvent(QGraphicsSceneMouseEvent *event)override;
//在myitem.cpp中:
//更改MyItem()函数为:
MyItem::MyItem()
{
   //设置可以被移动以及获得焦点,缺一不可
    setFlag(QGraphicsItem::ItemIsMovable);
    setFlag(QGraphicsItem::ItemIsFocusable);
}
//添加

//上下左右移动图形项
void MyItem::keyPressEvent(QKeyEvent *event){
    switch (event->key()) {
    case Qt::Key_Left:{
        moveBy(-1,0);
        break;
    }

    case Qt::Key_Up:{
        moveBy(0,-1);
        break;
    }
    case Qt::Key_Right:{
        moveBy(1,0);
        break;
    }
    case Qt::Key_Down:{
        moveBy(0,1);
        break;
    }
    }
}
//鼠标点击获得焦点
void MyItem::mousePressEvent(QGraphicsSceneMouseEvent *){
    setFocus();
}
好了,点中方框图形(点击在虚线里边),就可以上下左右键移动了,试一试吧,也许我们已经可以猜到结果了:
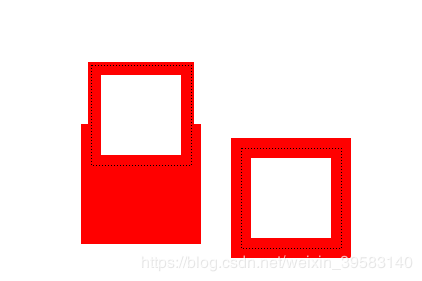
理解这一点基础在于QGraphicsView的一个属性ViewportUpdateMode,可以通过
void setViewportUpdateMode(QGraphicsView::ViewportUpdateMode mode)
进行设定:
总共有五种模式,很容易理解:
QGraphicsView::FullViewportUpdate 全视口更新,整体都更新的意思啦
QGraphicsView::MinimalViewportUpdate 最小更新,哪里有变动更新哪里
QGraphicsView::SmartViewportUpdate 智能选择,它要自己选
QGraphicsView::BoundingRectViewportUpdate 来了,来了,它就是我们要注意的。
QGraphicsView::NoViewportUpdate 不更新
其中默认为QGraphicsView::MinimalViewportUpdate,也就是上例中我们没有进行设置的情况。事实上除了设置为FullViewportUpdate 其余四种皆会出现问题,不妨试一试。
我们可以通过在MyView的构造函数中设置为FullViewportUpdate 的全视口更新得到我们想要的结果,但是却是以牺牲性能为代价的。
理解第三点,用来检测碰撞
第二个测试:
在第一个测试基础上做以下更改:
MyItem.h中做添加
private:
   void drawRectPath(QPainter *painter);//绘制矩形不在使用
   void drawtTriangle(QPainter *painter);//添加绘制三角形
在MyItem.cpp中更改三处
//第一处,实现drawtTriangle(QPainter *painter)
void MyItem::drawtTriangle(QPainter *painter){
    QPainterPath trianglePath;
    trianglePath.moveTo(0,-50);
    trianglePath.lineTo(50,50);
    trianglePath.lineTo(-50,50);
    trianglePath.closeSubpath();
    painter->setPen(QPen(Qt::red,1,Qt::SolidLine,Qt::SquareCap,Qt::MiterJoin));
    painter->drawPath(trianglePath);
}
//第二处 重新实现paint
void MyItem::paint(QPainter *painter
                   ,const QStyleOptionGraphicsItem *,QWidget *){
    //绘制boundingRect的QRect以方便查看
    painter->setPen(QPen(Qt::black,1,Qt::DotLine,Qt::SquareCap,Qt::MiterJoin));
    painter->drawRect(-50,-50,100,100);

    if(hasFocus()&&!collidingItems().isEmpty()){  //判断是否有在获得焦点的同时有碰撞
       painter->setBrush(QColor(Qt::black));     //若有碰撞则绘制的图形将以黑色作为画刷填充
    }
    drawtTriangle(painter);//这次是三角形
}
//第三处:在keyPressEvent()函数中添加一个旋转的响应(按下R键)
void MyItem::keyPressEvent(QKeyEvent *event){
    switch (event->key()) {
    case Qt::Key_Left:{
        moveBy(-1,0);
        break;
    }
    case Qt::Key_Up:{
        moveBy(0,-1);
        break;
    }
    case Qt::Key_Right:{
        moveBy(1,0);
        break;
    }
    case Qt::Key_Down:{
        moveBy(0,1);
        break;
    }
    case Qt::Key_R:{   //按下R键旋转90度
        setRotation(90);
        break;
    }
    }
}
结果如下:
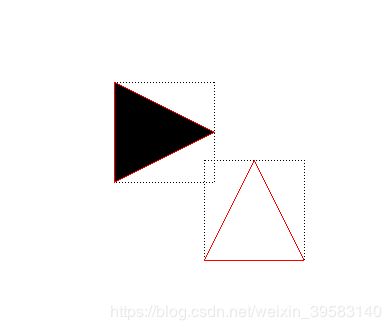
虚线接触时发生了碰撞,为了避免绘制的虚线对结果的影响,我们注释掉虚线部分
void MyItem::paint(QPainter *painter
                   ,const QStyleOptionGraphicsItem *,QWidget *){
//    painter->setPen(QPen(Qt::black,1,Qt::DotLine,Qt::SquareCap,Qt::MiterJoin));
//    painter->drawRect(-50,-50,100,100);
    if(hasFocus()&&!collidingItems().isEmpty()){
       painter->setBrush(QColor(Qt::black));
       .............
结果如下:
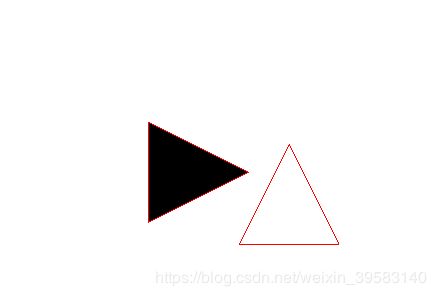
还没碰到呢,就已经变黑了(检测到碰撞了),可以得出结论了:
boundingRect与碰撞检测很明显是相关的 ;
但boundingRect返回的是矩形框,很明显不符合我们三角形碰撞的需求;
这就到了shape函数了,它返回的是QPainterPath故而可以是任何形状
myItem.h函数中添加新函数shape
//myitem.h
.........
protected:
    void keyPressEvent(QKeyEvent *event)override;
    void mousePressEvent(QGraphicsSceneMouseEvent *event)override;
    QPainterPath shape()const override;//重写shape函数
shape函数的实现
//myitem.cpp
......
QPainterPath MyItem::shape()const{    //shape()函数返回一个一样的三角形路径
    QPainterPath trianglePath;
    trianglePath.moveTo(0,-50);
    trianglePath.lineTo(50,50);
    trianglePath.lineTo(-50,50);
    trianglePath.closeSubpath();
    return trianglePath;
}
