ELK + filebeat 7.4.2 采集tomcat日志-使用记录
简单介绍
ELK,日志记录管理全家桶,E:elasticsearch,L:logstash,K:kibana,本文除了部署使用ELK,还会加上filebeat和elasticsearch-head插件。
ElasticSearch是一个基于Lucenc的搜索服务器,是用来搜索日志用的
PS.补充一点,需要java11噢~
logstash是用来接收日志,并且把日志输出到elasticsearch
kibana是一个针对elasticsearch的图形化服务,方便去查询日志
filebeat也是用来搜集日志的,常和logstash配合使用,因为filebeat运行占用的资源比logstash少,但是功能不及logstash强大,所以很多时候都是filebeat搜集日志,传给logstash,然后logstash收到数据后,经过filter配置,把日志输出到elasticsearch
elasticsearch-head插件,也是用来管理elasticsearch的极简图形化界面
丢个官方连接,除了head插件,其他都能在这里下载:https://www.elastic.co/downloads/past-releases
不知道你们网速咋样,反正我下载的很慢...这里丢个网盘连接
链接:https://pan.baidu.com/s/19kyIHrvWvTQbAy2dY0o08g
提取码:k4ow
里面包含了ELK和filebeat,版本都是7.4.2
PS.head插件从git上面获取:https://github.com/mobz/elasticsearch-head
话说,我11月开始琢磨的时候最新版本是7.4.2,这今天(2019.12.10)发现最新版已经是7.5了......
好啦下面开始干活!
在/usr/local下创建elk7.4.2文件夹,把下载好的elk文件放进去
然后tar –zxvf解压ELK(E:elasticsearch,L:logstash,K:kibana)
1. elasticsearch
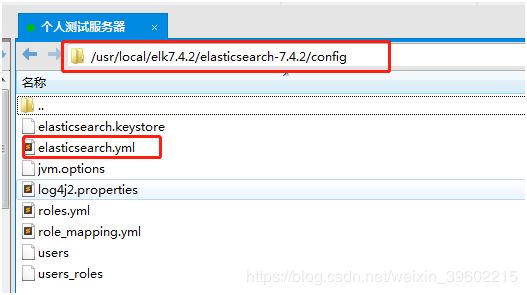
进入图片目录
cd /usr/local/elk7.4.2/elasticsearch-7.4.2/config
编辑以下文件,
vim elasticsearch.yml
添加以下内容
network.host: 0.0.0.0
discovery.type: single-node
xpack.security.enabled: true
xpack.license.self_generated.type: basic
xpack.security.transport.ssl.enabled: true
path.data: /usr/local/elk/data #没有就创建这个路径的文件夹
path.logs: /usr/local/elk/logs #没有就创建这个路径的文件夹
启动elasticsearch不能用root用户启动,这里我创建了用户zg
创建用户:adduser zg
设置密码:passwd zg
赋予权限:chown -R zg /usr/local/elk7.4.2和chown -R zg /usr/local/elk
切换用户:su zg
启动elasticsearch之前,需要初始化账户和密码
cd /usr/local/elk7.4.2/elasticsearch-7.4.2/bin
./elasticsearch-setup-passwords interactive
此处会要你设置内置用户的密码,分别有elastic, kibana, logstash_system,beats_system等。
elastic 账号:拥有 superuser 角色,是内置的超级用户。
kibana 账号:拥有 kibana_system 角色,用户 kibana 用来连接 elasticsearch 并与之通信。Kibana 服务器以该用户身份提交请求以访问集群监视 API 和 .kibana 索引。不能访问 index。
logstash_system 账号:拥有 logstash_system 角色。用户 Logstash 在 Elasticsearch 中存储监控信息时使用。
启动elasticsearch,这里建议暂时不使用后台模式运行,这样可以看看控制台输出的日志
./elasticsearch
后台模式运行:
./elasticsearch -d
如果外网访问不了,关闭防火墙
systemctl stop firewalld.service
systemctl disable firewalld.service
如果出现for elasticsearch process is too low, increase to at least [65536]
在文件末尾添加:
vi /etc/security/limits.conf
zg hard nofile 65536
zg soft nofile 65536
(此处的zg是linux下的另一个用户)
如果出现[1024] for user [apps] is too low, increase to at least [2048]
修改文件:
vi /etc/security/limits.d/20-nproc.conf
将
* soft nproc 1024
#修改为
* soft nproc 2048
如果出现nt [65530] likely too low, increase to at least [262144]
修改文件:
vi /etc/sysctl.conf
添加下面配置:
vm.max_map_count=655360
修改完sysctl.conf 之后并执行命令:sysctl -p
浏览器访问:
期间会需要输入账户和密码
ip地址:9200
能出现如图所示则启动成功
2. logstash
cd /usr/local/elk7.4.2/logstash-7.4.2/config
创建文件
vim logstash.conf
添加内容
input {
file {
path => "/home/zg/logs/*.log" #读取的日志的路径
type => "elasticsearch"
start_position => "beginning"
}
}
output {
elasticsearch {
hosts => ["http://localhost:9200"]
index => "mylog-%{+YYYY.MM.dd}"
user => "elastic"
password => "密码" #之前elasticsearch初始化的用户和密码
}
stdout{codec => rubydebug}
}
进入目录
cd /usr/local/elk7.4.2/logstash-7.4.2/bin
启动:
./logstash -f ../config/logstash.conf
启动后挂起,新建窗口进行验证:
进入目录
cd /home/zg/logs
输入:
echo "测111" >> log.log
在logstash窗口下,有如下输入,则logstash启动完成且能正常使用
{
"message" => "测试111",
"path" => "/home/zg/logs/log.log",
"type" => "elasticsearch",
"@version" => "1",
"host" => "iZ2ze9ryeo103e4aswzitxZ",
"@timestamp" => 2019-11-30T07:31:53.833Z
}
3. kibana
进入目录
cd /usr/local/elk7.4.2/kibana-7.4.2-linux-x86_64/config
vim kibana.yml
添加以下参数信息
#配置Kibana的远程访问
server.host: 0.0.0.0
#配置elasticsearch的访问地址
elasticsearch.hosts: ["http://127.0.0.1:9200"]
#汉化界面
i18n.locale: "zh-CN"
# elasticsearch设置的账户和密码
elasticsearch.username: "elastic"
elasticsearch.password: "密码"
进入目录
cd /usr/local/elk7.4.2/kibana-7.4.2-linux-x86_64/bin
启动
./kibana
4.新增Filebeat
关闭logstash,进入目录
cd /usr/local/elk7.4.2/logstash-7.4.2/config
新建文件
vim logstash2.conf
添加以下内容
# Sample Logstash configuration for creating a simple
# Beats -> Logstash -> Elasticsearch pipeline.
input {
beats {
port => 5044
}
}
output {
elasticsearch {
hosts => ["http://localhost:9200"]
index => "mylog-%{+YYYY.MM.dd}"
user => "elastic"
password => "密码"
}
stdout{codec => rubydebug}
}
启动logstash
./../bin/logstash -f logstash2.conf
下载filebeat放在如图目录
进入目录
cd /usr/local/filebeat/filebeat-7.4.2-linux-x86_64
编辑文件
vim filebeat.yml
如图编辑内容
启动
./filebeat -e -c filebeat.yml
验证,进入目录
cd /home/zg/logs/
echo "zhangge" >> log1.log
在logstash处看到如图所示表示配置完成
或者进入kibana查看你新加的日志记录
5. 安装ElasticSearch Head插件
该插件需要node,自行百度安装
head安装步骤
1. cd /usr/local/
2. git clone git://github.com/mobz/elasticsearch-head.git
3. npm install -g grunt-cli
4. cd /usr/local/elasticsearch-head/
5. npm install
6. cd /usr/local/elasticsearch-head/
7. vi Gruntfile.js
8.在connect-->server-->options下面添加: hostname:'0.0.0.0',保存并且退出
9. vi _site/app.js
10.把http://localhost:9200改成elasticsearch的地址,保存并且退出
11. elasticsearch的配置文件elasticsearch.yml,在文件末尾追加以代码
http.cors.enabled: true
http.cors.allow-origin: "*"
http.cors.allow-headers: Authorization,X-Requested-With,Content-Length,Content-Type
12. firewall-cmd --zone=public --add-port=9100/tcp –permanent
13. firewall-cmd –reload
(如果是阿里云服务器,则不需要12和13,自行配置安全组规则)
14.重启(或启动)elasticsearch
15.启动head,进入目录
cd /usr/local/elasticsearch-head/node_modules/grunt/bin
启动
./grunt server
启动head的时候,如果出现
Local Npm module "grunt-contrib-jasmine" not found. Is it installed?
这个错误
那么就在head的目录(我的目录是:/usr/local/elasticsearch-head)下执行以下语句
npm install grunt-contrib-clean grunt-contrib-concat grunt-contrib-watch grunt-contrib-connect grunt-contrib-copy grunt-contrib-jasmine
使用head
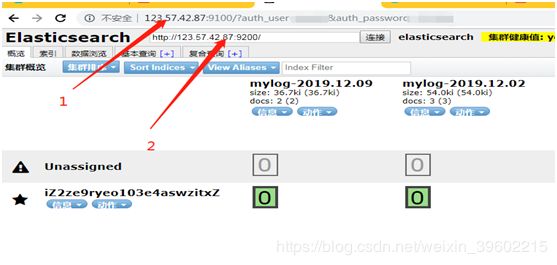
1.http://123.57.42.87:9100/?auth_user=用户名 &auth_password=密码
在地址上填充自己在elasticsearch中设置的用户名和密码
2.在输入框中输入elasticsearc的地址和端口,点击【连接】按钮,出现上图界面表示成功
6.采集tomcat日志
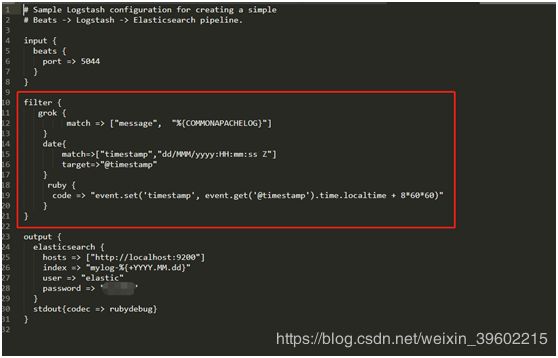
在logstash的配置文件里添加
vim logstash2.conf
filter {
grok {
match => ["message", "%{COMMONAPACHELOG}"]
}
date{
match=>["timestamp","dd/MMM/yyyy:HH:mm:ss Z"]
target=>"@timestamp"
}
ruby {
code => "event.set('timestamp', event.get('@timestamp').time.localtime + 8*60*60)"
}
}
文件内容如图所示
使用logstash2.conf配置文件来重启logstash
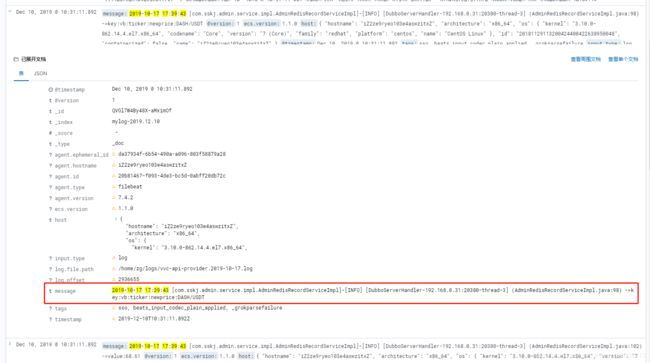
在kibana查看tomcat日志效果如图
补充
本问是单机部署噢


