从零开始在windows下使用QT根据点绘制图像
从零开始在windows下使用QT根据点绘制图像(QPainter or halcon)
- 前言
- QT+msvc+SDK+halcon环境搭建
- 1 添加 .lib库文件路径
- 2 添加 .h 头文件
- 3 添加 .dll动态运行库
- QT中直接调用halcon来显示图像
- QT中使用界面绘制类QPainter显示点云
- c++中的回调函数的使用
- QT进度条
- QT鼠标事件
- 鼠标滑轮事件
- 鼠标点击拖动事件
前言
下面是本文使用程序的源码GitHub链接,由于版权原因,删除了程序中关于使用halcon和SDK对传感器调用的代码
[email protected]:MRcao1001/view-of-C-QT.git
QT+msvc+SDK+halcon环境搭建
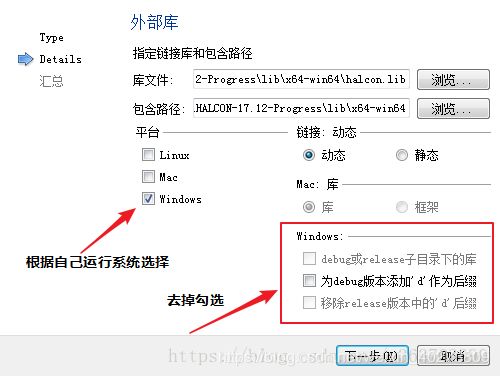
1 添加 .lib库文件路径
以下是添加halcon库文件的例子,如果有其他的库文件方法类似
图片转载自Y忍冬草_ http://blog.csdn.net/y363703390 https://blog.csdn.net/y363703390/article/details/81539814
配置完成之后打开.pro文件应该可以看到添加了很多类库
## C++中回调函数的使用
2 添加 .h 头文件
在.pro文件中添加这一句话
INCLUDEPATH += ' C: \Program Files\MVTec\HALCON-17.12-Progress\include '
这一路径应该包含你需要引用的头文件,然后你就可以在程序中使用
#include "myheadfile.h"
来引用你需要的外部头文件而无需使用全部路径
示例代码中是引用halcon头文件的方法,第三方开发包使用相同方式引入
3 添加 .dll动态运行库
.dll动态运行库通常在开发包的\bin目录下,在QT程序构建之后将该目录下的文件全部拷贝到编译根目录下即可
QT中直接调用halcon来显示图像
然后将读取图像部分的代码复制到cpp文件中的读取图像按钮的槽函数中:
此处需要注意,需要添加红线部分代码,如果删去红线部分的代码,则Halcon的图像显示窗口会独立于Qt的Dialog窗口,因为OpenWindow函数的第五个参数为指定窗口的父窗口,默认为0
需要获取Dialog的窗口句柄然后转换成Hlong类型。此处和MFC的代码有所区别
在测试中Halcon生成的窗口会覆盖原窗口上的部件进行显示
QT中使用界面绘制类QPainter显示点云
QT中的QPainter是一个很强大的类,
一般情况下执行QPainte::drawpoint(QPoint *)函数都需要重写paintevent()然后在其中调用,但是该方法是调用CPU的方法,写在事件函数中会大量占用系统资源
所以我们先在函数中对一个QPixmap执行 QPainte::drawpoint(QPoint *)操作,
然后使用QPainter::drawpixmap(Qpixmap *)函数在事件函数中调用GPU进行绘图
//代码如下:
//_vectorLength_intensity,  _vectorWidth_intensity 是定义的全局二维向量的长度和宽度
//_pointsVector_intensity 是自定义的存储点云原始数据的二维向量
//pfVec是定义的全局二维点云向量,存储的是QPoint类型的点
void Display::my_draw()
{
    pixmap = new QPixmap(_x,_y);
    //设置画布为黑色
    pixmap->fill(Qt::black);
    //在pixmap(画布)上绘图, 附带重置属性
    if(painter.begin(pixmap) == false){qDebug()<<"error";}
    //申明并初始化画笔
    QPen pen1(Qt::red,1,Qt::DashLine,Qt::FlatCap,Qt::RoundJoin);
    //显示亮度图
    int gray = 0;
    for(int i=0; i< _vectorLength_intensity; i++){
        for(int j=0; j < _vectorWidth_intensity; j++){
            gray = _pointsVector_intensity[i][j].intensity;
            if(gray == 0){
                continue;
            }
            pen1.setColor(QColor(gray, gray, gray));
            painter.setPen(pen1);
            painter.drawPoint(pfVec[i][j]);
        }
    }
    painter.end();
}
//重写paintevent函数
void Display::paintEvent(QPaintEvent *ev)
{
    QPainter _p(this);
    _p.drawPixmap(x_top, y_top, _x*ratio, _y*ratio, *pixmap);

}
c++中的回调函数的使用
C++在类中使用回调函数
1:将该回调函数定义为静态成员函数
2:将回调函数所需要的值定义为全局变量
因为在c++中,无法通过this指针进行回调函数的调用,所以必须定义为静态成员函数
QT进度条
在循环事件中使用以下代码就额可以实现进度条功能
//引用头文件:
#include QT鼠标事件
这两个事件都是基于前面已经绘制完成的pixmap进行操作
鼠标滑轮事件
//重写的绘图事件,调用drawpoint和drawoixmap方法将图像显示到界面上
void Display::paintEvent(QPaintEvent *ev)
{
    QPainter _p(this);
    _p.drawPixmap(x_top, y_top, _x*ratio, _y*ratio, *pixmap);

}

//重写鼠标滑轮事件
void Display::wheelEvent(QWheelEvent *event)
{
    if (event->delta()<0) {      //下滑,放大

       action=0;
       ratio -= 0.1;
       if(ratio <= 0)
           ratio =0.1;
       this->update();

    } else if(event->delta()>0) {                    //上滑,缩小
        action=1;
        ratio += 0.1;
        if(ratio >= 5)
            ratio =5;
        this->update();
    }

    event->accept();
}
鼠标点击拖动事件
//重写的绘图事件,调用drawpoint和drawoixmap方法将图像显示到界面上
void Display::paintEvent(QPaintEvent *ev)
{
    QPainter _p(this);
    _p.drawPixmap(x_top, y_top, _x*ratio, _y*ratio, *pixmap);

}
//重写鼠标单击拖动事件
bool Display::event(QEvent *event)
{
    static bool press=false;
    static QPoint PreDot;

    if(event->type() == QEvent::MouseButtonPress )
    {
        QMouseEvent *mouse = dynamic_cast<QMouseEvent* >(event);

        //判断鼠标是否是左键按下,且鼠标位置是否在绘画区域
        if(mouse->button()==Qt::LeftButton)
        {
            press=true;
            //QApplication::setOverrideCursor(Qt::OpenHandCursor); //设置鼠标样式
            this->setCursor(Qt::OpenHandCursor);

            PreDot = mouse->pos();
        }

    }
    else if(event->type() == QEvent::MouseButtonRelease)
    {
        QMouseEvent *mouse = dynamic_cast<QMouseEvent* >(event);

        //判断鼠标是否是左键释放,且之前是在绘画区域
        if(mouse->button()==Qt::LeftButton && press )
        {
            //QApplication::setOverrideCursor(Qt::ArrowCursor); //改回鼠标样式
            this->setCursor((Qt::ArrowCursor));
            press=false;
        }
    }

    if(event->type() == QEvent::MouseMove)              //移动图片
    {
        if(press)
        {
            QMouseEvent *mouse = dynamic_cast<QMouseEvent* >(event);

            offset.setX(mouse->x() - PreDot.x());
            offset.setY(mouse->y() - PreDot.y());
            x_top = x_top+=offset.x();
            y_top = y_top+=offset.y();
            PreDot = mouse->pos();
            action = 2;
            this->update();
        }
    }
    return QWidget::event(event);
}


