VS2015编译QT的ui文件
1.首先安装QT VS Tools插件,在VS的联机安装可以直接安装,或者到微软官网下载,安装完该插件,VS的上方多了QT VS Tools的选项证明安装成功
2.在Qt官网安装windows平台的版本
3.新建一个C++工程,并引入Qt的include目录和lib目录
4.设置ui文件的属性:
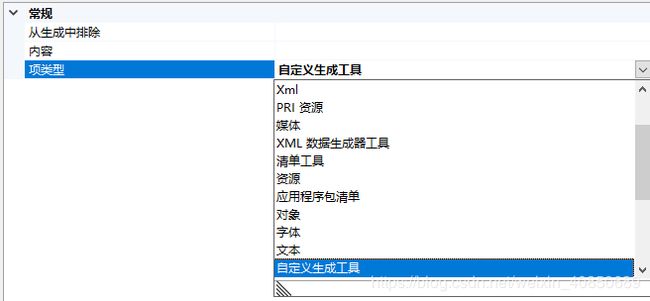
点击ui文件,右击进入属性,项类型选择“自定义生成工具”:
确定后,选择“自定义生成工具”:
命令行输入: "$(QTDIR)\bin\uic.exe" -o ".\GeneratedFiles\ui_%(Filename).h" "%(FullPath)"
说明输入:Uic%27ing %(Identity)...
输出:.\GeneratedFiles\ui_%(Filename).h;%(Outputs)
附加的依赖项:$(QTDIR)\bin\uic.exe;%(AdditionalInputs)
链接对象:选择是
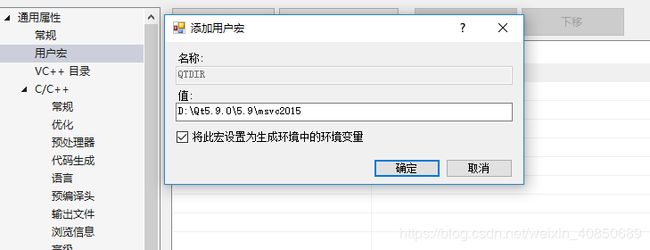
但是$(QTDIR)这个宏需要自己添加,可以在环境变量中添加,我直接在工程添加:
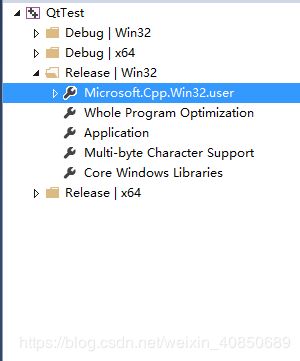
选择“视图”-->“其他窗口”-->“属性管理器”:
我只编译Release |win32项目的,所以只在此项目添加宏,选择用户宏,添加:
之后右键ui文件,即可以编译出ui_xxx.h文件
但这样还未能生成exe,还需要走moc,需要用moc编译出cpp文件,可以直接用命令行启动qt bin目录下的moc.exe把我们自己写的里面包含“Q_OBJECT”宏的头文件编译成对应的qt cpp文件:
moc.exe" "自定义的.h" -o "moc_xxx.cpp"
当然也可以添加到属性:
右键.h文件,进入熟悉页,并设置自定义生成工具
命令行输入:"$(QTDIR)\bin\moc.exe" "%(FullPath)" -o ".\GeneratedFiles\moc_%(Filename).cpp"
说明:Moc%27ing %(Identity)...
输出:.\GeneratedFiles\moc_%(Filename).cpp
附加依赖项目:$(QTDIR)\bin\moc.exe;%(FullPath)
链接对象:选择是
test.h:
#pragma  once
#include

//此头文件需要用moc编译成对应的cpp文件,并引入工程
namespace Ui
{
	class Form;
}
class Form:public QDialog
{
	Q_OBJECT
public:
	explicit Form(QWidget *parent = 0);
	~Form();
private:
	Ui::Form *ui;
};
test.cpp
#include"test.h"
#include "ui_Widget.h"  //引入ui生成的头文件

Form::Form(QWidget *parent):ui(new Ui::Form)
{
	ui->setupUi(this);
}
Form::~Form()
{
	delete ui;
}
main.cpp
#include
#include
#include "test.h"
static char * UnicodeToUtf8(const wchar_t * wstr) //返回的指针需要手动释放
{
	try
	{
		int len = 0;
		len = WideCharToMultiByte(CP_UTF8, NULL, wstr, -1, NULL, 0, NULL, NULL);
		char *buffer = new char[len + 1];
		memset(buffer, 0, len + 1);
		WideCharToMultiByte(CP_UTF8, NULL, wstr, -1, buffer, len, NULL, NULL);
		return buffer;
	}
	catch (...) {}
	return NULL;
}

int WINAPI WinMain(_In_ HINSTANCE hInstance, _In_opt_ HINSTANCE hPrevInstance, _In_ LPSTR lpCmdLine, _In_ int nShowCmd)
{
	int argc = 0;
	LPWSTR *argvW = CommandLineToArgvW(GetCommandLineW(), &argc);
	char **argv = new char *[argc];
	for (int i=0;i
工程目录和依赖项:
运行需要qt的dll,运行效果如下:
参考博客:
https://blog.csdn.net/u014047672/article/details/80778583


