Come on和我一起做基于深度学习的缺陷检测一(数据准备2)
基于深度学习的织物疵点检测
- Pascal-Voc格式数据集
- Pascal_Voc中.xml格式数据集增强
- 这样就可以实现Pascal_Voc格式的数据标注和增强了
Pascal-Voc格式数据集
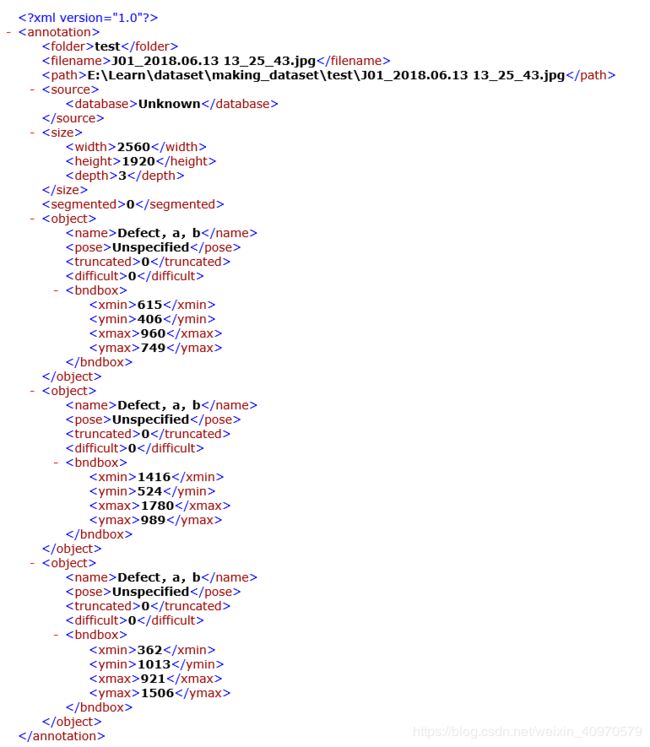
和上一个博客一样,同样是通过精灵标注助手,可以直接生成Pascal-Voc格式的数据,具体如下图所示。

文件属性都是 .xml 格式的文件,里面的内容有些许的差异,下面来看看如何用Python生成这个文件
# -*- coding: utf-8 -*-
from lxml import etree
import numpy as np
import xml.etree.ElementTree as ET
import math
import os
# 创建 xml格式 文件
def creat_pascal_voc_xml(xml_file, x, y, w, h):
    """
    新建xml文件
    :param xml_file: xml
    :param x: xmin
    :param y: ymin
    :param w: 宽
    :param h: 高
    :return:
    """
    annotation = etree.Element("annotation")
    folder = etree.SubElement(annotation, "folder")
    folder.text = 'DaiSha'
    filename = etree.SubElement(annotation, "filename")
    filename.text = 'DaiSha_028.jpg'
    path = etree.SubElement(annotation, "path")
    path.text = "E:\Learn\dataset\making_dataset\DaiSha\DaiSha_028.jpg"

    source = etree.SubElement(annotation, "source")
    database = etree.SubElement(source, "database")
    database.text = 'Unknown'
    size = etree.SubElement(annotation, 'size')
    width = etree.SubElement(size, 'width')
    width.text = '512'
    height = etree.SubElement(size, 'height')
    height.text = '512'
    depth = etree.SubElement(size, 'depth')
    depth.text = '3'

    segmented = etree.SubElement(annotation, "segmented")
    segmented.text = '0'
    object = etree.SubElement(annotation, 'object')
    name = etree.SubElement(object, 'name')
    name.text = 'DaiSha'
    pose = etree.SubElement(object, 'pose')
    pose.text = 'Unspecified'
    truncated = etree.SubElement(object, 'truncated')
    truncated.text = '0'
    difficult = etree.SubElement(object, 'difficult')
    difficult.text = '0'
    bndbox = etree.SubElement(object, 'bndbox')
    xmin = etree.SubElement(bndbox, "xmin")
    xmin.text = str(x)
    ymin = etree.SubElement(bndbox, "ymin")
    ymin.text = str(y)
    xmax = etree.SubElement(bndbox, "xmax")
    xmax.text = str(x + w)
    ymax = etree.SubElement(bndbox, "ymax")
    ymax.text = str(y + h)

    tree = etree.ElementTree(annotation)
    tree.write(xml_file, pretty_print=True, xml_declaration=False, encoding='utf-8')
    return xml_file

xx = creat_pascal_voc_xml('ss.xml', 32, 120, 80, 80)
Pascal_Voc中.xml格式数据集增强
这个数据增强适用于xml文件,增强的方式和 Come on和我一起做基于深度学习的缺陷检测一(数据准备)相同。同样适用于多个标注疵点的数据。下面直接上代码。
# -*- coding: utf-8 -*-
# 作者:大大玮在路上
# 图像和对应的xml文件扩充
import numpy as np
import xml.etree.ElementTree as ET
import math
import os
from tqdm import tqdm
import cv2


def edit_xml(xml_file, model, angle):
    '''
        修改xml文件,对于数据标注来说,我们改的格式主要就是以下两点:
    1. name
    2. bndbox
    因此,封好的函数主要也是围绕这两个变化而实现的功能
    1. 图像标注完成后,经图像旋转、翻转后的新的xml文件的生成.
    这里我是做缺陷检测的,所以说缩放、增强对比度、直方图均衡化之类的对我没啥用,我就不写了
    :param xml_file:xml文件的路径
    :
    :return:
    :param xml_file: 文件的路径
    :param model: 图像变换模式,rotate:图像旋转,angle可以为90,180,270,-90,-180,-270
                               flip:图像翻转,angle可以为0:水平翻转;1:垂直翻转;-1:先水平后垂直翻转
    :param angle:
    :return:
    '''
    global x, y, x_w, y_h, w_total, h_total
    tree = ET.parse(xml_file)  # 读取 xml 文件
    tree.getroot()
    for size in tree.iter('size'):
        for w in size.iter('width'):
            w_total = int(w.text)
        for h in size.iter('height'):
            h_total = int(h.text)
    for object in tree.iter('object'):
        for bndbox in object.iter('bndbox'):
            for xmin in bndbox.iter('xmin'):
                x = int(xmin.text)
            for ymin in bndbox.iter('ymin'):
                y = int(ymin.text)
            for xmax in bndbox.iter('xmax'):
                x_w = int(xmax.text)
            for ymax in bndbox.iter('ymax'):
                y_h = int(ymax.text)
            print(x,y)
        w_1 = x_w - x
        h_1 = y_h - y
        anglePi = angle * math.pi / 180.0
        cosA = math.cos(anglePi)
        sinA = math.sin(anglePi)
        print( x, y, x_w, y_h, w_total, h_total)
        center_array = np.array([[1, 0, 0],
                                 [0, -1, 0],
                                 [-0.5 * w_total, 0.5 * h_total, 1]
                                 ])
        i_center_array = np.array([[1, 0, 0],
                                   [0, -1, 0],
                                   [0.5 * w_total, 0.5 * h_total, 1]
                                   ])
        rotate_array = np.array([[cosA, sinA, 0],
                                 [-sinA, cosA, 0],
                                 [0, 0, 1]
                                 ])

        rotate = np.dot(center_array, rotate_array)
        i_rotate = np.dot(rotate, i_center_array)
        # 逆时针旋转
        if model == 'rotate':
            new_min = np.dot(np.array([x, y, 1]), i_rotate)
            x_new = new_min[0]
            y_new = new_min[1]
            print(angle)

            if angle == 90 or angle == -270:
                x_min = x_new
                y_min = y_new - w_1
                x_max = x_new + h_1
                y_max = y_new
            elif angle == 180 or angle == -180:
                x_min = x_new - w_1
                y_min = y_new - h_1
                x_max = x_new
                y_max = y_new

            elif angle == 270 or angle == -90:
                x_min = x_new - h_1
                y_min = y_new
                x_max = x_new
                y_max = y_new + w_1

            for xmin in bndbox.iter('xmin'):
                xmin.text = str(int(x_min))
            for ymin in bndbox.iter('ymin'):
                ymin.text = str(int(y_min))
            for xmax in bndbox.iter('xmax'):
                xmax.text = str(int(x_max))
            for ymax in bndbox.iter('ymax'):
                ymax.text = str(int(y_max))

        # 镜像翻转
        elif model == 'flip':
            new_min = np.dot(np.array([x, y, 1]), center_array)
            x_new = new_min[0]
            y_new = new_min[1]
            # 水平翻转
            if angle == 0:
                x_min = -x_new - w_1
                y_min = y_new
                x_max = -x_new
                y_max = y_new - h_1
            # 垂直翻转
            elif angle == 1:
                x_min = x_new
                y_min = -y_new + h_1
                x_max = x_new + w_1
                y_max = -y_new
            # 先水平后垂直
            elif angle == -1:
                x_min = -x_new - w_1
                y_min = -y_new + h_1
                x_max = -x_new
                y_max = -y_new
            result_min = np.dot(np.array([x_min, y_min, 1]), i_center_array)
            result_max = np.dot(np.array([x_max, y_max, 1]), i_center_array)

            print(result_max,result_min)
            for xmin in bndbox.iter('xmin'):
                xmin.text = str(int(result_min[0]))
                print(str(int(result_min[0])))
            for ymin in bndbox.iter('ymin'):
                ymin.text = str(int(result_min[1]))
            for xmax in bndbox.iter('xmax'):
                xmax.text = str(int(result_max[0]))
            for ymax in bndbox.iter('ymax'):
                ymax.text = str(int(result_max[1]))
        else:
            print('Model Error!!')

    path = 'E:/Learn/dataset/Making_dataset/'  # 文件存储的路径
    name = os.path.basename(xml_file)
    file_name = name.split('.')[0]
    tree.write(path + file_name + str('_') + model + str('_') + str(angle) + '.xml')

def image_increase(image_path, model, angle):
    '''
    :param image_path:输入图像
    :param model:rotate:图像旋转,flip:图像翻转
    :param angle: 90,180,270,-90,-180,-270,0,1,-1
    :return:
    '''

    image = cv2.imread(image_path)
    angle_rotate = [90, 180, 270, -90, -180, -270]
    angle_flip = [0, 1, -1]

    height, width, channels = image.shape
    if model == 'rotate':
        angle_rotate = set(angle_rotate)
        if angle in angle_rotate:

            matRotate = cv2.getRotationMatrix2D((height * 0.5, width * 0.5), angle, 1)

            img = cv2.warpAffine(image, matRotate, (height, width))

    elif model == 'flip':
        angle_flip = set(angle_flip)
        if angle in angle_flip:

            img = cv2.flip(image, angle)

    else:
        img = image
        print('The angle number is error! Please input True-angle!')
    path = 'E:\Learn\dataset\Making_dataset/'  # 文件存储的路径
    name = os.path.basename(image_path)
    file_name = name.split('.')[0]

    cv2.imwrite(path + file_name + str('_') + model + str('_') + str(angle) + '.jpg', img)
if __name__ == '__main__':
    # 这里要保证图像增强和对应的xml标注文件对应,所以命名两个变量
    model = 'flip'
    angle = 0
    # 标注文件增强
    path_xml = r'xml文件路径'
    xml_files = [os.path.join(rootdir, file) for rootdir, _, files in os.walk(path_xml) for file in files if
                 (file.endswith('.xml'))]
    for pathed in xml_files:
        head = os.path.join(pathed)
        edit_xml(pathed, model, angle)
    # 图像增强
    path_image = r'图片路径'
    img_files = [os.path.join(rootdir, file) for rootdir, _, files in os.walk(path_image) for file in files if
                 (file.endswith('.jpg'))]
    for pathed in img_files:
        head = os.path.join(pathed)
        image_increase(head, model, angle)
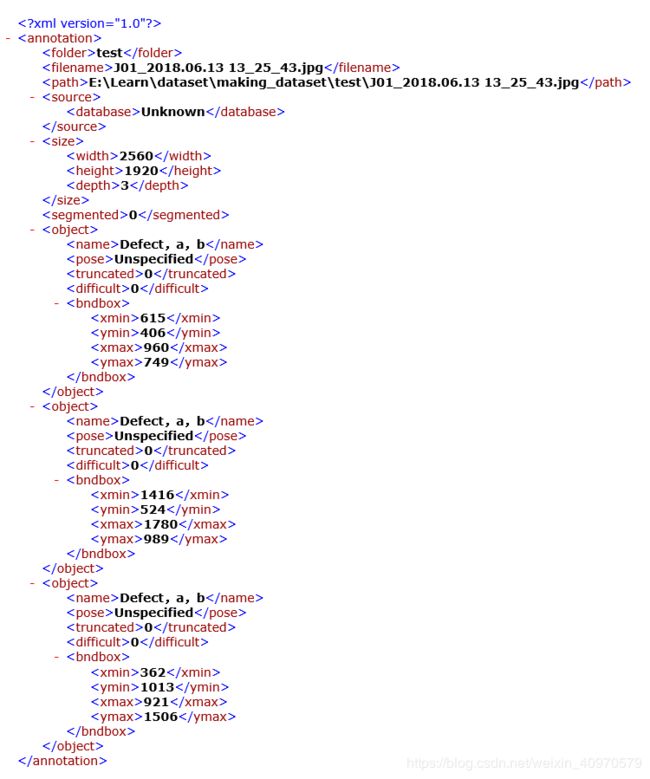
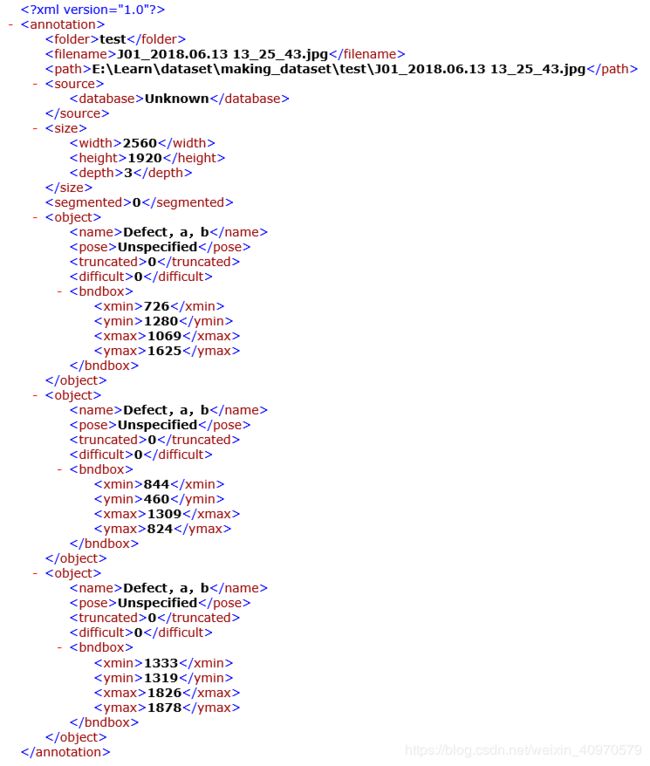
这样就可以实现单个标注和多个标注信息的增强了,下面看看多个标注信息增强后效果图。
先是原来的数据

然后是经过逆时针旋转90°后的数据
