Come on和我一起做基于深度学习的缺陷检测一(数据准备)
基于深度学习的织物疵点检测
- 数据集的制作
- 数据标注
- 数据增强(图像和xml文件同时增强)
这里有几句话要说:
- 这个项目会持续更新,由于要忙于毕业答辩和论文修改,更新时间不定;
- 由于本人研三,今年毕业要去工作,可能会出现拖更的现象;
- 我把以前Python-OpenCV的相关博客删除了,因为这个OPENCV更新太快,发现有的已经没啥作用了,以后的博客尽量用矩阵运算的形式来编写代码。
数据集的制作
这里数据集用的是我博客的数据集==>织物疵点数据集,选择这个数据集是因为以下两点原因:
- 很多人都问我能不能进行深度学习的训练,我想试试能不能;
- 网上现有的数据集关于缺陷检测的数据量都很少,我在下载了一部分开源的数据集,哪天我整理好,把链接发出来。
数据标注
首先要明白,缺陷检测是根据检测要求进行标注的,大致分为以下几种情况:
- 检测是否有缺陷,就像我们熟悉的猫狗识别,实际上是个二分类问题;
- 检测是否有缺陷,并分类,就像是手写数字识别,你要知道缺陷是啥就OK;
- 检测是否有缺陷,分类并定位。这就像是YoLo系列和FasterRcnn一样,你不光要知道是啥,还要告诉我它在哪。
这里呢,我准备一步到位,直接实现检测是否有缺陷,分类并定位。
数据集要实现分类定位,首先要做的就是数据的标注,这里的标注工具我用的是,精灵标注助手,下载戳 精灵标注助手,至于为啥不用LabelImg,就是个人喜好了。
由于我的数据集是包含粗条纹和方格布的,为了给增加电脑的信心,这里就不用这两个类型的了,把纯色的和复合色的布匹通过截图软件进行图像截取,这里我截取的是512x512大小,其中,对每张含有疵点的图像进行不同位置的截取,每张图像截取两张。费尽九牛二虎之力终于截完了所有的图像,一共得到了2728张图像。其中每类疵点包含的数据数量如下:
| 疵点类别 | 数目 | 命名 |
|---|---|---|
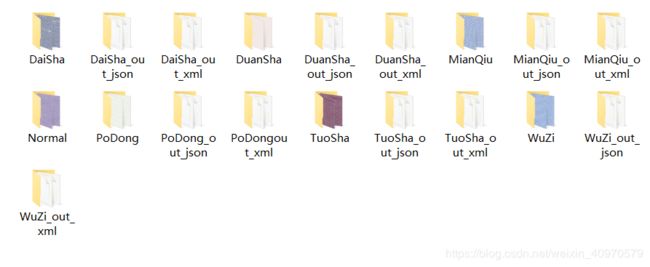
| 断纱 | 308 | DuanSha |
| 带纱 | 425 | DaiSha |
| 脱纱 | 668 | TuoSha |
| 破洞 | 112 | PoDong |
| 污渍 | 422 | WuZi |
| 棉球 | 184 | MianQiu |
| 正常 | 609 | Normal |
可以看出数据类别出现了不平衡的问题,不过这现在对我来说不重要。先是根据命名把截图改个名字,代码直接放上,(这个代码好像是在网上copy的,好久之前的就忘记了)
import os

class BatchRename():
    '''
    批量重命名文件夹中的图片文件
    '''
    def __init__(self):
        self.path = 'E:/Learn/dataset/Making_dataset/Normal'  # 表示需要命名处理的文件夹

    def rename(self):
        filelist = os.listdir(self.path)  # 获取文件路径
        total_num = len(filelist)  # 获取文件长度(个数)
        i = 1  # 表示文件的命名是从1开始的
        for item in filelist:
            if item.endswith('.png'):  # 初始的图片的格式为jpg格式的(或者源文件是png格式及其
                # 他格式,后面的转换格式就可以调整为自己需要的格式即可)
                src = os.path.join(os.path.abspath(self.path), item)
                dst = os.path.join(os.path.abspath(self.path), 'Normal_0' + str(i) + '.jpg')  # 处理后的格式也为jpg格式的,当然这里可以改成png格式
                # dst = os.path.join(os.path.abspath(self.path), '0000' + format(str(i), '0>3s') + '.jpg')    这种情况下的命名格式为0000000.jpg形式,可以自主定义想要的格式
                try:
                    os.rename(src, dst)
                    print('converting %s to %s ...' % (src, dst))
                    i = i + 1
                except:
                    continue
        print('total %d to rename & converted %d jpgs' % (total_num, i))

if __name__ == '__main__':
    demo = BatchRename()
    demo.rename()
这里我把它定义为 image_rename.py 文件
接下来使用精灵标注助手进行标注了,再次费尽九牛二虎之力后,完成了数据的标注。
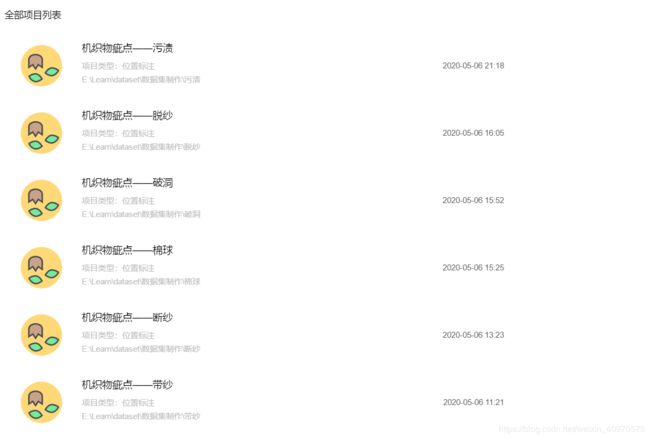
这里我导出两种格式,方便后续使用,分别是 .xml 和 .json格式。整完就是这样了。
数据增强(图像和xml文件同时增强)
图像数据增强的方式有很多比如图像的翻转、缩放、旋转、直方图均衡化等等,由于疵点检测不适合用颜色变换来增强图像,同时为确保增强后的图像大小依然为512x512大小的图像,所以我这里使用图像的翻转、旋转来增加数据量。这里我简单的写了个代码,我叫它image_increase.py
import numpy as np
import cv2
import math


# 图像缩放
def image_resize(image,model_type,xita_x,xita_y):
    '''
    :param image:
    :param model_type: 0:固定尺寸裁剪; model_type: 1:系数缩放;
    :param xita_x:
    :param xita_y:
    :return:
    '''
    if model_type == 0:
        image_resize_1 = cv2.resize(image, (xita_x, xita_y))
    elif model_type == 1:
        image_resize_1 = cv2.resize(image,(0,0),fx=xita_x,fy=xita_y,interpolation=cv2.INTER_NEAREST)
    else:
        print('param error')
        image_resize_1 = image
    return image_resize_1


def img_rotate(image, angle):

    h, w, channels = image.shape
    # 图像长h=600,宽w=554
    anglePi = angle * math.pi / 180.0
    cosA = math.cos(anglePi)
    sinA = math.sin(anglePi)
    tanA = math.tan(anglePi)
    img_r = np.zeros((h,w, channels), dtype=np.uint8)
    center_array = np.array([[1,0,0],
                             [0,-1,0],
                             [-0.5*w,0.5*h,1]
                             ])
    i_center_array= np.array([[1,0,0],
                             [0,-1,0],
                             [0.5*w,0.5*h,1]
                             ])
    rotate_array = np.array([[cosA,-sinA,0],
                             [sinA,cosA,0],
                             [0,0,1]
                             ])
    rotate = np.dot(center_array, rotate_array)
    i_rotate = np.dot(rotate, i_center_array)

    for i in range(0, w):
        for j in range(0, h):
            # x = int(cosA*i-sinA*j-0.5*w*cosA+0.5*h*sinA+0.5*w)
            # y = int(sinA*i+cosA*j-0.5*w*sinA-0.5*h*cosA+0.5*h)
            new = np.dot(np.array([i,j,1]),i_rotate)

            x = int(new[0])
            y = int(new[1])

            if x >= 0 and x < w and y >= 0 and y < h:
                img_r[j, i] = image[y, x]

    # ------------------------------------------------------------------
    # 逆时针坐标变换
    i_rotate_array = np.array([[cosA,sinA,0],
                             [-sinA,cosA,0],
                             [0,0,1]
                             ])
    rotate_i = np.dot(center_array, i_rotate_array)
    # 直线A'B':y = tanA*x + h/(2*cosA)
    # 直线B'C':y = -1/tanA*x + w/(2*sinA)
    # 直线C'D':y = tanA*x - h/(2*cosA)
    # 直线D'A':y = -1/tanA*x - w/(2*sinA)
    # 直线B'C'与 AB 交点
    x_BC_AB = int(-(h/2-w/(2*sinA))*tanA) ; y_BC_AB = h//2
    # 直线B'C'与 BC交点
    x_BC_BC = w//2;y_BC_BC = int(-w/(2*tanA)+w/(2*sinA))

    BC_AB = np.dot(np.array([x_BC_AB, y_BC_AB, 1]), i_center_array)
    BC_BC = np.dot(np.array([x_BC_BC, y_BC_BC, 1]), i_center_array)

    img_AB = img_r[0:int(BC_BC[1]), int(BC_AB[0]):w]
    img_AB_1 = np.rot90(img_AB)
    img_AB_2 = np.rot90(img_AB_1)
    img_AB_3 = img_AB + img_AB_2
    img_r[0:int(BC_BC[1]), int(BC_AB[0]):w] = img_AB_3

    # 直线C'D'与 CD 交点
    x_CD_CD = int((-h/2+h/(2*cosA))/tanA) ; y_CD_CD = -h//2
    # 直线C'D'与 BC 交点
    x_CD_BC = w//2;y_CD_BC = int(w/2*tanA-h/(2*cosA))

    CD_CD = np.dot(np.array([x_CD_CD, y_CD_CD, 1]), i_center_array)
    CD_BC = np.dot(np.array([x_CD_BC, y_CD_BC, 1]), i_center_array)
    img_CD = img_r[int(CD_BC[1]):h, int(CD_CD[0]):w]
    img_CD_1 = np.rot90(img_CD)
    img_CD_2 = np.rot90(img_CD_1)
    img_CD_3 = img_CD + img_CD_2
    img_r[int(CD_BC[1]):h, int(CD_CD[0]):w] = img_CD_3


    # 直线D'A'与 CD 交点
    x_DA_CD = int((h / 2 - w / (2 * sinA)) * tanA); y_DA_CD = -h // 2
    # 直线D'A'与 AD 交点
    x_DA_AD = -w // 2; y_DA_AD = int(w / (2 * tanA) - w / (2 * sinA))

    DA_CD = np.dot(np.array([x_DA_CD, y_DA_CD, 1]), i_center_array)
    DA_AD = np.dot(np.array([x_DA_AD, y_DA_AD, 1]), i_center_array)
    print(DA_CD, DA_AD)
    img_DA = img_r[int(DA_AD[1]):h, 0:int(DA_CD[0])]
    img_DA_1 = np.rot90(img_DA)
    img_DA_2 = np.rot90(img_DA_1)
    img_DA_3 = img_DA + img_DA_2
    img_r[int(DA_AD[1]):h, 0:int(DA_CD[0])] = img_DA_3

    # 直线A'B'与 AB 交点
    x_AB_AB = int((h / 2 - h / (2 * cosA)) / tanA); y_AB_AB = h // 2
    # 直线A'B'与 AD 交点
    x_AB_AD = -w // 2; y_AB_AD = int(-w / 2 * tanA + h / (2 * cosA))

    AB_AB = np.dot(np.array([x_AB_AB, y_AB_AB, 1]), i_center_array)
    AB_AD = np.dot(np.array([x_AB_AD, y_AB_AD, 1]), i_center_array)
    print(AB_AB, AB_AD)
    img_AB = img_r[0:int(AB_AD[1]), 0:int(AB_AB[0])]
    img_AB_1 = np.rot90(img_AB)
    img_AB_2 = np.rot90(img_AB_1)
    img_AB_3 = img_AB + img_AB_2
    img_r[0:int(AB_AD[1]), 0:int(AB_AB[0])] = img_AB_3

    return img_r

def image_flip(image, thea):
    '''
    :param image: 输入图像
    :param thea: thea:1=水平翻转;thea:0=垂直翻转;thea:-1=镜像翻转;
    :return: img
    '''
    if thea == 0:
        # 水平翻转
        img = cv2.flip(image, thea)
    elif thea == 1:
        # 垂直翻转
        img = cv2.flip(image, thea)
    elif thea == -1:
        # 垂直翻转
        img = cv2.flip(image, thea)
    else:
        img = image
        print('thea error!')
    return img
这里图像旋转部分是根据我的一篇博客‘图像任你转,黑边不再现’该的,这个方法对于旋转非直角的角度还是会出现边缘化的现象,但是对于直角角度的旋转并没有什么影响。
如果你这么做,你应该先增强数据,然后在标注。但是作为一名懒惰的研究生,肯定不做这么复杂的事情。
逆向思维,我们数据增强后也是要得到.xml格式的文件,但是根据你图像增强的方式,xml中坐标值也是有规律的。本着这个想法,先看看xml文件中都有啥。
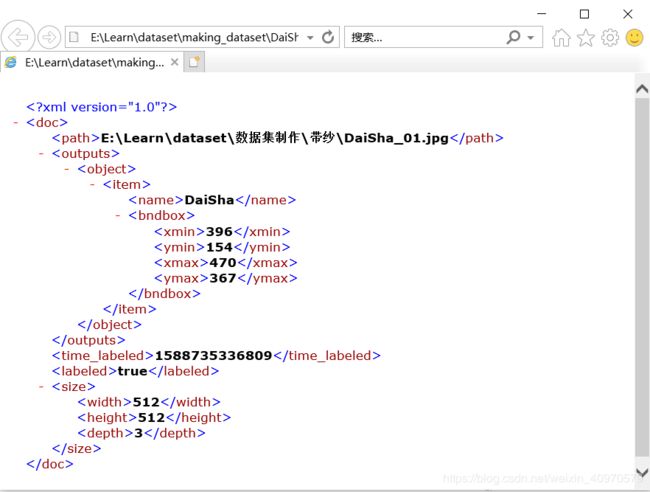
就是这个东西了,想修改这个东西,得先弄清楚这个玩意用Python怎么写,在网上找找资料,自己整了个Pytho_create_xml.py文件,
# -*- coding: utf-8 -*-
from lxml import etree
import numpy as np
import xml.etree.ElementTree as ET
import math
import os
# 创建 xml格式 文件
def creat_xml(xml_file, x, y, w, h):
    """
    新建xml文件
    :param xml_file: xml
    :param x: xmin
    :param y: ymin
    :param w: 宽
    :param h: 高
    :return:
    """
    doc = etree.Element("doc")  # 创建根节点 doc
    path = etree.SubElement(doc, "path")
    path.text = "E:\Learn\dataset\数据集制作\带纱\DaiSha_01.jpg"  # 为节点 path 添加描述信息

    outputs = etree.SubElement(doc, "outputs")  # 创建 doc 节点的子节点 outputs
    object = etree.SubElement(outputs, "object")  # 创建 outputs节点的子节点 object
    item = etree.SubElement(object, "item")  # 创建 object 节点的子节点 item
    name = etree.SubElement(item, "name") # 创建 item 节点的子节点 name
    name.text = "DaiSha"
    bndbox = etree.SubElement(item, "bndbox")
    xmin = etree.SubElement(bndbox, "xmin")
    xmin.text = str(x)
    ymin = etree.SubElement(bndbox, "ymin")
    ymin.text = str(y)
    xmax = etree.SubElement(bndbox, "xmax")
    xmax.text = str(x + w)
    ymax = etree.SubElement(bndbox, "ymax")
    ymax.text = str(y + h)
    time_labeled = etree.SubElement(doc, 'time_labelde')
    time_labeled.text = '1588735336809'
    label = etree.SubElement(doc, 'label')
    label.text = 'true'
    size = etree.SubElement(doc, 'size')
    width = etree.SubElement(size, 'width')
    width.text = '512'
    height = etree.SubElement(size, 'height')
    height.text = '512'
    depth = etree.SubElement(size, 'depth')
    depth.text = '3'
    tree = etree.ElementTree(doc)
    tree.write(xml_file, pretty_print=True, xml_declaration=False, encoding='utf-8')
    return xml_file

xx = creat_xml('ss.xml', 32, 120, 80, 80)
用这个写完,生成的文件就和那个图片内容一样了。 既然知道怎么写了,那怎么改也就不难了,经过我的‘苦心专研’,整出来了 image_xml_increase.py。先说说这个文件的功能,同时对图像和标注文件进行增强,增强方式包括:顺时针旋转90°,180°,270°,逆时针旋转-90°,-180°,-270°;图像水平翻转、垂直翻转、镜像翻转。并且得到对应的标注xml文件。
# -*- coding: utf-8 -*-
# 作者:大大玮在路上
# 图像和对应的xml文件扩充
import numpy as np
import xml.etree.ElementTree as ET
import math
import os
from tqdm import tqdm
import cv2

# 编辑 xml 格式文件
def edit_xml(xml_file, model, angle):
    '''
        修改xml文件,对于数据标注来说,我们改的格式主要就是以下两点:
    1. name
    2. bndbox
    因此,封好的函数主要也是围绕这两个变化而实现的功能
    1. 图像标注完成后,经图像旋转、翻转后的新的xml文件的生成.
    这里我是做缺陷检测的,所以说缩放、增强对比度、直方图均衡化之类的对我没啥用,我就不写了
    :param xml_file:xml文件的路径
    :
    :return:
    :param xml_file: 文件的路径
    :param model: 图像变换模式,rotate:图像旋转,angle可以为90,180,270,-90,-180,-270
                               flip:图像翻转,angle可以为0:水平翻转;1:垂直翻转;-1:先水平后垂直翻转
    :param angle:
    :return:
    '''
    global x, y, x_w, y_h, w_total, h_total
    tree = ET.parse(xml_file)  # 读取 xml 文件
    tree.getroot()
    for size in tree.iter('size'):
        for w in size.iter('width'):
            w_total = int(w.text)
        for h in size.iter('height'):
            h_total = int(h.text)

    for bndbox in tree.iter('bndbox'):
        for xmin in bndbox.iter('xmin'):
            x = int(xmin.text)
        for ymin in bndbox.iter('ymin'):
            y = int(ymin.text)
        for xmax in bndbox.iter('xmax'):
            x_w = int(xmax.text)
        for ymax in bndbox.iter('ymax'):
            y_h = int(ymax.text)

    w_1 = x_w - x
    h_1 = y_h - y
    anglePi = angle * math.pi / 180.0
    cosA = math.cos(anglePi)
    sinA = math.sin(anglePi)
    print( x, y, x_w, y_h, w_total, h_total)
    center_array = np.array([[1, 0, 0],
                             [0, -1, 0],
                             [-0.5 * w_total, 0.5 * h_total, 1]
                             ])
    i_center_array = np.array([[1, 0, 0],
                               [0, -1, 0],
                               [0.5 * w_total, 0.5 * h_total, 1]
                               ])
    rotate_array = np.array([[cosA, sinA, 0],
                             [-sinA, cosA, 0],
                             [0, 0, 1]
                             ])

    rotate = np.dot(center_array, rotate_array)
    i_rotate = np.dot(rotate, i_center_array)
    # 逆时针旋转
    if model == 'rotate':
        new_min = np.dot(np.array([x, y, 1]), i_rotate)
        x_new = new_min[0]
        y_new = new_min[1]
        print(angle)

        if angle == 90 or angle == -270:
            x_min = x_new
            y_min = y_new - w_1
            x_max = x_new + h_1
            y_max = y_new
        elif angle == 180 or angle == -180:
            x_min = x_new - w_1
            y_min = y_new - h_1
            x_max = x_new
            y_max = y_new

        elif angle == 270 or angle == -90:
            x_min = x_new - h_1
            y_min = y_new
            x_max = x_new
            y_max = y_new + w_1

        for bndbox in tree.iter('bndbox'):
            for xmin in bndbox.iter('xmin'):
                xmin.text = str(int(x_min))
            for ymin in bndbox.iter('ymin'):
                ymin.text = str(int(y_min))
            for xmax in bndbox.iter('xmax'):
                xmax.text = str(int(x_max))
            for ymax in bndbox.iter('ymax'):
                ymax.text = str(int(y_max))

    # 镜像翻转
    elif model == 'flip':
        new_min = np.dot(np.array([x, y, 1]), center_array)
        x_new = new_min[0]
        y_new = new_min[1]
        # 水平翻转
        if angle == 0:
            x_min = -x_new - w_1
            y_min = y_new
            x_max = -x_new
            y_max = y_new - h_1
        # 垂直翻转
        elif angle == 1:
            x_min = x_new
            y_min = -y_new + h_1
            x_max = x_new + w_1
            y_max = -y_new
        # 先水平后垂直
        elif angle == -1:
            x_min = -x_new - w_1
            y_min = -y_new + h_1
            x_max = -x_new
            y_max = -y_new
        result_min = np.dot(np.array([x_min, y_min, 1]), i_center_array)
        result_max = np.dot(np.array([x_max, y_max, 1]), i_center_array)

        print(result_max,result_min)
        for bndbox in tree.iter('bndbox'):
            for xmin in bndbox.iter('xmin'):
                xmin.text = str(int(result_min[0]))
                print(str(int(result_min[0])))
            for ymin in bndbox.iter('ymin'):
                ymin.text = str(int(result_min[1]))
            for xmax in bndbox.iter('xmax'):
                xmax.text = str(int(result_max[0]))
            for ymax in bndbox.iter('ymax'):
                ymax.text = str(int(result_max[1]))
    else:
        print('Model Error!!')
    path = 'E:/Learn/dataset/Making_dataset/'  # 文件存储的路径
    name = os.path.basename(xml_file)
    file_name = name.split('.')[0]
    tree.write(path + file_name + str('_') + model + str('_') + str(angle) + '.xml')

def image_increase(image_path, model, angle):
    '''

    :param image_path:输入图像
    :param model:rotate:图像旋转,flip:图像翻转
    :param angle: 90,180,270,-90,-180,-270,0,1,-1
    :return:
    '''

    image = cv2.imread(image_path)

    angle_rotate = [90, 180, 270, -90, -180, -270]
    angle_flip = [0, 1, -1]

    height, width, channels = image.shape
    if model == 'rotate':
        angle_rotate = set(angle_rotate)
        if angle in angle_rotate:

            matRotate = cv2.getRotationMatrix2D((height * 0.5, width * 0.5), angle, 1)

            img = cv2.warpAffine(image, matRotate, (height, width))

    elif model == 'flip':
        angle_flip = set(angle_flip)
        if angle in angle_flip:

            img = cv2.flip(image, angle)

    else:
        img = image
        print('The angle number is error! Please input True-angle!')
    path = 'E:\Learn\dataset\Making_dataset/'  # 文件存储的路径
    name = os.path.basename(image_path)
    file_name = name.split('.')[0]

    cv2.imwrite(path + file_name + str('_') + model + str('_') + str(angle) + '.jpg', img)
if __name__ == '__main__':
    # 这里要保证图像增强和对应的xml标注文件对应,所以命名两个变量
    model = 'flip'
    angle = -1
    # 标注文件增强
    path_xml = r'E:\Learn\dataset\making_dataset\DaiSha_out_xml/'
    xml_files = [os.path.join(rootdir, file) for rootdir, _, files in os.walk(path_xml) for file in files if
                 (file.endswith('.xml'))]
    for pathed in xml_files:
        head = os.path.join(pathed)
        edit_xml(pathed, model, angle)
    # 图像增强
    path_image = r'E:/Learn/dataset/Making_dataset/DaiSha/'
    img_files = [os.path.join(rootdir, file) for rootdir, _, files in os.walk(path_image) for file in files if
                 (file.endswith('.jpg'))]
    for pathed in img_files:
        head = os.path.join(pathed)
        image_increase(head, model, angle)
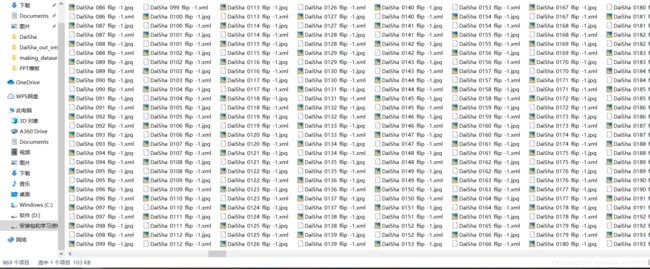
需要注意的是,为了区分数据增强后数据和原始数据,这里命名方式后面添加了增强方式,例如,原文件DaiSha_01.jpg,经过镜像翻转后的名字为DaiSha_01_flip_-1.jpg
我以水平翻转为例,这里就得到了增强后的jpg和xml文件,运行一下上面的代码,看下图,兴奋一下。
再来看看直观的对比图
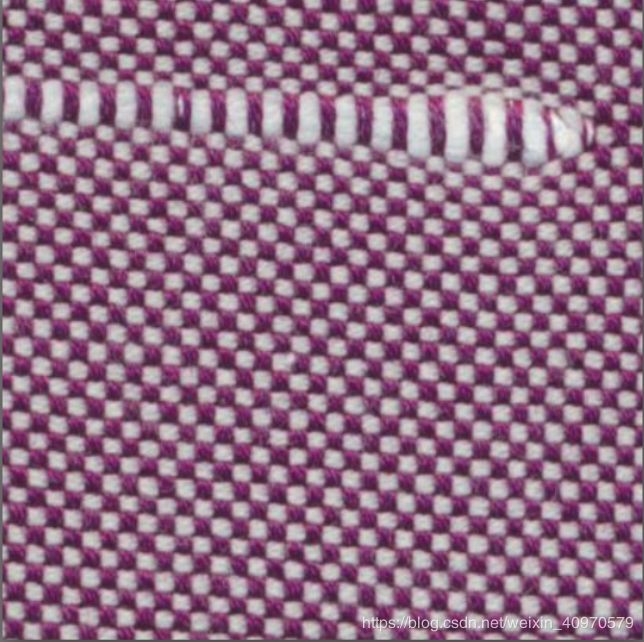
原图

翻转后的图像,再来看看xml文件的变化

这是原来的,

这是镜像翻转之后的。有的细心的小伙伴可能看到,文件路径没换啊,其实这个路径不是很重要,想换的,稍微改一下就可以了。
想一想,这一顿操作下来,数据可以扩充六倍啊。至于多少有效的数据我就不知道了,这个后期做完我再慢慢验证。
还有一点,有的小伙伴可能认为这个弄成灰度图不是更好吗,其实我也是这么认为的,我先拿三通道的图像试试,如果想直接用灰度图的话,把图像通过函数一变,xml文件中的赋值改为1就可以了。
以上就是数据集制作的全部内容了,喜欢的小伙伴点个赞啥的,要不总感觉自己在自言自语,哈哈哈。
下一个博客的名字就叫做数据的转换和读取。
未完待续。。。。。