Redis Cluster集群搭建
目录
一、Redis集群安装环境与版本介绍
二、Redis集群搭建过程
1、安装依赖包
2、安装RVM
3、RubyGems 镜像
4-1、安装Ruby
4-2、安装ruby(可选方法)
5、Redis安装及集群搭建
6、集群验证
三、Redis Cluster集群操作
一、Redis集群安装环境与版本介绍
用两台服务器模拟6个节点,一台机器3个节点,创建出3 master、3 salve环境。
redis 采用 redis-4.0.10 版本。
两台Linux服务器都是 CentOS ,一台 CentOS7(IP:10.20.5.72),一台 CentOS7(IP:10.20.5.74)。
二、Redis集群搭建过程
1、安装依赖包
# yum -y install gcc gcc-c++ make libtool zlib zlib-devel pcre pcre-devel wget unzip bzip2 bzip2-devel openssl openssl-devel tcl tk ntp vim lrzsz rsync
2、安装RVM
Yum 安装 ruby 最高只能安装到 2.0.0 的版本,redis cluster 群集需要的 ruby 版本最低是 2.2.2 或者更高,所以使用 rvm 安装 ruby 可安装到 2.3.3 ,甚至更高的版本。
CentOS7 yum库中ruby的版本支持到 2.0.0,可gem 安装redis需要最低是2.2.2,否则会报错:(redis requires Ruby version >= 2.2.2)
# gpg2 --keyserver hkp://keys.gnupg.net --recv-keys D39DC0E3
下载RVM,目前版本rvm-1.29.3.tgz
# curl -L get.rvm.io | bash -s stable
查看rvm路径
# find / -name rvm -print
# source /usr/local/rvm/scripts/rvm
查看RVM库中已知的ruby版本
# rvm list known
检查安装情况
# rvm requirements run
| 将显示: Checking requirements for centos. Requirements installation successful. |
3、RubyGems 镜像
(先执行4-1,然后再执行以下操作)
# yum -y install rubygems
# gem update --system
默认为亚马逊的源,连接不稳定,所以经常安装失败,修改为中国的源。
# gem sources --add https://gems.ruby-china.org/ --remove https://rubygems.org/
| https://gems.ruby-china.org/ added to sources https://rubygems.org/removed from sources |
# gem sources -l
| *** CURRENT SOURCES ***
https://gems.ruby-china.org/ # 请确保只有 gems.ruby-china.org |
# gem install rails
修改 RVM ,改用本站作为下载源, 提高安装速度。
# sed -i -E 's!https?://cache.ruby-lang.org/pub/ruby!https://ruby.taobao.org/mirrors/ruby!' $rvm_path/config/db
如果使用 Gemfile 和 Bundle (例如:Rails 项目),可以用 Bundler 的 Gem 源代码镜像命令。
# bundle config mirror.https://rubygems.org https://gems.ruby-china.org
4-1、安装Ruby
4-1.1卸载ruby
# yum remove ruby
4-1.2 下载、解压
# cd /data/soft/
# tar -jxvf ruby-2.5.1.tar.bz2
4-1.3 创建安装目录
# mkdir -p /usr/local/ruby
4-1.4 配置并定制安装目录
# cd ruby-2.5.1/
# ./configure --prefix=/usr/local/ruby
4-1.5 编译与安装
# make && make install
4-1.6 建立软连接
# ln -s /usr/local/ruby/bin/ruby /usr/local/bin/ruby
4-1.7 查看ruby版本
# ruby -v
ruby 2.5.1p57 (2018-03-29 revision 63029) [x86_64-linux]
4-1.8ruby的redis驱动
# yum -y install ruby-devel rpm-build
# gem install redis
| Fetching: redis-4.0.1.gem (100%) ERROR: Error installing redis: The last version of redis (>= 0) to support your Ruby & RubyGems was 3.3.5. Try installing it with `gem install redis -v 3.3.5` redis requires Ruby version >= 2.2.2. The current ruby version is . |
# rvm use 2.5.1 --default
# gem install redis
| Successfully installed redis-4.0.1 Parsing documentation for redis-4.0.1 Done installing documentation for redis after 0 seconds 1 gem installed |
4-2、安装ruby(可选方法)
# rvm install 2.5.1
可能会报错:
| Searching for binary rubies, this might take some time. No binary rubies available for: centos/7/x86_64/ruby-2.5.1. Continuing with compilation. Please read 'rvm help mount' to get more information on binary rubies. Checking requirements for centos. Requirements installation successful. Installing Ruby from source to: /usr/local/rvm/rubies/ruby-2.5.1, this may take a while depending on your cpu(s)... ruby-2.5.1 - #downloading ruby-2.5.1, this may take a while depending on your connection... % Total % Received % Xferd Average Speed Time Time Time Current Dload Upload Total Spent Left Speed 0 0 0 0 0 0 0 0 --:--:-- --:--:-- --:--:-- 0 0 0 0 0 0 0 0 0 --:--:-- 0:00:01 --:--:-- 0curl: (35) Peer reports incompatible or unsupported protocol version. There was an error(35). Checking fallback: https://ftp.ruby-lang.org/pub/ruby/2.5/ruby-2.5.1.tar.bz2 No fallback URL could be found, try increasing timeout with:
echo "export rvm_max_time_flag=20" >> ~/.rvmrc
There has been an error fetching the ruby interpreter. Halting the installation. |
手动下载好https://ftp.ruby-lang.org/pub/ruby/2.5/ruby-2.5.1.tar.bz2好后放到/usr/local/rvm/archives目录下
然后执行
# rvm install 2.5.1
| 安装完成,但是会有如下信息: Searching for binary rubies, this might take some time. No binary rubies available for: centos/7/x86_64/ruby-2.5.1. Continuing with compilation. Please read 'rvm help mount' to get more information on binary rubies. Checking requirements for centos. Requirements installation successful. Installing Ruby from source to: /usr/local/rvm/rubies/ruby-2.5.1, this may take a while depending on your cpu(s)... ruby-2.5.1 - #downloading ruby-2.5.1, this may take a while depending on your connection... ruby-2.5.1 - #extracting ruby-2.5.1 to /usr/local/rvm/src/ruby-2.5.1..... ruby-2.5.1 - #configuring................................................................... ruby-2.5.1 - #post-configuration.. ruby-2.5.1 - #compiling.................................................................................... ruby-2.5.1 - #installing.............................. ruby-2.5.1 - #making binaries executable.. curl: (35) Peer reports incompatible or unsupported protocol version. There was an error while trying to resolve rubygems version for 'latest'. Halting the installation. |
其实已经安装成功,如果再吃执行rvm install 2.5.1就会有以下信息
| Already installed ruby-2.5.1. To reinstall use:
rvm reinstall ruby-2.5.1 |
4-2.2 选择一个 ruby 版本使用
# rvm use 2.5.1
4-2.3 设置 ruby 默认版本
# rvm use 2.5.1 --default
4-2.4 卸载已知版本
# rvm remove 2.x.x
4-2.5 查看 ruby 版本
# ruby --version
5、Redis安装及集群搭建
5.1 下载、解压、编译
* 首先在 10.20.5.74机器上 /data 目录下创建 redis_cluster 目录:
# cd /data
# mkdir redis_cluster
# cd /data/soft
# wget http://download.redis.io/releases/redis-4.0.10.tar.gz
#tar xzf redis-4.0.10.tar.gz-C /data/redis_cluster/
#cd /data/redis_cluster/redis-4.0.10
#make
现在编译的二进制文件在src 目录中可用 。
# make test
5.2将 redis-trib.rb 复制到 /usr/local/bin 目录下
redis-trib.rb是官方提供 的创建集群的工具,默认在src文件夹下。
# cd /data/redis_cluster/redis-4.0.10/src/
# cp redis-trib.rb /usr/local/bin/
5.3 在 redis_cluster 目录下,创建名为redis_7001、redis_7002、redis_7003的目录,并将 redis.conf 拷贝到这三个目录中
# cd /data/redis_cluster
# mkdir -p redis_7001/confredis_7002/confredis_7003/conf
# cd redis-4.0.10/
# cp redis.conf /data/redis_cluster/redis_7001/conf
# cp redis.conf /data/redis_cluster/redis_7002/conf
# cp redis.conf /data/redis_cluster/redis_7003/conf
5.4分别修改配置文件,修改如下内容(同机器必须不同端口号,不同机器可同端口号,参考配置文件缓存型Redis Cluster之redis.conf):
| port 7001 //端口7001,7002,7003 protected-mode no //在redis3.2之后,redis增加了protected-mode,在这个模式下,即使注释掉了bind 127.0.0.1,再访问redisd时候还是报错,解决方法设置为no。 # bind 本机ip //默认ip为127.0.0.1 需要改为其他节点机器可访问的ip 否则创建集群时无法访问对应的端口,无法创建集群。 daemonize yes //redis后台运行 pidfile /data/redis_cluster/redis_7001/var/redis_7001.pid //pidfile文件对应7001,7002,7003 cluster-enabled yes //开启集群 把注释#去掉 cluster-config-file /data/redis_cluster/redis_7001/conf/nodes-7001.conf //集群的配置 配置文件首次启动自动生成 7001,7002,7002 cluster-node-timeout 15000 //请求超时 默认15秒,可自行设置 appendonly yes //aof日志开启 有需要就开启,它会每次写操作都记录一条日志 |
再分别在redis_7001、redis_7002、redis_7003下创建相关目录:
# mkdir data log var
5.5接着在另外一台机器上(10.20.5.72),的操作重复以上四步,只是把目录改为7003、7004、7005,对应的配置文件也按照这个规则修改即可
5.6 启动各个节点
第一台机器(10.20.5.74)上执行:
# redis-server redis_7001/conf/redis.conf
# redis-server redis_7002/conf/redis.conf
# redis-server redis_7003/conf/redis.conf
第一台机器(10.20.5.72)上执行:
# redis-server redis_7004/conf/redis.conf
# redis-server redis_7005/conf/redis.conf
# redis-server redis_7006/conf/redis.conf
5.7 检查Redis启动情况
# ps -ef | grep redis(10.20.5.74)
root 26486 1 0 12:05 ? 00:00:00 redis-server *:7003 [cluster]
root 26492 1 0 12:05 ? 00:00:00 redis-server *:7002 [cluster]
root 26498 1 0 12:05 ? 00:00:00 redis-server *:7001 [cluster]
# ps -ef | grep redis(10.20.5.72)
root 4099 1 0 12:08 ? 00:00:00 redis-server *:7004 [cluster]
root 4104 1 0 12:08 ? 00:00:00 redis-server *:7005 [cluster]
root 4109 1 0 12:08 ? 00:00:00 redis-server *:7006 [cluster]
5.8 创建集群
Redis 官方提供了 redis-trib.rb 这个工具,就在解压目录的 src 目录中,4.2中已将它复制到 /usr/local/bin 目录中,可以直接在命令行中使用了。使用下面这个命令即可完成安装。
--replicas 1 表示希望为集群中每个主节点创建一个从节点。
# redis-trib.rb create --replicas 1 10.20.5.74:7001 10.20.5.74:7002 10.20.5.74:7003 10.20.5.72:7004 10.20.5.72:7005 10.20.5.72:7006
| >>> Creating cluster [ERR] Sorry, can't connect to node 10.20.5.74:7001
在redis3.2之后,redis增加了protected-mode,在这个模式下,即使注释掉了bind 127.0.0.1,再访问redisd时候还是报错 解决办法:protected-mode no |
# redis-trib.rb create --replicas 1 10.20.5.74:7001 10.20.5.74:7002 10.20.5.74:7003 10.20.5.72:7004 10.20.5.72:7005 10.20.5.72:7006
| >>> Creating cluster >>> Performing hash slots allocation on 6 nodes... Using 3 masters: 10.20.5.74:7001 10.20.5.72:7004 10.20.5.74:7002 Adding replica 10.20.5.72:7006 to 10.20.5.74:7001 Adding replica 10.20.5.74:7003 to 10.20.5.72:7004 Adding replica 10.20.5.72:7005 to 10.20.5.74:7002 M: 2dbaa0effafda357f369c5c7001569592b066147 10.20.5.74:7001 slots:0-5460 (5461 slots) master M: 3f6a81ef50709eeae61f4fc366115a769f3e47d3 10.20.5.74:7002 slots:10923-16383 (5461 slots) master S: 4b1ec2411229a33c08961d9f3d467f6837abd74e 10.20.5.74:7003 replicates aa86858a0966df7d940d4270297da53ec2523edc M: aa86858a0966df7d940d4270297da53ec2523edc 10.20.5.72:7004 slots:5461-10922 (5462 slots) master S: ed6e8355f961ec417a8486caf768ce28e0c292fc 10.20.5.72:7005 replicates 3f6a81ef50709eeae61f4fc366115a769f3e47d3 S: 96aef14e8e552f97301a3e62a736f2c3741596dd 10.20.5.72:7006 replicates 2dbaa0effafda357f369c5c7001569592b066147 Can I set the above configuration? (type 'yes' to accept): yes >>> Nodes configuration updated >>> Assign a different config epoch to each node >>> Sending CLUSTER MEET messages to join the cluster Waiting for the cluster to join.. >>> Performing Cluster Check (using node 10.20.5.74:7001) M: 2dbaa0effafda357f369c5c7001569592b066147 10.20.5.74:7001 slots:0-5460 (5461 slots) master 1 additional replica(s) S: 4b1ec2411229a33c08961d9f3d467f6837abd74e 10.20.5.74:7003 slots: (0 slots) slave replicates aa86858a0966df7d940d4270297da53ec2523edc M: 3f6a81ef50709eeae61f4fc366115a769f3e47d3 10.20.5.74:7002 slots:10923-16383 (5461 slots) master 1 additional replica(s) S: 96aef14e8e552f97301a3e62a736f2c3741596dd 10.20.5.72:7006 slots: (0 slots) slave replicates 2dbaa0effafda357f369c5c7001569592b066147 M: aa86858a0966df7d940d4270297da53ec2523edc 10.20.5.72:7004 slots:5461-10922 (5462 slots) master 1 additional replica(s) S: ed6e8355f961ec417a8486caf768ce28e0c292fc 10.20.5.72:7005 slots: (0 slots) slave replicates 3f6a81ef50709eeae61f4fc366115a769f3e47d3 [OK] All nodes agree about slots configuration. >>> Check for open slots... >>> Check slots coverage... [OK] All 16384 slots covered. |
6、集群验证
在第一台机器上连接集群的7002端口的节点,在另外一台连接7005节点,连接方式为 redis-cli -h 10.20.5.74-c -p 7002 ,加参数 -c 可连接到集群。
在7002上执行如下命令:
| # redis-cli -h 10.20.5.74 -c -p 7002 10.20.5.74:7002> set hello world -> Redirected to slot [866] located at 10.20.5.74:7001 OK 10.20.5.74:7001> keys * 1) "hello" 10.20.5.74:7001> |
在7005上查看,如下:
| # redis-cli -h 10.20.5.72 -c -p 7005 10.20.5.72:7005> get hello -> Redirected to slot [866] located at 10.20.5.74:7001 "world" 10.20.5.74:7001> |
说明集群运作正常。
再次简单说一下原理:
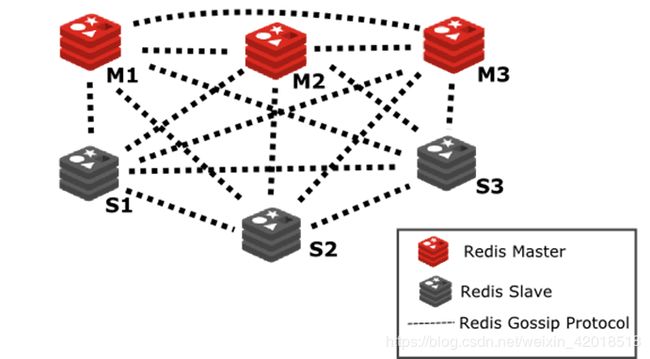
Redis Cluster在设计的时候,就考虑到了去中心化,去中间件,也就是说,集群中的每个节点都是平等的关系,都是对等的,每个节点都保存各自的数据和整个集群的状态。每个节点都和其他所有节点连接,而且这些连接保持活跃,这样就保证了我们只需要连接集群中的任意一个节点,就可以获取到其他节点的数据。
Redis 集群没有并使用传统的一致性哈希来分配数据,而是采用另外一种叫做哈希槽 (hash slot)的方式来分配的。redis cluster 默认分配了 16384 个slot,当我们set一个key时,会用CRC16算法来取模得到所属的slot,然后将这个key 分到哈希槽区间的节点上,具体算法就是:CRC16(key) % 16384。所以我们在测试的时候看到set 和 get 的时候,直接跳转到了7000端口的节点。
Redis 集群会把数据存在一个 master 节点,然后在这个 master 和其对应的salve 之间进行数据同步。当读取数据时,也根据一致性哈希算法到对应的 master 节点获取数据。只有当一个master 挂掉之后,才会启动一个对应的 salve 节点,充当 master 。
需要注意的是:必须要3个或以上的主节点,否则在创建集群时会失败,并且当存活的主节点数小于总节点数的一半时,整个集群就无法提供服务了。
cluster info 查询集群状态信息:
| 10.20.5.74:7001> cluster info cluster_state:ok cluster_slots_assigned:16384 cluster_slots_ok:16384 cluster_slots_pfail:0 cluster_slots_fail:0 cluster_known_nodes:6 cluster_size:3 cluster_current_epoch:6 cluster_my_epoch:1 cluster_stats_messages_ping_sent:690 cluster_stats_messages_pong_sent:681 cluster_stats_messages_sent:1371 cluster_stats_messages_ping_received:676 cluster_stats_messages_pong_received:690 cluster_stats_messages_meet_received:5 cluster_stats_messages_received:1371 |
查看结点信息:
| 10.20.5.74:7001> cluster nodes 4b1ec2411229a33c08961d9f3d467f6837abd74e10.20.5.74:7003@17003 slaveaa86858a0966df7d940d4270297da53ec2523edc 0 1533204411000 4 connected 3f6a81ef50709eeae61f4fc366115a769f3e47d310.20.5.74:7002@17002 master - 0 1533204408000 2 connected 10923-16383 96aef14e8e552f97301a3e62a736f2c3741596dd10.20.5.72:7006@17006 slave2dbaa0effafda357f369c5c7001569592b066147 0 1533204409000 6 connected 2dbaa0effafda357f369c5c7001569592b06614710.20.5.74:7001@17001 master - 0 1533204407000 1 connected 0-5460 aa86858a0966df7d940d4270297da53ec2523edc10.20.5.72:7004@17004 master - 0 1533204410395 4 connected 5461-10922 ed6e8355f961ec417a8486caf768ce28e0c292fc10.20.5.72:7005@17005 slave3f6a81ef50709eeae61f4fc366115a769f3e47d3 0 1533204411397 5 connected |
三、Redis Cluster集群操作