虚拟机 ubuntu 16 安装caffe CPU版本 安装open pose
虚拟机
- ubuntu 16.14
- open CV 3.3.0
- caffe CPU
- openpose
https://github.com/CMU-Perceptual-Computing-Lab/openpose
不需要装显卡驱动和cuda cudnn
安装 Caffe
-
安装各种依赖包
sudo apt-get install -y --no-install-recommends libboost-all-dev sudo apt-get install -y --no-install-recommends libprotobuf-dev libleveldb-dev libsnappy-dev libopencv-dev libboost-all-dev libhdf5-serial-dev libgflags-dev libgoogle-glog-dev liblmdb-dev protobuf-compiler libopenblas-dev libatlas-base-dev -
下载caffe
git clone https://github.com/BVLC/caffe cd caffe export CAFFE_HOME=${PWD} -
安装python依赖
sudo apt-get install -y --no-install-recommends python-pip export LC_ALL=C sudo pip install scikit-image protobuf cd ${CAFFE_HOME}/python for req in $(cat requirements.txt); do sudo pip install $req; done -
修改caffe的Makefile文件
 cd CAFFE
gedit  Makefile.config
几个需要调整的内容如下,其他地方按需调整
-
使用CPU还是GPU
# CPU-only switch (uncomment to build without GPU support). CPU_ONLY := 1 -
设置OpenCV版本
# Uncomment if you're using OpenCV 3 OPENCV_VERSION := 3 -
设置anaconda目录
     # ANACONDA_HOME := $(HOME)/anaconda2
     # PYTHON_LIB := $(ANACONDA_HOME)/lib
-
-
构建
make all
遇到错误
-
编译失败,缺少openlabs
错误
 In file included from ./include/caffe/util/math_functions.hpp:11:0,
          from src/caffe/data_transformer.cpp:10:
 ./include/caffe/util/mkl_alternate.hpp:14:19: fatal error: cblas.h: No such file or directory
 compilation terminated.
 Makefile:581: recipe for target '.build_release/src/caffe/data_transformer.o' failed
 make: *** [.build_release/src/caffe/data_transformer.o] Error 1
解决
sudo apt-get install libopenblas-dev -
编译失败,找不到文件
hdf5.h错误
 src/caffe/layers/hdf5_data_layer.cpp:13:18: fatal error: hdf5.h: No such file or directory
 compilation terminated.
 Makefile:581: recipe for target '.build_release/src/caffe/layers/hdf5_data_layer.o' failed
 make: *** [.build_release/src/caffe/layers/hdf5_data_layer.o] Error 1
解决
查找 hdf5.h 文件的位置,例如在 /usr/include/hdf5/serial/hdf5.h 修改Makefile.config,修改属性 INCLUDE_PATH,添加属性值 /usr/include/hdf5/serial -
链接失败,找不到文件
hdf5_hlhdf5cblasatlas错误
 LD -o .build_release/lib/libcaffe.so.1.0.0
 /usr/bin/ld: cannot find -lhdf5_hl
 /usr/bin/ld: cannot find -lhdf5
 collect2: error: ld returned 1 exit status
 Makefile:572: recipe for target '.build_release/lib/libcaffe.so.1.0.0' failed
 make: *** [.build_release/lib/libcaffe.so.1.0.0] Error 1
解决
-
locate libhdf5 的路径 并加入 LIBEARY_DIRS 空格增加路径 -
链接失败,找不到文件
lcblaslatlas错误
 LD -o .build_release/lib/libcaffe.so.1.0.0
 /usr/bin/ld: cannot find -lcblas
 /usr/bin/ld: cannot find -latlas
 collect2: error: ld returned 1 exit status
 Makefile:572: recipe for target '.build_release/lib/libcaffe.so.1.0.0' failed
 make: *** [.build_release/lib/libcaffe.so.1.0.0] Error 1
解决
安装库 atlas-base-dev库,sudo apt-get install libatlas-base-dev -
执行
make distribute时找不到arrayobject.h文件错误
 CXX/LD -o python/caffe/_caffe.so python/caffe/_caffe.cpp
 python/caffe/_caffe.cpp:10:31: fatal error: numpy/arrayobject.h: No such file or directory
 compilation terminated.
 Makefile:507: recipe for target 'python/caffe/_caffe.so' failed
 make: *** [python/caffe/_caffe.so] Error 1
解决
sudo apt-get install python-numpy
安装openpose
其实OpenPose中自带了caffe的安装方法,并不需要再单独查询。
-
下载openpose
git clone [email protected]:CMU-Perceptual-Computing-Lab/openpose cd openpose export OPENPOSE_HOME=${PWD} -
编译CPU版本
修改CMakeLists.txt文件
- 注释掉
set(GPU_MODE CUDA CACHE STRING "Select the acceleration GPU library or CPU otherwise.") - 添加
set(GPU_MODE CPU_ONLY CACHE STRING "No GPU, CPU ONLY")
- 注释掉
-
copy home 下 caffe文件夹到 openpose/3rdparty/caffe/文件夹
-
cd 3rdparty/caffe/
-
-
-
编译caffe,
#-j后面的数字写成你cpu的核数即可
make all -j4 && make distribute -j4
-
-
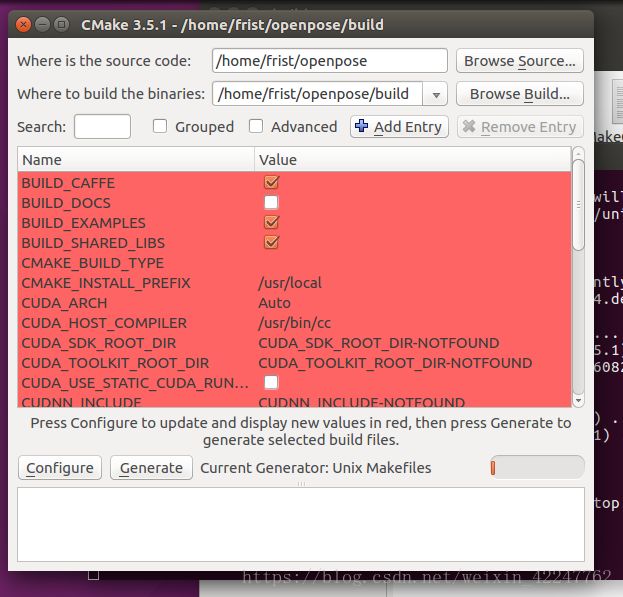
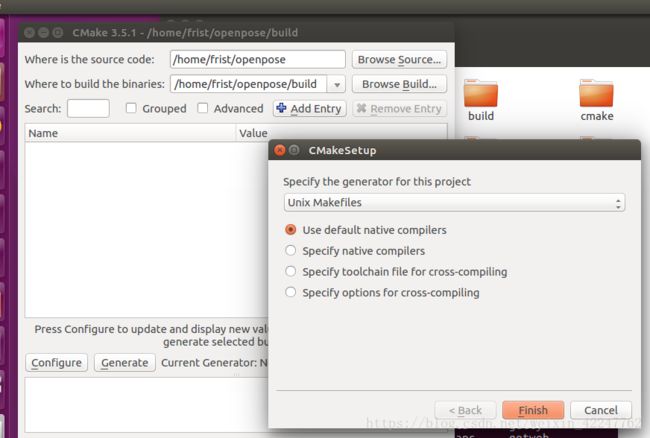
执行cmake
-
---------------------------
-
sudo apt-get install cmake-qt-gui
-
-------------------------------------------------
-
git checkout b6712ce WORKING_DIRECTORY
-
error: pathspec 'b6712ce' did not match any file(s) known to git.
-
In file included from /home/frist/openpose/build/caffe/include/caffe/blob.hpp:10:0,
from /home/frist/openpose/src/openpose/net/maximumCaffe.cpp:2:
/home/frist/openpose/build/caffe/include/caffe/syncedmem.hpp:7:19: fatal error: mkl.h: No such file or directory
compilation terminated.
mkdir build cd build cmake .. -
make -j`nproc`
---------------------------------
进到OpenPose的主目录下的Model文件夹,并执行getModels.sh下载caffe的模型文件
cd models
bash ./getModels.sh- 1
- 2
下载完成后回到OpenPose主目录,和安装caffe的时候一样,将ubuntu目录下的与你系统对应的Makefile.config.example 文件复制到主目录下。如果你用的OpenCV 3版本,这里同样要将Makefile.config里的 OPENCV_VERSION := 3的注释去掉。
意思就是说前面编译caffe的时候对Makefile.config做了什么修改,这里要做出同样的修改,否则编译可能会出错。
cd ..
cp ubuntu/Makefile.config.Ubuntu16_cuda8.example Makefile.config
make all -j4- 1
- 2
- 3
顺利的话,到这里就安装好了。如果出错了,先找到问题,make clean 一下之后再make all即可。
想卸载的话直接删掉OpenPose目录即可。
-----------------------------------------------------------------------------
OpenPose测试
视频测试:
# Ubuntu
./build/examples/openpose/openpose.bin --video examples/media/video.avi
# With face and hands
./build/examples/openpose/openpose.bin --video examples/media/video.avi --face --hand
# human pose
./build/examples/openpose/openpose.bin --video examples/media/video.avi
# human pose with face and hands
./build/examples/openpose/openpose.bin --video examples/media/video.avi --face --hand- 1
- 2
- 3
- 4
摄像头测试:
# human pose
./build/examples/openpose/openpose.bin
# human pose with face and hands
./build/examples/openpose/openpose.bin --face --hand- 1
- 2
- 3
- 4
图片测试:
# human pose
./build/examples/openpose/openpose.bin --image_dir examples/media/
# human pose with face and hands
./build/examples/openpose/openpose.bin --image_dir examples/media/ --face --hand
https://github.com/CMU-Perceptual-Computing-Lab/openpose
Running on Video
# Ubuntu
./build/examples/openpose/openpose.bin --video examples/media/video.avi
# With face and hands
./build/examples/openpose/openpose.bin --video examples/media/video.avi --face --hand
:: Windows - Portable Demo
bin\OpenPoseDemo.exe --video examples\media\video.avi
:: With face and hands
bin\OpenPoseDemo.exe --video examples\media\video.avi --face --hand
:: Windows - Library
build\x64\Release\OpenPoseDemo.exe --video examples\media\video.avi
:: With face and hands
build\x64\Release\OpenPoseDemo.exe --video examples\media\video.avi --face --hand
Running on Webcam
# Ubuntu
./build/examples/openpose/openpose.bin
# With face and hands
./build/examples/openpose/openpose.bin --face --hand
:: Windows - Portable Demo
bin\OpenPoseDemo.exe
:: With face and hands
bin\OpenPoseDemo.exe --face --hand
:: Windows - Library
build\x64\Release\OpenPoseDemo.exe
:: With face and hands
build\x64\Release\OpenPoseDemo.exe --face --hand
Running on Images
# Ubuntu
./build/examples/openpose/openpose.bin --image_dir examples/media/
# With face and hands
./build/examples/openpose/openpose.bin --image_dir examples/media/ --face --hand
:: Windows - Portable Demo
bin\OpenPoseDemo.exe --image_dir examples\media\
:: With face and hands
bin\OpenPoseDemo.exe --image_dir examples\media\ --face --hand
:: Windows - Library
build\x64\Release\OpenPoseDemo.exe --image_dir examples\media\
:: With face and hands
build\x64\Release\OpenPoseDemo.exe --image_dir examples\media\ --face --hand
Maximum Accuracy Configuration
This command provides the most accurate results we have been able to achieve for body, hand and face keypoint detection. However, this command will need around 6.7 GB of GPU memory and runs around 1 FPS on a Titan X for body.
# Ubuntu: Body
./build/examples/openpose/openpose.bin --net_resolution "1312x736" --scale_number 4 --scale_gap 0.25
# Ubuntu: Body + Hand + Face
./build/examples/openpose/openpose.bin --net_resolution "1312x736" --scale_number 4 --scale_gap 0.25 --hand --hand_scale_number 6 --hand_scale_range 0.4 --face
:: Windows - Portable Demo: Body
bin\OpenPoseDemo.exe --net_resolution "1312x736" --scale_number 4 --scale_gap 0.25
:: Windows - Portable Demo: Body + Hand + Face
bin\OpenPoseDemo.exe --net_resolution "1312x736" --scale_number 4 --scale_gap 0.25 --hand --hand_scale_number 6 --hand_scale_range 0.4 --face
:: Windows - Library: Body
build\x64\Release\OpenPoseDemo.exe --net_resolution "1312x736" --scale_number 4 --scale_gap 0.25
:: Windows - Library: Body + Hand + Face
build\x64\Release\OpenPoseDemo.exe --net_resolution "1312x736" --scale_number 4 --scale_gap 0.25 --hand --hand_scale_number 6 --hand_scale_range 0.4 --face
3-D Reconstruction
- Real-time demo
# Ubuntu
./build/examples/openpose/openpose.bin --flir_camera --3d --number_people_max 1
# With face and hands
./build/examples/openpose/openpose.bin --flir_camera --3d --number_people_max 1 --face --hand
:: Windows - Portable Demo
bin\OpenPoseDemo.exe --flir_camera --3d --number_people_max 1
:: With face and hands
bin\OpenPoseDemo.exe --flir_camera --3d --number_people_max 1 --face --hand
:: Windows - Library
build\x64\Release\OpenPoseDemo.exe --flir_camera --3d --number_people_max 1
:: With face and hands
build\x64\Release\OpenPoseDemo.exe --flir_camera --3d --number_people_max 1 --face --hand
- Saving 3-D keypoints
# Ubuntu (same flags for Windows version)
./build/examples/openpose/openpose.bin --flir_camera --3d --number_people_max 1 --write_json output_folder_path/
- Fast stereo camera image saving (without keypoint detection) for later post-processing
# Ubuntu (same flags for Windows version)
# Saving video
# Note: saving in PNG rather than JPG will improve image quality, but slow down FPS (depending on hard disk writing speed and camera number)
./build/examples/openpose/openpose.bin --flir_camera --num_gpu 0 --write_video output_folder_path/video.avi --camera_fps 5
# Saving images
# Note: saving in PNG rather than JPG will improve image quality, but slow down FPS (depending on hard disk writing speed and camera number)
./build/examples/openpose/openpose.bin --flir_camera --num_gpu 0 --write_images output_folder_path/ --write_images_format jpg
- Reading and processing previouly saved stereo camera images
# Ubuntu (same flags for Windows version)
# Optionally add `--face` and/or `--hand` to include face and/or hands
# Assuming 3 cameras
# Note: We highly recommend to reduce `--output_resolution`. E.g. for 3 cameras recording at 1920x1080, the resulting image is (3x1920)x1080, so we recommend e.g. 640x360 (x3 reduction).
# Video
./build/examples/openpose/openpose.bin --video output_folder_path/video.avi --3d_views 3 --3d --number_people_max 1 --output_resolution {desired_output_resolution}
# Images
./build/examples/openpose/openpose.bin --image_dir output_folder_path/ --3d_views 3 --3d --number_people_max 1 --output_resolution {desired_output_resolution}
- Reconstruction when at least n visible views
# Ubuntu (same flags for Windows version)
# Assuming >=2 cameras and reconstruction when at least 2 visible views
./build/examples/openpose/openpose.bin --flir_camera --3d --number_people_max 1 --3d_min_views 2 --output_resolution {desired_output_resolution}
Expected Visual Results
The visual GUI should show the original image with the poses blended on it, similarly to the pose of this gif:
If you choose to visualize a body part or a PAF (Part Affinity Field) heat map with the command option --part_to_show, the result should be similar to one of the following images:
elif [[ $ubuntu_version == *"16."* ]]; then
wget -c "https://developer.nvidia.com/compute/cuda/8.0/Prod2/local_installers/cuda-repo-ubuntu1604-8-0-local-ga2_8.0.61-1_amd64-deb"
sudo dpkg --install cuda-repo-ubuntu1604-8-0-local-ga2_8.0.61-1_amd64-deb
fi
sudo apt-get update
sudo apt-get install cuda


