开源仓库Harbor搭建及配置过程
1、Harbor介绍
Harbor是Vmvare中国团队开发的开源registry仓库,相比docker官方拥有更丰富的权限权利和完善的架构设计,适用大规模docker集群部署提供仓库服务。
2、安装环境(自行准备docker环境)
系统:centos7
docker版本:17.09 客户端和服务器版本一致
compose:1.18
Harbor版本:1.3
3、环境准备
1)Harbor是通过docker的compose项目部署的,需要安装compose,幸好compost 在git上提供了安装指令:
curl -L https://github.com/docker/compose/releases/download/1.18.0/docker-compose-`uname -s`-`uname -m` -o /usr/local/bin/docker-compose
chmod +x /usr/local/bin/docker-compose   #设置执行权限
docker-compose --version  #查看安装是否程成功
这是2条命令,先执行curl再执行chmod指令,下载过程可能会出现网络问题,多尝试几次即可。
安装截图:

软件git网址:https://github.com/docker/compose/releases
2)Harbor软件安装
harbor软件网址:https://github.com/vmware/harbor/releases
此页面提供源码安装和二进制安装下载地址,不建议方式
镜像网址:http://harbor.orientsoft.cn/
此页面只提供离线下载安装包,建议此种方式,在线安装容易出现科学上网问题。
#下载离线安装软件
wget http://harbor.orientsoft.cn/harbor-v1.8.0-rc4/harbor-offline-installer-v1.8.0-rc4.tgz
#解压文件
tar -zxf harbor-offline-installer-v1.8.0-rc4.tgz
#解压后的文件夹是harbor
解压完成后:修改配置文件harbor.conf,如果是测试环境基本不用什么更改配置,主要就是hostname
[root@c7test_master harbor]# vim harbor.yaml

## Configuration file of Harbor

#The IP address or hostname to access admin UI and registry service.
#DO NOT use localhost or 127.0.0.1, because Harbor needs to be accessed by external clients.
#主机地址,不可以设置为127或者localhosthostname = 200.200.100.83
hostname = 200.200.100.83
#The protocol for accessing the UI and token/notification service, by default it is http.
#It can be set to https if ssl is enabled on nginx.
ui_url_protocol = http

#The password for the root user of mysql db, change this before any production use.#mysql密码
db_password = root123

#Maximum number of job workers in job service
max_job_workers = 3

#Determine whether or not to generate certificate for the registry's token.
#If the value is on, the prepare script creates new root cert and private key
#for generating token to access the registry. If the value is off the default key/cert will be used.
#This flag also controls the creation of the notary signer's cert.
customize_crt = on

#The path of cert and key files for nginx, they are applied only the protocol is set to https
ssl_cert = /data/cert/server.crt
ssl_cert_key = /data/cert/server.key

#The path of secretkey storage
secretkey_path = /data

#Admiral's url, comment this attribute, or set its value to NA when Harbor is standalone
admiral_url = NA

#The password of the Clair's postgres database, only effective when Harbor is deployed with Clair.
#Please update it before deployment, subsequent update will cause Clair's API server and Harbor unable to access Clair's database.
clair_db_password = password

#Log files are rotated log_rotate_count times before being removed. If count is 0, old versions are removed rather than rotated.
log_rotate_count = 50
#Log files are rotated only if they grow bigger than log_rotate_size bytes. If size is followed by k, the size is assumed to be in kilobytes.
#If the M is used, the size is in megabytes, and if G is used, the size is in gigabytes. So size 100, size 100k, size 100M and size 100G
#are all valid.
log_rotate_size = 200M

#NOTES: The properties between BEGIN INITIAL PROPERTIES and END INITIAL PROPERTIES
#only take effect in the first boot, the subsequent changes of these properties
#should be performed on web ui

#************************BEGIN INITIAL PROPERTIES************************

#Email account settings for sending out password resetting emails.

#Email server uses the given username and password to authenticate on TLS connections to host and act as identity.
#Identity left blank to act as username.
email_identity =

email_server = smtp.mydomain.com
email_server_port = 25
email_username = sample_admin@mydomain.com
email_password = abc
email_from = admin .com>
email_ssl = false
email_insecure = false

##The initial password of Harbor admin, only works for the first time when Harbor starts.
#It has no effect after the first launch of Harbor.
#Change the admin password from UI after launching Harbor.#这里是web登录页面的密码,可以更改
harbor_admin_password = Harbor12345

##By default the auth mode is db_auth, i.e. the credentials are stored in a local database.
#Set it to ldap_auth if you want to verify a user's credentials against an LDAP server.
auth_mode = db_auth

#The url for an ldap endpoint.
ldap_url = ldaps://ldap.mydomain.com

#A user's DN who has the permission to search the LDAP/AD server.
#If your LDAP/AD server does not support anonymous search, you should configure this DN and ldap_search_pwd.
#ldap_searchdn = uid=searchuser,ou=people,dc=mydomain,dc=com

#the password of the ldap_searchdn
#ldap_search_pwd = password

#The base DN from which to look up a user in LDAP/AD
ldap_basedn = ou=people,dc=mydomain,dc=com

#Search filter for LDAP/AD, make sure the syntax of the filter is correct.
#ldap_filter = (objectClass=person)

# The attribute used in a search to match a user, it could be uid, cn, email, sAMAccountName or other attributes depending on your LDAP/AD
ldap_uid = uid

#the scope to search for users, 1-LDAP_SCOPE_BASE, 2-LDAP_SCOPE_ONELEVEL, 3-LDAP_SCOPE_SUBTREE
ldap_scope = 3

#Timeout (in seconds)  when connecting to an LDAP Server. The default value (and most reasonable) is 5 seconds.
ldap_timeout = 5

#Turn on or off the self-registration feature
self_registration = on

#The expiration time (in minute) of token created by token service, default is 30 minutes
token_expiration = 30

#The flag to control what users have permission to create projects
#The default value "everyone" allows everyone to creates a project.
#Set to "adminonly" so that only admin user can create project.
project_creation_restriction = everyone

#The follow configurations are for Harbor HA mode only

#the address of the mysql database.
db_host = mysql

#The port of mysql database host
db_port = 3306

#The user name of mysql database
db_user = root
#************************END INITIAL PROPERTIES************************
#The following attributes only need to be set when auth mode is uaa_auth
uaa_endpoint = uaa.mydomain.org
uaa_clientid= id
uaa_clientsecret= secret
uaa_ca_root= /path/to/uaa_ca.pem
#############
启动harbor,修改完配置文件就可以执行该目录下的install.sh文件即可,程序会自动启动相关镜像,因为harbor是用你镜像进行安装的。
[root@c7test_master harbor]# ./install.sh
安装截图:
检测环境及下载harbor相关镜像,镜像比较多,耐心等待。
安装完成:

运行的容器:
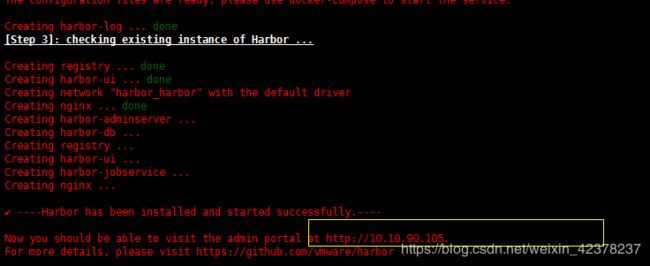
访问地址:http://200.200.100.83
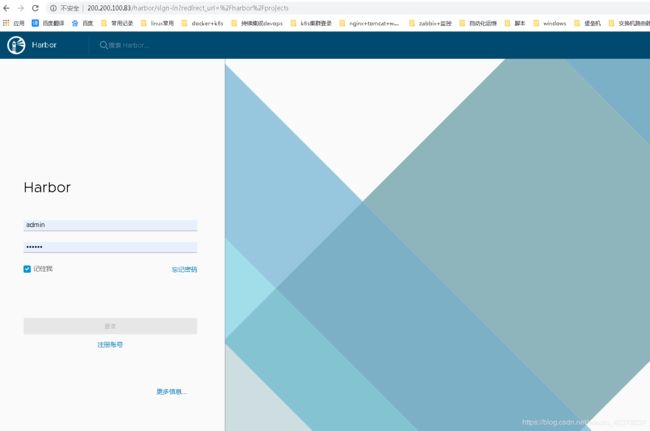
登录密码是配置文件中的harbor_admin_password = Harbor12345
3)有关使用其实无非就是创建仓库,上传镜像等操作
常见问题:
1、docker login报错Error response from daemon: Get https://200.200.100.83/v2/: dial tcp 200.200.100.83:443: getsockopt: connection refused
解决方案:修改docekr参数
文件:/etc/systemd/system/multi-user.target.wants/docker.service

修改完成后 执行:
[root@c7test_master ~]# systemctl daemon-reload
[root@c7test_master ~]# systemctl start docker
再次重启我们的harbor,进入解压的目录并执行start会自动编排
查看是否启动成功:
尝试login:
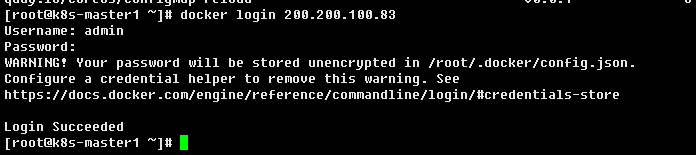
login成功!!!!!!!!