opencv:双目视觉 ——实现详细教程(matlabR2015b+opencv-python)
原本这个文章是打算转载别人的,在经历过各个教程都失败后(1.要不然是前后不对应,估计是随便复制一下,2.要么是讲解很不清楚,没有讲解怎么使用参数),决定自己写一下。记录一下,尽量会非常详细
0.前期准备
- 准备棋盘格
类似于这种:下载地址在这里:https://pan.baidu.com/s/1qYu0IkgbffuoCgANiQ5-Dw
必须实际打印出来哦,你用别人的标定图片怎么可能反映你自己的摄像头特征呢。
- 准备标定图片
利用opencv读取你自己的摄像头,按下s键进行截图,分别保存在left文件夹和right文件夹
| 有可能需要修改的地方: 1.folder 改为自己的路径 2.我这里的双目摄像头图像是在一个框里显示的,所以只需要capture一次,如果你的摄像头是分开的,则要两次capture 3.分辨率设置的时候,要根据自己的摄像机分辨率参数来设置,这很重要!!! |
import cv2
import time

AUTO = True  # 自动拍照,或手动按s键拍照
INTERVAL = 2 # 自动拍照间隔
camera = cv2.VideoCapture(0)#也许你可能要capture两次
camera.set(cv2.CAP_PROP_FRAME_WIDTH, 2560)#设置分辨率
camera.set(cv2.CAP_PROP_FRAME_HEIGHT, 960)#
utc = time.time()
folder = "E:/pythonlearning/opencv/screenshot/" # 拍照文件目录

def shot( frame):
    global counter
    leftpath = folder +"left/"+"left_" + str(counter) + ".jpg"
    rightpath=folder + "right/"+ "right_" + str(counter) + ".jpg"
    leftframe=frame[0:960,0:1280]#这里是为了将合在一个窗口显示的图像分为左右摄像头
    rightframe=frame[0:960,1280:2560]
    cv2.imwrite(leftpath, leftframe)
    cv2.imwrite(rightpath, rightframe)
    print("snapshot saved into: " + leftpath)
    print("snapshot saved into: " + rightpath)

while True:
    ret, frame = camera.read()

    cv2.imshow("original", frame)

    now = time.time()
    key = cv2.waitKey(1)
    if key == ord("q"):
        break
    elif key == ord("s"):
        shot( frame)
        counter += 1

camera.release()
cv2.destroyWindow("original")
这是我获得的标定图片

1.Matlab标定
matlab版本:R2015b
获取图片成功后,则要使用这些图片了
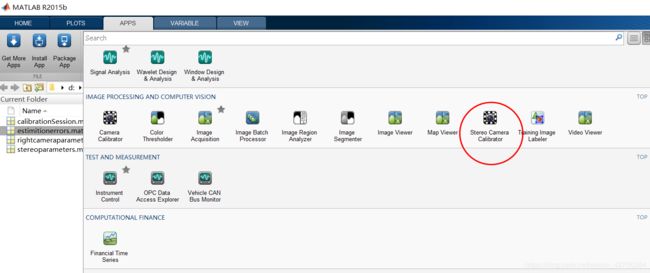
1.打开app->找到stereo calibration camera
2.选定三个复选框后,add images
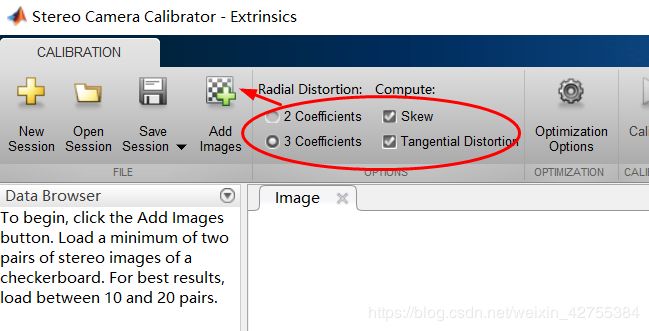
切记此处的 25是系统默认的,实际的是根据自己打印出来的方格宽度决定的。

添加图片


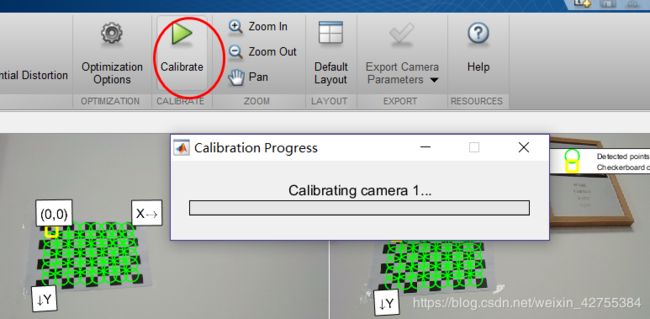


下面将会使用这些参数
2.opencv配置参数
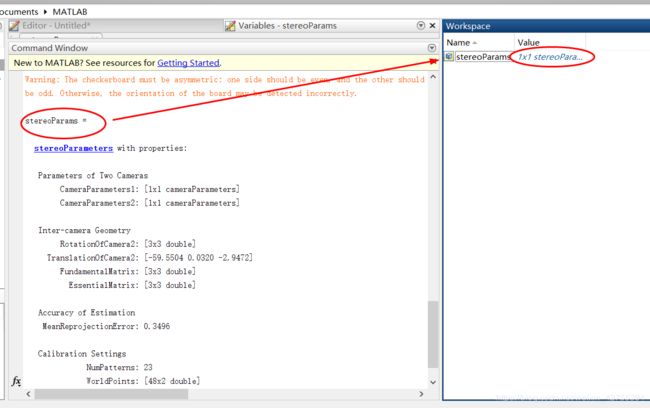
- 点进去stereoParams.CameraParameters1.IntrinsicMatrix
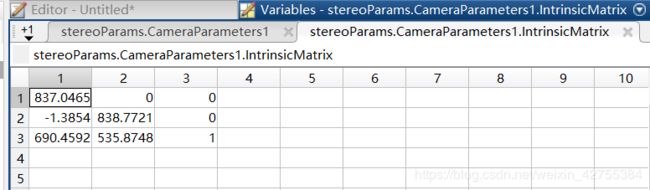
left_camera_matrix = np.array([[837.046533944197,	0.,	0.],
                               [-1.38537933662732,	838.772077702795,	0.],
                               [690.459242460418,	535.874773256865,	1.]])
- 点进去radialdistortion和tangentialdistoration


RadialDistortion:径向畸变,摄像头由于光学透镜的特性使得成像存在着径向畸变,可由K1,K2,K3确定。
TangentialDistortion:切向畸变,由于装配方面的误差,传感器与光学镜头之间并非完全平行,因此成像存在切向畸变,可由两个参数P1,P2确定。
使用时,需要注意参数的排放顺序,即K1,K2,P1,P2,K3。切记不可弄错,否则后续的立体匹配会出现很大的偏差。
left_distortion = np.array([[0.0037, 0.00060366, 0.0101, 0.0013, -0.0626]])
- 同理写出右摄像头的矩阵,stereoParams.CameraParameters2中
right_camera_matrix = np.array([[829.904768800558,	0.,	0.],
                                [0.449308928342319,	831.157653465328,	0.],
                                [728.582976346643,	550.936706268738,	1.]])
right_distortion = np.array([[0.00607433417962732,	-0.0112160302647384, 0.0104597000277839	,0.00265721874066941,-0.0262959511445746]])
- 外部数据:(相机二相对于相机一的旋转变量与平移变量)


| 此处必须提醒,有些教程会有OM,然后再转成R,可能以前matlab这样,但是现在matlab直接提供R了,则不需要你自己再去转换了,直接用就好 |
R = np.array([[1.,	     0.0039,  	-0.0038],
              [-0.0039,	   1.,	        0.],
              [0.0038,     0.,	        1.]])#旋转向量
T = np.array([-59.5777,0.032,-2.9472]) # 平移关系向量TranslationOfCamera2
此段完成代码为
import numpy as np
import cv2


left_camera_matrix = np.array([[837.046533944197,	0.,	0.],
                               [-1.38537933662732,	838.772077702795,	0.],
                               [690.459242460418,	535.874773256865,	1.]])  #CameraParameters1.IntrinsicMatrix
left_distortion = np.array([[0.00372605723623423,	0.000603658659694726, 0.0100736540032466,	0.00134603874266809, -0.0625795789344168]])


right_camera_matrix = np.array([[829.904768800558,	0.,	0.],
                                [0.449308928342319,	831.157653465328,	0.],
                                [728.582976346643,	550.936706268738,	1.]])
right_distortion = np.array([[0.00607433417962732,	-0.0112160302647384, 0.0104597000277839	,0.00265721874066941,-0.0262959511445746]])


R = np.array([[1.,	     0.0039,  	-0.0038],
              [-0.0039,	   1.,	        0.],
              [0.0038,     0.,	        1.]])#旋转向量
T = np.array([-59.5777,0.032,-2.9472]) # 平移关系向量TranslationOfCamera2

size = (1280, 960) # 图像尺寸

# 进行立体更正
R1, R2, P1, P2, Q, validPixROI1, validPixROI2 = cv2.stereoRectify(left_camera_matrix, left_distortion,
                                                                  right_camera_matrix, right_distortion, size, R,
                                                                  T)
# 计算更正map
left_map1, left_map2 = cv2.initUndistortRectifyMap(left_camera_matrix, left_distortion, R1, P1, size, cv2.CV_16SC2)
right_map1, right_map2 = cv2.initUndistortRectifyMap(right_camera_matrix, right_distortion, R2, P2, size, cv2.CV_16SC2)
3.opencv生成深度图
| 请务必按照你实际相机的像素参数进行设置,否则一定会报错!!! |
import numpy as np
import cv2


left_camera_matrix = np.array([[837.046533944197,	0.,	0.],
                               [-1.38537933662732,	838.772077702795,	0.],
                               [690.459242460418,	535.874773256865,	1.]])  #CameraParameters1.IntrinsicMatrix
left_distortion = np.array([[0.00372605723623423,	0.000603658659694726, 0.0100736540032466,	0.00134603874266809, -0.0625795789344168]])


right_camera_matrix = np.array([[829.904768800558,	0.,	0.],
                                [0.449308928342319,	831.157653465328,	0.],
                                [728.582976346643,	550.936706268738,	1.]])
right_distortion = np.array([[0.00607433417962732,	-0.0112160302647384, 0.0104597000277839	,0.00265721874066941,-0.0262959511445746]])


R = np.array([[1.,	     0.0039,  	-0.0038],
              [-0.0039,	   1.,	        0.],
              [0.0038,     0.,	        1.]])#旋转向量
T = np.array([-59.5777,0.032,-2.9472]) # 平移关系向量TranslationOfCamera2

size = (1280, 960) # 图像尺寸

# 进行立体更正
R1, R2, P1, P2, Q, validPixROI1, validPixROI2 = cv2.stereoRectify(left_camera_matrix, left_distortion,
                                                                  right_camera_matrix, right_distortion, size, R,
                                                                  T)
# 计算更正map
left_map1, left_map2 = cv2.initUndistortRectifyMap(left_camera_matrix, left_distortion, R1, P1, size, cv2.CV_16SC2)
right_map1, right_map2 = cv2.initUndistortRectifyMap(right_camera_matrix, right_distortion, R2, P2, size, cv2.CV_16SC2)
# ToDO 问题可能出在此处,读取的摄像头并不大,导致
cv2.namedWindow("left")
cv2.namedWindow("right")
cv2.namedWindow("depth")
cv2.moveWindow("left", 0, 0)
cv2.moveWindow("right", 600, 0)
cv2.createTrackbar("num", "depth", 0, 10, lambda x: None)
cv2.createTrackbar("blockSize", "depth", 5, 255, lambda x: None)
camera = cv2.VideoCapture(0)
camera.set(cv2.CAP_PROP_FRAME_WIDTH, 2560)#1920,1280
camera.set(cv2.CAP_PROP_FRAME_HEIGHT, 960)#1080,720
# camera2 = cv2.VideoCapture(1)

# 添加点击事件,打印当前点的距离
def callbackFunc(e, x, y, f, p):
    if e == cv2.EVENT_LBUTTONDOWN:
        print (threeD[y][x])

cv2.setMouseCallback("depth", callbackFunc, None)

while True:
    ret, frame= camera.read()
    # ret2, frame2 = camera2.read()

    if not ret :
        print('can\'t open camera or camera has been opened' )
        break
    frame1=frame[0:960,0:1280]
    frame2=frame[0:960,1280:2560]
    # 根据更正map对图片进行重构
    img1_rectified = cv2.remap(frame1, left_map1, left_map2, cv2.INTER_LINEAR)
    img2_rectified = cv2.remap(frame2, right_map1, right_map2, cv2.INTER_LINEAR)

    # 将图片置为灰度图,为StereoBM作准备
    imgL = cv2.cvtColor(img1_rectified, cv2.COLOR_BGR2GRAY)
    imgR = cv2.cvtColor(img2_rectified, cv2.COLOR_BGR2GRAY)

    # 两个trackbar用来调节不同的参数查看效果
    num = cv2.getTrackbarPos("num", "depth")
    blockSize = cv2.getTrackbarPos("blockSize", "depth")
    if blockSize % 2 == 0:
        blockSize += 1
    if blockSize < 5:
        blockSize = 5

    # 根据Block Maching方法生成差异图(opencv里也提供了SGBM/Semi-Global Block Matching算法,有兴趣可以试试)
    stereo = cv2.StereoBM_create(numDisparities=16*num, blockSize=blockSize)
    disparity = stereo.compute(imgL, imgR)

    disp = cv2.normalize(disparity, disparity, alpha=0, beta=255, norm_type=cv2.NORM_MINMAX, dtype=cv2.CV_8U)
    # 将图片扩展至3d空间中,其z方向的值则为当前的距离
    threeD = cv2.reprojectImageTo3D(disparity.astype(np.float32)/16., Q)

    cv2.imshow("left", img1_rectified)
    cv2.imshow("right", img2_rectified)
    cv2.imshow("depth", disp)

    key = cv2.waitKey(1)
    if key == ord("q"):
        break
    elif key == ord("s"):
        cv2.imwrite("E:/pythonlearning/opencv/screenshot/BM_left.jpg", imgL)
        cv2.imwrite("E:/pythonlearning/opencv/screenshot/BM_right.jpg", imgR)
        cv2.imwrite("E:/pythonlearning/opencv/screenshot/BM_depth.jpg", disp)

camera.release()
# camera2.release()
cv2.destroyAllWindows()