Python手动搭建神经网络
用基本的numpy库实现一个模拟神经元的或非门和异或门。
先随机对网络神经元权重赋值,一开始输出数据杂乱无章,但是在训练过程中不断匹配希望得到的输出,通过梯度下降算法,以降低误差,减小损失函数为目的,调整权重值,迭代一千次运算之后可以得到精准的或非门输出。通过各种组合可以实现各种数字电路的搭建。
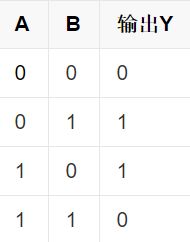
输入对应输出分别如下:
代码中可以使用了四种激活函数,分别是双曲正切函数tanh(x),sigmoid函数,relu函数,Leaky ReLU函数。只需要在主函数中输入对应想要用的激活函数即可调用。对比不同的激活函数可以自己看训练效果。
损失函数采用两种可选,分别是:
import numpy as np
# 定义激活函数和他们的导数
####################################################
def tanh(x):        #双曲正切函数
    return np.tanh(x)
def tanh_deriv(x):   #双曲正切函数的导数
    return 1.0 - np.tanh(x) ** 2
####################################################
def Leaky_ReLU(x):        #双曲正切函数
    return np.maximum(0.01*x, x)

def Leaky_ReLU_deriv(x):   #双曲正切函数的导数
    if x < 0:
        return 0.01
    else:
        return 1
####################################################
def logistic(x):    #sigmoid函数
    return 1 / (1 + np.exp(-x))

def logistic_derivative(x):    #sigmoid函数导数
    return logistic(x) * (1 - logistic(x))
####################################################
def Relu(x):
    return np.maximum(0, x)

def Relu_derivative(x):
    return np.maximum(0, 1)
####################################################
# 定义损失函数和他们的导数
####################################################
#平方损失函数
def Square_cost(y , a):
    return 0.5 * pow((y - a),2)

def Square_cost_deriv(y , a):
    return (y - a)
####################################################
#交叉熵损失函数
def cross_entropy(y,a):
    return -(y*np.log(a)+(1-y)*np.log(1-a))

def cross_entropy_deriv(y,a):
    return ( (-y/a)+(1-y)/(1-a) )


# 定义NeuralNetwork 神经网络算法
class NeuralNetwork:
    # 初始化,layes表示的是一个list,eg[10,10,3]表示第一层10个神经元,第二层10个神经元,第三层3个神经元
    def __init__(self, layers, activation, error_fun):
        """
        :param layers: A list containing the number of units in each layer.
        Should be at least two values
        :param activation: The activation function to be used. Can be
        "logistic" or "tanh"
        """
        if activation == 'logistic':
            self.activation = logistic
            self.activation_deriv = logistic_derivative
        elif activation == 'tanh':
            self.activation = tanh
            self.activation_deriv = tanh_deriv
        elif activation == 'Relu':
            self.activation = Relu
            self.activation_deriv = Relu_derivative
        elif activation == 'Leaky_ReLU':
            self.activation = Leaky_ReLU
            self.activation_deriv = Leaky_ReLU_deriv

        if error_fun =="Square_cost":
            self.error_fun = Square_cost
            self.error_fun_deriv = Square_cost_deriv
        elif error_fun == "cross_entropy":
            self.error_fun = cross_entropy
            self.error_fun_deriv = cross_entropy_deriv


        self.weights = []
        # 三层网络权重初始化。循环从1开始,相当于以第二层为基准,进行权重的初始化
        for i in range(1, len(layers) - 1):
            # 对当前神经节点的前驱(权重)赋值,np.random.random 生成-0.25到+0.25之间的随机浮点数float
            self.weights.append((2 * np.random.random(   (layers[i - 1] + 1, layers[i] + 1)   ) - 1) * 0.25)  #第一级
            # 对当前神经节点的后继赋值
            self.weights.append((2 * np.random.random((layers[i] + 1, layers[i + 1])) - 1) * 0.25)  #第二级
            # 训练函数   ,X矩阵,每行是一个实例 ,y是每个实例对应的结果,learning_rate 学习率,

    # epochs,表示抽样的方法对神经网络进行更新的最大次数
    def fit(self, X, y, learning_rate=0.1, epochs=10000):  #修改epoch的值可以修改迭代训练样本的次数,理论上越高越准确
        X = np.atleast_2d(X)  # 确定X至少是二维的数据
        temp = np.ones([X.shape[0], X.shape[1] + 1])  # 初始化矩阵
        temp[:, 0:-1] = X  # adding the bias unit to the input layer
        X = temp   #在矩阵X之后又加了一列数组
        y = np.array(y)  # 把list转换成array的形式,输出

        for k in range(epochs):  #k从0到9999
            # 随机选取 00,01,10,11 一组二维向量作为输入,对神经网络进行更新
            i = np.random.randint(X.shape[0])   #随机从X中抽取 i是输入的二维向量
            a = [X[i]]  #给到a,作为神经网络的输入

            # 完成所有正向的更新
            for l in range(len(self.weights)):  #注意,这里是字母l不是1,将l从0到weights长度-1循环  ,这里是全连接,所以每一个下层网络都是有
                                                # len(self.weights)个权重与下级神经元连接
                a.append(self.activation(np.dot(a[l], self.weights[l])))  #a1与对应权重相乘之后作为激活函数的输入,并且加到a数组的最后一行

            error = y[i] - a[-1]
            error_deriv_a = self.error_fun_deriv(y[i],a[-1])
            deltas = [error_deriv_a * self.activation_deriv(a[-1])]  #残差就是最后一层神经元激活值a乘上损失函数对a的导数
            if k % 1000 == 0:                                # 其实是刚好损失函数求导就是误差
                print(k, '...', 0.5 * error * error)         # 如果选用了别的损失函数,就应该要改变上面的[error * self.activation_deriv(a[-1])]
            # 开始反向计算误差,更新权重                     # 因为求导之后不一定就刚好是error
            for l in range(len(a) - 2, 0, -1):  # we need to begin at the second to last layer  步长为-1,从倒数第二层个数开始,激活神经元个数len(a)
                deltas.append(  np.dot(     deltas[-1] , ((self.weights[l].T) * self.activation_deriv(a[l]))     )   ) # .         T是转置操作  下一层残差乘权重的和
            deltas.reverse()     #将残差里面的元素颠倒,最后输出层残差放在第一个元素,方面矩阵运算 运行梯度下降算法                                                                #,      再乘上激活函数对a的导数 是上一层的残差
            for i in range(len(self.weights)):                                                  #   其实这里activation_deriv(a[l]))应该是a
                layer = np.atleast_2d(a[i])
                delta = np.atleast_2d(deltas[i])
                self.weights[i] += learning_rate * layer.T.dot(delta)
                # 预测函数

    def predict(self, x):
        x = np.array(x)
        temp = np.ones(x.shape[0] + 1)
        temp[0:-1] = x
        a = temp
        for l in range(0, len(self.weights)):
            a = self.activation(np.dot(a, self.weights[l]))
        return a


huofei = NeuralNetwork([2, 10,1], 'logistic','Square_cost')
yihuo = NeuralNetwork([2, 10,1], 'logistic','Square_cost')   #神经网络三层,每一层神经元数量分别是2  10  1

X = np.array([[0, 0], [0, 1], [1, 0], [1, 1]])   #创建4行2列二维数组
y = np.array([1, 0, 0, 0])   #X和y定义输入和输出的对应关系,修改可以第定义成不同的门电路

Z = np.array([[0, 0], [0, 1], [1, 0], [1, 1]])
w = np.array([0, 1, 1, 0])

huofei.fit(X, y)
yihuo.fit(Z, w)

print("或非门电路:")
for i in [[0, 0], [0, 1], [1, 0], [1, 1]]:
    print("模拟输入:",i, ", 模拟输出-->",huofei.predict(i))

print("异或门电路:")
for i in [[0, 0], [0, 1], [1, 0], [1, 1]]:
    print("模拟输入:",i,", 模拟输出-->", yihuo.predict(i))
输出结果如下:
D:\Anaconda_setup\python.exe G:/Deeplearning_code/DIY/BPNN_DIY.py
0 ... [0.12179908]
1000 ... [0.02503359]
2000 ... [0.17474842]
3000 ... [0.00093653]
4000 ... [9.31449645e-05]
5000 ... [1.1357721e-05]
6000 ... [0.00083786]
7000 ... [8.64692404e-07]
8000 ... [3.28111191e-07]
9000 ... [0.00011373]
0 ... [0.12548975]
1000 ... [0.12068519]
2000 ... [0.13938873]
3000 ... [0.10389508]
4000 ... [0.10021494]
5000 ... [0.10193966]
6000 ... [0.10975672]
7000 ... [0.12099792]
8000 ... [0.15410592]
9000 ... [0.11279369]
或非门电路:
模拟输入: [0, 0] , 模拟输出--> [0.96165333]
模拟输入: [0, 1] , 模拟输出--> [0.01301775]
模拟输入: [1, 0] , 模拟输出--> [0.01169065]
模拟输入: [1, 1] , 模拟输出--> [0.00043309]
异或门电路:
模拟输入: [0, 0] , 模拟输出--> [0.43879153]
模拟输入: [0, 1] , 模拟输出--> [0.43959247]
模拟输入: [1, 0] , 模拟输出--> [0.43743751]
模拟输入: [1, 1] , 模拟输出--> [0.43827793]

Process finished with exit code 0


