Hive安装与配置详解
评论- 6
Hive安装与配置详解
hive安装和配置
hive的测试
hive安装和配置
安装
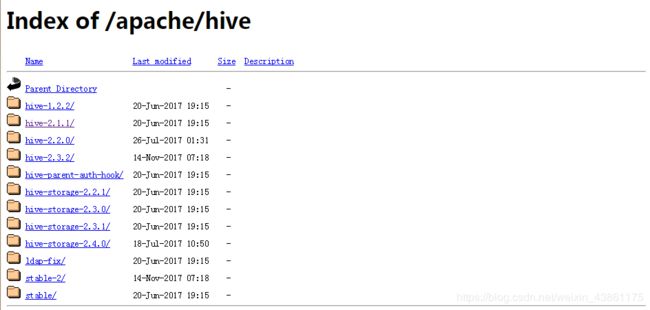
一:下载hive——地址:http://mirror.bit.edu.cn/apache/hive/

这里以hive-2.1.1为例子,如图:

将hive解压到/usr/local下:
[root@s100 local]# tar -zxvf apache-hive-2.1.1-bin.tar.gz -C /usr/local/
将文件重命名为hive文件:
[root@s100 local]# mv apache-hive-2.1.1-bin hive
修改环境变量/etc/profile:
[root@s100 local]# vim /etc/profile


1 #hive
2 export HIVE_HOME=/usr/local/hive
3 export PATH=$PATH:$HIVE_HOME/bin
执行source /etc.profile:
执行hive --version
[root@s100 local]# hive --version
有hive的版本显现,安装成功!
配置
[root@s100 conf]# cd /usr/local/hive/conf/
修改hive-site.xml:

这里没有,我们就以模板复制一个:
[root@s100 conf]# cp hive-default.xml.template hive-site.xml
[root@s100 conf]# vim hive-site.xml
1.配置hive-site.xml(第5点的后面有一个单独的hive-site.xml配置文件,这个如果有疑问可以用后面的配置文件,更容易明白)
主要是mysql的连接信息(在文本的最开始位置)
javax.jdo.option.ConnectionUserName 用户名(这4是新添加的,记住删除配置文件原有的哦!)
root
javax.jdo.option.ConnectionPassword 密码
123456
javax.jdo.option.ConnectionURL mysql
jdbc:mysql://192.168.1.68:3306/hive
javax.jdo.option.ConnectionDriverName mysql驱动程序
com.mysql.jdbc.Driver
hive.exec.script.wrapper

2.复制mysql的驱动程序到hive/lib下面(这里已经拷贝好了)
[root@s100 lib]# ll mysql-connector-java-5.1.18-bin.jar
-rw-r--r-- 1 root root 789885 1月   4 01:43 mysql-connector-java-5.1.18-bin.jar
3.在mysql中hive的schema(在此之前需要创建mysql下的hive数据库)
  1 [root@s100 bin]# pwd
    2 /usr/local/hive/bin
    3 [root@s100 bin]# schematool -dbType mysql -initSchema
4.执行hive命令
[root@localhost hive]# hive

成功进入hive界面,hive配置完成
5.查询mysql(hive这个库是在 schematool -dbType mysql -initSchema 之前创建的!)
   1 [root@localhost ~]# mysql -uroot -p123456
     2 Welcome to the MySQL monitor.  Commands end with ; or \g.
     3 Your MySQL connection id is 10
     4 Server version: 5.1.73 Source distribution
     5
     6 Copyright (c) 2000, 2013, Oracle and/or its affiliates. All rights reserved.
     7
     8 Oracle is a registered trademark of Oracle Corporation and/or its
     9 affiliates. Other names may be trademarks of their respective
    10 owners.
    11
    12 Type 'help;' or '\h' for help. Type '\c' to clear the current input statement.
    13
    14 mysql> use hive
    15 Reading table information for completion of table and column names
    16 You can turn off this feature to get a quicker startup with -A
    17
    18 Database changed
    19 mysql> show tables;
    20 +---------------------------+
    21 | Tables_in_hive            |
    22 +---------------------------+
    23 | AUX_TABLE                 |
    24 | BUCKETING_COLS            |
    25 | CDS                       |
    26 | COLUMNS_V2                |
    27 | COMPACTION_QUEUE          |
    28 | COMPLETED_COMPACTIONS     |
备注 (这里不计入正文不要重复配置hive-site.xml)
配置文件hive-site.xml
这里不得不说一下,如果你的 schematool -dbType mysql -initSchema 并没有执行成功怎么办,小博主昨天在这卡了一天,最后根据伟大的百度和hive官方文档,直接写了一个hive-site.xml配置文本:
javax.jdo.option.ConnectionURL
jdbc:mysql://localhost:3306/hahive (mysql地址localhost)
javax.jdo.option.ConnectionDriverName (mysql的驱动)
com.mysql.jdbc.Driver
javax.jdo.option.ConnectionUserName (用户名)
root
javax.jdo.option.ConnectionPassword (密码)
123456
hive.metastore.schema.verification
false
那我们做这些事干什么的呢,下面小段测试大家感受一下
hive测试:
备注:这里是第二个配置文件的演示:所以数据库名称是hahive数据库!
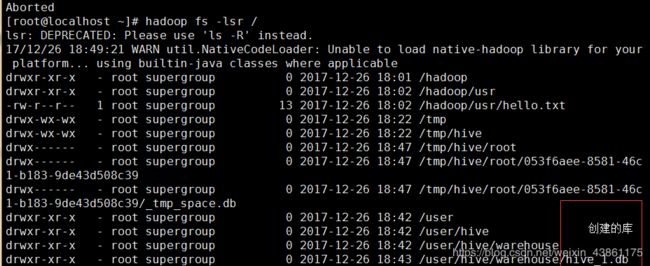
1.需要知道现在的hadoop中的HDFS存了什么
[root@localhost conf]# hadoop fs -lsr /
2.进入hive并创建一个测试库和测试表
[root@localhost conf]# hive
创建库:
1 hive> create database hive_1;
2 OK
3 Time taken: 1.432 seconds
 显示库:
1 hive> show databases;
2 OK
3 default
4 hive_1
5 Time taken: 1.25 seconds, Fetched: 2 row(s)
创建库成功!
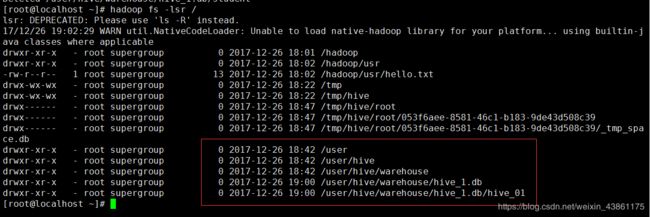
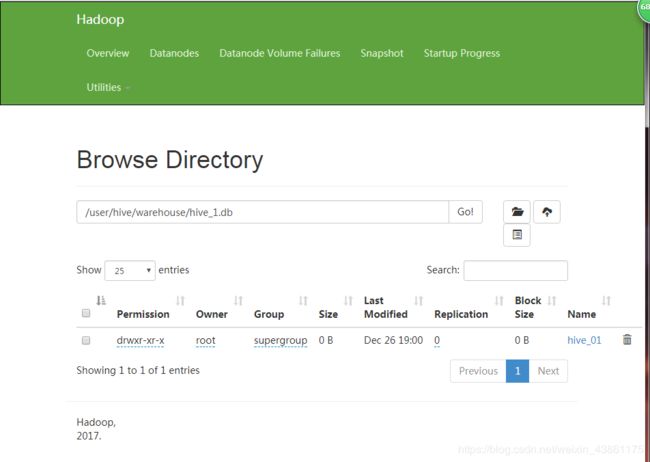
3.查询一下HDFS有什么变化

多了一个库hive_1
1 mysql> use hahive;


