使用vue制作简单的登录页面(含验证码)
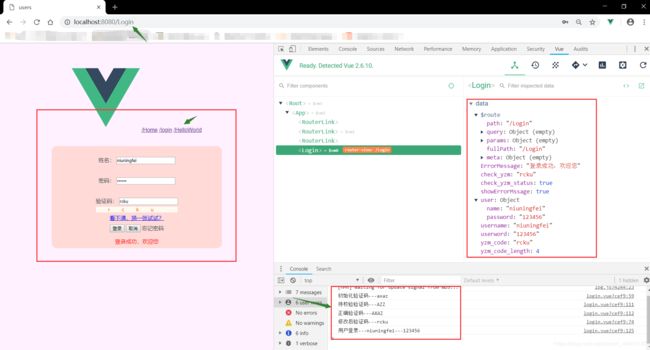
话不多说,先看结果,时间匆忙,样式没有怎么调整,能看就行,图片都懒得换了 qwq…
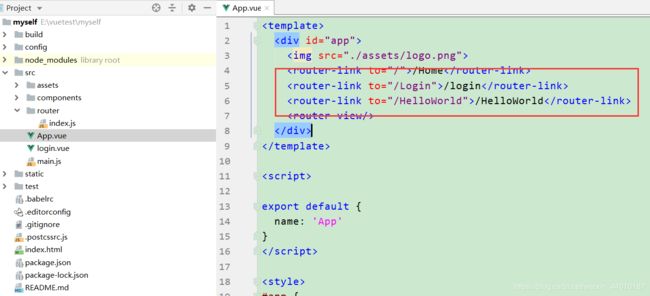
同样,为了进行后续的拓展,使用的简单的路由功能(其实就是懒得换)

首先便是项目的创建,这个不再过多叙述,接下来修改部分文件:
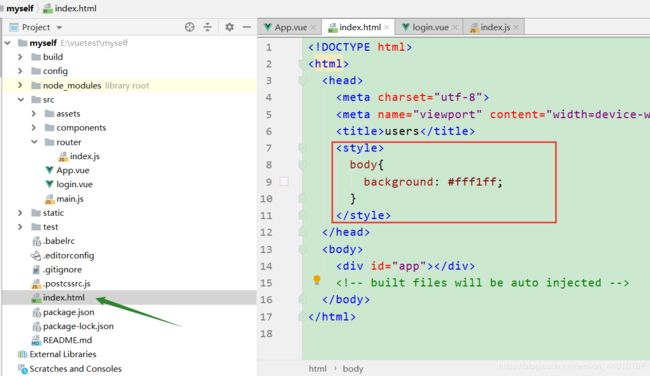
1.index.html中添加样式,修改背景颜色
2.src文件夹下新建login登录组件 login.vue
接下来详细讲解下整个实现代码:
模版显示区:包括用户名称区域,用户密码区域,验证码区域,登录/取消区域,错误/成功信息提示区域(默认隐藏)
script区块:
里面包括:
1.信息初始化和computed方法(log显示初始化验证码信息,意义不大)
name: "login",
        data(){
          return{
            username:'',
            userword:'',
            yzm_code:'axaz',
            check_yzm:'',
            check_yzm_status:false,
            yzm_code_length:4,
            ErrorMessage:'',
            showErrorMssage:false,
            user:{name:'niuningfei',password:'123456'}
          }
        },
      computed:{
      init(){
        console.log("初始化验证码---axaz")
      }
      },
2.方法区块中:
更换验证码:
changeYZM:function(){
          let yzm_code = '';//点击更换时-初始验证码
          let yzm_code_length = this.yzm_code_length;//验证码长度获取
          let codeChars = new Array(0, 1, 2, 3, 4, 5, 6, 7, 8, 9,
            'a','b','c','d','e','f','g','h','i','j','k','l','m','n','o','p','q','r','s','t','u','v','w','x','y','z',
            'A', 'B', 'C', 'D', 'E', 'F', 'G', 'H', 'I', 'J', 'K', 'L', 'M', 'N', 'O', 'P', 'Q', 'R', 'S', 'T', 'U', 'V', 'W', 'X', 'Y', 'Z');//候选字符
          //通过循环获取yzm_code_length位codeChars中的字符下标,并通过下标获取指定字符,最后拼接
          for (let i = 0; i < yzm_code_length; i++ ) {
            let charNum = Math.floor(Math.random() * 62);//获取随机验证码下标
            yzm_code += codeChars[charNum];//根据下标获取指定字符并拼接
          }
          console.log("修改后验证码---"+yzm_code);
          return this.yzm_code = yzm_code;
        }
用户名、用户密码、验证码规则校验
checkName:function () {
          if(this.username == ''){
            this.ErrorMessage = '用户名不能为空';
            this.showErrorMssage = true;
            return;
          }else if(this.username != this.user.name){
            this.ErrorMessage = '用户名输入有误';
            this.showErrorMssage = true;
            return;
          }else {
            this.ErrorMessage = '';
            this.showErrorMssage = false;
          }
        },
        checkWord:function () {
          if(this.userword == ''){
            this.ErrorMessage = '用户密码不能为空';
            this.showErrorMssage = true;
            return;
          }else if(this.userword != this.user.password){
            this.ErrorMessage = '用户密码输入有误';
            this.showErrorMssage = true;
            return;
          }else {
            this.ErrorMessage = '';
            this.showErrorMssage = false;
          }
        },
        checkYZM:function () {
          if(this.check_yzm == ''){
            this.ErrorMessage = '验证码不能为空';
            this.showErrorMssage = true;
            return;
          }else if(this.check_yzm.toUpperCase() != this.yzm_code.toUpperCase()){
            console.log("待校验验证码---"+this.check_yzm.toUpperCase())
            console.log("正确验证码---"+this.yzm_code.toUpperCase())
            this.ErrorMessage = '验证码输入有误';
            this.showErrorMssage = true;
            return;
          }else {
            this.ErrorMessage = '';
            this.showErrorMssage = false;
            this.check_yzm_status = true;
          }
        }
3.登录、取消登陆方法
login:function () {
          if(this.username == this.user.name && this.userword == this.user.password){
            if(this.check_yzm_status){
              console.log("用户登录---"+this.username+"---"+this.userword);
              this.ErrorMessage = '登录成功,欢迎您';
              this.showErrorMssage = true;
            }else {
              this.ErrorMessage = '请再次校验验证码';
              this.showErrorMssage = true;
              return;
            }
          }
        },
        reset:function () {
          this.username = '';
          this.userword = '';
          this.yzm_code = '';
          this.check_yzm = '';
          this.check_yzm_status = false;
          this.ErrorMessage = '请重新输入用户信息';
          this.showErrorMssage = true;
          this.check_yzm_status = false;
        }

      }
接下来修改src/router/index.js文件:
import Vue from 'vue'
import Router from 'vue-router'
import HelloWorld from '@/components/HelloWorld'
import Login from '../login.vue'
Vue.use(Router)

export default new Router({
  mode:'history',
  base:__dirname,
  routes: [
    {
      path: '/',
      component: Login
    },
    {
      path: '/Login',
      component: Login
    },
    {
      path: '/HelloWorld',
      component: HelloWorld
    }
  ]
})

/Home
/login
/HelloWorld
大功告成!!!!
