VGG——CNN经典网络模型(pytorch实现)
三、VGG
论文下载地址
VGG
是Oxford的Visual Geometry Group的组提出的(大家应该能看出VGG名字的由来了)。该网络是在ILSVRC 2014上的相关工作,主要工作是证明了增加网络的深度能够在一定程度上影响网络最终的性能。VGG有两种结构,分别是VGG16和VGG19,两者并没有本质上的区别,只是网络深度不一样。
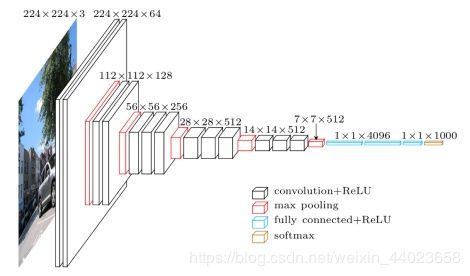
VGG原理
VGG16相比AlexNet的一个改进是采用连续的几个3x3的卷积核代替AlexNet中的较大卷积核(11x11,7x7,5x5)。对于给定的感受野(与输出有关的输入图片的局部大小),采用堆积的小卷积核是优于采用大的卷积核,因为多层非线性层可以增加网络深度来保证学习更复杂的模式,而且代价还比较小(参数更少)。
简单来说,在VGG中,使用了3个3x3卷积核来代替7x7卷积核,使用了2个3x3卷积核来代替5*5卷积核,这样做的主要目的是在保证具有相同感知野的条件下,提升了网络的深度,在一定程度上提升了神经网络的效果。
比如,3个步长为1的3x3卷积核的一层层叠加作用可看成一个大小为7的感受野(其实就表示3个3x3连续卷积相当于一个7x7卷积),其参数总量为 3x(9xC^2) ,如果直接使用7x7卷积核,其参数总量为 49xC^2 ,这里 C 指的是输入和输出的通道数。很明显,27xC2小于49xC2,即减少了参数;而且3x3卷积核有利于更好地保持图像性质。
这里解释一下为什么使用2个3x3卷积核可以来代替5*5卷积核:
5x5卷积看做一个小的全连接网络在5x5区域滑动,我们可以先用一个3x3的卷积滤波器卷积,然后再用一个全连接层连接这个3x3卷积输出,这个全连接层我们也可以看做一个3x3卷积层。这样我们就可以用两个3x3卷积级联(叠加)起来代替一个 5x5卷积。
基本概念拓展——cnn感受野
在卷积神经网络中,决定某一层输出 结果中一个元素所对应的输入层的区域大 小,被称作感受野(receptive field)。通俗 的解释是,输出feature map上的一个单元 对应输入层上的区域大小。
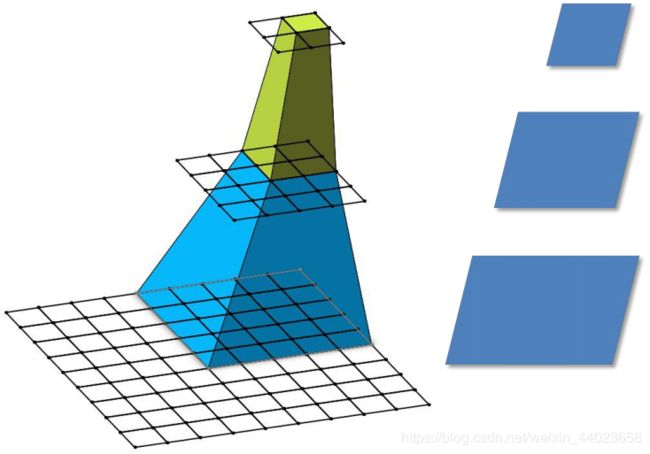 比如上图为:
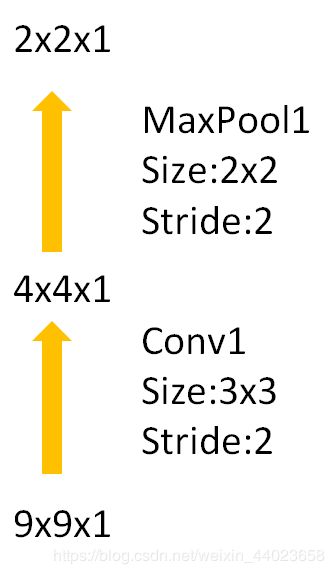 计算公式为:

	F(i)为第i层感受野
	Stride为第i层的步距
	Ksize为卷积核或池化核尺寸
因此
Feature map: F = 1
Pool1:	F = (1 - 1) x 2 + 2 = 2
Conv1:	F = (2 - 1) x 2 + 3 = 5
具体如下图所示:
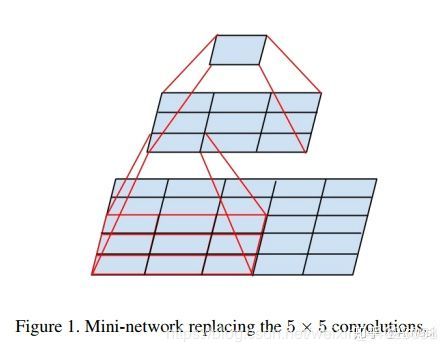
至于为什么使用3个3x3卷积核可以来代替7*7卷积核,推导过程与上述类似,大家可以自行绘图理解。
VGG网络结构
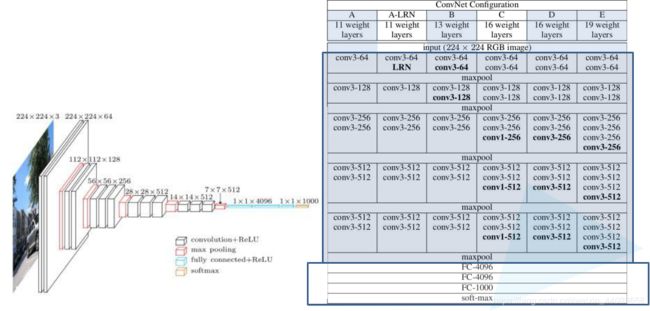
下面是VGG网络的结构(VGG16和VGG19都在):
-
VGG16包含了16个隐藏层(13个卷积层和3个全连接层),如上图中的D列所示
-
VGG19包含了19个隐藏层(16个卷积层和3个全连接层),如上图中的E列所示
VGG网络的结构非常一致,从头到尾全部使用的是3x3的卷积和2x2的max pooling。
虽然网络层数加深,但VGG在训练的过程中比AlexNet收敛的要快一些,主要因为:
(1)使用小卷积核和更深的网络进行的正则化;
(2)在特定的层使用了预训练得到的数据进行参数的初始化。对于较浅的网络,如网络A,可以直接使用随机数进行随机初始化,而对于比较深的网络,则使用前面已经训练好的较浅的网络中的参数值对其前几层的卷积层和最后的全连接层进行初始化。
VGG优点
- VGGNet的结构非常简洁,整个网络都使用了同样大小的卷积核尺寸(3x3)和最大池化尺寸(2x2)。
- 几个小滤波器(3x3)卷积层的组合比一个大滤波器(5x5或7x7)卷积层好:
- 验证了通过不断加深网络结构可以提升性能。
VGG缺点
- VGG耗费更多计算资源,并且使用了更多的参数(这里不是3x3卷积的锅),导致更多的内存占用(140M)。其中绝大多数的参数都是来自于第一个全连接层。VGG可是有3个全连接层啊!
注:很多pretrained的方法就是使用VGG的model(主要是16和19),VGG相对其他的方法,参数空间很大,最终的model有500多m,AlexNet只有200m,GoogLeNet更少,所以train一个vgg模型通常要花费更长的时间,所幸有公开的pretrained model让我们很方便的使用。
代码篇:VGG训练与测试
这里推荐两个开源库,训练请参考tensorflow-vgg
快速测试请参考VGG-in TensorFlow。
代码实现
注:本次训练集下载在AlexNet博客有详细解说:https://blog.csdn.net/weixin_44023658/article/details/105798326
#model.py

import torch.nn as nn
import torch

#分类网络
class VGG(nn.Module):
    def __init__(self, features, num_classes=1000, init_weights=False):
        super(VGG, self).__init__()
        self.features = features
        #先会进行一个展平处理
        self.classifier = nn.Sequential( #定义分类网络结构
            nn.Dropout(p=0.5), #减少过拟合
            nn.Linear(512*7*7, 2048),
            nn.ReLU(True),
            nn.Dropout(p=0.5),
            nn.Linear(2048, 2048),
            nn.ReLU(True),
            nn.Linear(2048, num_classes)
        )
        if init_weights:
            self._initialize_weights()

    def forward(self, x):
        # N x 3 x 224 x 224
        x = self.features(x)
        # N x 512 x 7 x 7
        x = torch.flatten(x, start_dim=1)#展平处理
        # N x 512*7*7
        x = self.classifier(x)
        return x

    def _initialize_weights(self): #初始化权重函数
        for m in self.modules():
            if isinstance(m, nn.Conv2d):
                # nn.init.kaiming_normal_(m.weight, mode='fan_out', nonlinearity='relu')
                nn.init.xavier_uniform_(m.weight)
                if m.bias is not None:
                    nn.init.constant_(m.bias, 0)#初始化偏置为0
            elif isinstance(m, nn.Linear):
                nn.init.xavier_uniform_(m.weight)
                # nn.init.normal_(m.weight, 0, 0.01)
                nn.init.constant_(m.bias, 0)


def make_features(cfg: list):#提取特征函数
    layers = [] #存放创建每一层结构
    in_channels = 3 #RGB
    for v in cfg:
        if v == "M":
            layers += [nn.MaxPool2d(kernel_size=2, stride=2)]
        else:
            conv2d = nn.Conv2d(in_channels, v, kernel_size=3, padding=1)
            layers += [conv2d, nn.ReLU(True)]
            in_channels = v
    return nn.Sequential(*layers)   #通过非关键字参数传入


cfgs = {
    'vgg11': [64, 'M', 128, 'M', 256, 256, 'M', 512, 512, 'M', 512, 512, 'M'], #数字为卷积层个数,M为池化层结构
    'vgg13': [64, 64, 'M', 128, 128, 'M', 256, 256, 'M', 512, 512, 'M', 512, 512, 'M'],
    'vgg16': [64, 64, 'M', 128, 128, 'M', 256, 256, 256, 'M', 512, 512, 512, 'M', 512, 512, 512, 'M'],
    'vgg19': [64, 64, 'M', 128, 128, 'M', 256, 256, 256, 256, 'M', 512, 512, 512, 512, 'M', 512, 512, 512, 512, 'M'],
}

#实例化VGG网络
def vgg(model_name="vgg16", **kwargs): #**字典
    try:
        cfg = cfgs[model_name]
    except:
        print("Warning: model number {} not in cfgs dict!".format(model_name))
        exit(-1)
    model = VGG(make_features(cfg), **kwargs) #
    return model


#vgg_model = vgg(model_name='vgg13')
#train.py

import torch.nn as nn
from torchvision import transforms, datasets
import json
import os
import torch.optim as optim
from model import vgg
import torch
import time

device = torch.device("cuda:0" if torch.cuda.is_available() else "cpu")
print(device)

#数据预处理,从头
data_transform = {
    "train": transforms.Compose([transforms.RandomResizedCrop(224),
                                 transforms.RandomHorizontalFlip(),
                                 transforms.ToTensor(),
                                 transforms.Normalize((0.5, 0.5, 0.5), (0.5, 0.5, 0.5))]),
    "val": transforms.Compose([transforms.Resize((224, 224)),
                               transforms.ToTensor(),
                               transforms.Normalize((0.5, 0.5, 0.5), (0.5, 0.5, 0.5))])}


#data_root = os.path.abspath(os.path.join(os.getcwd(), "../.."))  # get data root path
data_root = os.getcwd()
image_path = data_root + "/flower_data/"  # flower data set path
train_dataset = datasets.ImageFolder(root=image_path + "/train",
                                     transform=data_transform["train"])
train_num = len(train_dataset)

# {'daisy':0, 'dandelion':1, 'roses':2, 'sunflower':3, 'tulips':4}
flower_list = train_dataset.class_to_idx
cla_dict = dict((val, key) for key, val in flower_list.items())
# write dict into json file
json_str = json.dumps(cla_dict, indent=4)
with open('class_indices.json', 'w') as json_file:
    json_file.write(json_str)

batch_size = 32
train_loader = torch.utils.data.DataLoader(train_dataset,
                                           batch_size=batch_size, shuffle=True,
                                           num_workers=0)

validate_dataset = datasets.ImageFolder(root=image_path + "val",
                                        transform=data_transform["val"])
val_num = len(validate_dataset)
validate_loader = torch.utils.data.DataLoader(validate_dataset,
                                              batch_size=batch_size, shuffle=False,
                                              num_workers=0)

# test_data_iter = iter(validate_loader)
# test_image, test_label = test_data_iter.next()

model_name = "vgg16"
net = vgg(model_name=model_name, num_classes=5, init_weights=True)
net.to(device)
loss_function = nn.CrossEntropyLoss()
optimizer = optim.Adam(net.parameters(), lr=0.0001)

best_acc = 0.0
save_path = './{}Net.pth'.format(model_name)
for epoch in range(20):
    # train
    net.train()
    running_loss = 0.0
    t1 = time.perf_counter()
    for step, data in enumerate(train_loader, start=0):
        images, labels = data
        optimizer.zero_grad()
        #with torch.no_grad(): #用来消除验证阶段的loss,由于梯度在验证阶段不能传回,造成梯度的累计
        outputs = net(images.to(device))
        loss = loss_function(outputs, labels.to(device))
        loss.backward()
        optimizer.step()

        # print statistics
        running_loss += loss.item()
        # print train process
        rate = (step + 1) / len(train_loader)
        a = "*" * int(rate * 50)
        b = "." * int((1 - rate) * 50)
        print("\rtrain loss: {:^3.0f}%[{}->{}]{:.3f}".format(int(rate * 100), a, b, loss), end="")
    print()
    print(time.perf_counter() - t1)

    # validate
    net.eval()
    acc = 0.0  # accumulate accurate number / epoch
    with torch.no_grad():
        for val_data in validate_loader:
            val_images, val_labels = val_data
            #optimizer.zero_grad()
            outputs = net(val_images.to(device))
            predict_y = torch.max(outputs, dim=1)[1]
            acc += (predict_y == val_labels.to(device)).sum().item()
        val_accurate = acc / val_num
        if val_accurate > best_acc:
            best_acc = val_accurate
            torch.save(net.state_dict(), save_path)
        print('[epoch %d] train_loss: %.3f  test_accuracy: %.3f' %
              (epoch + 1, running_loss / step, val_accurate))

print('Finished Training')
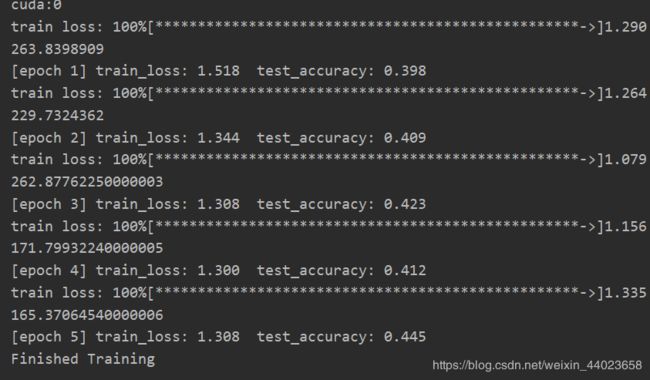
由于我硬件问题我的batch_size和轮数都比较小,所以最后test_accuracy都会比较低点
#predict.py

import torch
from model import vgg
from PIL import Image
from torchvision import transforms
import matplotlib.pyplot as plt
import json

data_transform = transforms.Compose(
    [transforms.Resize((224, 224)),
     transforms.ToTensor(),
     transforms.Normalize((0.5, 0.5, 0.5), (0.5, 0.5, 0.5))])

# load image
img = Image.open("./sunflower.jpg")  #验证太阳花
#img = Image.open("./roses.jpg")     #验证玫瑰花
plt.imshow(img)
# [N, C, H, W]
img = data_transform(img)
# expand batch dimension
img = torch.unsqueeze(img, dim=0) #扩充维度,加bench维度

# read class_indict
try:
    json_file = open('./class_indices.json', 'r')
    class_indict = json.load(json_file)
except Exception as e:
    print(e)
    exit(-1)

# create model
net = vgg(model_name=img, num_classes=5, init_weights=True)
# load model weights
model_weight_path = "./vgg16Net.pth"
model.load_state_dict(torch.load(model_weight_path)) #载入网络模型
model.eval() #关闭dropout方法
#跟踪准确梯度
with torch.no_grad():
    # predict class
    output = torch.squeeze(model(img)) #压缩掉beach维度
    predict = torch.softmax(output, dim=0)
    predict_cla = torch.argmax(predict).numpy() #获取最大索引
#print(class_indict[str(predict_cla)], predict[predict_cla].item())
plt.show()
参考自:
Amusi
