Pacemaker + Corosync 集群高可用的实现(Fence、nfs共享存储)
一、基础概念
1.什么是Pacemaker?
Pacemaker是 Linux环境中使用最为广泛的开源集群资源管理器, Pacemaker利用集群基础架构(Corosync或者 Heartbeat)提供的消息和集群成员管理功能,实现节点和资源级别的故障检测和资源恢复,从而最大程度保证集群服务的高可用。从逻辑功能而言, pacemaker在集群管理员所定义的资源规则驱动下,负责集群中软件服务的全生命周期管理,这种管理甚至包括整个软件系统以及软件系统彼此之间的交互。 Pacemaker在实际应用中可以管理任何规模的集群,由于其具备强大的资源依赖模型,这使得集群管理员能够精确描述和表达集群资源之间的关系(包括资源的顺序和位置等关系)。同时,对于任何形式的软件资源,通过为其自定义资源启动与管理脚本(资源代理),几乎都能作为资源对象而被 Pacemaker管理。
此外,需要指出的是, Pacemaker仅是资源管理器,并不提供集群心跳信息,由于任何高可用集群都必须具备心跳监测机制,因而很多初学者总会误以为 Pacemaker本身具有心跳检测功能,而事实上 Pacemaker的心跳机制主要基于 Corosync或 Heartbeat来实现
Pacemaker是整个高可用集群的控制中心,用来管理整个集群的资源状态行为,客户端通过 pacemaker来配置、管理、监控整个集群的运行状态。Pacemaker是一个功能非常强大并支持众多操作系统的开源集群资源管理器,Pacemaker支持主流的 Linux系统,如 Redhat的 RHEL系列、 Fedora系列、 openSUSE系列、Debian系列、 Ubuntu系列和 centos系列,这些操作系统上都可以运行 Pacemaker并将其作为集群资源管理器。
2.Pacemaker的主要功能包括:
- 监测并恢复节点和服务级别的故障。
- 存储无关,并不需要共享存储。
- 资源无关,任何能用脚本控制的资源都可以作为集群服务。
- 支持节点 STONITH功能以保证集群数据的完整性和防止集群脑裂。
- 支持大型或者小型集群。
- 支持 Quorum机制和资源驱动类型的集群。
- 支持几乎是任何类型的冗余配置。
- 自动同步各个节点的配置文件。
- 可以设定集群范围内的 Ordering、 Colocation and Anti-colocation等约束。
- 高级服务类型支持,例如:
Clone功能,即那些要在多个节点运行的服务可以通过 Clone功能实现, Clone功能将会在多个节点上启动相同的服务;
Multi-state功能,即那些需要运行在多状态下的服务可以通过 Multi–state实现,在高可用集群的服务中,有很多服务会运行在不同的高可用模式下,如:Active/Active模式或者 Active/passive模式等,并且这些服务可能会在 Active 与standby(Passive)之间切换。 - 具有统一的、脚本化的集群管理工具。
主机环境:rhel6.5 selinux and iptables disabled
| 主机名 | ip | 服务 |
|---|---|---|
| server1 | 172.25.254.1 | pacemaker |
| server2 | 172.25.254.2 | pacemaker |
| server3 | 172.25.254.3 | nfs-utils、rpcbind |
二、Pacemaker实现高可用
搭建步骤:
1.配置高级的yum源(server1、server2)
[root@server1 yum.repos.d]# vim rhel-source.repo
[rhel-source]
name=Red Hat Enterprise Linux $releasever - $basearch - Source
baseurl=http://172.25.254.73/rhel6.5/
enabled=1
gpgcheck=0
gpgkey=file:///etc/pki/rpm-gpg/RPM-GPG-KEY-redhat-release

[LoadBalancer]
name=Red Hat Enterprise Linux $releasever - $basearch - Source
baseurl=http://172.25.254.73/rhel6.5/LoadBalancer
enabled=1
gpgcheck=0
gpgkey=file:///etc/pki/rpm-gpg/RPM-GPG-KEY-redhat-release

[HighAvailability]
name=Red Hat Enterprise Linux $releasever - $basearch - Source
baseurl=http://172.25.254.73/rhel6.5/HighAvailability
enabled=1
gpgcheck=0
gpgkey=file:///etc/pki/rpm-gpg/RPM-GPG-KEY-redhat-release

[ResilientStorage]
name=Red Hat Enterprise Linux $releasever - $basearch - Source
baseurl=http://172.25.254.73/rhel6.5/ResilientStorage
enabled=1
gpgcheck=0
gpgkey=file:///etc/pki/rpm-gpg/RPM-GPG-KEY-redhat-release

[ScalableFileSystem]
name=Red Hat Enterprise Linux $releasever - $basearch - Source
baseurl=http://172.25.254.73/rhel6.5/ScalableFileSystem
enabled=1
gpgcheck=0
gpgkey=file:///etc/pki/rpm-gpg/RPM-GPG-KEY-redhat-release
[root@server1 yum.repos.d]# yum clean all
[root@server1 yum.repos.d]# yum repolist
server2操作相同
[root@server1 yum.repos.d]# scp rhel-source.repo server2:/etc/yum.repos.d/
[root@server2 ~]# yum clean all
[root@server2 ~]# yum repolist
2.下软件,提供crm命令行接口,配置心跳节点,同时启动
01.安装支持crm命令行接口的软件
[root@server1 ~]# yum install pacemaker -y
[root@server1 ~]# ls
anaconda-ks.cfg                   install.log         pssh-2.3.1-2.1.x86_64.rpm
crmsh-1.2.6-0.rc2.2.1.x86_64.rpm  install.log.syslog
[root@server1 ~]# yum install pssh-2.3.1-2.1.x86_64.rpm crmsh-1.2.6-0.rc2.2.1.x86_64.rpm -y
[root@server2 ~]# yum install pacemaker -y
[root@server2 ~]# ls
anaconda-ks.cfg                   install.log         pssh-2.3.1-2.1.x86_64.rpm
crmsh-1.2.6-0.rc2.2.1.x86_64.rpm  install.log.syslog
[root@server2 ~]# yum install pssh-2.3.1-2.1.x86_64.rpm crmsh-1.2.6-0.rc2.2.1.x86_64.rpm -y
03.修改配置文件(让corosync在pacemaker启动时也启动)
[root@server1 corosync]# cp corosync.conf.example corosync.conf
[root@server1 corosync]# vim corosync.conf
 10                 bindnetaddr: 172.25.254.0	#同网段
 11                 mcastaddr: 226.94.1.1		#多播地址(不需要修改)
 12                 mcastport: 5405				#多播端口
 35 service {
 36         name:pacemaker
 37         ver:0
 38 }
 [root@server1 corosync]# scp /etc/corosync/corosync.conf server2:/etc/corosync/
04.两边同时启动corosync服务
[root@server2 corosync]# /etc/init.d/corosync start
Starting Corosync Cluster Engine (corosync):               [  OK  ]
[root@server1 corosync]# /etc/init.d/corosync start
Starting Corosync Cluster Engine (corosync):               [  OK  ]
05.在server1端使用动态监控查看集群状态
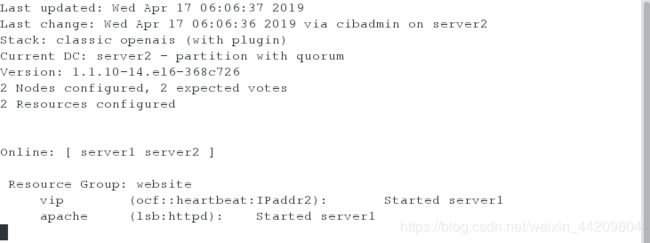
[root@server1 corosync]# crm_mon
- 关于crm shell的使用
—crm可以显示并修改配置文件
—直接执行crm命令进行交互式修改配置文件,交互式输入的内容被记 录在配置文件中
—show 显示配置文件
—commit提交
—如果添加资源时出错,首先进入resource,将添加的资源stop,然后进入cofigure,delete添加错误的资源
01.进行全局资源配置,将fence设备关闭(否则服务起不来)
[root@server2 corosync]# crm
crm(live)# configure
##因为在这里我们还没有对fence进行配置,先将stonith-enabled 设置为 false,表示资源不会迁移
crm(live)configure# property stonith-enabled=false
crm(live)configure# verify
crm(live)configure# commit
crm(live)configure# exit
02.在server1、server2上安装httpd,编写默认发布页
[root@server2 corosync]# yum install httpd -y
[root@server2 corosync]# vim /var/www/html/index.html
[root@server2 corosync]# cat /var/www/html/index.html
server2
03.设置集群资源VIP
[root@server2 corosync]# crm
crm(live)# configure
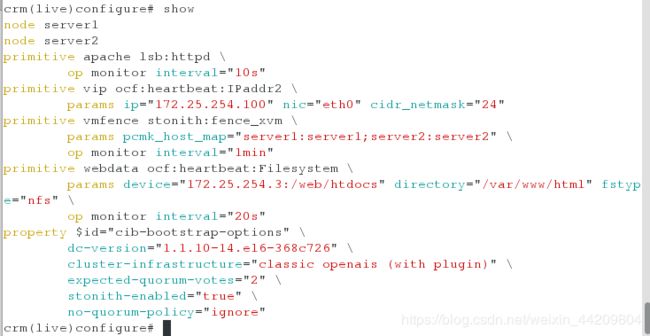
crm(live)configure# primitive vip ocf:heartbeat:IPaddr2 params ip=172.25.254.100 nic=eth0 cidr_netmask=24
##添加vip资源,params 指定参数 op monitor
crm(live)configure# verify
crm(live)configure# commit
[root@server2 corosync]# crm
crm(live)# configure
crm(live)configure# primitive apache lsb:httpd op monitor interval=10s
##lsb 添加脚本 op monitor 监控配置,interval指定执行操作的频率,单位:秒
crm(live)configure# verify
crm(live)configure# commit
注意:经常在/etc/init.d目录下看到的资源启动脚本便是LSB标准的资源控制脚本

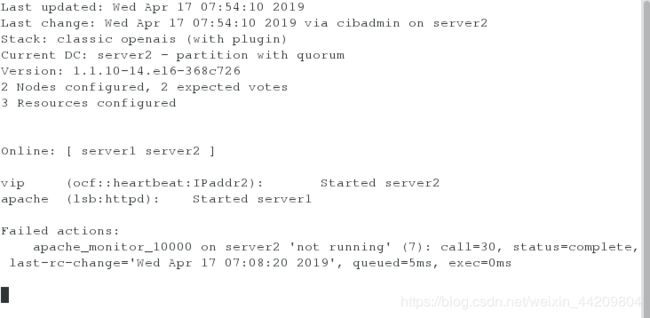
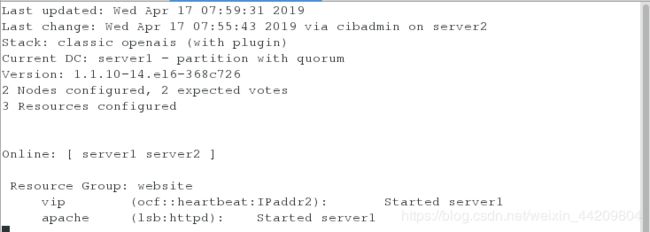
注意:动态监控下看到此时的VIP在server1上,httpd在server2上
4.设置集群资源组
[root@server2 corosync]# crm
crm(live)# configure
##定义组名字,将资源添加进组
crm(live)configure# group website vip apache
crm(live)configure# verify
crm(live)configure# commit
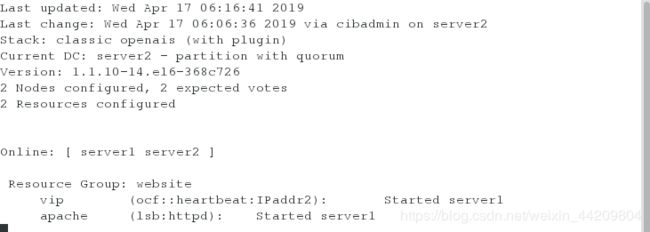
测试:

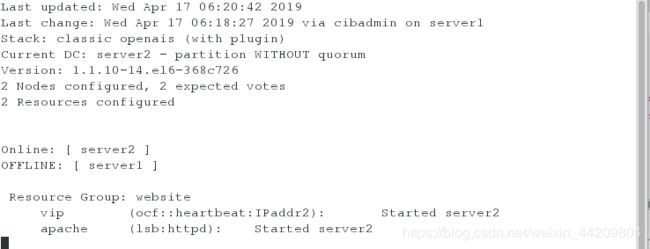
测试1:将server1的corosync服务停掉(在server2上开启监控)
[root@server1 corosync]# /etc/init.d/corosync status
[root@server1 corosync]# /etc/init.d/corosync stop
解决办法:
[root@server1 corosync]# /etc/init.d/corosync start
[root@server1 corosync]# crm
crm(live)# configure
crm(live)configure# property no-quorum-policy=
no-quorum-policy (enum, [stop]): What to do when the cluster does not have quorum
    What to do when the cluster does not have quorum  Allowed values: stop, freeze, ignore, suicide

crm(live)configure# property no-quorum-policy=ignore
 crm(live)configure# verify
crm(live)configure# commit
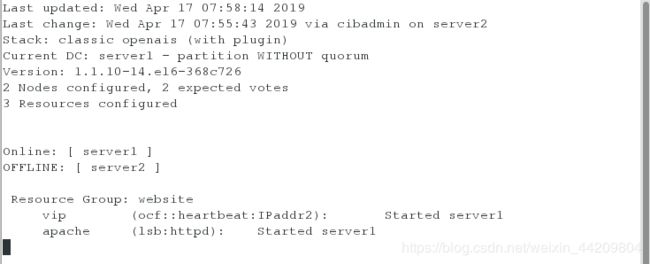
注意:选举模式:如果一个下线,另一个想获得资源(需要进行票选);默认一般为三台服务器组,当一个挂掉,另外的进行票选进行谁上线,此处是两台,当票选不够,忽略
测试2:此时将server1服务停掉
[root@server1 corosync]# /etc/init.d/corosync stop
三、配置fence设备
搭建步骤:
添加fence之前必须监控httpd
注意:在pacemaker默认会将fence和资源放在不同的服务器上
1.在server1、server2上建立目录
[root@server1 corosync]# mkdir /etc/cluster
[root@server2 corosync]# mkdir /etc/cluster
[root@foundation73 ~]# cd /etc/cluster/
[root@foundation73 cluster]# ls
fence_xvm.key
[root@foundation73 cluster]# rm -rf fence_xvm.key
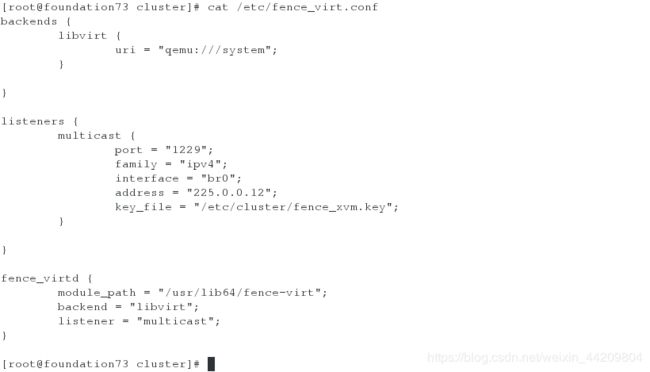
[root@foundation73 cluster]# cat /etc/fence_virt.conf
[root@foundation73 cluster]# dd if=/dev/urandom of=/etc/cluster/fence_xvm.key bs=128 count=1
3.将密钥发送给server1、server2,开启服务
[root@foundation73 cluster]# scp fence_xvm.key [email protected]:/etc/cluster/
[root@foundation73 cluster]# scp fence_xvm.key [email protected]:/etc/cluster/
[root@foundation73 cluster]# systemctl start fence_virtd.service
4.在server1和server2上查看密钥是否存在


5.查看此时的fence设备
[root@server1 cluster]# stonith_admin -I
[root@server2 cluster]# stonith_admin -I
6.安装软件,生成fence设备
[root@server1 cluster]# yum provides */fence_xvm
[root@server1 cluster]# yum install fence-virt-0.2.3-15.el6.x86_64 -y
[root@server1 cluster]# stonith_admin -I
[root@server2 cluster]# yum provides */fence_xvm
[root@server2 cluster]# yum install fence-virt-0.2.3-15.el6.x86_64 -y
[root@server2 cluster]# stonith_admin -I
7.配置集群全局资源将之前停掉的fence服务开启,添加fence设备
[root@server1 cluster]# crm
crm(live)# configure
crm(live)configure# property stonith-enabled=true
crm(live)configure# primitive vmfence stonith:fence_
fence_legacy   fence_pcmk     fence_virt     fence_xvm
##自定义vmfence,将fence设备添加到server1和server2上,(hostname:虚拟机名字)
crm(live)configure# primitive vmfence stonith:fence_xvm params pcmk_host_map="server1:server1;server2:server2" op monitor interval=1min
crm(live)configure# verify
crm(live)configure# commit
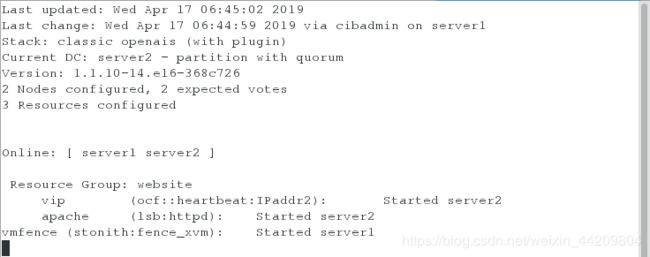
[root@server2 cluster]# crm_mon
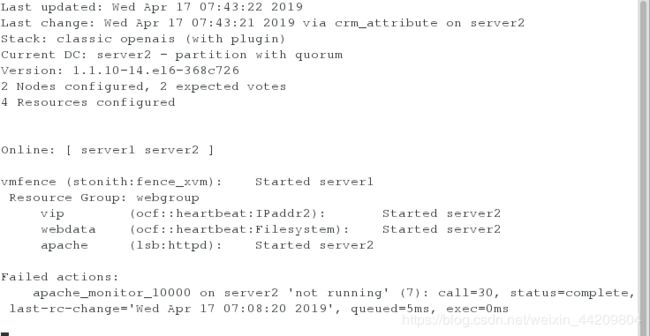
此时可以看到fence设备和资源分别被加在不同的服务器上
测试:
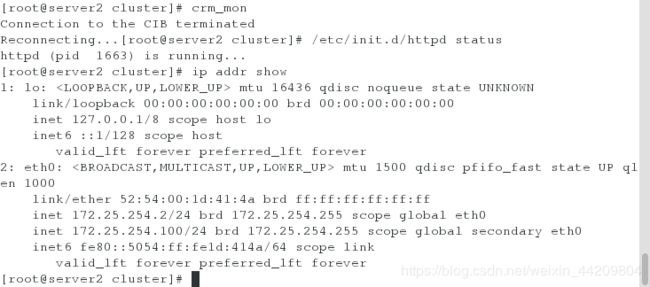
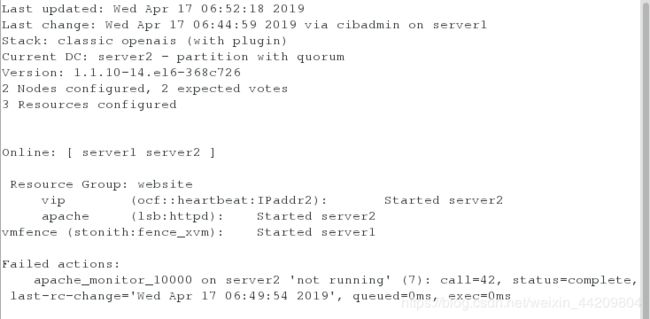
测试1:将httpd服务关闭,会发现fence会自己启动httpd
(此时的httpd服务在server2上开启的,ip资源也在server2)
[root@server2 cluster]# /etc/init.d/httpd status
[root@server2 cluster]# ip addr show
[root@server2 cluster]# echo c >/proc/sysrq-trigger

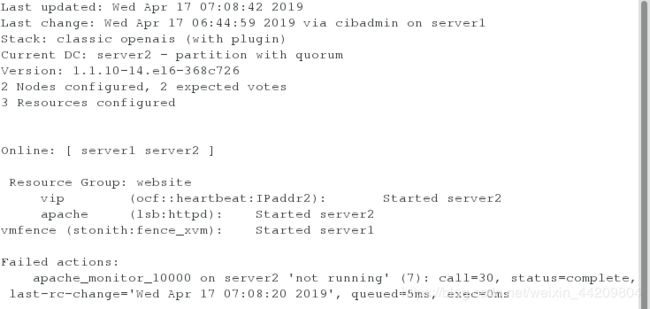
注意:会发现fence设备和资源都被加在同一台服务器,会出现报错

测试3:在server1监控:将server2的服务开启会发现资源和fence设备分配在不同服务器
将server2和server1的corosync设置开机自启
[root@server2 ~]# /etc/init.d/corosync status
corosync is stopped
[root@server2 ~]# /etc/init.d/corosync start
[root@server2 ~]# chkconfig corosync on
[root@server1 cluster]# chkconfig corosync on
测试4:在server2上监控:将server1的网络关闭,会发现fence设备和资源被分配到一台服务器上
[root@server1 cluster]# /etc/init.d/network stop

将server1重新连接,会发现fence设备和资源重新被分配到不同服务器
四、NFS共享存储
搭建步骤:
1.安装nfs共享存储需要的软件,开服务
[root@server3 ~]# yum install nfs-utils rpcbind -y
[root@server3 ~]# /etc/init.d/rpcbind start
2.建立一个目录用来共享
[root@server3 ~]# mkdir -p /web/htdocs
[root@server3 ~]# chmod o+x /web/htdocs/
[root@server3 ~]# ll -d /web/htdocs/
drwxr-xr-x 2 root root 4096 Apr 17 07:20 /web/htdocs/
3.编辑nfs共享文件策略
[root@server3 ~]# vim /etc/exports
 1 /web/htdocs 172.25.254.0/24(rw)
 [root@server3 ~]# exportfs -r
[root@server3 ~]# showmount -e
clnt_create: RPC: Program not registered
4.在共享目录里写入东西
[root@server3 ~]# cd /web/htdocs/
[root@server3 htdocs]# vim index.html
[root@server3 htdocs]# cat index.html
hello world
5.开启服务
[root@server3 htdocs]# /etc/init.d/rpcbind status
rpcbind (pid  1064) is running...
[root@server3 htdocs]# /etc/init.d/nfs start
6.在server1和server2上测试挂载情况
[root@server1 ~]# mount -t nfs 172.25.254.3:/web/htdocs /mnt
[root@server2 ~]# mount -t nfs 172.25.254.3:/web/htdocs /mnt
7.添加集群资源(前提:将已挂载设备卸载,确保服务端rpcbind、nfs服务开启)

[root@server1 ~]# crm
crm(live)# configure
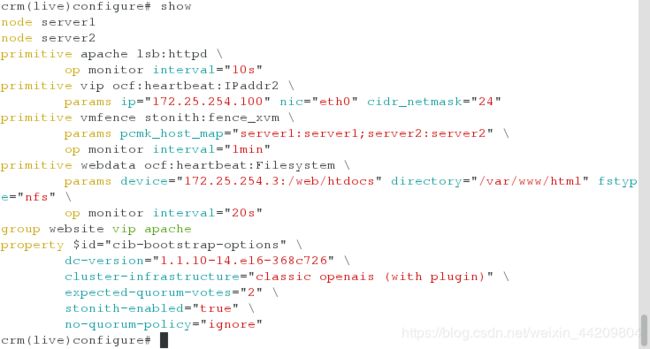
crm(live)configure# primitive webdata ocf:heartbeat:Filesystem params device="172.25.254.3:/web/htdocs" directory="/var/www/html" fstype="nfs" op monitor interval=20s
crm(live)configure# verify
WARNING: webdata: default timeout 20s for start is smaller than the advised 60
WARNING: webdata: default timeout 20s for stop is smaller than the advised 60
WARNING: webdata: default timeout 20s for monitor is smaller than the advised 40
crm(live)configure# commit
WARNING: webdata: default timeout 20s for start is smaller than the advised 60
WARNING: webdata: default timeout 20s for stop is smaller than the advised 60
WARNING: webdata: default timeout 20s for monitor is smaller than the advised 40
crm(live)configure#
注意:报错是因为默认响应最短时间必须是40s,此处的设置小于了默认,无影响
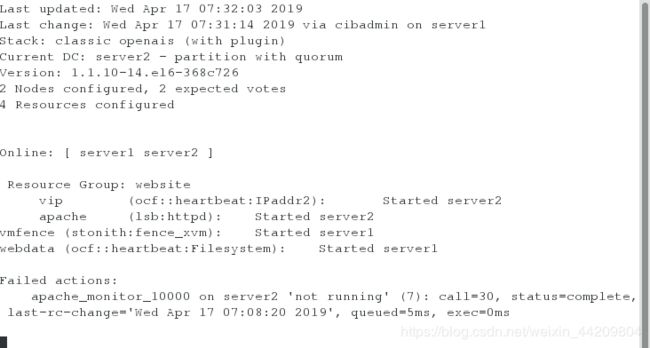
8.在server2上监控查看信息( 此时文件系统和vip与apache不在同一服务器上 )
crm(live)configure# cd
crm(live)# resource
crm(live)resource# show
 Resource Group: website
     vip	(ocf::heartbeat:IPaddr2):	Started
     apache	(lsb:httpd):	Started
 vmfence	(stonith:fence_xvm):	Started
 webdata	(ocf::heartbeat:Filesystem):	Started
crm(live)resource# stop website
crm(live)resource# show
 Resource Group: website
     vip	(ocf::heartbeat:IPaddr2):	Stopped
     apache	(lsb:httpd):	Stopped
 vmfence	(stonith:fence_xvm):	Started
 webdata	(ocf::heartbeat:Filesystem):	Started
crm(live)resource# cd
crm(live)# configure
delcrm(live)configure# delete website
crm(live)configure# group webgroup vip webdata apache
测试:
测试1:将server2下线:(监控下会发现fence设备和资源都在同一服务器)
[root@server2 ~]# crm
crm(live)# node
crm(live)node# show
server2: normal
server1: normal
crm(live)node# standby server2
crm(live)node# show
server2: normal
	standby: on
server1: normal
crm(live)node#
测试2:将server2上线:(监控下会发现三个资源在一台服务器上,fence设备在一台服务器上)
crm(live)node# show
server2: normal
	standby: on
server1: normal
crm(live)node# online server2
crm(live)node# show
server2: normal
	standby: off
server1: normal
###########################################################################
如何合理删除资源?
如何设置资源组里的顺序?
crm(live)resource# cd
crm(live)# configure
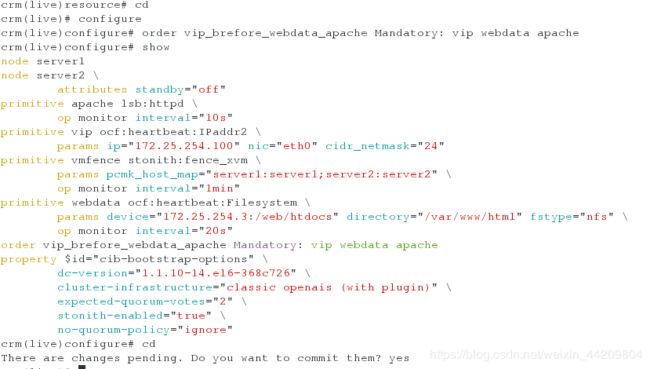
crm(live)configure# order vip_brefore_webdata_apache Mandatory: vip webdata apache
注意:顺序约束(Order):顺序约束限定了资源之间的启动顺序。
如何设置资源回切?
crm(live)resource# cd
crm(live)# configure
crm(live)configure# group website vip apache
crm(live)configure# verify
comcrm(live)configure# commit
测试:在server1监控:将server2的corosync服务停掉,发现server1抢了资源,当开启server2的服务时资源不会回切
[root@server2 ~]# /etc/init.d/corosync stop
Signaling Corosync Cluster Engine (corosync) to terminate: [  OK  ]
Waiting for corosync services to unload:..                 [  OK  ]
[root@server2 ~]# /etc/init.d/corosync start
Starting Corosync Cluster Engine (corosync):               [  OK  ]
解决:
[root@server2 ~]# crm
crm(live)# configure
crm(live)configure# location website_on_server2 website 50: server2
crm(live)configure# verify
crm(live)configure# commit
注意:位置约束(Location):位置约束限定了资源应该在哪个集群节点上启动运行。
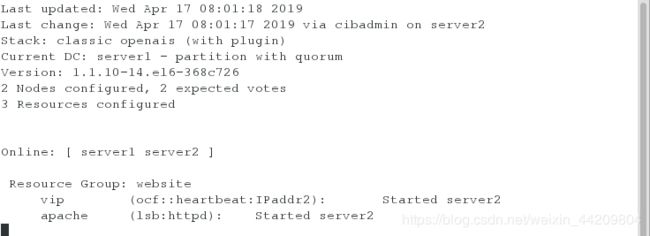
注意:设置完成后监控下发现资源回到server2上


