SparkStreaming整合Flume
文章目录
- 案例一、Flume-style Push-based Approach
- 案例二、Push-based Approach using a Custom Sink
SparkStreaming整合Flume有两种方式,下面会一一列举这两个Demo
案例一、Flume-style Push-based Approach
首先来看一下官方文档,之前所介绍的socket或者fileSystem都属于基本数据源,在这里将主要介绍一下高级数据源。

官网给出三种高级数据源,今天主要来看一下Flume的相关部分。。。
可以将数据放入多个Flume Agent之间,串联或并联放入都可以,SparkStreaming作为一个avro的接收方,接收Flume采集过来的数据。。
配置方法是:
- Flume和Worker在一台节点上启动
- Flume配置之后将数据发送给一个端口之中
此外SparkStreaming是接收数据的,因此要先启动并且监听一个Flume注入数据的端口。。
- 先配置一下Flume
# Name the components on this agent
simple-agent.sources = netcat-source
simple-agent.sinks = avro-sink
simple-agent.channels = memory-channel

# Describe/configure the source
simple-agent.sources.netcat-source.type = netcat
simple-agent.sources.netcat-source.bind = hadoop1
simple-agent.sources.netcat-source.port = 44444

# Describe the sink
simple-agent.sinks.avro-sink.type = avro
simple-agent.sinks.avro-sink.hostname = hadoop1
simple-agent.sinks.avro-sink.port = 41414

# Use a channel which buffers events in memory
simple-agent.channels.memory-channel.type = memory
simple-agent.channels.memory-channel.capacity = 1000
simple-agent.channels.memory-channel.transactionCapacity = 100

# Bind the source and sink to the channel
simple-agent.sources.netcat-source.channels = memory-channel
simple-agent.sinks.avro-sink.channel = memory-channel
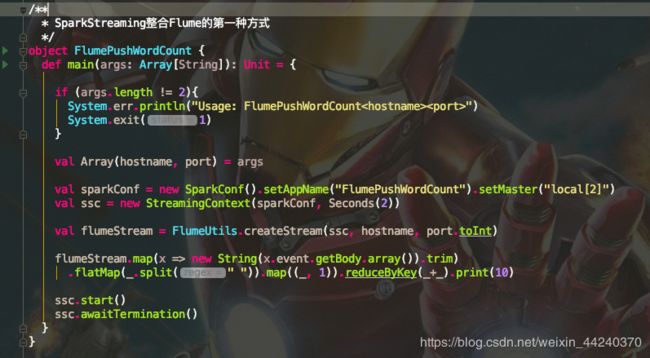
2.写SparkStreaming应用程序,导入FlumeUtils创建DStream
首先导入相关依赖:
		<dependency>
            <groupId>org.apache.sparkgroupId>
            <artifactId>spark-streaming-flume_2.11artifactId>
            <version>2.1.1version>
        dependency>
3.测试
本地测试中,需要将Flume的配置中Sink配置改成主机ip地址,不是服务器地址,然后启动SparkStreaming,之后启动Flume,使用talent输入数据,观察控制台的输出
simple-agent.conf
# Name the components on this agent
simple-agent.sources = netcat-source
simple-agent.sinks = avro-sink
simple-agent.channels = memory-channel

# Describe/configure the source
simple-agent.sources.netcat-source.type = netcat
simple-agent.sources.netcat-source.bind = hadoop1
simple-agent.sources.netcat-source.port = 44444

# Describe the sink
simple-agent.sinks.avro-sink.type = avro
simple-agent.sinks.avro-sink.hostname = 192.168.1.161
simple-agent.sinks.avro-sink.port = 41414

# Use a channel which buffers events in memory
simple-agent.channels.memory-channel.type = memory
simple-agent.channels.memory-channel.capacity = 1000
simple-agent.channels.memory-channel.transactionCapacity = 100

# Bind the source and sink to the channel
simple-agent.sources.netcat-source.channels = memory-channel
simple-agent.sinks.avro-sink.channel = memory-channel
启动Flume
flume-ng agent
--name simple-agent
--conf /home/hadoop1/modules/apache-flume-1.7.0-bin/conf/
--conf-file /home/hadoop1/modules/apache-flume-1.7.0-bin/conf/flume_push_streaming.conf
-Dflume.root.logger=INFO,console
使用telnet,要先开放端口,然后再启动telnet-server才能连接上
- spark-submit上线部署
测试成功之后进行线上部署,先把Flume的配置文件改成之前的hadoop1的hostname,然后用mvn clean package -DskipTests将SparkStreaming打成jar包,然后启动spark-submit
[1@hadoop1 spark-2.1.1-bin-hadoop2.7]$ spark-submit
--name spark_flume
--class com.fyj.spark.spark_flume
--master local[*]
--packages org.apache.spark:spark-streaming-flume_2.11:2.1.1 /home/hadoop1/modules/apache-flume-1.7.0-bin/test_dataSource/flume_spark/target/flume_spark-1.0-SNAPSHOT.jar
hadoop1 41414
案例二、Push-based Approach using a Custom Sink
指SparkStreaming拉取过来信息,只需要让Flume将数据push到一个buffer区,SparkStreaming会使用一个合适的Flume Receiver,从sink内拉出来,并且这个操作只会在数据被SparkStreaming完成副本和接收成功之后才会完成。。
因此这种方式比第一种方式要安全可靠,支持容错很高,所以需要配置Flume到一个自定义的Sink上面。。
需求:使用一台机器运行flume agent ,然后用SparkStreaming去方位这台正在工作的自定义sink就ok了。
- 首先需要配置sink的jar包到SparkStreaming的pom文件上
		<dependency>
            <groupId>org.apache.commonsgroupId>
            <artifactId>commons-lang3artifactId>
        dependency>
        <dependency>
            <groupId>org.apache.sparkgroupId>
            <artifactId>spark-streaming-flume-sink_2.11artifactId>
            <version>2.1.1version>
        dependency>
- 配置Flume Agent Conf
# Name the components on this agent
simple-agent.sources = netcat-source
simple-agent.sinks = spark-sink
simple-agent.channels = memory-channel

# Describe/configure the source
simple-agent.sources.netcat-source.type = netcat
simple-agent.sources.netcat-source.bind = hadoop1
simple-agent.sources.netcat-source.port = 44444

# Describe the sink
simple-agent.sinks.spark-sink.type = org.apache.spark.streaming.flume.sink.SparkSink
simple-agent.sinks.spark-sink.hostname = hadoop1
simple-agent.sinks.spark-sink.port = 41414

# Use a channel which buffers events in memory
simple-agent.channels.memory-channel.type = memory
simple-agent.channels.memory-channel.capacity = 1000
simple-agent.channels.memory-channel.transactionCapacity = 100

# Bind the source and sink to the channel
simple-agent.sources.netcat-source.channels = memory-channel
simple-agent.sinks.spark-sink.channel = memory-channel


