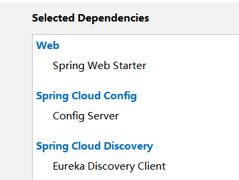
SpringCloud的入门,快速使用,服务的注册与发现,服务消费者,路由网关zuul,分布式配置中心,高可用的分布式配置中心,自动刷新配置文件,高可用的服务注册中心,断路器Hystrix
1、SpringCloud
(一)微服务简介
-
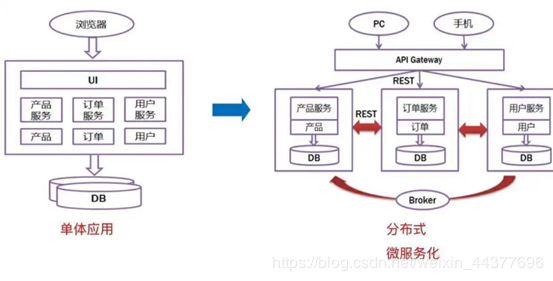
微服务是一种架构模式或者一种架构风格,提倡将单一应用程序划分成一组小的服务,每个服务独立部署,服务之间相互配合、相互协调,每个服务运行于自己的进程中。服务与服务间采用轻量级通讯模式,如HTTP的RESTful API等。避免统一的、集中式的服务管理机制。
-
单体应用与微服务应用对比:
-
优缺点:
- 1、优点
- 每个服务足够内聚,足够小,比较容易聚焦
- 开发简单且效率高,一个服务只做一件事情
- 微服务是松耦合的,无论开发还是部署都可以独立完成
- 微服务能用不同的语言开发
- 易于和第三方集成,微服务允许容易且灵活的自动集成部署(持续集成工具
- Jenkins,Hudson,bamboo等)
- 微服务易于被开发人员理解,修改和维护,这样可以使小团队更加关注自己的工作成果,而
- 需一定要通过合作才能体现价值。
- 微服务允许你融合最新的技术。
- 微服务只是业务逻辑的代码,不会和HTML,CSS或其他界面组件融合。
- 每个微服务都可以有自己的存储能力,数据库可自有也可以统一,十分灵活。
- 一句话:容错性,并发性,解耦,扩展性,细粒度的控制,团队开发,职责换分非常清晰…代码重用(Pc,移动端)
- 2、缺点:
- 开发人员要处理分布式系统的复杂性
- 随着服务的增加,运维的压力也会增大
- 服务间通讯的成本
- 系统集成测试
- 1、优点
-
微服务架构需要的功能
- 1、服务注册中心,服务的注册和调用都在注册中心进行。
- 2、所有的客户端都通过同一个网关地址访问注册中心的服务。通过路由网关配置,来判断一个UR请求由哪个服务处理。
- 3、每个服务需要做到高可用,调用服务时需要使用负载均衡。
- 4、服务之间彼此可以相互访问。
- 5、断路器,用来及时处理服务调用时的超时和错误,防止由于其中一个服务的问题而导致整体系统的瘫痪。
- 6、监控中心,监控每个服务调用花费的时间以及服务之间的调用关系等。
- …
(二)SpringCloud入门
1.SpringCloud简介
- SpringCloud是基于SpringBoot的一整套实现微服务的框架。提供了微服务开发所需的配置管理、服务发现、断路器、智能路由、微代理、控制总线、全局锁、决策竞选、分布式会话和集群状态管理等组件。
- SpringBoot旨在简化创建产品级的 Spring 应用和服务,简化了配置文件,使用嵌入式web服务器,含有诸多开箱即用的微服务功能。基于SpringBoot来开发微服务极其方便。
2.SpringCloud和SpringBoot的关系
- Spring Boot 是 Spring 的一套快速配置框架,我们可以基于Spring Boot 来快速开发单个微服务;Spring Cloud是一个基于Spring Boot实现的云应用开发工具。
- Spring Boot专注于快速、方便集成的单个微服务个体;Spring Cloud关注全局的服务治理框架,如何发布,如何调用等;
- Spring Boot使用了默认大于配置的理念,很多集成方案已经帮你选择好了,能不配置就不配置,Spring Cloud是基于Spring Boot来实现的。
- Spring Boot可以离开Spring Cloud独立使用开发项目,但是Spring Cloud离不开Spring Boot,属于依赖的关系。
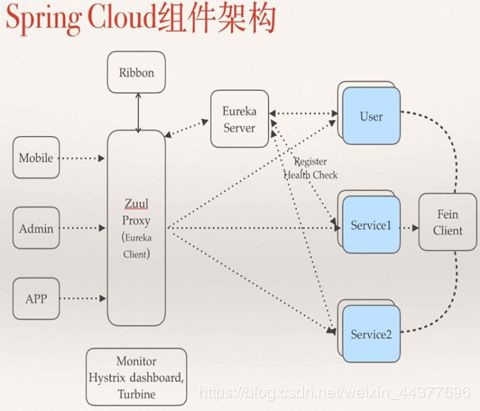
3.SpringCloud组件
- Springcloud是一系列微服务框架的集合:
4.SpringCloud版本
- SpringCloud版本名称采用了伦敦地铁站的名字,依次是:Angel、Brixton、Camden、Dalston、Edgware、Finchley、Greenwich…习惯上,Dalston简称 D 版,Edgware简称E版。
- SpringBoot和Spring Cloud版本不能随便选择,存在着对应关系的,以下是SpringBoot与Spring Cloud版本的对照表:
| SpringBoot版本 | SpringCloud版本 |
|---|---|
| 1.2.x | Angel版本 |
| 1.3.x | Brixton版本 |
| 1.4.x | Camden版本 |
| 1.5.x | Dalston版本、Edgware版本 |
| 1.5.x | Dalston版本、Edgware版本 |
| 2.0.x | Finchley版本 |
| 2.1.x | Greenwich版本 |
| … | …H |
2、快速使用
(三)工程搭建
- 1.创建SpringBoot工程:创建一个空的springboot工程,作为父工程。
- 2.在主工程中添加依赖声明,但可以不加(本示例不加):
<properties>
    <spring-cloud.version>Greenwich.RELEASEspring-cloud.version>
properties>


<parent>
<groupId>org.springframework.bootgroupId>
<artifactId>spring-boot-starter-parentartifactId>
<version>2.1.3.RELEASEversion>
<relativePath/>
parent>


<packaging>pompackaging>

<dependencyManagement>
    <dependencies>
        <dependency>
            <groupId>org.springframework.cloudgroupId>
            <artifactId>spring-cloud-dependenciesartifactId>
            <version>${spring-cloud.version}version>
            <type>pomtype>
            <scope>importscope>
        dependency>
    dependencies>
dependencyManagement>
(四)服务的注册与发现
1.Eureka简介
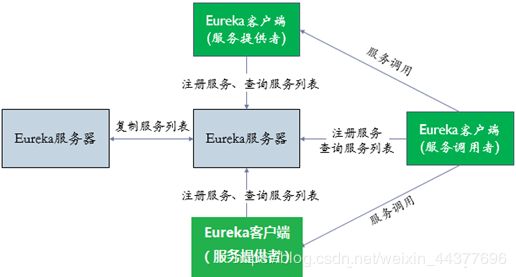
- Eureka是Spring Cloud Netflix微服务套件中的一部分,是一套成熟的服务注册和发现组件,可以与Springboot构建的微服务很容易的整合起来。
- Eureka包含了服务器端和客户端组件。(server,client)
- Eureka服务器用作服务注册服务器。
- Eureka客户端是一个java客户端,用来简化与服务器的交互、作为轮询负载均衡器,并提供服务的故障切换支持。
-
- 服务发布
- 使用eureka-client组件发布user服务到注册中心
- 当client向server注册时,它会提供一些元数据,例如主机和端口,URL,主页等
- Eureka server 从每个client实例接收心跳消息(周期性,默认30秒一次)。如果心跳超时(默认90秒),则通常将该实例从注册中心server中删除。
2.本例操作:
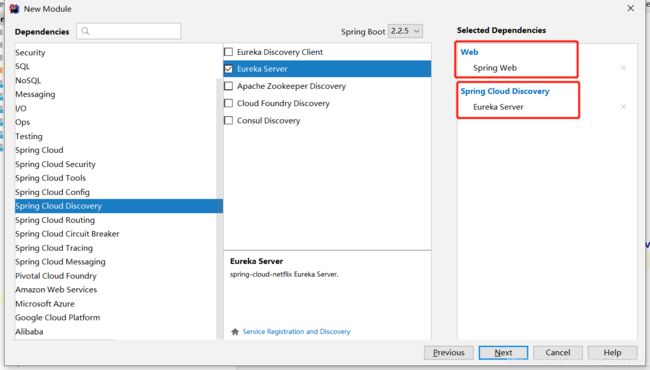
2.1新建注册中心服务:
<dependency>
    <groupId>org.springframework.cloudgroupId>
    <artifactId>spring-cloud-starter-netflix-eureka-serverartifactId>
dependency>
<dependency>
    <groupId>org.springframework.bootgroupId>
    <artifactId>spring-boot-starter-webartifactId>
dependency>
- (2)在项目启动类上添加@EnableEurekaServer注解。
@SpringBootApplication
@EnableEurekaServer // 开启EurekaServer  启用注册中心服务
public class YoulexuanReistyApplication {
    public static void main(String[] args) {
        SpringApplication.run(YoulexuanReistyApplication.class, args);
    }
}
- (3)创建appication.yml,添加如下配置:
server:
  port: 8761 #注册服务端口 8761
eureka:
  instance:
    #当前ip名称
    hostname: localhost
  client:
    #是否将自己注册到Eureka服务中,本身就是,所以无需注册
    registerWithEureka: false
    #是否从Eureka中获取注册信息
    fetchRegistry: false
    #EurekaServer注册中心地址
    serviceUrl:
      #注册中心地址 localhost:8761/eureka/ 以逗号分割,可以写多个注册中心
      defaultZone: http://${eureka.instance.hostname}:${server.port}/eureka/
spring:
  application:
    #当前工程的名称
    name: eurka-server
其中:通过eureka.client.registerWithEureka:false和fetchRegistry:false来表明自己是一个eureka server(注册中心)。
- (4)启动工程
- 启动工程,打开浏览器访问: http://localhost:8761/ (注册中心项目的路径),eureka server
- 访问界面中:
- system status为系统信息
- General Info为一般信息
- Instances currently registered with Eureka为注册到的所有微服务列表
2.2新建服务提供者模块(youlexuan-user):
- (1)添加eureka-client依赖
<dependency>
    <groupId>org.springframework.cloudgroupId>
    <artifactId>spring-cloud-starter-netflix-eureka-clientartifactId>
    <version>2.0.1.RELEASEversion>
dependency>
<dependency>
    <groupId>org.springframework.bootgroupId>
    <artifactId>spring-boot-starter-webartifactId>
dependency>
- (2)在启动类上添加 @EnableEurekaClient ,表明此项目是一个eureka client,即服务发布端。
@SpringBootApplication
@EnableEurekaClient
public class ClientApplication {
    public static void main(String[] args) {
        SpringApplication.run(ClientApplication.class, args);
    }
}
- (3)修改application.yml添加以下内容:
server:
  # 指定服务端口
  port: 8763
spring:
  application:
    # 需要指明spring.application.name,这个很重要!!!,
    # 这在以后的服务与服务之间相互调用一般都是根据这个name,name不区分大小写
    name: youlexuan-user
eureka:
  client:
    serviceUrl:
      #注册中心地址 localhost:8761/eureka/ 以逗号分割,可以写多个注册中心
      defaultZone: http://localhost:8761/eureka/
- (4)、新建UserService.java
@RestController
public class UserService {

    @Value("${server.port}")
    String port ;

    @GetMapping("/user/{id}")
    public String getUserById(@PathVariable String id){
        User user = new User();
        user.setId(id);
        user.setName("test :" + port);
        return user.toString();
    }

    @DeleteMapping("/user/{id}")
    public String deleteByid(@PathVariable String id){
        return "根据id删除用户 = "+id + "," + port;
    }
}
- 测试
(五)服务消费者(调用方式1:restTemplate+ribbon)
- 在微服务架构中,业务都会被拆分成一个独立的服务,服务与服务的通讯是基于http restful的。Spring cloud在调用服务时有两种方式:一种是ribbon+restTemplate,ribbon作为一个负载均衡客户端;另一种是feign。在这一节中先讲解ribbon+restTemplate调用服务。
本例操作:
- 1.开启多个服务提供实例
- 2.创建子工程youlexuan-order:服务消费者
<dependency>
    <groupId>org.springframework.cloudgroupId>
    <artifactId>spring-cloud-starter-netflix-eureka-clientartifactId>
    <version>2.0.1.RELEASEversion>
dependency>
<dependency>
    <groupId>org.springframework.bootgroupId>
    <artifactId>spring-boot-starter-webartifactId>
dependency>
<dependency>
    <groupId>org.springframework.cloudgroupId>
    <artifactId>spring-cloud-starter-netflix-ribbonartifactId>
    <version>2.0.1.RELEASEversion>
dependency>
- 配置application.yml
- 在工程的配置文件指定服务的注册中心地址为http://localhost:8761/eureka/,程序名称为 youlexuan-order,程序端口为8765。
server:
  port: 8765
spring:
  application:
    name: youlexuan-order
eureka:
  client:
    serviceUrl:
      defaultZone: http://localhost:8761/eureka/
- 新建配置类 OrderServiceConfig.java
- @Bean 注入bean
- @LoadBalanced注解表明这个RestRemplate开启负载均衡的功能。
- RestTemplate 可以模拟客户端请求rest端口
@Configuration
public class OrderServiceConfig {
    @Bean  //注入bean
    @LoadBalanced //restTemplate在请求某一个rest接口时,会进行负载均衡。
    RestTemplate restTemplate() {
        return new RestTemplate();
    }
}
- 修改工程启动类
- 在工程的启动类中,通过@EnableDiscoveryClient向服务中心注册;
@SpringBootApplication
@EnableEurekaClient
@EnableDiscoveryClient
public class YoulexuanOrderApplication {
    public static void main(String[] args) {
        SpringApplication.run(YoulexuanOrderApplication.class, args);
    }
}
- 创建Service类 OrderService.java
@RestController
public class OrderService {
    @Autowired
    RestTemplate restTemplate;

    @Value("${server.port}")
    String port;

    @GetMapping("/orders")
    public String getOrders(){
        return "查询所有订单"+port;
    }

    //get的方式调用 getForobject
    @GetMapping("/orders/{oid}/{uid}")
    public String getOrderAndUser(@PathVariable(name = "oid") String oid,@PathVariable String uid){
        String str = restTemplate.getForObject("http://YOULEXUAN-USER/user/" + uid, String.class);
        return "查询指定用户的订单"+oid+","+uid+","+str;
    }

    //post的方式调用 postForObject
    @PostMapping("/orders")
    public String getOrderAndUser2(User user){
        MultiValueMap<String, Object> param = new LinkedMultiValueMap<String, Object>();
        param.add("id", user.getId());
        param.add("name", user.getName());

        HttpHeaders headers = new HttpHeaders();
        headers.add("Content-Type", "application/x-www-form-urlencoded");

        HttpEntity<MultiValueMap<String, Object>> formEntity =
                new HttpEntity<MultiValueMap<String, Object>>(param, headers);
        //含有请求头
        String result = restTemplate.postForObject("http://YOULEXUAN-USER/user/", formEntity, String.class);
        return result;
    }
}
(六)服务消费者(调用方式2:Feign)(推荐)
- 1.Feign简介
- Feign是一个声明式的伪Http客户端,它使得写Http客户端变得更简单。使用Feign,只需要创建一个接口并注解。它具有可插拔的注解特性,可使用Feign 注解和JAX-RS注解。Feign支持可插拔的编码器和解码器。Feign默认集成了Ribbon,并和Eureka结合,默认实现了负载均衡的效果。
- Feign 采用的是基于接口的注解;
- Feign 整合了ribbon,具有负载均衡的能力;
- 整合了Hystrix,具有熔断的能力;
本例操作:
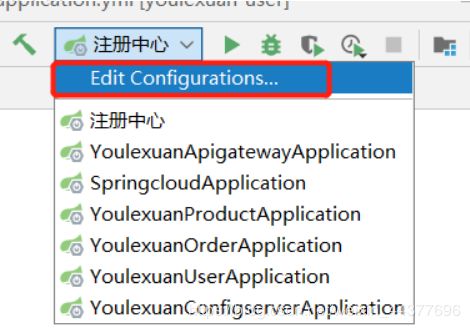
- 继续用上一节的工程,启动youlexuan-reisty,端口为8761;启动youlexuan-order 两次,端口分别为8764、8765。
- 创建子工程youlexuan-product:服务消费者
- 添加pom依赖
<dependency>
    <groupId>org.springframework.boot</groupId>
    <artifactId>spring-boot-starter-web</artifactId>
</dependency>
<!--每一个服务都要加一个client-->
<dependency>
    <groupId>org.springframework.cloud</groupId>
    <artifactId>spring-cloud-starter-netflix-eureka-client</artifactId>
</dependency>
<dependency>
    <groupId>org.springframework.cloud</groupId>
    <artifactId>spring-cloud-starter-openfeign</artifactId>
</dependency>
- 配置application.yml文件
eureka:
  client:
    serviceUrl:
      # 服务注册地址
      defaultZone: http://localhost:8761/eureka/
server:
  # 端口号
  port: 8765
spring:
  application:
    # 消费者名称
    name: youlexuan-product
- 修改程序启动类
- 使用@EnableFeignClients注解开启Feign的功能。
@SpringBootApplication
@EnableEurekaClient
@EnableDiscoveryClient
@EnableFeignClients
public class YoulexuanProductApplication {
    public static void main(String[] args) {
        SpringApplication.run(YoulexuanProductApplication.class, args);
    }
}
- 创建接口 OrderService.java
//@ FeignClient(“服务名”) //远程服务调用,指定名称
@FeignClient(value = "YOULEXUAN-ORDER")
public interface OrderService {

    ////远程服务的方法
    @GetMapping("/orders")
    public String getAllOrders();

    @GetMapping("/orders/{oid}/{uid}")
    public String getOrderAndUser(@PathVariable(name = "oid") String oid, @PathVariable String uid);

}
- 在Web层的controller层 ProductService.java,通过上面定义的Feign客户端OrderService 来消费服务。
@Autowired
OrderService orderService; //忽略此处的编译错误!!

@GetMapping("/product")
public String getProduct(){
    String allOrders = orderService.getAllOrders();
    return "Product中getProduct调用订单服务:"+allOrders;
}
- 测试
- 启动程序,多次访问http://localhost:8765/product,结果浏览器交替显示
(七)路由网关zuul(api gateway)
- 简介:
- 在Spring Cloud微服务系统中,一种常见的负载均衡方式是,客户端的请求首先经过负载均衡,再到达服务网关(zuul集群),然后再到具体的服务。服务统一注册到高可用的服务注册中心集群,服务的所有的配置文件由 配置服务 来管理。配置服务 的配置文件放在git仓库,方便开发人员随时改配置。
- 网关的作用:、
- 1、拦截 校验
- 2、配置每一个服务的访问路径(统一化)
Zuul简介
- Zuul的主要功能是路由转发、作为过滤器,做一些安全验证。路由功能是微服务的一部分,比如/api/user转发到到user服务,/api/shop转发到到shop服务。zuul默认和Ribbon结合实现了负载均衡的功能。
- Zuul有以下功能:
- (1) Authentication认证
- (2) Stress Testing 压力测试
- (3) Dynamic Routing动态路由
- (4) Service Migration服务迁移
- (5) Load Shedding 减载(限流)
- (6) Security安全
- (7) Static Response handling静态响应处理
- (8) Active/Active traffic management主动/主动交通管理
- (9) Insights
- (10) Canary Testing
本例操作(路由转发):
- 新建youlexuan-apigateway工程,Pom依赖:
<dependency>
    <groupId>org.springframework.bootgroupId>
    <artifactId>spring-boot-starter-webartifactId>
dependency>
<dependency>
    <groupId>org.springframework.cloudgroupId>
    <artifactId>spring-cloud-starter-netflix-zuulartifactId>
    <version>2.0.1.RELEASEversion>
dependency>
<dependency>
    <groupId>org.springframework.cloudgroupId>
    <artifactId>spring-cloud-starter-netflix-eureka-clientartifactId>
    <version>2.0.1.RELEASEversion>
dependency>
- 在入口类加上注解@EnableZuulProxy,开启zuul的功能:
@SpringBootApplication
@EnableZuulProxy
@EnableEurekaClient
@EnableDiscoveryClient
public class YoulexuanApigatewayApplication {
    public static void main(String[] args) {
        SpringApplication.run(YoulexuanApigatewayApplication.class, args);
    }
}
- application.yml添加以下配置:
eureka:
  client:
    serviceUrl:
      # 指定服务注册中心的地址为http://localhost:8761/eureka/
      defaultZone: http://localhost:8761/eureka/
server:
  # 服务的端口为8767
  port: 8767
spring:
  application:
    name: youlexuan-apigateway
zuul:
  routes:
    # 服务名为YOULEXUAN-USER;以/service-user/ 开头的请求都转发给YOULEXUAN-USER服务;
    # 以/service-order/开头的请求都转发给YOULEXUAN-ORDER服务; ..
    api-user:
      path: /service-user/**
      serviceId: YOULEXUAN-USER
    api-order:
      path: /service-order/**
      serviceId: YOULEXUAN-ORDER
    api-product:
      path: /service-product/**
      serviceId: YOULEXUAN-PRODUCT
本例操作(服务过滤ZuulFilter)
- 新建AuthenticationFilter.java继承ZuulFilter
- filterType方法,返回一个字符串代表过滤器的类型,在zuul中定义了四种不同生命周期的过滤器类型,具体如下:
- pre:路由之前
- routing:路由之时
- post: 路由之后
- error:发送错误调用
- filterOrder方法:过滤的顺序,存在多个过滤器时执行的顺序
- shouldFilter方法:这里可以写逻辑判断,是否要过滤,本文true,永远过滤。
- run方法:过滤器的具体逻辑。可用很复杂,包括查sql,nosql去判断该请求到底有没有权限访问。
- filterType方法,返回一个字符串代表过滤器的类型,在zuul中定义了四种不同生命周期的过滤器类型,具体如下:
/**
 * 本示例演示 传递token,等于1才可以进行访问
 * 验证客户端http请求是否具有权限
 * 获取每一个请求的token参数,token=1允许请求到目标服务,token=0不允许
 *
 */
@Component
public class AuthenticationFilter extends ZuulFilter {

    @Override
    public String filterType() {
        return "pre";// pre: 路由之前  前置filter
    }

    @Override
    public int filterOrder() { //filter排序 顺序
        return 0;
    }

    @Override
    public boolean shouldFilter() { //filter 开关
        return true;
    }

    @Override
    public Object run() throws ZuulException {
        //拦截器执行逻辑
        RequestContext ctx = RequestContext.getCurrentContext();
        HttpServletRequest request = ctx.getRequest();

        String token = request.getParameter("token");
        ctx.getResponse() .setContentType("text/html;charset=utf-8");
        if (token!=null&&token.equals("1")){
            System.out.println("验证成功");
        }else {
            ctx.setSendZuulResponse(false); //不允许访问 不允许请求到目标服务
            ctx.setResponseStatusCode(401);
            System.out.println("验证失败");
            try {
                ctx.getResponse().getWriter().write("{'code':401,'msg':'token不合法','token':'"+token+"'}");
            }catch (Exception e){

            }
        }
        return null;
    }
}
(八)分布式配置中心Config
- 简介:在分布式系统中,由于服务数量很多,为了方便服务配置文件的统一管理,实时更新,需要使用分布式配置中心组件spring cloud config ;
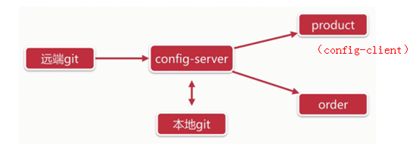
- 在spring cloud config 组件中有两个角色, 一是config server,二是config client。 config-server也是一个单独的微服务,需要注册到注册中心。
- config-server从远端git读取配置文件到,并存储到本地git仓库,其他的服务需要集成config client这个组件,连接config-server来读取配置文件数据。
本例操作
  <dependency>
        <groupId>org.springframework.bootgroupId>
        <artifactId>spring-boot-starter-testartifactId>
        <scope>testscope>
    dependency>
    <dependency>
        <groupId>org.springframework.bootgroupId>
        <artifactId>spring-boot-starter-webartifactId>
    dependency>
    <dependency>
        <groupId>org.springframework.cloudgroupId>
        <artifactId>spring-cloud-config-serverartifactId>
    dependency>
    <dependency>
        <groupId>org.springframework.cloudgroupId>
        <artifactId>spring-cloud-starter-netflix-eureka-clientartifactId>
        <version>2.0.1.RELEASEversion>
    dependency>
- 修改启动类,添加如下注解
@SpringBootApplication
@EnableEurekaClient
@EnableConfigServer
public class YoulexuanConfigserverApplication {
    public static void main(String[] args) {
        SpringApplication.run(YoulexuanConfigserverApplication.class, args);
    }
}
- application.yml
server:
  port: 8768
spring:
  application:
    name: youlexuan-configserver
  cloud:
    config:
      server:
        git:
          # 项目地址(http) 先在github创建一个仓库名叫youlexuan.git
          uri: https://github.com/Tang-Cyi/youlexuan.git
          # github账号
          username: [email protected]
          # github密码
          password: xxxxxxxxx
          # 设置超时时间
          timeout: 60000
eureka:
  client:
    serviceUrl:
      defaultZone: http://localhost:8761/eureka/
- 测试- http://localhost:8767/order-dev.yml (前提github仓库上已存放该文件:order-dev.yml)
构建Config Client
- 每一个服务都可以是config-client。 通过config-server配置中心来读取配置。
- (1)新建config-client项目,本例以原来youlexuan-product为例
- (2)将项目中的application.yml自定义名称,比如本例改名为:bootstrap.yml
- 项目会先加载bootstrap.yml,再去config-server中加载指定的配置文件,
- 并且文件名=spring.application.name + spring.cloud.config.profile+ .yml
- 比如本例:configclient-dev.yml
- 并且文件名=spring.application.name + spring.cloud.config.profile+ .yml
- 项目会先加载bootstrap.yml,再去config-server中加载指定的配置文件,
spring:
  application:
    name: configclient
  cloud:
    config:
      label: master
      profile: dev
      uri: http://localhost:8767/
server:
  port: 8768
- 其中:
- Uri:配置中心的地址
- Label:分支名称,远程仓库的分支
- Profile:环境,通常使用dev表示开发环境,test测试环境,pro正式环境
- configclient-dev.yml的格式一定要正确,否则的话就加载失败。
- service层代码
@Value("${redis.port}")
    String redis_port;
    @GetMapping("/getRedisPort")
    public String getRedis_port(){
        return " redis_port : " + redis_port;
    }
(九)自动刷新配置文件
- 上一节中实现了从配置中心拉取配置信息,但是修改git中的内容后,并不会自动刷新,重启后才会生效。修改了github上的配置文件,需要重启cofig-client(youlexuan-product)。
- 我们的目的:修改github的配置文件,不需要重启,即可生效。
本例操作
- youlexuan-product pom.xml 添加依赖:
<dependency>
    <groupId>org.springframework.boot</groupId>
    <artifactId>spring-boot-starter-actuator</artifactId>
</dependency>
youlexuan-product bootstrap.yml
server:
  port: 8081
spring:
  application:
    # spring.application.name,这个很重要!!!,这在以后的服务与服务之间相互调用一般都是根据这个name
    name: youlexuan-product
  cloud:
    config:
      label: master
      profile: dev
      discovery:
        # 从配置中心读取文件
        enabled: true
        # 指定配置中心的服务名
        service-id: YOULEXUAN-CONFIGSERVER
eureka:
  client:
    serviceUrl:
      defaultZone: http://localhost:8761/eureka/
#
management:
  endpoints:
    web:
      exposure:
        # 暴露端点接口  refresh 在post方式请求http://localhost:8081/actuator/refresh时刷新配置文件
        include: refresh,health,info
- YoulexuanProductApplication ProductService 添加@RefreshScope 注解
@RestController
@RefreshScope
public class ProductService {

    @Value("${spring.redis.host}")
    String redisHost;
    @Value("${spring.redis.port}")
    String redisPort;

    @Autowired
    OrderService orderService;

    @GetMapping("/product")
    public String getProduct(){
        String allOrders = orderService.getAllOrders();
        return "Product中getProduct调用订单服务:"+allOrders+",redisPort:"+redisPort+",redisHost:"+redisHost;
    }
}
- 测试 修改github上配置文件,使用postman以post方式请求一个端点接口http://localhost:8081/actuator/refresh
(十)高可用的分布式配置中心
- 当项目中的服务很多时,都从配置中心读取文件,这时可以考虑将配置中心做成一个微服务,将其集群化,从而达到高可用
本例操作
- 1.改造config-client(以原youlexuan-product项目为例)
spring:
  application:
    name: configclient
  cloud:
    config:
      label: master
      profile: dev
      discovery:
        # 从配置中心读取文件
        enabled: true
        # 指定配置中心的服务名
        service-id: YOULEXUAN-CONFIGSERVER
        # uri只能找到唯一实例,对高可用配置中心配置不可用 所以注释掉,
        # 此时改为service-id,根据service-id来找配置中心
        # uri: http://localhost:8767/
        # 在读取配置文件不再写ip地址,而是配置中心的服务名,
        # 将配置中心多运行几个实例8082/8083,形成集群,通过负载均衡,从而高可用。
server:
  port: 8768
eureka:
  client:
    serviceUrl:
      defaultZone: http://localhost:8761/eureka/
- 2.重启config-server实例(youlexuan-configserver),多次重启config-client服务(youlexuan-product)访问可看见效果
(十一)高可用的服务注册中心
- 在前面介绍了服务注册与发现,其中服务注册中心Eureka Server,是单个实例,当成千上万个服务向它注册的时候,它的负载是非常高的,这在生产环境上是不太合适的,这节来介绍怎么将Eureka Server集群化形成一个高可用的注册中心。
- Eureka通过运行多个实例,使其更具有高可用性。事实上,这是它默认的属性,你需要做的就是给对等的实例一个合法的关联serviceurl。
- 多个eureka-server是对等的,并且相互感应;都存有相同的信息,这就是通过服务器的冗余来增加可靠性,当有一台服务器宕机了,服务并不会终止,因为另一台服务存有相同的数据。
本例操作
- 1.改造eureka-server(本例:youlexuan-reisty)
server:
  #注册服务端口 8761 8082 8083
  port: 8761
eureka:
  instance:
    # 当前ip名称
    hostname: localhost
    # **记录实例所在的ip**
    prefer-ip-address: true
  client:
    # 是否将自己注册到Eureka服务中,本身就是所以无需注册
    registerWithEureka: false
    # 是否从Eureka中获取注册信息
    fetchRegistry: false
    # EurekaServer注册中心地址
    serviceUrl:
      # 注册中心地址 localhost:8761/eureka/
      # defaultZone: http://${eureka.instance.hostname}:${server.port}/eureka/
      # defaultZone: http://localhost:8761/eureka/,http://localhost:8083/eureka/
      defaultZone: http://localhost:8761/eureka/
  server:
    enable-self-preservation: false
spring:
  application:
    # 当前工程的名称
    name: eurka-server
- 分别在8761、8762、8763端口启动注册中心,
- 启动8761实例时,defaultZone修改为如下:
- defaultZone: http://localhost:8762/eureka/,http://localhost:8763/eureka/
- 启动8762实例时,defaultZone修改为如下:
- defaultZone: http://localhost:8761/eureka/,http://localhost:8763/eureka/
- 启动8763实例时,defaultZone修改为如下:
- defaultZone: http://localhost:8761/eureka/,http://localhost:8762/eureka/
- 启动8761实例时,defaultZone修改为如下:
- 修改所有服务工程,将配置文件中defaultZone改成所有注册中心实例的地址,用逗号分隔。
eureka:
defaultZone: http://localhost:8761/eureka/,http://localhost:8762/eureka/,http://localhost:8763/eureka/
- 测试
- 查看三个注册中心,分别访问: http://localhost:8761/ http://localhost:8762/ http://localhost:8763/
(十二)断路器Hystrix
“雪崩”效应:
- 在微服务架构中,根据业务来拆分成独立的服务,服务与服务之间可以相互RPC远程调用。为了保证其高可用,单个服务通常会集群部署。由于网络原因或者自身的原因,服务并不能保证100%可用,如果单个服务出现问题,在调用这个服务就会出现线程阻塞,此时若有大量的请求涌入,Servlet容器的线程资源会被消耗完毕,导致服务瘫痪。
- 服务与服务之间的依赖性,故障会传播,会对整个微服务系统造成灾难性的严重后果,这就是服务故障的“雪崩”效应。
- 为了解决这个问题,业界提出了断路器模型:A --> B --> C --> D(如果D服务现在不可用,强制返回,执行一个本地服务即可)
断路器Hystrix
- Netflix开源了Hystrix组件,实现了断路器模式,SpringCloud对这一组件进行了整合。如果较底层的服务如果出现故障,那就会导致连锁故障。当对指定服务的调用的“不可用”达到一个阀值时(Hystrix是5秒20次),断路器将会被打开。断路打开后,避免连锁故障,fallback方法可以直接返回一个固定值。
Feign中使用断路器
- Feign是自带断路器的,在D版本的Spring Cloud之后,它没有默认打开。需要在配置文件中配置打开它,在配置文件加以下代码:
feign.hystrix.enabled: true
本例操作
- 1、准备工作:
- 启动eureka-server(youlexuan-reisty)工程,端口为8762;
- 启动服务消费者service-product工程,它的端口为8081。
- 2、service-product工程 配置文件加以下代码
server:
  # 8766 8081
  port: 8081
spring:
  application:
    # 需要指明spring.application.name,这个很重要!!!,这在以后的服务与服务之间相互调用一般都是根据这个name
    name: youlexuan-product
  cloud:
    config:
      label: master
      profile: dev
      discovery:
        # 从配置中心读取文件
        enabled: true
        # 指定配置中心的服务名
        service-id: YOULEXUAN-CONFIGSERVER
      # uri只能找到唯一实例 所以注释掉
      # uri: http://localhost:8768/
eureka:
  client:
    serviceUrl:
      defaultZone: http://localhost:8761/eureka/,http://localhost:8082/eureka/,http://localhost:8083/eureka/
management:
  endpoints:
    web:
      exposure:
        include: refresh,health,info
# 开启断路器
feign:
  hystrix:
    enabled: true
- 3、基于youlexuan-product工程进行改造只需要在@FeignClient的 OrderService 接口的注解中加上 fallback 的指定类就行了:
//远程服务调用,指定名称
@FeignClient(value = "YOULEXUAN-ORDER",fallback = NativeOrderService.class)
public interface OrderService {

    ////远程服务的方法

    @GetMapping("/orders")
    public String getAllOrders();

    @GetMapping("/orders/{oid}/{uid}")
    public String getOrderAndUser(@PathVariable(name = "oid") String oid, @PathVariable String uid);
}
其中注意:NativeOrderService需要实现OrderService 接口,并注入到Ioc容器中:
@Component
public class NativeOrderService implements OrderService {
    ////远程服务的方法
    @Override
    public String getAllOrders() {
        return "{'code':401,'msg':'远程服务不可用,执行本地代码','method':'getAllOrders'}";
    }

    @Override
    public String getOrderAndUser(String oid, String uid) {
        return "{'code':402,'msg':'远程服务方法getOrderAndUser不可用,执行本地代码','method':'getOrderAndUser'}";
    }
}
- 测试 http://localhost:8081/product
