基于spring5的ssm整合练习 -- day01 纯注解配置
一、搭建项目环境
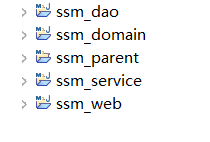
1、创建父子工程
2、父工程中导入jar包
		5.0.2.RELEASE
		1.6.6
		1.2.12
		1.2.3
		3.4.5
		5.0.1.RELEASE


			org.aspectj
			aspectjweaver
			1.6.8


			org.springframework
			spring-aop
			${spring.version}


			org.springframework
			spring-context
			${spring.version}


			org.springframework
			spring-context-support
			${spring.version}


			org.springframework
			spring-web
			${spring.version}


			org.springframework
			spring-orm
			${spring.version}


			org.springframework
			spring-beans
			${spring.version}


			org.springframework
			spring-core
			${spring.version}


			org.springframework
			spring-test
			${spring.version}


			org.springframework
			spring-webmvc
			${spring.version}


			org.springframework
			spring-tx
			${spring.version}


			junit
			junit
			4.12
			test


			mysql
			mysql-connector-java
			5.1.6


			com.oracle
			ojdbc14
			10.2.0.4.0


			javax.servlet
			javax.servlet-api
			3.1.0
			provided


			javax.servlet.jsp
			jsp-api
			2.0
			provided


			jstl
			jstl
			1.2


			log4j
			log4j
			${log4j.version}


			org.slf4j
			slf4j-api
			${slf4j.version}


			org.slf4j
			slf4j-log4j12
			${slf4j.version}


			org.mybatis
			mybatis
			${mybatis.version}


			org.mybatis
			mybatis-spring
			1.3.0


			c3p0
			c3p0
			0.9.1.2
			jar
			compile


			com.github.pagehelper
			pagehelper
			5.1.2


			org.springframework.security
			spring-security-web
			${spring.security.version}


			org.springframework.security
			spring-security-config
			${spring.security.version}


			org.springframework.security
			spring-security-core
			${spring.security.version}


			org.springframework.security
			spring-security-taglibs
			${spring.security.version}


			com.alibaba
			druid
			1.0.9


		    javax.annotation
		    jsr250-api
		    1.0


				org.apache.tomcat.maven
				tomcat7-maven-plugin
				2.2
3、加入各个工程之间的依赖关系
parent --> domain --> dao --> service --> web
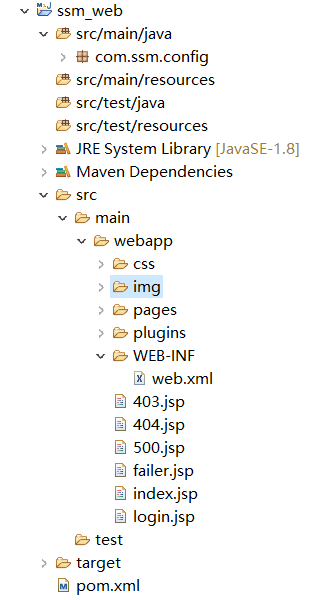
4、导入通用页面
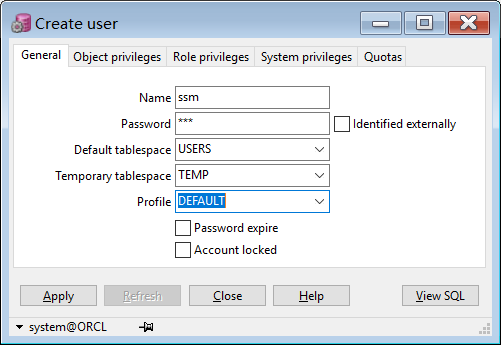
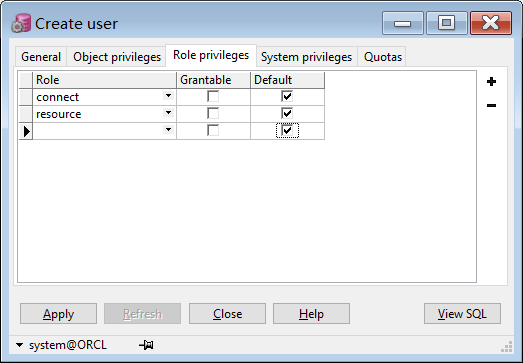
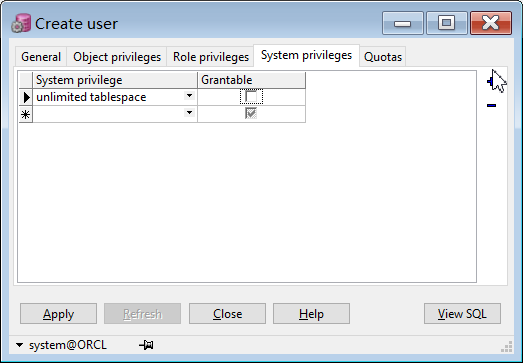
5、创建Oracle数据库中的用户
创建用户:
分配角色:
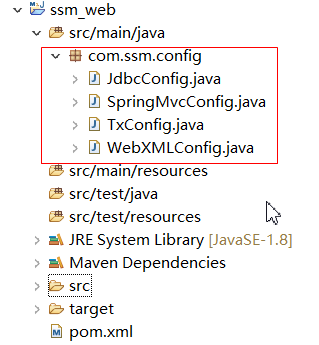
二、加入配置类
1、dao层配置类
JdbcConfig.java
package com.ssm.config;

import javax.sql.DataSource;

import org.mybatis.spring.SqlSessionFactoryBean;
import org.mybatis.spring.annotation.MapperScan;
import org.springframework.context.annotation.Bean;
import org.springframework.test.context.ContextConfiguration;

import com.mchange.v2.c3p0.ComboPooledDataSource;

/**
 * spring配置类
 *
 * @author wingz
 *
 */

@ContextConfiguration // 将该java文件当作一个配置类
@MapperScan("com.ssm.dao") // 配置要扫描的Mybatis的注解的包
public class JdbcConfig {

	private String driverClass = "oracle.jdbc.driver.OracleDriver";

	private String jdbcUrl = "jdbc:oracle:thin:@192.168.88.6:1521:orcl";

	private String user = "ssm";

	private String password = "ssm";

	/**
	 * 创建数据源
	 *
	 * @return
	 */
	@Bean // 该注解将返回的对象放入spring容器中
	public DataSource getDateSource() {
		ComboPooledDataSource dataSource = new ComboPooledDataSource();
		try {
			dataSource.setDriverClass(driverClass);
			dataSource.setJdbcUrl(jdbcUrl);
			dataSource.setUser(user);
			dataSource.setPassword(password);
		} catch (Exception e) {
			e.printStackTrace();
		}
		return dataSource;
	}

	/**
	 * 创建sessionFactory
	 *
	 * @param dataSource
	 * @return
	 */
	@Bean
	public SqlSessionFactoryBean getSqlSessionFactoryBean(DataSource dataSource) {
		SqlSessionFactoryBean factory = new SqlSessionFactoryBean();
		factory.setDataSource(dataSource);
		return factory;
	}

}
2、service层配置类
TxConfig.java
package com.ssm.config;

import javax.sql.DataSource;

import org.springframework.context.annotation.Bean;
import org.springframework.context.annotation.ComponentScan;
import org.springframework.jdbc.datasource.DataSourceTransactionManager;
import org.springframework.test.context.ContextConfiguration;
import org.springframework.transaction.annotation.EnableTransactionManagement;

@ContextConfiguration // 将该java文件当作一个配置类
@ComponentScan("com.ssm.service") // 配置要扫描的service层的注解
@EnableTransactionManagement // 开始事务管理器的注解
public class TxConfig {

	/**
	 * 配置事务管理器
	 *
	 * @param dataSource
	 * @return
	 */
	@Bean
	public DataSourceTransactionManager getDataSourceTransactionManager(DataSource dataSource) {
		DataSourceTransactionManager manager = new DataSourceTransactionManager();
		manager.setDataSource(dataSource);
		return manager;
	}
}
3、web层配置类
SpringMvcConfig.java
package com.ssm.config;

import org.springframework.context.annotation.Bean;
import org.springframework.context.annotation.ComponentScan;
import org.springframework.test.context.ContextConfiguration;
import org.springframework.web.servlet.config.annotation.EnableWebMvc;
import org.springframework.web.servlet.view.InternalResourceViewResolver;

@ContextConfiguration // 将该java文件当作一个配置类
@ComponentScan("com.ssm.controller") // 配置要扫描的springmvc的注解的包
@EnableWebMvc // 相当于xml中配置的注解:配置适配器、映射器
public class SpringMvcConfig {

	@Bean
	public InternalResourceViewResolver getInternalResourceViewResolver() {
		String prefix = "/WEB-INF/pages/";
		String suffix = ".jsp";
		InternalResourceViewResolver res = new InternalResourceViewResolver(prefix, suffix);
		return res;
	}
}
4、web.xml中配置变注解
WebXMLConfig.java
package com.ssm.config;

import java.util.EnumSet;

import javax.servlet.DispatcherType;
import javax.servlet.ServletContext;
import javax.servlet.ServletException;
import javax.servlet.ServletRegistration.Dynamic;

import org.springframework.web.WebApplicationInitializer;
import org.springframework.web.context.ContextLoaderListener;
import org.springframework.web.context.support.AnnotationConfigWebApplicationContext;
import org.springframework.web.filter.CharacterEncodingFilter;
import org.springframework.web.servlet.DispatcherServlet;

/**
 * 该配置类实现WebApplicationInitializer接口,在项目启动时,会执行该类中的onStartup方法
 *
 * @author wingz
 *
 */
public class WebXMLConfig implements WebApplicationInitializer {

	@Override
	public void onStartup(ServletContext servletContext) throws ServletException {

		// AnnotationConfigWebApplicationContext对象的作用是:把所有的配置类加载到spring容器中
		AnnotationConfigWebApplicationContext context = new AnnotationConfigWebApplicationContext();
		context.register(JdbcConfig.class, SpringMvcConfig.class, TxConfig.class);

		// 添加spring核心控制器
		servletContext.addListener(new ContextLoaderListener(context));

		// 配置springmvc前端控制器
		Dynamic servlet = servletContext.addServlet("springmvc", new DispatcherServlet(context));
		servlet.addMapping("*.do"); // 配置拦截所有.do结尾的请求

		// 添加编码过滤器
		javax.servlet.FilterRegistration.Dynamic filter = servletContext.addFilter("encoding",
				new CharacterEncodingFilter("UTF-8"));
		// EnumSet:枚举类型,配置过滤器过滤的请求类型
		EnumSet dispatcherTypes = EnumSet.noneOf(DispatcherType.class);
		dispatcherTypes.add(DispatcherType.FORWARD);
		dispatcherTypes.add(DispatcherType.REQUEST);
		filter.addMappingForUrlPatterns(dispatcherTypes, false, "/*");
	}

}
注意:使用3.0以后版本的servlet-api.jar,才可以使用注解式的xml
三、测试环境
1、创建表
CREATE TABLE product(
       id varchar2(32) DEFAULT SYS_GUID() PRIMARY KEY,
       productNum varchar2(50) NOT NULL,
       productName varchar2(50),
       cityName varchar2(50),
       DepartureTime date,
       productPrice Number,
       productDesc varchar2(500),
       productStatus number,
       CONSTRAiNT product UNIQUE (id, productNum)
);
2、创建实体类
public class Product {

	private String id;
	private String productNum;
	private String productName;
	private String cityName;
	private Date departureTime;
	private String departureTimeStr;
	private double productPrice;
	private String productDesc;
	private Integer productStatus;
	private String productStatusStr;
3、编写Dao、service、controller层代码以及jsp页面
ProductDao.java
package com.ssm.dao;

import java.util.List;

import org.apache.ibatis.annotations.Insert;
import org.apache.ibatis.annotations.Select;
import org.apache.ibatis.annotations.Update;
import org.springframework.ui.Model;

import com.ssm.domain.Product;

public interface ProductDao {

	@Select("select * from product")
	public List findAllProduct();

	@Insert("insert into product(PRODUCTNUM, PRODUCTNAME, CITYNAME,"
			+ "DEPARTURETIME, PRODUCTPRICE, PRODUCTDESC, PRODUCTSTATUS) "
			+ "values(#{productNum}, #{productName}, #{cityName}, #{departureTime},"
			+ "#{productPrice}, #{productDesc}, #{productStatus})")
	public void saveProduct(Product model);

	@Select("select * from product where id = #{id}")
	public Product findById(String id);

	@Update("update product set PRODUCTNUM = #{productNum}, PRODUCTNAME = #{productName},"
			+ " CITYNAME = #{cityName}, DEPARTURETIME = #{departureTime}, PRODUCTPRICE = #{productPrice}, "
			+ "PRODUCTDESC = #{productDesc}, PRODUCTSTATUS = #{productStatus}")
	public void updatePro(Product product);

}
ProductServiceImpl.java
package com.ssm.service.impl;

import java.util.List;

import org.springframework.beans.factory.annotation.Autowired;
import org.springframework.stereotype.Service;
import org.springframework.transaction.annotation.Transactional;

import com.ssm.dao.ProductDao;
import com.ssm.domain.Product;
import com.ssm.service.ProductService;

@Service
@Transactional
public class ProductServiceImpl implements ProductService {

	@Autowired
	private ProductDao productDao;

	public List findAllProduct() {
		List list = productDao.findAllProduct();
		return list;
	}

	@Override
	public void saveProduct(Product model) {
		productDao.saveProduct(model);

	}

	@Override
	public Product findById(String id) {

		return productDao.findById(id);
	}

	@Override
	public void update(Product model) {

		productDao.updatePro(model);
	}

}
PorductController.java
package com.ssm.controller;

import java.util.List;

import org.springframework.beans.factory.annotation.Autowired;
import org.springframework.stereotype.Controller;
import org.springframework.ui.Model;
import org.springframework.web.bind.annotation.RequestMapping;

import com.ssm.domain.Product;
import com.ssm.service.ProductService;

@Controller
@RequestMapping("product")
public class ProductController {

	@Autowired
	private ProductService productService;

	@RequestMapping("findAll")
	public String findAllProducts(Model model) {
		List list = productService.findAllProduct();
		model.addAttribute("list", list);
		return "product-list";
	}

	@RequestMapping("save")
	public String saveProduct(Product model) {
		productService.saveProduct(model);
		return "redirect:findAll.do";
	}

	@RequestMapping("toEdit")
	public String findById(String id, Model model) {
		Product product = productService.findById(id);
		model.addAttribute("product", product);
		return "product-update";
	}

	@RequestMapping("update")
	public String update(Product model) {
		productService.update(model);
		return "redirect:findAll.do";
	}
}
product-list.jsp
4、关于时间类型的参数显示以及接受的问题
时间类型的字段在jsp页面显示:
方式1:使用jsp的
方式2:修改实体类中对应字段的get方法
时间类型的字段在后台接受参数的处理:
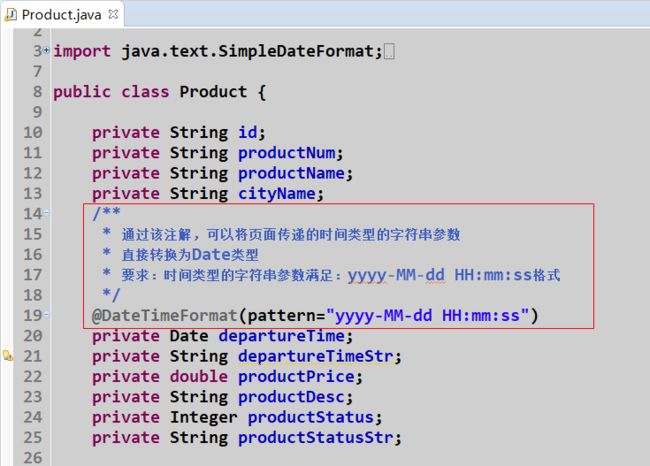
方式1:在实体类中的时间类型属性上加入注解:
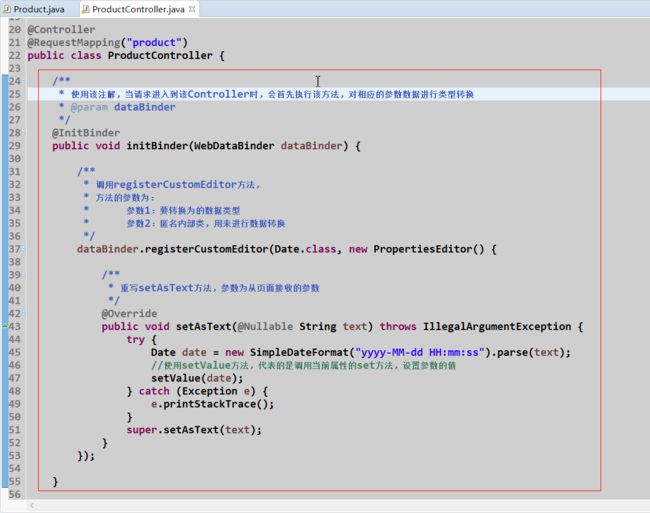
方式2:在controller中使用注解进行转换
三、Order操作
1、创建表
CREATE TABLE orders(
id varchar2(32) default SYS_GUID() PRIMARY KEY,
orderNum VARCHAR2(20) NOT NULL UNIQUE,
orderTime timestamp,
peopleCount INT,
orderDesc VARCHAR2(500),
payType INT,
orderStatus INT,
productId varchar2(32),
memberId varchar2(32),
FOREIGN KEY (productId) REFERENCES product(id)
)
2、创建实体类
public class Order {

	private String id;
	private String orderNum;
	private Date orderTime;
	private int orderStatus;
	private int peopleCount;
	private Product product;
	private Integer payType;
	private String orderDesc;
3、创建Dao、Service、Controller代码
OrderDao.java
package com.ssm.dao;

import java.util.List;

import org.apache.ibatis.annotations.One;
import org.apache.ibatis.annotations.Result;
import org.apache.ibatis.annotations.Results;
import org.apache.ibatis.annotations.Select;

import com.ssm.domain.Orders;
import com.ssm.domain.Product;

public interface OrderDao {

	@Select("select * from orders")
	/**
	 * 当返回值为中有集合或者其他实体类对象时候,需要使用@Results注解进行映射
	 * @return
	 */
	@Results({
		//property:Orders实体类中的其他对象属性名
		//column:ordres表中对应的其他表的主键
		//javaType:对象属性对应的JavaBean字节文件
		//如果属性是一个其他类,就用one=@One(select="此处是调用查询的方法的全类路径名")
		@Result(property="product", column="productid", javaType=Product.class,
				one=@One(select = "com.ssm.dao.ProductDao.findById"))
	})
	public List findAll();
}
OrderServiceImpl.java
package com.ssm.service.impl;

import java.util.List;

import org.springframework.beans.factory.annotation.Autowired;
import org.springframework.stereotype.Service;
import org.springframework.transaction.annotation.Transactional;

import com.ssm.dao.OrderDao;
import com.ssm.domain.Orders;
import com.ssm.service.OrderService;

@Service
@Transactional
public class OrderServiceImpl implements OrderService {

	@Autowired
	private OrderDao orderDao;

	@Override
	public List findAll() {

		return orderDao.findAll();
	}

}
OrderController.java
package com.ssm.controller;

import java.util.List;

import org.springframework.beans.factory.annotation.Autowired;
import org.springframework.stereotype.Controller;
import org.springframework.web.bind.annotation.RequestMapping;

import com.ssm.domain.Orders;
import com.ssm.service.OrderService;

@Controller
@RequestMapping("orders")
public class OrderController {

	@Autowired
	private OrderService orderService;

	@RequestMapping("findAll")
	public void findAll(){
		List list = orderService.findAll();
		for (Orders orders : list) {
			System.out.println(orders);
		}
	}
} 