如何在 VS Code 中调试 LeetCode 代码
如何在 VS Code 中调试 LeetCode 代码
- VS扩展-LeetCode
- 语言设置
- Java版调试
- 准备环境
- 代码示例
- debug
- CSharp版调试
- 准备环境
- 创建dontnet console工程
- run工程
- 配置vscode的launch.json和task.json
- 方式一:自动(推荐)
- 方式二:半自动
- 代码示例
- debug
- 完整的vs code工作区
- 参考
VS扩展-LeetCode
神器级扩展。
注意这个扩展依赖nodejs环境,其它没什么。
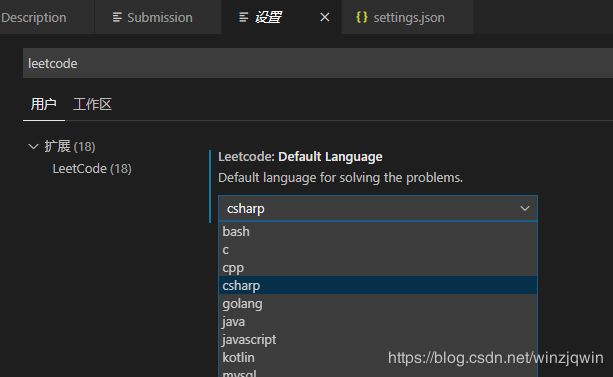
语言设置
Java版调试
准备环境
本地java环境+安装两个vs code扩展:
- Language Support for Java™ by Red Hat,提供智能提示等语言相关
- Debugger for Java,Java 调试器。
代码示例
/*
 * @lc app=leetcode.cn id=1 lang=java
 *
 * [1] 两数之和
 */

// @lc code=start
class Solution {
    public int[] twoSum(int[] nums, int target) {
        int[] res = new int[2];
        for (int i = 0; i < nums.length; i++) {
            int dif = target - nums[i];
            // j = i + 1 的目的是减少重复计算和避免两个元素下标相同
            for (int j = i + 1; j < nums.length; j++) {
                if (nums[j] == dif){
                    res[0] = i;
                    res[1] = j;
                    return res;
                }
            }
        }
        return res;
    }
}
// @lc code=end

class Main {
    public static void main(String[] args) {
        // Create a new Solution instance
        Solution solution = new Solution();
        // Create a test case
        int[] nums = {2,7,11,15};
        int target = 9;
        // Get the answer
        int[] answer = solution.twoSum(nums, target);
        // Print the answer
        System.out.println("answer");
        for (int i = 0; i < answer.length; i++) {
            System.out.println(answer[i]);
        }
    }
}
debug
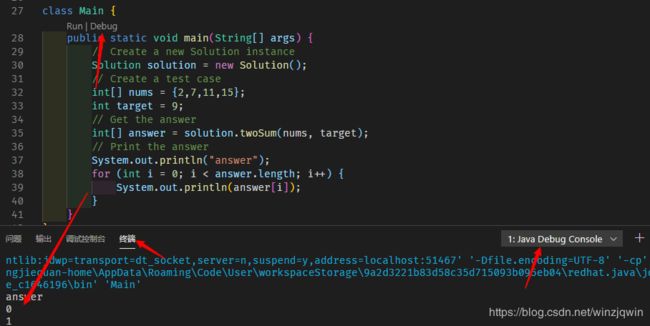

这里有一点需要注意的是,由于 LeetCode 生成的答题模板的类名均为 Solution,因此会造成同一个目录下存在多个同名类的情况出现,可能导致代码无法正确执行,因此如果希望调试 LeetCode Java 代码,但当前目录又存在有多个 LeetCode Java 文件时,需要保证类名的唯一性,我们可以把被调试的 Solution 类改一个名字(但要记住提交时把名字改回来),或者干脆拷贝到另一个干净的目录下调试即可。
CSharp版调试
准备环境
创建dontnet console工程
vs code终端中cd到leetcode目录,用以下命令创建dontnet console工程
dotnet new console -o "cspj"
也可以这样
mkdir cspj
cd cspj
dotnet new console

run工程
cd到刚刚创建的cspj目录,然后执行run(run之前会自动build),检查工程能否正常编译/执行。
![]()
可以看到默认生成的代码输出了Hello World!。
另外,执行成功之后,会看到cspj下生成了bin文件夹。
Ps:编译命令为dotnet build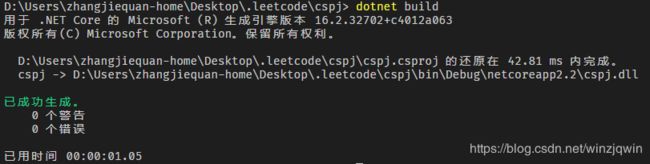
配置vscode的launch.json和task.json
launch.json,定义点debug时怎么干,干什么。
task.json,这里用到的是,由launch.json调用,调用里面的任务,用于build(即调试前先编译最新代码)。
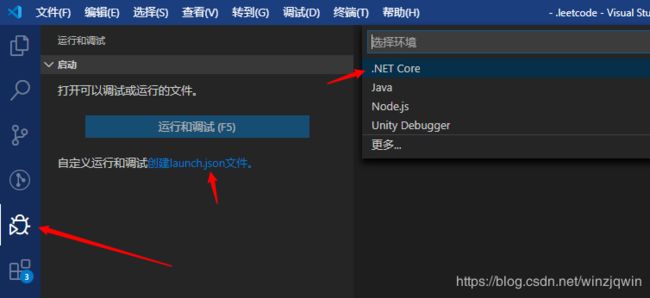
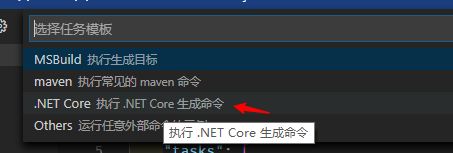
方式一:自动(推荐)
如果执行过dotnet run,且vscode工作区路径为cspj目录(而非.leetcode目录)vs code会自动配置launch和task,如下图操作。
注意,最后如果使用.leetcode目录为工作区,要把cspj下的.vscode下的launch.json和task.json搬到.leetcode下的.vscode下,同时,改两个json中的路径,具体为加“/cspj”。
方式二:半自动
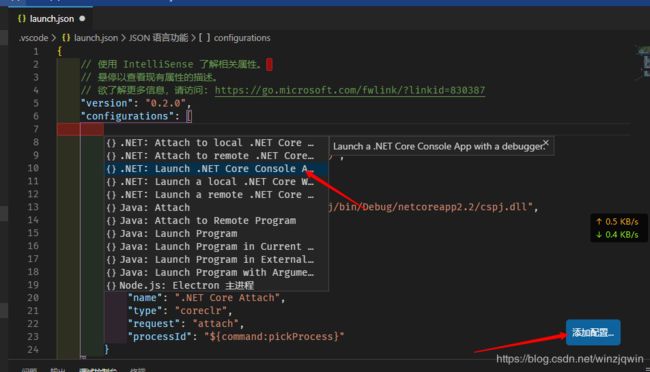
如果一开始已经有launch.json,这时需要半自动配置。
1、添加一个.NET Core Launch (console)启动配置
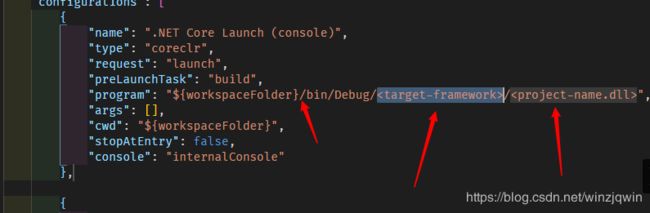
2、修改program字段
由
${workspaceFolder}/bin/Debug/< target-framework>/
改为
${workspaceFolder}/cspj/bin/Debug/netcoreapp2.2/cspj.dll
说明一下,
- workspaceFolder为vscode工作区目录,我这里是D:\Users\zhangjiequan-home\Desktop.leetcode,其实就是.vscode文件夹所在目录。
- 尖括号里的target-framework和project-name.dll,并不是workspaceFolder之类的宏,它只是一个坑位让你手动填写。
- 我是怎么知道一个dll的路径的?其实它是c#build的dll,先执行一下build,就会有了。
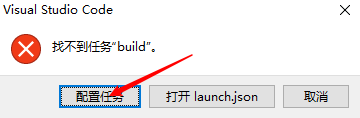
3、创建task.json
如果已经有在用的task,就备份一下,按下文创建完再把之前task中的内容整合到新的task中。

4、添加args
参数中添加目标路径 “${workspaceRoot}\cspj\cspj.csproj”
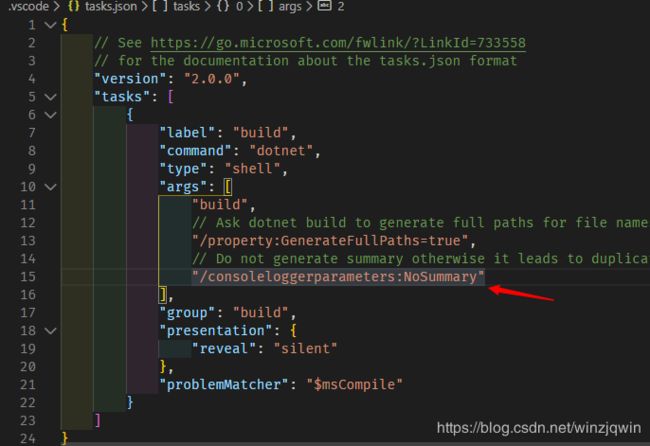
添加完是这样子:
![]()
说明一下,
- 这里其实是表示,这个build的任务,做的事情是,用shell调用了命令dotnet,增加了参数,.csproj文件的位置。
- 这个task由launch调用,可以看到,launch文件中,指定了前置启动任务为build。
代码示例
修改Program.cs。
- 把leetcode插件生成的Solution类拷贝一下,
- 在原来的Main方法里面,写一下测试用例,调用一下solution的方法。
如下:
using System;
using System.Collections;

public class Solution
{
    public int[] TwoSum(int[] nums, int target)
    {
        Hashtable map = new Hashtable();
        for (int i = 0; i < nums.Length; i++)
        {
            int complement = target - nums[i];
            if (map.ContainsKey(complement))
            {
                return new int[] { Convert.ToInt32(map[complement]), i };
            }
            if (!map.ContainsKey(nums[i]))
            {
                map.Add(nums[i], i);
            }
        }
        return null;
    }
}

namespace cspj
{
    class Program
    {
        static void Main(string[] args)
        {
            Solution solution = new Solution();
            // Create a test case
            int[] nums = { 2, 7, 11, 15 };
            int target = 9;
            // Get the answer
            int[] answer = solution.TwoSum(nums, target);
            // Print the answer
            Console.WriteLine("answer");
            for (int i = 0; i < answer.Length; i++)
            {
                Console.WriteLine(answer[i]);
            }
        }
    }
}
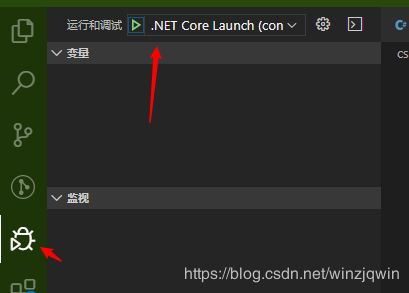
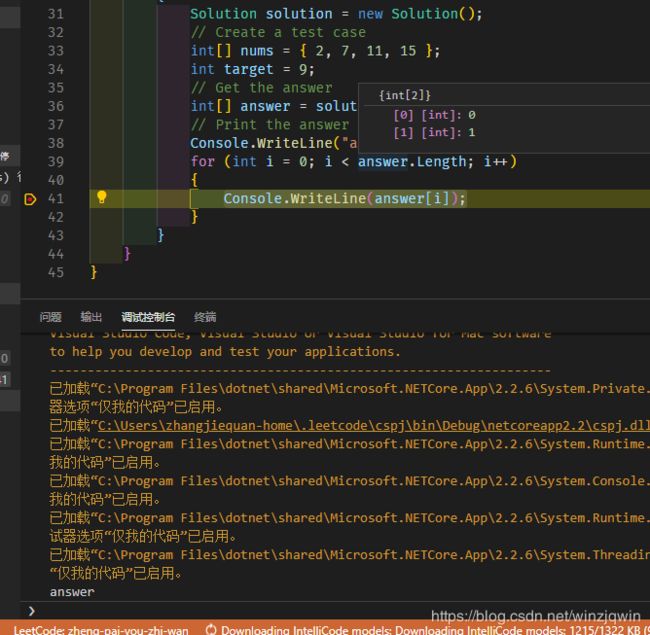
debug
用vs code的debug来启动
最后, 我的目录结构长这样子:
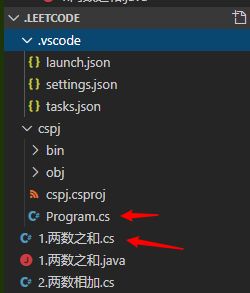
刷题的流程是,
1、用leetcode插件生成题目文件1.两数之和.cs
2、拷贝1.两数之和.cs中的Solution到Progam.cs中编码并调试、测试。
3、把Progam中的写好Solution类拷贝到1.两数之和.cs中,使用leetcode插件提交到leetcode官网。
完整的vs code工作区
这里直接下载我配置好的完整的vs code工作区,可以参考launch/task的配置,以及调试入口,另外注意本地的扩展和环境要自己搞好。
参考
Java版:
如何在 VS Code 中调试 LeetCode 代码
CSharp版:
C#刷遍Leetcode面试题系列连载(1) - 入门与工具简介
使用Visual Studio Code创建asp.net core项目
使用VsCode编写和调试.NET Core项目
手工编辑 tasks.json 和 launch.json,让你的 VSCode 具备调试 .NET Core 程序的能力